Image Fitness 540 Support and Manuals
Get Help and Manuals for this Image Fitness item

View All Support Options Below
Free Image Fitness 540 manuals!
Problems with Image Fitness 540?
Ask a Question
Free Image Fitness 540 manuals!
Problems with Image Fitness 540?
Ask a Question
Popular Image Fitness 540 Manual Pages
English Manual - Page 1

... LADDER 1 TAPE MEASURE OR RULER 1 SOCKET WRENCH w/ 7/16 & 9/16 1 SET, SMALL ALLEN WRENCHES
OPEN END WRENCHES 7/16 & 9/16 1 SMALL ADJUSTABLE WRENCH 1 PLIERS 1 MALLET OR HAMMER
PRE-ASSEMBLY INSTRUCTIONS • TWO PEOPLE ARE REQUIRED FOR SAFER AND EASIER ASSEMBLY. • SEPARATE AND IDENTIFY ALL PARTS. • SEPARATE AND IDENTIFY ALL NUTS, BOLTS, WASHERS, AND...
English Manual - Page 2

...
9
12
, •
LEG PRESS
a
8 6
PRESS ARM STATION 13
.PREACHER
5
CHAIR
0
3 2
•••
•
4
PEC ARMS
ITEM
1 2 3 4 5 6 7 8
9 10 11 12 13
FIGURE 1 MAIN FRAME ASSEMBLY
PART NO.
540-01 .540-02
540-03 540-04 540-05 540-06 540-07 540-08 540-09 540-10 540-11 540-12...
English Manual - Page 3

... the far side of two 2 3/4" bolts, mentioned in the top bar of (10) to fasten it to (9).
6. NOTE: (12) is another 3" bolt.
3 Remove the other parts will be changed later, when other 2 3/4" bolts holding (3) to ( 1 common holes and secure with one 3" bolt at the top one 4 1/2" bolt to (5) at this time...
English Manual - Page 5

... up thf, top hole of the Index Rod with two flat washers and nut. in the weights.
Insert two Weight Guide Rods through the center hole of the weights.
To install the Weight Guide (73) you have to remove the bolts that holds (13) to lock in the Weight Cap to (10). The...
English Manual - Page 7

...) to allow (16) to secure.
4. Add Tightening Knob (20) to go down. NOTE: HAIR SPRANCON THE RODS WILL HELP IN INSTALLATION OF ALL ROLLER PADS AND HANDLE GRIPS. NOTE: The lock washers should be next to the Foot Press.
6. PREACHER CHAIR ASSEMBLY FIGURE THREE... secure with a Push nut (126). Release Pop Pin when desired level is reached. THIS ALSO HELPS TO BOND THE PARTS TOGETHER.
English Manual - Page 9

...Drive Pin
Head Pad
x
Back Pad
x
Pec Back Pad Holder
Pec Seat Mount
Pec Seat Front Support Bar
Stop Angle
Extension Tube
Roller Tube
Pec Seat Holder
Seat Pad
x
Roller Tube Mount
Pec ... place as shown. Bolt (38) to (4) with lock washers. 5. Slide in (22). 2. Bolt the two Support Bars (31) to (13) with one 1/2 x 3" bolt.
8. Add Roller Pads. 10. Add the Collar...
English Manual - Page 10

Seat Holder
1
Press Arm - ITEM
41 42 43 44 45 46 47
48
49
50
PART NO.
540-41 540-42 540-43 540-44 540-45 540-46 540-47
540-48
540-49
540-50
1 PRESS ARM ASSEMBLY FIGURE ...
English Manual - Page 13

... Press Assembly. Push the four 13/16 plastic plugs into the four blank holes on each piece. Set the back of (62). Since (58) is between the two bars of (57) at the ...
56
1
Leg Press - Main Base
57
1
Base Extensiion
58
1
Seat Adjustment Tube
59
1
Seat Holder
60
1
Side Support
61
1
Pivot Frame
62
1
Push Deck
63
2
Pivot Frame Pin - 3/4 x 10 1/4
64
1
Pivot Arm
65...
English Manual - Page 15
... pulley cover (70). Loop cable over Pulley (88) designated (E) and install inside of (6). Add the Long Cable Guide, as (E).
7. Pulley (A) is en-caged with the cable in . Long Pulley Cover Cable Guide - Press Arm -,.338" Pulley 4 1/2" w/ 1" Bushing Pulley 4 1/2" w/ 2" Bushing Pulley 3 1/2" w/ 1" Bushing Snap Link - Install Pulley (88) designated "C" in the same way as you must...
English Manual - Page 17

...
1
Cable - Lower Pec 158"
84
2
Cable - Start this cable goes between the two Pec Seat Support Bars (31). and another nut to the far side. The other end of this by using the two... welded to secure. Page 17
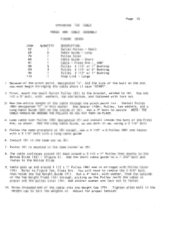
PEC ARM CABLE ASSEMBLY
FIGURE EIGHT
ITEM QUANTITY DESCRIPTION
73
1
Top Weight Guide - Main Pec 106"
83
1
Cable - Run the cable up both these pulleys and mount them...
English Manual - Page 19

... . Long
70
1
Pulley Cover
85
1
Cable - Main Preacher
115"
86
1
Cable - Replace it ) and through the weight guide, pulley (88), ( with another Floating Pulley (112) as mentioned in place by adding a ...Bar
69
1
Cable Guide - Bolt the threaded end of the cable and the Hi Lat Bar (53).
7. Remove the 2 3/4" bolt that is held in the Pec Cable instructions. Secure with the ...
English Manual - Page 21

...A 4 1/2 x 1" pulley must be mounted between the plates of the Base.
Replace pulley (A) and secure.
;. Use a 3 1/2" bolt for this pulley also. Use... cable is in place as shown. Pulley sets between the uprights of the Pivot Arm (...Remove the lower 4" bolt, install the pulley with the cable looped... bolt holding the Top Weight Guide (71). You will have to temporarily remove the pulley marked (A) to...
English Manual - Page 22

... PAD SNAP THE BLACK END CAPS INTO THE ENDS OF THE TUBES. 5. REPAIR PARTS
WHEN ORDERING REPAIR PARTS, ALWAYS GIVE THE FOLLOWING INFORMATION:
PRODUCT
FOUR STACK MACHINE
MODEL NUMBER
540-OSI
PART NUMBER
PART DESCRIPTION
CONTACT: IMAGE 6063 FRANTZ ROAD SUITE 103 COLUMBUS, OHIO 43017
ITEM PART NUMBER QUANTITY DESCRIPTION
1
540-001
2
540-002
3
540-003
4
540-004...
English Manual - Page 23

...1
SWIVEL PULLEY - X
1
PAD - X
1
PAD - X
1
PRESS ARM
1
PRESS ARM PEN 1 X 9 3/4
1
PRESS ARM - X
4
PLASTIC PLUG 13/16
4
PLASTIC PLUG 7/16
6
CABLE GUIDE - LONG
5
PULLEY COVER
2
TOP WEIGHT GUIDE
1
TOP WEIGHT GUIDE - PEC SEAT SUPPORT BAR
1
PEC STOP ANGLE
1
EXTENSION TUBE
1
ROLLER TUBE
1
PEC SEAT HOLDER
1
PAD - SEAT BRACKET
1
PAD - 16
540-016
17
540...
English Manual - Page 24

...qA
6
4 6 6 17 7 3 1 6
1
540-113A
2
(04- 4:7( 4 /%10°
Ne,IR Rat",
WEIGHT CUSHION
WEIGHT GUIDE ROD
WEIGHT - 10 POUNDS EACH
WEIGHT INDEX ROD
WEIGHT INDEX PIN '(1.. LEG PRESS 320"
PULLEY - 4 1/2 W/ 1" BUSHING
PULLEY - 4 1/2...
LOCK NUT 1/2" REGULAR
SNAP LINK - SMALL
FLOATING PULLEY PLATE
WEIGHT DECAL SETS
LOCK NUT 1/4
LOCK NUT 3/8
POP PIN
BRONZE BUSHING 3/4" I .D.
...
Image Fitness 540 Reviews
We have not received any reviews for Image Fitness yet.