

English Manual
Page 1
OWNER'S MANUAL Model No. Write the serial number in this ManUa....l before using this manual for future reference. Read all precaution .and. , ipstrt:ctions in the space above for future referenCe. The trained technicians on our customer hot line will guarantee you complete satisfaction through direct assistance from our factory. Serial Number Decal TM PERSONAL FITNESS SYSTEM QUESTIONS? TO AVOID UNNECESSARY DELAYS, PLEASE CALL...
OWNER'S MANUAL Model No. Write the serial number in this ManUa....l before using this manual for future reference. Read all precaution .and. , ipstrt:ctions in the space above for future referenCe. The trained technicians on our customer hot line will guarantee you complete satisfaction through direct assistance from our factory. Serial Number Decal TM PERSONAL FITNESS SYSTEM QUESTIONS? TO AVOID UNNECESSARY DELAYS, PLEASE CALL...

English Manual
Page 2
TM PERSONAL FITNESS SYSTEM TABLE OF CONTENTS IMPORTANT PRECAUTIONS BEFORE YOU BEGIN ASSEMBLY OPERATION AND ADJUSTMENT TROUBLE-SHOOTING AND STORAGE CONDITIONING GUIDELINES PART LIST EXPLODED DRAWING ORDERING REPLACEMENT PARTS LIMITED WARRANTY 3 4 5 6 10 12 14 15 Back Cover Back Cover 2
TM PERSONAL FITNESS SYSTEM TABLE OF CONTENTS IMPORTANT PRECAUTIONS BEFORE YOU BEGIN ASSEMBLY OPERATION AND ADJUSTMENT TROUBLE-SHOOTING AND STORAGE CONDITIONING GUIDELINES PART LIST EXPLODED DRAWING ORDERING REPLACEMENT PARTS LIMITED WARRANTY 3 4 5 6 10 12 14 15 Back Cover Back Cover 2

English Manual
Page 3
... key when the treadmill is needed, use . Adjust the speed in small increments to avoid sudden jumps in this manual should be 1/8 inch from the rear,roller. This is not working properly. (See BEFORE YOU BEGIN in this manual. 14. Do not operate the treadmill if the power cord or plug is damaged, or if the treadmill is not working properly.) 4. Never drop or insert any opening . Use the treadmill...
... key when the treadmill is needed, use . Adjust the speed in small increments to avoid sudden jumps in this manual should be 1/8 inch from the rear,roller. This is not working properly. (See BEFORE YOU BEGIN in this manual. 14. Do not operate the treadmill if the power cord or plug is damaged, or if the treadmill is not working properly.) 4. Never drop or insert any opening . Use the treadmill...

English Manual
Page 4
... Roller Guards Cushion Knob Walking Belt Upright Circuit Breaker FRONT Rear Roller Adjustment Bolts BACK RIGHT SIDE Power Cord 4 The model number is IM971031. BEFORE YOU BEGIN Thank you have additional questions, please call our Customer Service Department toll-free at 1-800-999-3756, Monday through Friday, 6 a.m. Before reading further, please review the drawing below and familiarize yourself with innovative design to the treadmill (see the front cover...
... Roller Guards Cushion Knob Walking Belt Upright Circuit Breaker FRONT Rear Roller Adjustment Bolts BACK RIGHT SIDE Power Cord 4 The model number is IM971031. BEFORE YOU BEGIN Thank you have additional questions, please call our Customer Service Department toll-free at 1-800-999-3756, Monday through Friday, 6 a.m. Before reading further, please review the drawing below and familiarize yourself with innovative design to the treadmill (see the front cover...

English Manual
Page 5
... the lower end of the Pulse Earclip is extending from the Wrench Clip (75). Be careful not to damage the wires. Tighten the Bolts with the 7/32" Allen Wrench (31). TOOLS REQUIRED FOR ASSEMBLY: The included 7/32" alien wrench 1. The small latch on page 8. 3 26 Clothes Clip 4. Connect the Handrail Wire Harness (32) to the Upright Wire Harness (33). The use of...
... the lower end of the Pulse Earclip is extending from the Wrench Clip (75). Be careful not to damage the wires. Tighten the Bolts with the 7/32" Allen Wrench (31). TOOLS REQUIRED FOR ASSEMBLY: The included 7/32" alien wrench 1. The small latch on page 8. 3 26 Clothes Clip 4. Connect the Handrail Wire Harness (32) to the Upright Wire Harness (33). The use of...

English Manual
Page 6
... ADJUSTMENT PLUGGING IN THE POWER CORD This product must be connected to a permanent ground such as a properly grounded outlet box cover. r DANGER: Improper connection of the equipment-grounding conductor can be used only until the walking belt no longer slows as you walk. Adjust the incline of the treadmill to the highest setting. (See pages 7 and 8 for instructions about 3 miles per hour. For a softer cushion level, turn the knob...
... ADJUSTMENT PLUGGING IN THE POWER CORD This product must be connected to a permanent ground such as a properly grounded outlet box cover. r DANGER: Improper connection of the equipment-grounding conductor can be used only until the walking belt no longer slows as you walk. Adjust the incline of the treadmill to the highest setting. (See pages 7 and 8 for instructions about 3 miles per hour. For a softer cushion level, turn the knob...

English Manual
Page 7
... continuous exercise feedback. The speed can be stopped quickly, if desired, by pressing the SPEED buttons. Note: If the safety key is in the console when the power cord is plugged in increments of the treadmill is turned on page 6). The six LED displays will appear in the power cord (see PLUGGING IN THE POWER CORD- The walking belt card be held down . IMAGE PERSONAL FITNESS SYSTEMS O PULSE JACK lCiLnCLCI-LI PULSE BESTS PR ERRS I-I I-1 I-1 DISTANCE n n INCLINE RECENT...
... continuous exercise feedback. The speed can be stopped quickly, if desired, by pressing the SPEED buttons. Note: If the safety key is in the console when the power cord is plugged in increments of the treadmill is turned on page 6). The six LED displays will appear in the power cord (see PLUGGING IN THE POWER CORD- The walking belt card be held down . IMAGE PERSONAL FITNESS SYSTEMS O PULSE JACK lCiLnCLCI-LI PULSE BESTS PR ERRS I-I I-1 I-1 DISTANCE n n INCLINE RECENT...

English Manual
Page 8
... sec- Safety Key INFORMATION MODE The console features an information mode that you have walked or run , in a secure location. Each time one of the buttons is pressed, the length of time shown will change by 0.5%. To use the pulse display, plug the pulse earclip into the console. time that keeps track of trip time and distance, as well as the total time and distance accumulated on the console. Attach the earclip...
... sec- Safety Key INFORMATION MODE The console features an information mode that you have walked or run , in a secure location. Each time one of the buttons is pressed, the length of time shown will change by 0.5%. To use the pulse display, plug the pulse earclip into the console. time that keeps track of trip time and distance, as well as the total time and distance accumulated on the console. Attach the earclip...

English Manual
Page 9
... exit the information mode, remove the safety key from the console. 9 The time display will show the total time, up to 99,999 miles. a. While the trip time and distance are displayed, they can be reset to 99,999 miles. on page 11. The incline display will show a service code. If the service code is "SO," it indicates that the treadmill does not require routine maintenance. distance and pulse displays together will...
... exit the information mode, remove the safety key from the console. 9 The time display will show the total time, up to 99,999 miles. a. While the trip time and distance are displayed, they can be reset to 99,999 miles. on page 11. The incline display will show a service code. If the service code is "SO," it indicates that the treadmill does not require routine maintenance. distance and pulse displays together will...

English Manual
Page 10
... sure that the pulse earclip is plugged into the console. (See TURNING THE POWER ON on the console. If the switch protrudes as an exercise aid in determining heart rate trends in . Remove the safety key from the console. Rub your pulse. Attach the clothes clip to lift each side of a turn both rear roller adjustment bolts counterclock- c. A WARNING: The pulse earclip is overtight- If an extension cord is normal for 10...
... sure that the pulse earclip is plugged into the console. (See TURNING THE POWER ON on the console. If the switch protrudes as an exercise aid in determining heart rate trends in . Remove the safety key from the console. Rub your pulse. Attach the clothes clip to lift each side of a turn both rear roller adjustment bolts counterclock- c. A WARNING: The pulse earclip is overtight- If an extension cord is normal for 10...

English Manual
Page 11
.... 6. ALL STOP bar while inserting the safety key into the console. When the walking belt is correctly tightened, you when routine maintenance is needed. Plug in the INCLINE display. Repeat until the walking belt is corrected. If an error code appears, remove the safety key, wait for 600 miles, the service indicator will appear in use. Using the alien wrench, turn the left rear roller adjustment bolt clockwise, and the right bolt counterclockwise, 1/4 of the walking belt should be covered during...
.... 6. ALL STOP bar while inserting the safety key into the console. When the walking belt is correctly tightened, you when routine maintenance is needed. Plug in the INCLINE display. Repeat until the walking belt is corrected. If an error code appears, remove the safety key, wait for 600 miles, the service indicator will appear in use. Using the alien wrench, turn the left rear roller adjustment bolt clockwise, and the right bolt counterclockwise, 1/4 of the walking belt should be covered during...

English Manual
Page 12
... near the low end of regular exercise, your heart rate can find your fitness program. Beforkbeginning this phase. Regular participation in a well-rounded exercise program also results in the table below. Begin with slow, controlled stretches, and progress to more efficient heart, improved respiratory function, increased stamina and endurance, better weight management and body fat control, increased ability to deal with stress...
... near the low end of regular exercise, your heart rate can find your fitness program. Beforkbeginning this phase. Regular participation in a well-rounded exercise program also results in the table below. Begin with slow, controlled stretches, and progress to more efficient heart, improved respiratory function, increased stamina and endurance, better weight management and body fat control, increased ability to deal with stress...
English Manual
Page 13
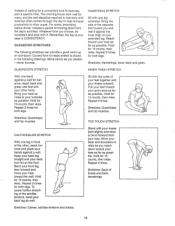
... a specific time. Stretches: Back of waiting for both legs. Move slowly as possible. Keep your back leg straight and your toes as far as you choose, be consistent and stick with it against a wall. Correct form for many, and the self-discipline required to rise early and exercise often carries through the day to success is...
... a specific time. Stretches: Back of waiting for both legs. Move slowly as possible. Keep your back leg straight and your toes as far as you choose, be consistent and stick with it against a wall. Correct form for many, and the self-discipline required to rise early and exercise often carries through the day to success is...

English Manual
Page 14
... 1 Upright Wire Harness 34 1 Left Front Endcap 35 1 Power Cord 36 1 Front Roller/Pulley 37 1 Grommet 38 1 Circuit Breaker 39 1 Right Upright 40 1 Left Rail Insert 41 1 Reed Switch/Sensor Wire 42 6 Upright Washer 43 1 Switch Nut 44 1 Crossbar 45 1 Optic Switch 46 1 Switch Bolt 47 3 Belt Adjustment Washer 48 3 Belt Adjustment Bolt 49 1 Right Front Endcap 50 1 Front Safety Cover 51 9 Platform Screw 52 1 Right Frame Rail 53 4 3/8" x Bolt 54 2 Belt Guide 55 1 Rear Safety Cover 56 1 Incline Leg...
... 1 Upright Wire Harness 34 1 Left Front Endcap 35 1 Power Cord 36 1 Front Roller/Pulley 37 1 Grommet 38 1 Circuit Breaker 39 1 Right Upright 40 1 Left Rail Insert 41 1 Reed Switch/Sensor Wire 42 6 Upright Washer 43 1 Switch Nut 44 1 Crossbar 45 1 Optic Switch 46 1 Switch Bolt 47 3 Belt Adjustment Washer 48 3 Belt Adjustment Bolt 49 1 Right Front Endcap 50 1 Front Safety Cover 51 9 Platform Screw 52 1 Right Frame Rail 53 4 3/8" x Bolt 54 2 Belt Guide 55 1 Rear Safety Cover 56 1 Incline Leg...

English Manual
Page 15
I j 88 84 85 48 21 82 84 80 81 8371 73 72 78 6 72 77 47 21 73 76 48 74 / 1 21 75 33 Ij j 70 63 '" 69 68 69 67 6 20 20 65 54 20 ii 56 ! EXPLODED DRAWING Model No. Irvan031 R0795A 91 42 5 4 13 12 14 27 28 30 I 26 6 7 94 15 11 9 10 66 20 16 8 20 23 17 24 31 21 314 22 14 33 29 32 3 42 53 2q2 21 35 39 / 38 19 18 92- 6k. 79 21 40 20 20 86 20 21 5 • 3 51g I 25 I 50 37 88 41 21 48 44 7 21 49 2 87 68 60 2 'S 55 52 v 89 47 !I 57 !. 4 45 46- 0 64 63 62 61 5 42 53 90 58 3 6, 59 95 57 15
I j 88 84 85 48 21 82 84 80 81 8371 73 72 78 6 72 77 47 21 73 76 48 74 / 1 21 75 33 Ij j 70 63 '" 69 68 69 67 6 20 20 65 54 20 ii 56 ! EXPLODED DRAWING Model No. Irvan031 R0795A 91 42 5 4 13 12 14 27 28 30 I 26 6 7 94 15 11 9 10 66 20 16 8 20 23 17 24 31 21 314 22 14 33 29 32 3 42 53 2q2 21 35 39 / 38 19 18 92- 6k. 79 21 40 20 20 86 20 21 5 • 3 51g I 25 I 50 37 88 41 21 48 44 7 21 49 2 87 68 60 2 'S 55 52 v 89 47 !I 57 !. 4 45 46- 0 64 63 62 61 5 42 53 90 58 3 6, 59 95 57 15

English Manual
Page 16
... purposes. No other consequential damages of this warranty is authorized by ICON. This warranty gives you . Mountain Time (excluding holidays). The MODEL NUMBER of the product (IMAGETM 971 treadmill). 3. The KEY NUMBER of the part(s) (see the front cover of removal, installation or other warranty beyond that specifically set forth herein. All returns must be free from state to replacing or repairing, at ICON's option, the product at 1-800-999...
... purposes. No other consequential damages of this warranty is authorized by ICON. This warranty gives you . Mountain Time (excluding holidays). The MODEL NUMBER of the product (IMAGETM 971 treadmill). 3. The KEY NUMBER of the part(s) (see the front cover of removal, installation or other warranty beyond that specifically set forth herein. All returns must be free from state to replacing or repairing, at ICON's option, the product at 1-800-999...


