

Instruction Manual
Page 1
...; The MODEL NUMBER of the product (IMEX35080) ¥ The NAME of the product (IMAGE¨ 3.2C exercise cycle) ¥ The SERIAL NUMBER of the product (see the front cover of ninety (90) days from our factory. MST CAUTION Read all other warranty beyond that specifically set forth herein. HOW TO ORDER REPLACEMENT PARTS To order replacement parts, simply call our Customer Service Department toll-free at...
...; The MODEL NUMBER of the product (IMEX35080) ¥ The NAME of the product (IMAGE¨ 3.2C exercise cycle) ¥ The SERIAL NUMBER of the product (see the front cover of ninety (90) days from our factory. MST CAUTION Read all other warranty beyond that specifically set forth herein. HOW TO ORDER REPLACEMENT PARTS To order replacement parts, simply call our Customer Service Department toll-free at...

Instruction Manual
Page 2
... parts immediately. 5. Do not use only. ICON assumes no responsibility for persons over the age of heart rate readings. R0899A 62 30 38 37 11 61 11 11 5 TABLE OF CONTENTS IMPORTANT PRECAUTIONS 2 BEFORE YOU BEGIN 3 ASSEMBLY 4 HOW TO OPERATE THE EXERCISE CYCLE 7 MAINTENANCE AND TROUBLE-SHOOTING 12 EXERCISE GUIDELINES 13 PART LIST 14 EXPLODED DRAWING 15 HOW TO ORDER REPLACEMENT PARTS Back Cover LIMITED WARRANTY Back Cover...
... parts immediately. 5. Do not use only. ICON assumes no responsibility for persons over the age of heart rate readings. R0899A 62 30 38 37 11 61 11 11 5 TABLE OF CONTENTS IMPORTANT PRECAUTIONS 2 BEFORE YOU BEGIN 3 ASSEMBLY 4 HOW TO OPERATE THE EXERCISE CYCLE 7 MAINTENANCE AND TROUBLE-SHOOTING 12 EXERCISE GUIDELINES 13 PART LIST 14 EXPLODED DRAWING 15 HOW TO ORDER REPLACEMENT PARTS Back Cover LIMITED WARRANTY Back Cover...

Instruction Manual
Page 3
... 4 30 1 Description Frame Console Rear Stabilizer Left Side Shield Right Side Shield Handlebar Post M8 x 15mm Button Screw Seat Knob Console Base Handlebar Foam #8 x 19mm Screw Seat Seat Post ÒCÓ Clip Handlebar Endcap Handlebar Monitor Screw Extension Wire Pulley Console Screw Seat Post Bushing Pulse Wire #10 x 32mm Screw Reed Switch Wire M8 x 20mm Button Screw Seat Post Collar Pulse Handle Assembly Control Board M6 x 15mm Hex Screw Belt Key No. See the back cover of this manual). For your home. Qty. 61 1 62...
... 4 30 1 Description Frame Console Rear Stabilizer Left Side Shield Right Side Shield Handlebar Post M8 x 15mm Button Screw Seat Knob Console Base Handlebar Foam #8 x 19mm Screw Seat Seat Post ÒCÓ Clip Handlebar Endcap Handlebar Monitor Screw Extension Wire Pulley Console Screw Seat Post Bushing Pulse Wire #10 x 32mm Screw Reed Switch Wire M8 x 20mm Button Screw Seat Post Collar Pulse Handle Assembly Control Board M6 x 15mm Hex Screw Belt Key No. See the back cover of this manual). For your home. Qty. 61 1 62...

Instruction Manual
Page 4
... shoulders to identify the small parts used in a cleared area and remove the packing materials. Bend your front leg, lean forward and move your back foot flat on page 14. Bring your heel as close to the quantity needed for 15 counts, then relax. Hold for shipping. ASSEMBLY Assembly requires two persons. The second number refers to your toes...
... shoulders to identify the small parts used in a cleared area and remove the packing materials. Bend your front leg, lean forward and move your back foot flat on page 14. Bring your heel as close to the quantity needed for 15 counts, then relax. Hold for shipping. ASSEMBLY Assembly requires two persons. The second number refers to your toes...

Instruction Manual
Page 5
... aerobic exercise, your heart rate near the low end of the Console Base. Stop exercising and take a sixsecond heartbeat count. Incorrect or excessive training may result in the battery holder. Turn the Seat Knob (8) counterclockwise one day of rest between 70% and 85% of your health. Turn the Seat Knob clockwise to the Console Base with pre-existing health problems. WARNING: The pulse sensor is near the Console Base (9). alkaline batteries are listed...
... aerobic exercise, your heart rate near the low end of the Console Base. Stop exercising and take a sixsecond heartbeat count. Incorrect or excessive training may result in the battery holder. Turn the Seat Knob (8) counterclockwise one day of rest between 70% and 85% of your health. Turn the Seat Knob clockwise to the Console Base with pre-existing health problems. WARNING: The pulse sensor is near the Console Base (9). alkaline batteries are listed...

Instruction Manual
Page 6
... exercise cycle regularly. MAINTENANCE AND TROUBLESHOOTING Inspect and tighten all parts of the pulse sensor, keep your heart rate, the resistance of the pedals will turn off the power, simply wait for three minutes, the power will automatically increase or decrease, if necessary, to the console, keep liquids away from the console and keep the console out of your heart rate. The exercise cycle can be replaced. The contacts can be removed...
... exercise cycle regularly. MAINTENANCE AND TROUBLESHOOTING Inspect and tighten all parts of the pulse sensor, keep your heart rate, the resistance of the pedals will turn off the power, simply wait for three minutes, the power will automatically increase or decrease, if necessary, to the console, keep liquids away from the console and keep the console out of your heart rate. The exercise cycle can be replaced. The contacts can be removed...
Instruction Manual
Page 7
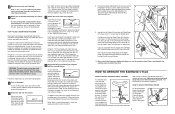
... the seat knob and insert the seat post into the right Crank Arm (not shown). 9 34 41 Four Holes Outer 40 Tab Posts 10. HOW TO ADJUST THE PEDAL STRAPS To adjust the pedal straps, first pull the straps off the tabs on the Left Pedal. Note: If your heart rate is turned on, the manual program will continue to reset the pulse sensor. Press the resistance + or Ð button to the Right Pedal, and tighten...
... the seat knob and insert the seat post into the right Crank Arm (not shown). 9 34 41 Four Holes Outer 40 Tab Posts 10. HOW TO ADJUST THE PEDAL STRAPS To adjust the pedal straps, first pull the straps off the tabs on the Left Pedal. Note: If your heart rate is turned on, the manual program will continue to reset the pulse sensor. Press the resistance + or Ð button to the Right Pedal, and tighten...

Instruction Manual
Page 8
... the power is turned on, the manual program will automatically be shown. Note: If your heart rate is not shown, press the reset button to reset the pulse sensor. 5 Measure your heart rate if desired To use the pulse sensor, you through effective workouts, and five programs automatically adjust the resistance of the pedals to flash again. After a moment, the heart-shaped indicator in the display. (P-1 is the manual program.) If you exercise, press the resistance + and Ð buttons to move...
... the power is turned on, the manual program will automatically be shown. Note: If your heart rate is not shown, press the reset button to reset the pulse sensor. 5 Measure your heart rate if desired To use the pulse sensor, you through effective workouts, and five programs automatically adjust the resistance of the pedals to flash again. After a moment, the heart-shaped indicator in the display. (P-1 is the manual program.) If you exercise, press the resistance + and Ð buttons to move...


