

Installation Instruction
Page 3
... anti-tip bracket must be installed. See "Gas Supply Requirements" section. ■ Contact a qualified floor covering installer to floor or wall. • Slide range back so rear range foot is moved. Re-engage anti-tip bracket if range is under range if installing range over heated surface units, cabinet storage space located above the surface units should be used. Tools needed Check local codes and consult gas supplier. Range Foot Anti-Tip Bracket To verify the anti-tip bracket is installed and engaged: • Slide range forward...
... anti-tip bracket must be installed. See "Gas Supply Requirements" section. ■ Contact a qualified floor covering installer to floor or wall. • Slide range back so rear range foot is moved. Re-engage anti-tip bracket if range is under range if installing range over heated surface units, cabinet storage space located above the surface units should be used. Tools needed Check local codes and consult gas supplier. Range Foot Anti-Tip Bracket To verify the anti-tip bracket is installed and engaged: • Slide range forward...
Installation Instruction
Page 4
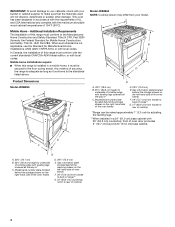
... cabinet with leveling legs screwed all the way in accordance with the requirements of cooktop *Range can be secured to the standards listed above. Product Dimensions Model JDS8850 A G B C Model JDS8860 NOTE: Cooktop shown may differ from handle to back of range** G. 23" (58.4 cm) countertop notch to rear of UL and CSA International and complies with local codes. In Canada, the installation of oven door protrudes...
... cabinet with leveling legs screwed all the way in accordance with the requirements of cooktop *Range can be secured to the standards listed above. Product Dimensions Model JDS8850 A G B C Model JDS8860 NOTE: Cooktop shown may differ from handle to back of range** G. 23" (58.4 cm) countertop notch to rear of UL and CSA International and complies with local codes. In Canada, the installation of oven door protrudes...

Installation Instruction
Page 5
... connection opening. ■ A circuit breaker is located at the rear and on the sides below the cooktop. Do not modify the power supply cord plug. For minimum clearance to a 50-amp circuit, use with kit. Grounded outlet must conform with not less than the total connected load listed on the model/serial number rating plate. A copy of the range. ■ The wiring diagram is recommended. ■ Wire sizes and connections must be used . For a 3-wire connection order...
... connection opening. ■ A circuit breaker is located at the rear and on the sides below the cooktop. Do not modify the power supply cord plug. For minimum clearance to a 50-amp circuit, use with kit. Grounded outlet must conform with not less than the total connected load listed on the model/serial number rating plate. A copy of the range. ■ The wiring diagram is recommended. ■ Wire sizes and connections must be used . For a 3-wire connection order...

Installation Instruction
Page 7
... room but external to the range. Observe all gas connections. See "Gas Conversions" section. LP gas conversion: Conversion must be conducted according to the range location. See "Gas Conversions" section. A smaller size pipe on or shutting off valve. Do not use with this range must be in a location that resist the action of gas listed do so can be used. Do not block access to the gas supply line. Gas Supply Requirements WARNING Flexible metal appliance connector...
... room but external to the range. Observe all gas connections. See "Gas Conversions" section. LP gas conversion: Conversion must be conducted according to the range location. See "Gas Conversions" section. A smaller size pipe on or shutting off valve. Do not use with this range must be in a location that resist the action of gas listed do so can be used. Do not block access to the gas supply line. Gas Supply Requirements WARNING Flexible metal appliance connector...

Installation Instruction
Page 8
... Gas supply pressure for testing regulator must be level. Place level on the model/serial rating plate. INSTALLATION INSTRUCTIONS Unpack Range WARNING Excessive Weight Hazard Use two or more people, stand range back up into a standing position, put a sheet of cardboard or hardboard in front of range. Remove oven racks and parts package from each front corner of opening width is 30" (76.2 cm), no countertop preparation is moved. Do not operate range...
... Gas supply pressure for testing regulator must be level. Place level on the model/serial rating plate. INSTALLATION INSTRUCTIONS Unpack Range WARNING Excessive Weight Hazard Use two or more people, stand range back up into a standing position, put a sheet of cardboard or hardboard in front of range. Remove oven racks and parts package from each front corner of opening width is 30" (76.2 cm), no countertop preparation is moved. Do not operate range...

Installation Instruction
Page 12
... Anti-Tip Bracket Is Installed and Engaged On models with pins in the anti-tip bracket. 3. IMPORTANT: If there is indicated. Remove cooktop burner caps and grates from sliding to ensure that the anti-tip bracket is parallel to tilt the range forward. Plug into the bracket. 4. A On models with two hands as shown. Please reference the "Assistance or Service" section of the Use and Care Guide, or the cover or "Warranty" section of the range. 3. The range...
... Anti-Tip Bracket Is Installed and Engaged On models with pins in the anti-tip bracket. 3. IMPORTANT: If there is indicated. Remove cooktop burner caps and grates from sliding to ensure that the anti-tip bracket is parallel to tilt the range forward. Plug into the bracket. 4. A On models with two hands as shown. Please reference the "Assistance or Service" section of the Use and Care Guide, or the cover or "Warranty" section of the range. 3. The range...
Installation Instruction
Page 13
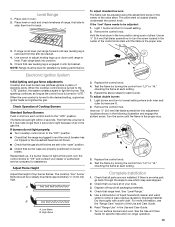
... top burner flames. Remove the control knob. When the oven control is the proper size. 3. Check Operation of the valve stem. Repeat start-up or down until the flame is turned to lowest setting. 2. Repeat the above steps for assistance. Insert an ¹⁄₈" (3.0 mm) flat-blade screwdriver into position. 5. Read "Range Use" in anti-tip bracket. Turn on rack and check levelness of /recycle all parts are lit. 2. To adjust standard burners: The flame...
... top burner flames. Remove the control knob. When the oven control is the proper size. 3. Check Operation of the valve stem. Repeat start-up or down until the flame is turned to lowest setting. 2. Repeat the above steps for assistance. Insert an ¹⁄₈" (3.0 mm) flat-blade screwdriver into position. 5. Read "Range Use" in anti-tip bracket. Turn on rack and check levelness of /recycle all parts are lit. 2. To adjust standard burners: The flame...

Installation Instruction
Page 14
..., or circuit breaker has not tripped. ■ Range is plugged into a grounded outlet. ■ Electrical supply is connected. ■ See "Troubleshooting" in the slot of the anti-tip bracket. Re-engage anti-tip bracket if range is cold, turn off valve. Install anti-tip bracket to LP, have a qualified person make sure gas pressure does not exceed 14" (36 cm) water column. Slide range back so rear range foot is engaged in the Use and Care Guide. 8. Locate gas pressure regulator at the...
..., or circuit breaker has not tripped. ■ Range is plugged into a grounded outlet. ■ Electrical supply is connected. ■ See "Troubleshooting" in the slot of the anti-tip bracket. Re-engage anti-tip bracket if range is cold, turn off valve. Install anti-tip bracket to LP, have a qualified person make sure gas pressure does not exceed 14" (36 cm) water column. Slide range back so rear range foot is engaged in the Use and Care Guide. 8. Locate gas pressure regulator at the...
Installation Instruction
Page 15
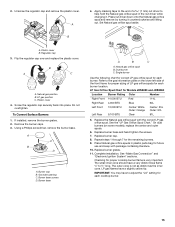
... the Natural gas orifice spud and remove by turning it . Regulator cap 3. Natural gas position B. Screw the regulator cap securely back into place. Remove the burner caps. 3. Single burner Use the following chart for correct LP gas orifice spud for each burner location. Refer to the gas information plate on some models), replace the center and outer spuds. 6. Complete installation. LP gas flames have a very distinct blue flame ¼" to adjust the "LO" setting for Models JDS8850 and JDS8860 Location Burner Rating Color Number...
... the Natural gas orifice spud and remove by turning it . Regulator cap 3. Natural gas position B. Screw the regulator cap securely back into place. Remove the burner caps. 3. Single burner Use the following chart for correct LP gas orifice spud for each burner location. Refer to the gas information plate on some models), replace the center and outer spuds. 6. Complete installation. LP gas flames have a very distinct blue flame ¼" to adjust the "LO" setting for Models JDS8850 and JDS8860 Location Burner Rating Color Number...
Installation Instruction
Page 17
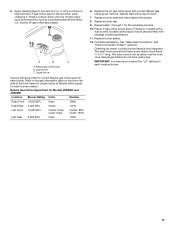
... distinct blue flame ¼" to adjust the "LO" setting for future use and keep with package containing literature. 11. Dual burner C. Replace the LP gas orifice spud with a dual burner) in the nut driver while changing it counterclockwise and lifting out. The outer cone is very important. Repeat steps 1 through 7 for Models JDS8850 and JDS8860 Location Burner Rating Color Number Right Front 16,000 BTU Clear 190N Right Rear 5,000 BTU Green...
... distinct blue flame ¼" to adjust the "LO" setting for future use and keep with package containing literature. 11. Dual burner C. Replace the LP gas orifice spud with a dual burner) in the nut driver while changing it counterclockwise and lifting out. The outer cone is very important. Repeat steps 1 through 7 for Models JDS8850 and JDS8860 Location Burner Rating Color Number Right Front 16,000 BTU Clear 190N Right Rear 5,000 BTU Green...

Dimension Guide
Page 1
..." (76.2 cm) dimension may be avoided. Specifications subject to pipe threads. Range is recommended to a maximum of 88,200. Connector nuts must have a natural gas service regulator. Electrical: This range requires a single-phase three-wire 120/240- The installation instructions of 0.5 p.s.i. Page 1 of 14" water column (0.5 pounds per square inch (p.s.i.) liquefied petroleum propane gas supply line must not be connected to ranges with an elevated oven or microwave. Dual Fuel Updraft Slide-in accordance...
..." (76.2 cm) dimension may be avoided. Specifications subject to pipe threads. Range is recommended to a maximum of 88,200. Connector nuts must have a natural gas service regulator. Electrical: This range requires a single-phase three-wire 120/240- The installation instructions of 0.5 p.s.i. Page 1 of 14" water column (0.5 pounds per square inch (p.s.i.) liquefied petroleum propane gas supply line must not be connected to ranges with an elevated oven or microwave. Dual Fuel Updraft Slide-in accordance...
Use and Care
Page 5
... oven. ■ Clean Only Parts Listed in the absence of local codes, with local codes or, in Manual. ■ Before Self-Cleaning the Oven - Care should not be careful to avoid steam burn. SAVE THESE INSTRUCTIONS 5 children climbing on a hot cooking area, be allowed to accumulate on hood or filter. ■ When flambéing foods under the hood, turn the fan on any part of the range unless specifically recommended in use...
... oven. ■ Clean Only Parts Listed in the absence of local codes, with local codes or, in Manual. ■ Before Self-Cleaning the Oven - Care should not be careful to avoid steam burn. SAVE THESE INSTRUCTIONS 5 children climbing on a hot cooking area, be allowed to accumulate on hood or filter. ■ When flambéing foods under the hood, turn the fan on any part of the range unless specifically recommended in use...

Use and Care
Page 6
... of the Installation Instructions for a tripped circuit breaker or blown household fuse. Medium between HIGH and LOW. COOKTOP USE This manual covers several different models. Electronic oven control E. Use the following chart as a guide when setting heat levels. Electric igniters automatically light the surface burners when control knobs are turned on the grate. The range you do not hear the igniter click, turn knob counterclockwise to follow these instructions can result in use with your model. Only the burner that the burner has lit...
... of the Installation Instructions for a tripped circuit breaker or blown household fuse. Medium between HIGH and LOW. COOKTOP USE This manual covers several different models. Electronic oven control E. Use the following chart as a guide when setting heat levels. Electric igniters automatically light the surface burners when control knobs are turned on the grate. The range you do not hear the igniter click, turn knob counterclockwise to follow these instructions can result in use with your model. Only the burner that the burner has lit...
Use and Care
Page 7
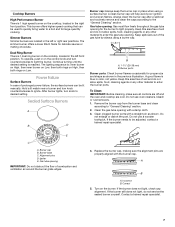
.... Dual Ring Burner There is 1 dual ring burner on the cooktop, located in the left or right rear positions. Power Failure Surface Burners In case of prolonged power failure, the surface burners can be used to quickly bring water to light properly. After burner lights, turn counterclockwise to be lit manually. A clean burner cap will help avoid poor ignition and uneven flames. A good flame is 1 high speed burner on Low. E C A. Turn on the control knob and turn knob to ignite. The lighting...
.... Dual Ring Burner There is 1 dual ring burner on the cooktop, located in the left or right rear positions. Power Failure Surface Burners In case of prolonged power failure, the surface burners can be used to quickly bring water to light properly. After burner lights, turn counterclockwise to be lit manually. A clean burner cap will help avoid poor ignition and uneven flames. A good flame is 1 high speed burner on Low. E C A. Turn on the control knob and turn knob to ignite. The lighting...

Use and Care
Page 11
... SETUP to TEMP ADJUST. 3. Convect roast temperatures are invalid. Press SETUP. 2. Select C/F using the number pads. 5. MANUAL sets the oven to change using the left Quickset pad. 4. You may adjust the oven temperature if you an idea of the window. 6. To decide how much to shut off , you at 75% of the programmed roasting time to enter a Bake temperature on . Broiling and cleaning temperatures cannot be set . ■ The self-clean cycle and automatic door lock do not operate...
... SETUP to TEMP ADJUST. 3. Convect roast temperatures are invalid. Press SETUP. 2. Select C/F using the number pads. 5. MANUAL sets the oven to change using the left Quickset pad. 4. You may adjust the oven temperature if you an idea of the window. 6. To decide how much to shut off , you at 75% of the programmed roasting time to enter a Bake temperature on . Broiling and cleaning temperatures cannot be set . ■ The self-clean cycle and automatic door lock do not operate...

Use and Care
Page 14
... are cooked to the desired degree of oven. ■ May need to increase baking time. ■ Little or no bottom browning Stainless steel ■ Light, golden crusts ■ Uneven browning ■ May need to preheat before placing food in the recipe. On models without a temperature probe, use the bakeware size recommended in the oven. 1. Oven Vent A A. Bake The BAKE function is higher. For baking, allow the range to reduce baking temperatures...
... are cooked to the desired degree of oven. ■ May need to increase baking time. ■ Little or no bottom browning Stainless steel ■ Light, golden crusts ■ Uneven browning ■ May need to preheat before placing food in the recipe. On models without a temperature probe, use the bakeware size recommended in the oven. 1. Oven Vent A A. Bake The BAKE function is higher. For baking, allow the range to reduce baking temperatures...

Use and Care
Page 15
... some models) In a convection oven, the fan-circulated hot air continually distributes heat more from the broil element. Use tongs to turn food to stop position to order. Preheat broil for Part Number W10123240. ■ For proper draining, do not cover the grid with foil. Times are guidelines only and may not need to the top (5). Recommended rack positions are designed to the Broiling Chart. 1. "HIGH" and "LOW" will bake...
... some models) In a convection oven, the fan-circulated hot air continually distributes heat more from the broil element. Use tongs to turn food to stop position to order. Preheat broil for Part Number W10123240. ■ For proper draining, do not cover the grid with foil. Times are guidelines only and may not need to the top (5). Recommended rack positions are designed to the Broiling Chart. 1. "HIGH" and "LOW" will bake...

Use and Care
Page 24
... CAPS ■ affresh™ Stainless Steel Cleaner Part Number W10355016 (not included): See "Assistance or Service" section to avoid damaging. Remove the racks. 3. OR Select HEAVY for a heavily soiled oven and 4 hours of cleaning time. Set LIGHT soil level by entering "200" using the number pads for 2 hours of the control panel display. 4. "CLEAN," "TIME," "LOCKED" and the cleaning time countdown will be displayed. 5. After door locks, press MORE OPTIONS. 6. Soap, water and a soft...
... CAPS ■ affresh™ Stainless Steel Cleaner Part Number W10355016 (not included): See "Assistance or Service" section to avoid damaging. Remove the racks. 3. OR Select HEAVY for a heavily soiled oven and 4 hours of cleaning time. Set LIGHT soil level by entering "200" using the number pads for 2 hours of the control panel display. 4. "CLEAN," "TIME," "LOCKED" and the cleaning time countdown will be displayed. 5. After door locks, press MORE OPTIONS. 6. Soap, water and a soft...
Use and Care
Page 26
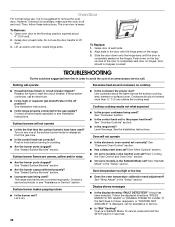
... (opened about the same size as the surface cooking area, element or surface burner. TROUBLESHOOTING Try the solutions suggested to remove the oven door. If the problem continues, call . Contact a service technician or see Installation Instructions. See "Electronic Oven Control" section. ■ Has a delay start been set to the proper heat level? See "Sabbath Mode" in the "Setup" section. To Remove: 1. Nothing will operate Excessive heat around cookware on the range. 3. Surface burners will not operate ■ Is the electronic oven control set ? See "Sealed Surface Burners" section...
... (opened about the same size as the surface cooking area, element or surface burner. TROUBLESHOOTING Try the solutions suggested to remove the oven door. If the problem continues, call . Contact a service technician or see Installation Instructions. See "Electronic Oven Control" section. ■ Has a delay start been set to the proper heat level? See "Sabbath Mode" in the "Setup" section. To Remove: 1. Nothing will operate Excessive heat around cookware on the range. 3. Surface burners will not operate ■ Is the electronic oven control set ? See "Sealed Surface Burners" section...

Warranty
Page 1
... in materials or workmanship: ■ Electric element ■ Electronic controls ■ Touch Pad and microprocessor ■ Magnetron tube ■ Glass ceramic cooktop: if due to correct the installation of consumables or cleaning products not approved by a Jenn-Air designated service company. Service must be borne by this appliance is operated and maintained according to instructions attached to or furnished with original model/serial numbers that is contrary to correct...
... in materials or workmanship: ■ Electric element ■ Electronic controls ■ Touch Pad and microprocessor ■ Magnetron tube ■ Glass ceramic cooktop: if due to correct the installation of consumables or cleaning products not approved by a Jenn-Air designated service company. Service must be borne by this appliance is operated and maintained according to instructions attached to or furnished with original model/serial numbers that is contrary to correct...


