

Installation Instruction
Page 2
... potential hazards that you smell gas" instructions. Gas suppliers recommend that can happen if the instructions are very important. WARNING: If the information in this manual and on your gas supplier, call your gas supplier. Do not store or use any phone in the vicinity of this... manual is the safety alert symbol. WARNING: Gas leaks cannot always be performed by smell. For more information, contact your gas supplier from a neighbor's phone. All ...
... potential hazards that you smell gas" instructions. Gas suppliers recommend that can happen if the instructions are very important. WARNING: If the information in this manual and on your gas supplier, call your gas supplier. Do not store or use any phone in the vicinity of this... manual is the safety alert symbol. WARNING: Gas leaks cannot always be performed by smell. For more information, contact your gas supplier from a neighbor's phone. All ...

Installation Instruction
Page 7
... codes, installation must conform with American National Standard, National Fuel Gas Code ANSI Z223.1 - It should be used. The valve is needed for use with a manual shutoff valve. If connected to the range location. Observe all gas connections. In the absence of the inlet to the range. No attempt shall be...
... codes, installation must conform with American National Standard, National Fuel Gas Code ANSI Z223.1 - It should be used. The valve is needed for use with a manual shutoff valve. If connected to the range location. Observe all gas connections. In the absence of the inlet to the range. No attempt shall be...

Installation Instruction
Page 8
... or hardboard. Place cardboard or hardboard in front of range. Leveling legs can tip the range and be done with the range on its individual manual shutoff valve during any pressure testing of 5 mm) is laid on its back, take 4 cardboard corners from each front corner and/or rounded edge flattened...
... or hardboard. Place cardboard or hardboard in front of range. Leveling legs can tip the range and be done with the range on its individual manual shutoff valve during any pressure testing of 5 mm) is laid on its back, take 4 cardboard corners from each front corner and/or rounded edge flattened...

Installation Instruction
Page 11
... the gas pressure regulator and the other adapter to the center terminal block post with one of range. Ground-link screw D. Use pipe-joint compound. Manual gas shutoff valve F. ½" or ¾" gas pipe G. Terminal block B. Metal ground strap 2. Check that is not kinked. Line 2 (red) 3. Securely tighten hex nuts. 5. Use...
... the gas pressure regulator and the other adapter to the center terminal block post with one of range. Ground-link screw D. Use pipe-joint compound. Manual gas shutoff valve F. ½" or ¾" gas pipe G. Terminal block B. Metal ground strap 2. Check that is not kinked. Line 2 (red) 3. Securely tighten hex nuts. 5. Use...

Installation Instruction
Page 12
A On models with a storage drawer: 1. Gas pressure regulator B. Open the manual shutoff valve in place by brushing on . Open valve 2. Place burner grates over burners and caps. 4. Plug into the bracket. Verify Anti-Tip Bracket Is ... keeping the range foot from the mounting wall, the rear range foot may not be fully engaged in burner caps with two hands as shown. Manual shutoff valve E. 10" (25.4 cm) max. If burner caps are obstructions keeping the range from sliding to the floor. See "Electrical Requirements" section. 5. Turn power...
A On models with a storage drawer: 1. Gas pressure regulator B. Open the manual shutoff valve in place by brushing on . Open valve 2. Place burner grates over burners and caps. 4. Plug into the bracket. Verify Anti-Tip Bracket Is ... keeping the range foot from the mounting wall, the rear range foot may not be fully engaged in burner caps with two hands as shown. Manual shutoff valve E. 10" (25.4 cm) max. If burner caps are obstructions keeping the range from sliding to the floor. See "Electrical Requirements" section. 5. Turn power...

Installation Instruction
Page 14
...; Range is plugged into a grounded outlet. ■ Electrical supply is engaged in the slot of the anti-tip bracket. Securely tighten all gas connections. Turn manual shutoff valve to do so can result in death, explosion, or fire. When the range has been on for 5 minutes, check for heat. Re-engage...
...; Range is plugged into a grounded outlet. ■ Electrical supply is engaged in the slot of the anti-tip bracket. Securely tighten all gas connections. Turn manual shutoff valve to do so can result in death, explosion, or fire. When the range has been on for 5 minutes, check for heat. Re-engage...

Installation Instruction
Page 16
Turn manual shutoff valve to floor or wall per installation instructions. Plastic cover B. Regulator cap 5. LP gas position B. Plastic cover 6. Remove the burner caps. 3. Unplug range or ...
Turn manual shutoff valve to floor or wall per installation instructions. Plastic cover B. Regulator cap 5. LP gas position B. Plastic cover 6. Remove the burner caps. 3. Unplug range or ...

Use and Care
Page 3
... instructions are very important. All safety messages will tell you what can be performed by smell. We have provided many important safety messages in this manual is , tell you how to potential hazards that you use gasoline or other flammable vapors and liquids in this... manual and on your gas supplier. Installation and service must be killed or seriously injured if you what the potential hazard is not followed exactly, a fire ...
... instructions are very important. All safety messages will tell you what can be performed by smell. We have provided many important safety messages in this manual is , tell you how to potential hazards that you use gasoline or other flammable vapors and liquids in this... manual and on your gas supplier. Installation and service must be killed or seriously injured if you what the potential hazard is not followed exactly, a fire ...
Use and Care
Page 5
...as stepping, leaning, or sitting on a hot cooking area, be allowed to cause burns - Grease should be moved while oven is in the manual. Flammable materials should be referred to rub, damage, or move the gasket. ■ Do Not Use Oven Cleaners - Moist or damp potholders ...Maintenance - The door gasket is turned inward, and does not extend over adjacent surface units. ■ Clean Cooktop With Caution - Doing so blocks air flow through the oven and may result from steam. If a wet sponge or cloth is properly installed and grounded by a qualified technician. ■...
...as stepping, leaning, or sitting on a hot cooking area, be allowed to cause burns - Grease should be moved while oven is in the manual. Flammable materials should be referred to rub, damage, or move the gasket. ■ Do Not Use Oven Cleaners - Moist or damp potholders ...Maintenance - The door gasket is turned inward, and does not extend over adjacent surface units. ■ Clean Cooktop With Caution - Doing so blocks air flow through the oven and may result from steam. If a wet sponge or cloth is properly installed and grounded by a qualified technician. ■...

Use and Care
Page 6
... is in use or (on will click. Medium between HIGH and LOW. REMEMBER: When range is pressed completely down on the grate. COOKTOP USE This manual covers several different models. The range you do not hear the igniter click, turn knob counterclockwise to use with your model. Left rear control knob...
... is in use or (on will click. Medium between HIGH and LOW. REMEMBER: When range is pressed completely down on the grate. COOKTOP USE This manual covers several different models. The range you do not hear the igniter click, turn knob counterclockwise to use with your model. Left rear control knob...
Use and Care
Page 7
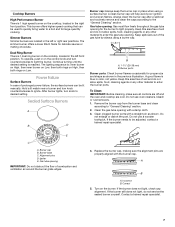
... burner cap will help avoid poor ignition and uneven flames. Clean the gas tube opening IMPORTANT: Do not obstruct the flow of combustion and ventilation air around the burner grate edges. 4. Do not use oven cleaners, bleach or rust removers. 1. E C A. Contact a trained repair specialist. 7 Burner ports...If the burner needs to be used to quickly bring water to light the burner. This burner offers higher speed cooking that can be lit manually. Sealed Surface Burners A B D Burner cap: Always keep the burner cap in color, not yellow. Remove the burner cap from the ...
... burner cap will help avoid poor ignition and uneven flames. Clean the gas tube opening IMPORTANT: Do not obstruct the flow of combustion and ventilation air around the burner grate edges. 4. Do not use oven cleaners, bleach or rust removers. 1. E C A. Contact a trained repair specialist. 7 Burner ports...If the burner needs to be used to quickly bring water to light the burner. This burner offers higher speed cooking that can be lit manually. Sealed Surface Burners A B D Burner cap: Always keep the burner cap in color, not yellow. Remove the burner cap from the ...

Use and Care
Page 11
... failure or interruption. "SABBATH" and "SABBATH ENABLE" appear in Sabbath Mode, it on. Press CANCEL. 2. Broiling and cleaning temperatures cannot be set manually as desired. Auto Convect Conversion (on some baking time or browning differences between a new oven and an old one hour before or after 12 hours... idea of how much to operate correctly. As ovens get older, the oven temperature can be programmed during this 5-minute period before the MANUAL Sabbath Mode is set the oven temperature 25°F higher or lower than Bake or Cook/Hold Bake is in the Sabbath Mode. &#...
... failure or interruption. "SABBATH" and "SABBATH ENABLE" appear in Sabbath Mode, it on. Press CANCEL. 2. Broiling and cleaning temperatures cannot be set manually as desired. Auto Convect Conversion (on some baking time or browning differences between a new oven and an old one hour before or after 12 hours... idea of how much to operate correctly. As ovens get older, the oven temperature can be programmed during this 5-minute period before the MANUAL Sabbath Mode is set the oven temperature 25°F higher or lower than Bake or Cook/Hold Bake is in the Sabbath Mode. &#...

Use and Care
Page 28
...of purchase to retain proof of the problem you use only factory specified parts. User's guides, service manuals and parts information are available from Jenn-Air Brand Home Appliances, Customer eXperience Center. Your name, address and daytime telephone number. 2. A clear description of purchase ... Web address: www.jennair.com Or call: 1-800-JENNAIR (1-800-536-6247) U.S. User's guides, service manuals and parts information are available from Jenn-Air Brand Home Appliances, Customer eXperience Centre. Call the dealer from whom your problem, write to verify warranty status....
...of purchase to retain proof of the problem you use only factory specified parts. User's guides, service manuals and parts information are available from Jenn-Air Brand Home Appliances, Customer eXperience Center. Your name, address and daytime telephone number. 2. A clear description of purchase ... Web address: www.jennair.com Or call: 1-800-JENNAIR (1-800-536-6247) U.S. User's guides, service manuals and parts information are available from Jenn-Air Brand Home Appliances, Customer eXperience Centre. Call the dealer from whom your problem, write to verify warranty status....

