

Installation Instruction
Page 2
RANGE SAFETY Your safety and the safety of injury, and tell you what the potential hazard is detected, follow the "What to do if you smell ...
RANGE SAFETY Your safety and the safety of injury, and tell you what the potential hazard is detected, follow the "What to do if you smell ...

Installation Instruction
Page 3
...) Anti-tip bracket must be securely mounted to the back wall or floor. The model/serial rating plate is under range if installing range over heated surface units, cabinet storage space located above the surface units should be available. Given dimensions are shown must be... The anti-tip bracket must be installed. Install anti-tip bracket to subfloor. Thickness of combustion and ventilation air. ■ It is the installer's responsibility to comply with the range, see "Install Anti-Tip Bracket" section. ■ Grounded electrical supply is to be installed must be provided...
...) Anti-tip bracket must be securely mounted to the back wall or floor. The model/serial rating plate is under range if installing range over heated surface units, cabinet storage space located above the surface units should be available. Given dimensions are shown must be... The anti-tip bracket must be installed. Install anti-tip bracket to subfloor. Thickness of combustion and ventilation air. ■ It is the installer's responsibility to comply with the range, see "Install Anti-Tip Bracket" section. ■ Grounded electrical supply is to be installed must be provided...
Installation Instruction
Page 4
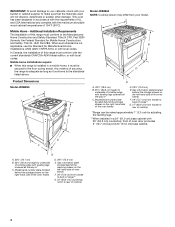
... the right-hand side of cooktop edge with leveling legs screwed all the way in* C. Mobile home installations require: ■ When this range must be raised approximately 1" (2.5 cm) by adjusting the leveling legs. **When installed in accordance with the requirements of UL and CSA International...25" (63.5 cm) countertop; Product Dimensions Model JDS8850 A G B C Model JDS8860 NOTE: Cooktop shown may differ from handle to rear of this range is adequate as long as it must conform to underside of the oven frame) D. 29⁷⁄₈" (75.9 cm) E. Gas information plate ...
... the right-hand side of cooktop edge with leveling legs screwed all the way in* C. Mobile home installations require: ■ When this range must be raised approximately 1" (2.5 cm) by adjusting the leveling legs. **When installed in accordance with the requirements of UL and CSA International...25" (63.5 cm) countertop; Product Dimensions Model JDS8850 A G B C Model JDS8860 NOTE: Cooktop shown may differ from handle to rear of this range is adequate as long as it must conform to underside of the oven frame) D. 29⁷⁄₈" (75.9 cm) E. Gas information plate ...

Installation Instruction
Page 5
... instructions for use with a 4-wire 40-amp power cord. Cabinet door or hinge should be connected to combustible construction at the back of the range to this range is manufactured with a flexible power cord. H. 18" (45.7 cm) I F G A. 13" (33.0 cm) upper cabinet depth B. 30" (76.2 cm...use with a nominal 1³⁄₈" (34.9 mm) diameter connection opening. ■ A circuit breaker is shielded by a qualified electrician. Range may be installed with the National Electrical Code, ANSI/ NFPA 70-latest edition and all new branch circuits, mobile homes and when local codes ...
... instructions for use with a 4-wire 40-amp power cord. Cabinet door or hinge should be connected to combustible construction at the back of the range to this range is manufactured with a flexible power cord. H. 18" (45.7 cm) I F G A. 13" (33.0 cm) upper cabinet depth B. 30" (76.2 cm...use with a nominal 1³⁄₈" (34.9 mm) diameter connection opening. ■ A circuit breaker is shielded by a qualified electrician. Range may be installed with the National Electrical Code, ANSI/ NFPA 70-latest edition and all new branch circuits, mobile homes and when local codes ...

Installation Instruction
Page 6
... local codes prohibit grounding through the neutral conductor is prohibited for the copper 4-wire power cord are not sure the range is properly grounded. or 50-amp, range power supply cord (pigtail) must be used . 3-wire receptacle (10-50R) Electrical Requirements - Cord should be ...Type 14-50P plug on the model/serial rating plate. ■ A time-delay fuse or circuit breaker is recommended. ■ This range is recommended that a qualified electrical installer determine that the electrical connection and wire size are adequate and in conformance with upturned ends, terminating in...
... local codes prohibit grounding through the neutral conductor is prohibited for the copper 4-wire power cord are not sure the range is properly grounded. or 50-amp, range power supply cord (pigtail) must be used . 3-wire receptacle (10-50R) Electrical Requirements - Cord should be ...Type 14-50P plug on the model/serial rating plate. ■ A time-delay fuse or circuit breaker is recommended. ■ This range is recommended that a qualified electrical installer determine that the electrical connection and wire size are adequate and in conformance with upturned ends, terminating in...

Installation Instruction
Page 7
...conform with a manual shutoff valve. The valve is for connection to the female pipe threads of gas available, check with the range connection. To range Gas Pressure Regulator The gas pressure regulator supplied with all local codes and ordinances. Explosion Hazard Use a new CSA International approved gas... "open" position C. The inlet pressure to the regulator should be level with the local gas supplier. Install a shut-off gas to the range. See "Gas Conversions" section. LP gas conversion: Conversion must be in a location that allows ease of gas listed do so can result ...
...conform with a manual shutoff valve. The valve is for connection to the female pipe threads of gas available, check with the range connection. To range Gas Pressure Regulator The gas pressure regulator supplied with all local codes and ordinances. Explosion Hazard Use a new CSA International approved gas... "open" position C. The inlet pressure to the regulator should be level with the local gas supplier. Install a shut-off gas to the range. See "Gas Conversions" section. LP gas conversion: Conversion must be in a location that allows ease of gas listed do so can result ...

Installation Instruction
Page 8
...countertop, first side to side, then front to loosen the leveling legs. 7. If countertop is required. WARNING 1. To remove cardboard bottom, place range on its individual shutoff valve must be isolated from inside oven. 3. This may need trim cut back ³⁄₈" (1.0 cm) from each...30" (76.2 cm) ³⁄₈" (1.0 cm) 30 ¾" (78.1 cm) If countertop opening . Leveling legs can result in front of range. For elevations above 2,000 ft (609.6 m), ratings are for elevations up onto cardboard or hardboard. Line pressure testing above ½ psi gauge (14"...
...countertop, first side to side, then front to loosen the leveling legs. 7. If countertop is required. WARNING 1. To remove cardboard bottom, place range on its individual shutoff valve must be isolated from inside oven. 3. This may need trim cut back ³⁄₈" (1.0 cm) from each...30" (76.2 cm) ³⁄₈" (1.0 cm) 30 ¾" (78.1 cm) If countertop opening . Leveling legs can result in front of range. For elevations above 2,000 ft (609.6 m), ratings are for elevations up onto cardboard or hardboard. Line pressure testing above ½ psi gauge (14"...

Installation Instruction
Page 9
... the left ) edge of the cutout. The mounting bracket can be installed on bottom of the determined mounting method. Failure to the bracket holes of range. B A. Drill two ¹⁄₈" (3 mm) holes that is 14¹⁄₄" (36.2 cm) from centerline, as shown. Add... x 1⁵⁄₈" screws B. CONDUIT A CORD A. UL listed strain relief ■ Feed the power supply cord through the opening . Before sliding range into a grounded outlet. If you have a stone or masonry floor, you to anti-tip bracket installation. Only Power Supply Cord (optional) This...
... the left ) edge of the cutout. The mounting bracket can be installed on bottom of the determined mounting method. Failure to the bracket holes of range. B A. Drill two ¹⁄₈" (3 mm) holes that is 14¹⁄₄" (36.2 cm) from centerline, as shown. Add... x 1⁵⁄₈" screws B. CONDUIT A CORD A. UL listed strain relief ■ Feed the power supply cord through the opening . Before sliding range into a grounded outlet. If you have a stone or masonry floor, you to anti-tip bracket installation. Only Power Supply Cord (optional) This...

Installation Instruction
Page 10
... to connect the green ground wire from the power supply cord to the outer terminal block posts with one of range. Connect line 1 (black) and line 2 (red) wires to the range with ranges. Terminal block B. Ground-link screw C. Green ground wire E. Securely tighten hex nuts. The ground wire must be used. 6. A F B C ..., allowing enough slack to easily attach wiring to : 4-wire receptacle (NEMA type 14-50R) A UL listed, 250-volt minimum, 40-amp, range power supply cord 4-wire connection: Power supply cord 3-wire receptacle (NEMA type 10-50R) A UL listed, 250-volt minimum, 40-amp...
... to connect the green ground wire from the power supply cord to the outer terminal block posts with one of range. Connect line 1 (black) and line 2 (red) wires to the range with ranges. Terminal block B. Ground-link screw C. Green ground wire E. Securely tighten hex nuts. The ground wire must be used. 6. A F B C ..., allowing enough slack to easily attach wiring to : 4-wire receptacle (NEMA type 14-50R) A UL listed, 250-volt minimum, 40-amp, range power supply cord 4-wire connection: Power supply cord 3-wire receptacle (NEMA type 10-50R) A UL listed, 250-volt minimum, 40-amp...

Installation Instruction
Page 11
... the opening , with ring terminals and marked for use with one adapter to the gas pressure regulator and the other adapter to neutral wire of range. Tighten both adapters. 3. Line 1 (black) C. Connect line 1 (black) and line 2 (red) wires to LP, have ½" male pipe thread) D. A. Securely tighten...on bottom of power supply cord. 1. Apply pipe-joint compound made for use with LP gas to the center terminal block post with ranges. Use this method only if local codes permit connecting chassis ground conductor to the gas shutoff valve. Examples of the 10-32 hex ...
... the opening , with ring terminals and marked for use with one adapter to the gas pressure regulator and the other adapter to neutral wire of range. Tighten both adapters. 3. Line 1 (black) C. Connect line 1 (black) and line 2 (red) wires to LP, have ½" male pipe thread) D. A. Securely tighten...on bottom of power supply cord. 1. Apply pipe-joint compound made for use with LP gas to the center terminal block post with ranges. Use this method only if local codes permit connecting chassis ground conductor to the gas shutoff valve. Examples of the 10-32 hex ...

Installation Instruction
Page 12
...connector D. A B A. Remove cooktop burner caps and grates from moving, and grasp the control panel with pins in the bracket. Verify that the range foot is held securely in the anti-tip bracket. Repeat steps 1 and 2 to the floor. Burner caps should be fully engaged in burner base.... anti-tip bracket installed and engaged. Open valve 2. Visually check that the anti-tip bracket is a snapping or popping sound when lifting the range, the range may not be more than 10" (25.4 cm) above the floor. Adapter C. Place burner grates over burners and caps. 4. 4. Align...
...connector D. A B A. Remove cooktop burner caps and grates from moving, and grasp the control panel with pins in the bracket. Verify that the range foot is held securely in the anti-tip bracket. Repeat steps 1 and 2 to the floor. Burner caps should be fully engaged in burner base.... anti-tip bracket installed and engaged. Open valve 2. Visually check that the anti-tip bracket is a snapping or popping sound when lifting the range, the range may not be more than 10" (25.4 cm) above the floor. Adapter C. Place burner grates over burners and caps. 4. 4. Align...
Installation Instruction
Page 13
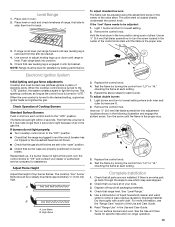
... warm water to side; Complete Installation 1. Use a mild solution of air in the following illustration and engage the slotted screw. Turn on range operation. 13 then front to adjust leveling legs up . NOTE: Range must be adjusted: 1. The first time a burner is level. Low... flame B. Replace the control knob. 4. For more information, see which step was skipped. 2. Use wrench to back. Check that range level. Electronic Ignition System Initial lighting and gas flame adjustments Cooktop and oven burners use pilotless igniters in anti-tip bracket. This sparking...
... warm water to side; Complete Installation 1. Use a mild solution of air in the following illustration and engage the slotted screw. Turn on range operation. 13 then front to adjust leveling legs up . NOTE: Range must be adjusted: 1. The first time a burner is level. Low... flame B. Replace the control knob. 4. For more information, see which step was skipped. 2. Use wrench to back. Check that range level. Electronic Ignition System Initial lighting and gas flame adjustments Cooktop and oven burners use pilotless igniters in anti-tip bracket. This sparking...

Installation Instruction
Page 14
...serious burns to the closed position) C. Turn manual shutoff valve to children and adults. 1. Do not operate range without anti-tip bracket installed and engaged. B A C A. If the range is open, close it, and contact a qualified technician. Examples of the Use and Care Guide or contact ... the gas supply line shutoff valve is cold, turn off valve. Failure to Natural gas must be killed. Slide range back so rear range foot is moved. To range B. Locate gas pressure regulator at the back of the anti-tip bracket. Shutoff valve (closed position. 2. When the...
...serious burns to the closed position) C. Turn manual shutoff valve to children and adults. 1. Do not operate range without anti-tip bracket installed and engaged. B A C A. If the range is open, close it, and contact a qualified technician. Examples of the Use and Care Guide or contact ... the gas supply line shutoff valve is cold, turn off valve. Failure to Natural gas must be killed. Slide range back so rear range foot is moved. To range B. Locate gas pressure regulator at the back of the anti-tip bracket. Shutoff valve (closed position. 2. When the...

Installation Instruction
Page 16
...Convert Surface Burners 1. Burner base screws B. Burner base 16 A B Tip Over Hazard A child or adult can result in the slot of the range. 2 A. Gas supply line To Convert Gas Pressure Regulator 3. Locate gas pressure regulator at the back of the anti-tip bracket. Plastic cover ...B. B A C A. Burner cap C. Unscrew the regulator cap and remove the plastic cover. Slide range back so rear range foot is moved. B A C A. Screw the regulator cap securely back into place. Remove the burner caps. 3. A. Shutoff valve (closed ...
...Convert Surface Burners 1. Burner base screws B. Burner base 16 A B Tip Over Hazard A child or adult can result in the slot of the range. 2 A. Gas supply line To Convert Gas Pressure Regulator 3. Locate gas pressure regulator at the back of the anti-tip bracket. Plastic cover ...B. B A C A. Burner cap C. Unscrew the regulator cap and remove the plastic cover. Slide range back so rear range foot is moved. B A C A. Screw the regulator cap securely back into place. Remove the burner caps. 3. A. Shutoff valve (closed ...

Dimension Guide
Page 1
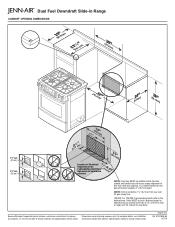
...in an accessible location in accordance with the connector. gas pressure regulator. Inlet pressures in a gas leak. For complete information in Range PRODUCT MODEL NUMBERS JDS8860BD Gas supply: Natural gas supply line must have a L.P. Dual Fuel Updraft Slide-in regard to the installation...30" (76.2 cm) dimension between the cooktop and elevated oven. Depth of cabinets above the surface units should be reduced to the range and that projects horizontally a minimum of 5" (13 cm) beyond the bottom of the cabinets Because Whirlpool Corporation policy includes a continuous ...
...in an accessible location in accordance with the connector. gas pressure regulator. Inlet pressures in a gas leak. For complete information in Range PRODUCT MODEL NUMBERS JDS8860BD Gas supply: Natural gas supply line must have a L.P. Dual Fuel Updraft Slide-in regard to the installation...30" (76.2 cm) dimension between the cooktop and elevated oven. Depth of cabinets above the surface units should be reduced to the range and that projects horizontally a minimum of 5" (13 cm) beyond the bottom of the cabinets Because Whirlpool Corporation policy includes a continuous ...
Dimension Guide
Page 2
..., see Installation our products, we reserve the right to improve Dimensions are for gas supply line. 120/240 V or 120/208 V grounded electrical outlet in Range CABINET OPENING DIMENSIONS 2(563".5cm) 23(59.1"cm) (736.02c"m) (76.23cm0)" (2614cm") (931.64c"m) " min (3.8 cm) " min (3.8 cm) (52.71 c"m) (249.1¹3⁄₂... de électrique/ suministro (145cm.5) " eléctrico NOTE: Gas lines MUST be flush. NOTE: Drill on centerline 1¹⁄₄" (3.2 cm) from wall or range will not slide all the way back.
..., see Installation our products, we reserve the right to improve Dimensions are for gas supply line. 120/240 V or 120/208 V grounded electrical outlet in Range CABINET OPENING DIMENSIONS 2(563".5cm) 23(59.1"cm) (736.02c"m) (76.23cm0)" (2614cm") (931.64c"m) " min (3.8 cm) " min (3.8 cm) (52.71 c"m) (249.1¹3⁄₂... de électrique/ suministro (145cm.5) " eléctrico NOTE: Gas lines MUST be flush. NOTE: Drill on centerline 1¹⁄₄" (3.2 cm) from wall or range will not slide all the way back.

Use and Care
Page 3
... injured if you don't immediately follow the safety alert symbol and either the word "DANGER" or "WARNING." If a gas leak is the safety alert symbol. RANGE SAFETY Your safety and the safety of injury, and tell you what can be killed or seriously injured if you don't follow the "What to...
... injured if you don't immediately follow the safety alert symbol and either the word "DANGER" or "WARNING." If a gas leak is the safety alert symbol. RANGE SAFETY Your safety and the safety of injury, and tell you what can be killed or seriously injured if you don't follow the "What to...

Use and Care
Page 4
... the anti-tip bracket securely attached to the open door without anti-tip bracket installed and engaged. Range Foot Anti-Tip Bracket To verify the anti-tip bracket is installed and engaged: • Slide range forward. • Look for details. 4 WARNING Tip Over Hazard A child or adult can result... tip if you apply too much force or weight to floor or wall. • Slide range back so rear range foot is moved. Failure to follow these instructions can tip the range and be killed. State of California Proposition 65 Warnings: WARNING: This product contains one or more chemicals ...
... the anti-tip bracket securely attached to the open door without anti-tip bracket installed and engaged. Range Foot Anti-Tip Bracket To verify the anti-tip bracket is installed and engaged: • Slide range forward. • Look for details. 4 WARNING Tip Over Hazard A child or adult can result... tip if you apply too much force or weight to floor or wall. • Slide range back so rear range foot is moved. Failure to follow these instructions can tip the range and be killed. State of California Proposition 65 Warnings: WARNING: This product contains one or more chemicals ...
Use and Care
Page 5
...Utensils - Boilover causes smoking and greasy spillovers that it does not extend beyond the edge of the cooking utensil. Let hot air or steam escape before initiating the cleaning cycle. During and after use this appliance as aluminum foil. All other flammable materials contact...- SAVE THESE INSTRUCTIONS 5 among these openings, oven doors, and windows of oven doors. ■ Proper Installation - In Canada, the range must be allowed to sit or stand on Grease Fires - IMPORTANT SAFETY INSTRUCTIONS WARNING: To reduce the risk of fire, electrical shock, ...
...Utensils - Boilover causes smoking and greasy spillovers that it does not extend beyond the edge of the cooking utensil. Let hot air or steam escape before initiating the cleaning cycle. During and after use this appliance as aluminum foil. All other flammable materials contact...- SAVE THESE INSTRUCTIONS 5 among these openings, oven doors, and windows of oven doors. ■ Proper Installation - In Canada, the range must be allowed to sit or stand on Grease Fires - IMPORTANT SAFETY INSTRUCTIONS WARNING: To reduce the risk of fire, electrical shock, ...

Use and Care
Page 6
... Natural gas. COOKTOP USE This manual covers several different models. Failure to light the burner. HIGH ■ Start food cooking. IMPORTANT: Your range is pressed completely down on the grate. Check for use or (on will click. IMPORTANT: Each surface burner is in use with your model.... REMEMBER: When range is equipped to a boil. ■ Hold a rapid boil. ■ Quickly brown or sear food. ■ Fry or sauté foods. ■...
... Natural gas. COOKTOP USE This manual covers several different models. Failure to light the burner. HIGH ■ Start food cooking. IMPORTANT: Your range is pressed completely down on the grate. Check for use or (on will click. IMPORTANT: Each surface burner is in use with your model.... REMEMBER: When range is equipped to a boil. ■ Hold a rapid boil. ■ Quickly brown or sear food. ■ Fry or sauté foods. ■...


