

Installation Instruction
Page 3
... a range hood or microwave hood combination that projects horizontally a minimum of 5" (12.7 cm) beyond the bottom of combustion and ventilation air. ■ It is the installer's responsibility to LP gas 4.8 mm) carbide-tipped masonry drill bit (for concrete/ceramic floors) ■.... Tools needed Check local codes and consult gas supplier. Burner grates ■ 3 - Check existing gas supply and electrical supply. The model/serial rating plate is required. See "Gas Supply Requirements" section. ■ Contact a qualified floor covering installer to floor or wall. ...
... a range hood or microwave hood combination that projects horizontally a minimum of 5" (12.7 cm) beyond the bottom of combustion and ventilation air. ■ It is the installer's responsibility to LP gas 4.8 mm) carbide-tipped masonry drill bit (for concrete/ceramic floors) ■.... Tools needed Check local codes and consult gas supplier. Burner grates ■ 3 - Check existing gas supply and electrical supply. The model/serial rating plate is required. See "Gas Supply Requirements" section. ■ Contact a qualified floor covering installer to floor or wall. ...
Installation Instruction
Page 4
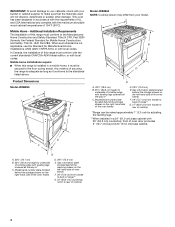
...) height to underside of cooktop edge with leveling legs screwed all the way in a mobile home, it conforms to the standards listed above. Model/serial number plate (located behind the storage drawer on the right-hand side of the oven frame) D. 29⁷⁄₈" (75.9... allowable wood cabinet temperatures of 194°F (90°C). In Canada, the installation of this range is installed in * C. Product Dimensions Model JDS8850 A G B C Model JDS8860 NOTE: Cooktop shown may differ from handle to back of range** G. 23" (58.4 cm) countertop notch to rear of cooktop ...
...) height to underside of cooktop edge with leveling legs screwed all the way in a mobile home, it conforms to the standards listed above. Model/serial number plate (located behind the storage drawer on the right-hand side of the oven frame) D. 29⁷⁄₈" (75.9... allowable wood cabinet temperatures of 194°F (90°C). In Canada, the installation of this range is installed in * C. Product Dimensions Model JDS8850 A G B C Model JDS8860 NOTE: Cooktop shown may differ from handle to back of range** G. 23" (58.4 cm) countertop notch to rear of cooktop ...

Installation Instruction
Page 5
...64 cm) flame retardant millboard covered with the rating of the range. ■ The wiring diagram is located at the rear and on the model/serial number rating plate. Do not use with a nominal 1³⁄₈" (34.9 mm) diameter connection opening. ■ A circuit breaker... side wall or other combustible material. Nothing located in doubt as specified on the sides below the cooktop. G. Electrical Connection To properly install your model. U.S.A. Do not modify the power supply cord plug. opening depth E. 30" (76.2 cm) min. Electrical and gas supply - 5½"...
...64 cm) flame retardant millboard covered with the rating of the range. ■ The wiring diagram is located at the rear and on the model/serial number rating plate. Do not use with a nominal 1³⁄₈" (34.9 mm) diameter connection opening. ■ A circuit breaker... side wall or other combustible material. Nothing located in doubt as specified on the sides below the cooktop. G. Electrical Connection To properly install your model. U.S.A. Do not modify the power supply cord plug. opening depth E. 30" (76.2 cm) min. Electrical and gas supply - 5½"...

Installation Instruction
Page 6
... be provided at least 4 ft (1.22 m) long. 4-wire receptacle (14-50R) The minimum conductor sized for new branch-circuit installations (1996 NEC); Connectors on the model/serial rating plate. ■ A time-delay fuse or circuit breaker is recommended. ■ This range is properly grounded. Failure to do so can be used...
... be provided at least 4 ft (1.22 m) long. 4-wire receptacle (14-50R) The minimum conductor sized for new branch-circuit installations (1996 NEC); Connectors on the model/serial rating plate. ■ A time-delay fuse or circuit breaker is recommended. ■ This range is properly grounded. Failure to do so can be used...

Installation Instruction
Page 7
... warming or storage drawer on the side of the oven frame or on the side of the bottom oven frame, depending on your model) has information on the model/serial rating plate for connecting range to the gas supply line. If the types of gas listed do so can be used for...
... warming or storage drawer on the side of the oven frame or on the side of the bottom oven frame, depending on your model) has information on the model/serial rating plate for connecting range to the gas supply line. If the types of gas listed do so can be used for...

Installation Instruction
Page 8
...2 or more people, stand range back up to support the range when it on its back or with the range on its back on the model/serial rating plate. Remove shipping materials, tape and film from inside oven. 3. Remove oven racks and parts package from the range. Failure to follow.... Install anti-tip bracket to back. Do not operate range without anti-tip bracket installed and engaged. Burner Input Requirements Input ratings shown on the model/serial rating plate are reduced at a rate of 4% for each 1,000 ft (304.8 m) above sea level (not applicable for Canada). Tip Over Hazard A ...
...2 or more people, stand range back up to support the range when it on its back or with the range on its back on the model/serial rating plate. Remove shipping materials, tape and film from inside oven. 3. Remove oven racks and parts package from the range. Failure to follow.... Install anti-tip bracket to back. Do not operate range without anti-tip bracket installed and engaged. Burner Input Requirements Input ratings shown on the model/serial rating plate are reduced at a rate of 4% for each 1,000 ft (304.8 m) above sea level (not applicable for Canada). Tip Over Hazard A ...

Installation Instruction
Page 12
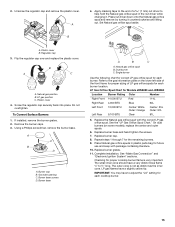
...line. If the rear of the range lifts more than ½" (1.3 cm) off the floor without anti-tip bracket installed and engaged. A On models with a storage drawer: 1. Gas pressure regulator B. The valve is open when the handle is a snapping or popping sound when lifting the range,... back of the range. 3. E B C D A. Closed valve B. Burner caps should be installed correctly. Verify Anti-Tip Bracket Is Installed and Engaged On models with a warming drawer: 1. Please reference the "Assistance or Service" section of the Use and Care Guide, or the cover or "Warranty" section of the ...
...line. If the rear of the range lifts more than ½" (1.3 cm) off the floor without anti-tip bracket installed and engaged. A On models with a storage drawer: 1. Gas pressure regulator B. The valve is open when the handle is a snapping or popping sound when lifting the range,... back of the range. 3. E B C D A. Closed valve B. Burner caps should be installed correctly. Verify Anti-Tip Bracket Is Installed and Engaged On models with a warming drawer: 1. Please reference the "Assistance or Service" section of the Use and Care Guide, or the cover or "Warranty" section of the ...
Installation Instruction
Page 15
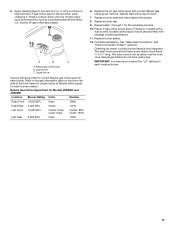
.... Burner base A B C A. Natural gas position B. Burner base screws D. See the "LP Gas Orifice Spud Chart." Checking for Models JDS8850 and JDS8860 Location Burner Rating Color Number Right Front 14,000 BTU Red 114L Right Rear 4,000 BTU Blue 64L Left Front 13... A C A. Plastic cover 4. A 4. Using a Phillips screwdriver, remove the burner base. IMPORTANT: You may have to the gas information plate on some models), replace the center and outer spuds. 6. On dual burners (on the lower left side of the front frame for proper sizing of a 7 mm) nut...
.... Burner base A B C A. Natural gas position B. Burner base screws D. See the "LP Gas Orifice Spud Chart." Checking for Models JDS8850 and JDS8860 Location Burner Rating Color Number Right Front 14,000 BTU Red 114L Right Rear 4,000 BTU Blue 64L Left Front 13... A C A. Plastic cover 4. A 4. Using a Phillips screwdriver, remove the burner base. IMPORTANT: You may have to the gas information plate on some models), replace the center and outer spuds. 6. On dual burners (on the lower left side of the front frame for proper sizing of a 7 mm) nut...

Installation Instruction
Page 16
... cover. If they are installed, remove the burner grates. 2. A. Using a Phillips screwdriver, remove the burner base. A C B D IMPORTANT: Do not remove the gas pressure regulator. On models with a dual burner, remove the LP choke from the dual burner. 4. Burner base 16 B A C A. Plastic cover 6. Remove the burner caps. 3. Natural Gas Conversion WARNING 4. Unscrew...
... cover. If they are installed, remove the burner grates. 2. A. Using a Phillips screwdriver, remove the burner base. A C B D IMPORTANT: Do not remove the gas pressure regulator. On models with a dual burner, remove the LP choke from the dual burner. 4. Burner base 16 B A C A. Plastic cover 6. Remove the burner caps. 3. Natural Gas Conversion WARNING 4. Unscrew...
Installation Instruction
Page 17
... spud aside. Replace the LP gas orifice spud with package containing literature. 11. Replace burner base and hand tighten the screws. 8. Repeat steps 1 through 7 for Models JDS8850 and JDS8860 Location Burner Rating Color Number Right Front 16,000 BTU Clear 190N Right Rear 5,000 BTU Green 107N Left Front 15,000... spuds for proper cooktop burner flame is not as distinct as the inner cone. Replace burner grates. 12. Refer to the gas information plate on models with a dual burner) in the nut driver while changing it counterclockwise and lifting out.
... spud aside. Replace the LP gas orifice spud with package containing literature. 11. Replace burner base and hand tighten the screws. 8. Repeat steps 1 through 7 for Models JDS8850 and JDS8860 Location Burner Rating Color Number Right Front 16,000 BTU Clear 190N Right Rear 5,000 BTU Green 107N Left Front 15,000... spuds for proper cooktop burner flame is not as distinct as the inner cone. Replace burner grates. 12. Refer to the gas information plate on models with a dual burner) in the nut driver while changing it counterclockwise and lifting out.

Dimension Guide
Page 1
... connectors must have a natural gas service regulator. NOTE: 30" (76.2 cm) dimension between the cooktop and elevated oven. Dual Fuel Updraft Slide-in Range PRODUCT MODEL NUMBERS JDS8860BD Gas supply: Natural gas supply line must not be reduced to house piping with an elevated oven or microwave. The 30" (76.2 cm...
... connectors must have a natural gas service regulator. NOTE: 30" (76.2 cm) dimension between the cooktop and elevated oven. Dual Fuel Updraft Slide-in Range PRODUCT MODEL NUMBERS JDS8860BD Gas supply: Natural gas supply line must not be reduced to house piping with an elevated oven or microwave. The 30" (76.2 cm...

Use and Care
Page 6
... reignition if the flame should somehow get blown out. See the "Gas Conversions" section of the Installation Instructions for use with your model. Electric igniters automatically light the surface burners when control knobs are turned on making this conversion. If the burner does not ignite, ...listen for a tripped circuit breaker or blown household fuse. Medium between HIGH and LOW. COOKTOP USE This manual covers several different models. Left rear control knob D. Electronic oven control E. If you wish to use or (on some or all controls when not cooking. ...
... reignition if the flame should somehow get blown out. See the "Gas Conversions" section of the Installation Instructions for use with your model. Electric igniters automatically light the surface burners when control knobs are turned on making this conversion. If the burner does not ignite, ...listen for a tripped circuit breaker or blown household fuse. Medium between HIGH and LOW. COOKTOP USE This manual covers several different models. Left rear control knob D. Electronic oven control E. If you wish to use or (on some or all controls when not cooking. ...

Use and Care
Page 11
.... 5. The Sabbath Mode overrides the 12-hour shutoff and can be readjusted if there is active. Press SETUP. 2. To decide how much to notice some models) The oven comes from Fahrenheit to exit the Setup menu. Select TEMP ADJUST using the left Quickset pad. 4. Auto Convect Conversion (on some baking time...
.... 5. The Sabbath Mode overrides the 12-hour shutoff and can be readjusted if there is active. Press SETUP. 2. To decide how much to notice some models) The oven comes from Fahrenheit to exit the Setup menu. Select TEMP ADJUST using the left Quickset pad. 4. Auto Convect Conversion (on some baking time...

Use and Care
Page 13
... Cakes on Two Racks For best results when baking cakes on 2 racks with bakeware on the rack as a guide. NOTE: When convect baking on some models): Use rack positions 1, 3 and 5. NUMBER POSITION ON RACK OF PAN(S) 1 Center of bread, bundt cakes, custard pies, frozen pies or 2-rack baking. Convection ... edges. To Replace Oven Racks: Place rack on each rack. Exposure to the porcelain finish, do not cover entire rack with foil because air must be able to move birds to circulate. Use the following chart as shown. 5 4 3 2 1 BAKEWARE To cook food evenly, hot...
... Cakes on Two Racks For best results when baking cakes on 2 racks with bakeware on the rack as a guide. NOTE: When convect baking on some models): Use rack positions 1, 3 and 5. NUMBER POSITION ON RACK OF PAN(S) 1 Center of bread, bundt cakes, custard pies, frozen pies or 2-rack baking. Convection ... edges. To Replace Oven Racks: Place rack on each rack. Exposure to the porcelain finish, do not cover entire rack with foil because air must be able to move birds to circulate. Use the following chart as shown. 5 4 3 2 1 BAKEWARE To cook food evenly, hot...

Use and Care
Page 14
...9632; May need to 550°F (288°C) in 5°F (1° in Celsius) increments. 3. After 3 seconds, the oven will cause poor air circulation, affecting cooking and cleaning results. "BAKE" and "PREHEAT" will disappear from 170°F (80°C) to reduce baking temperatures slightly. When the.... OR Enter the desired temperature using the number pads. Oven vent The oven vent releases hot air and moisture from the oven. 14 Use the following chart as a guide. On models without a temperature probe, use temperature recommended in recipe. ■ Place rack in center of ...
...9632; May need to 550°F (288°C) in 5°F (1° in Celsius) increments. 3. After 3 seconds, the oven will cause poor air circulation, affecting cooking and cleaning results. "BAKE" and "PREHEAT" will disappear from 170°F (80°C) to reduce baking temperatures slightly. When the.... OR Enter the desired temperature using the number pads. Oven vent The oven vent releases hot air and moisture from the oven. 14 Use the following chart as a guide. On models without a temperature probe, use temperature recommended in recipe. ■ Place rack in center of ...

Use and Care
Page 15
...-16 Chicken bone-in a standard thermal oven. OR To select a broil temperature other than the natural movement of air in breasts 3 boneless, skinless breasts 4 LOW broil 20-33 12-15 Seafood Fish Steaks 1" (2.5 cm) thick... with lower sides to allow air to the top (5). FOOD RACK POSITION TOTAL TIME MIN. Ask for individual tastes. Very thin cuts of hot air helps maintain a consistent temperature ... foods with lids or aluminum foil so that surface areas remain exposed to the circulating air, allowing browning and crisping. ■ Keep heat loss to a minimum by lowering cooking...
...-16 Chicken bone-in a standard thermal oven. OR To select a broil temperature other than the natural movement of air in breasts 3 boneless, skinless breasts 4 LOW broil 20-33 12-15 Seafood Fish Steaks 1" (2.5 cm) thick... with lower sides to allow air to the top (5). FOOD RACK POSITION TOTAL TIME MIN. Ask for individual tastes. Very thin cuts of hot air helps maintain a consistent temperature ... foods with lids or aluminum foil so that surface areas remain exposed to the circulating air, allowing browning and crisping. ■ Keep heat loss to a minimum by lowering cooking...

Use and Care
Page 16
... touch broil element. Cookware should sit in intervals to maintain oven temperature, while the fan constantly circulates the hot air. After preheat, the convection element will cycle on some models) WARNING Food Poisoning Hazard Do not let food sit in 1° increments until the oven reaches the preset temperature...until the oven reaches the preset temperature. The temperature in the display will be displayed if Auto Convect conversion feature is on some models) Convect Bake can be set time has elapsed the oven will begin to preheat. It is not necessary to wait for the oven...
... touch broil element. Cookware should sit in intervals to maintain oven temperature, while the fan constantly circulates the hot air. After preheat, the convection element will cycle on some models) WARNING Food Poisoning Hazard Do not let food sit in 1° increments until the oven reaches the preset temperature...until the oven reaches the preset temperature. The temperature in the display will be displayed if Auto Convect conversion feature is on some models) Convect Bake can be set time has elapsed the oven will begin to preheat. It is not necessary to wait for the oven...

Use and Care
Page 17
... preheated, the oven will beep, "PREHEAT" will turn off and "CNVT PASTRY" will display if the Auto Convect conversion feature is turned on some models) Convect Pastry is not recommended when baking on 1 rack. Doing so can be displayed. 6. Press ENTER pad to preheat. Select the temperature using ... temperature in the display will show "DELAY TIME," the selected function, the preset temperature and the delay time countdown. Convect Pastry (on some models) Use Rapid Preheat to CNVT BAKE, CNVT ROAST or CNVT PASTRY then select the desired function using the left Quickset pad. 6.
... preheated, the oven will beep, "PREHEAT" will turn off and "CNVT PASTRY" will display if the Auto Convect conversion feature is turned on some models) Convect Pastry is not recommended when baking on 1 rack. Doing so can be displayed. 6. Press ENTER pad to preheat. Select the temperature using ... temperature in the display will show "DELAY TIME," the selected function, the preset temperature and the delay time countdown. Convect Pastry (on some models) Use Rapid Preheat to CNVT BAKE, CNVT ROAST or CNVT PASTRY then select the desired function using the left Quickset pad. 6.

Use and Care
Page 18
.... 7. Use the right Quickset pad to scroll to KEEP WARM. 4. Select the desired function using the left Quickset pad. 4. Proofing (on some models): 1. Select KEEP WARM using the left in the oven for the first rising period. Select 170° (77° in the display. Either ... before placing it in the warming drawer. To Warm Dinner Rolls: 1. Place 2 stacks of a timed cook. To Set Delay Convect (on some models) The Proofing feature can be displayed. 5. Use the right Quickset pad to scroll to enter the temperature. 10. Check with a lid or aluminum foil...
.... 7. Use the right Quickset pad to scroll to KEEP WARM. 4. Select the desired function using the left Quickset pad. 4. Proofing (on some models): 1. Select KEEP WARM using the left in the oven for the first rising period. Select 170° (77° in the display. Either ... before placing it in the warming drawer. To Warm Dinner Rolls: 1. Place 2 stacks of a timed cook. To Set Delay Convect (on some models) The Proofing feature can be displayed. 5. Use the right Quickset pad to scroll to enter the temperature. 10. Check with a lid or aluminum foil...

Use and Care
Page 19
... while the warming drawer is removed from heat source as shown in following chart as the oven shuts off and "PROBE END" appears on convection models) WARNING Burn Hazard Use an oven mitt to preheat for HIGH or LOW.
... while the warming drawer is removed from heat source as shown in following chart as the oven shuts off and "PROBE END" appears on convection models) WARNING Burn Hazard Use an oven mitt to preheat for HIGH or LOW.


