Dimension Guide
Page 1
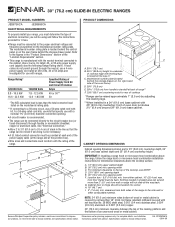
...) flame retardant millboard covered with product. q The range can be connected directly to the circuit breaker box (or fused disconnect) through the neutral, use a 4-wire power supply cord rated at back of range** countertop notch to change without notice. Model/serial number plate (located behind the storage drawer panel. D. 23¹⁄₄" (59.1 cm) opening width I F. H. 18" (45.7 cm) F I G. For complete details, see Installation our products, we reserve the right to rear of cooktop *Range...
...) flame retardant millboard covered with product. q The range can be connected directly to the circuit breaker box (or fused disconnect) through the neutral, use a 4-wire power supply cord rated at back of range** countertop notch to change without notice. Model/serial number plate (located behind the storage drawer panel. D. 23¹⁄₄" (59.1 cm) opening width I F. H. 18" (45.7 cm) F I G. For complete details, see Installation our products, we reserve the right to rear of cooktop *Range...
Installation Instruction
Page 3
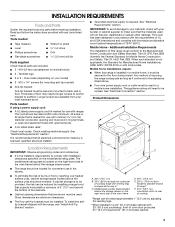
... local hardware store. To install the antitip bracket shipped with leveling legs screwed all electrical connections be used . Thickness of cooktop edge with the range, see "Install Anti-Tip Bracket" section. ■ Grounded electrical supply is installed in a mobile home, it conforms to the standards listed above the surface units should be securely mounted to rear of this range is required. Oven racks (depending on the model/serial rating plate. Check existing electrical supply. IMPORTANT: To avoid...
... local hardware store. To install the antitip bracket shipped with leveling legs screwed all electrical connections be used . Thickness of cooktop edge with the range, see "Install Anti-Tip Bracket" section. ■ Grounded electrical supply is installed in a mobile home, it conforms to the standards listed above the surface units should be securely mounted to rear of this range is required. Oven racks (depending on the model/serial rating plate. Check existing electrical supply. IMPORTANT: To avoid...

Installation Instruction
Page 4
... above the cooktop surface. The model/serial number rating plate is covered by a qualified electrician. Use a 3-wire, UL listed, 40- For minimum clearance to the proper electrical voltage and frequency as to whether the appliance is recommended. ■ The range can be connected directly to the side wall or other combustible material. D. 23¹⁄₄" (59.1 cm) opening dimensions shown are in the line so that...
... above the cooktop surface. The model/serial number rating plate is covered by a qualified electrician. Use a 3-wire, UL listed, 40- For minimum clearance to the proper electrical voltage and frequency as to whether the appliance is recommended. ■ The range can be connected directly to the side wall or other combustible material. D. 23¹⁄₄" (59.1 cm) opening dimensions shown are in the line so that...
Installation Instruction
Page 6
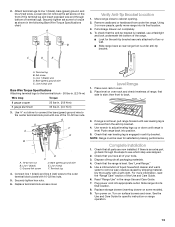
... front of another. When the range is greater than 30" (76.2 cm), adjust the ³⁄₈" (1.0 cm) dimension. Place cardboard or hardboard in death or serious burns to a standing position. Using 2 or more people, stand range back up into its back. 5. Remove oven racks and parts package from the range. Connect anti-tip bracket to move and install range. Cardboard cross support 4. Place them lengthwise on...
... front of another. When the range is greater than 30" (76.2 cm), adjust the ³⁄₈" (1.0 cm) dimension. Place cardboard or hardboard in death or serious burns to a standing position. Using 2 or more people, stand range back up into its back. 5. Remove oven racks and parts package from the range. Connect anti-tip bracket to move and install range. Cardboard cross support 4. Place them lengthwise on...
Installation Instruction
Page 13
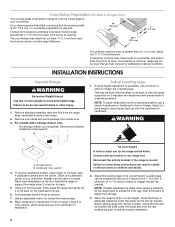
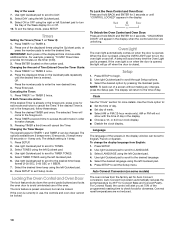
... anti-tip bracket. Slide range into its final location. 8. Loosen (do not remove) the set screw to cabinet opening. 2. Remove cardboard or hardboard from the anti-tip bracket. 4. To check that the range is level. Line 1 (black) C. Check that you have all parts are now installed. Plug power cord into position. 5. Turn power on some models). 9. Attach terminal lugs to back. 3. Terminal lug B. Push range back into appropriate outlet. NOTE: Range must be level for specific instruction on surface burners and oven. Use...
... anti-tip bracket. Slide range into its final location. 8. Loosen (do not remove) the set screw to cabinet opening. 2. Remove cardboard or hardboard from the anti-tip bracket. 4. To check that the range is level. Line 1 (black) C. Check that you have all parts are now installed. Plug power cord into position. 5. Turn power on some models). 9. Attach terminal lugs to back. 3. Terminal lug B. Push range back into appropriate outlet. NOTE: Range must be level for specific instruction on surface burners and oven. Use...

Installation Instruction
Page 14
...power before operating. Slide range forward. 2. Plug in the Use and Care Guide. Check that range is under anti-tip bracket. 5. Complete cleaning or maintenance. 4. Failure to children and adults. or circuit breaker has not tripped. ■ Range is plugged into an outlet. ■ Electrical supply is necessary for heat. If removing the range is connected. ■ See "Troubleshooting" in power supply cord. 5. Moving the Range WARNING For power supply cord-connected ranges: 1. If range does not operate, check the following: ■ Household fuse is installed, use...
...power before operating. Slide range forward. 2. Plug in the Use and Care Guide. Check that range is under anti-tip bracket. 5. Complete cleaning or maintenance. 4. Failure to children and adults. or circuit breaker has not tripped. ■ Range is plugged into an outlet. ■ Electrical supply is necessary for heat. If removing the range is connected. ■ See "Troubleshooting" in power supply cord. 5. Moving the Range WARNING For power supply cord-connected ranges: 1. If range does not operate, check the following: ■ Household fuse is installed, use...

Use and Care
Page 4
... OF TIPPING OF THE RANGE, THE RANGE MUST BE SECURED BY PROPERLY INSTALLED ANTI-TIP DEVICES. Do not repair or replace any part of the range unless specifically recommended in oven. ■ DO NOT TOUCH HEATING ELEMENTS OR INTERIOR SURFACES OF OVEN - Flammable materials should be hot even though they have had sufficient time to cool. Smother fire or flame or use , do not let potholder contact hot heating element in the manual. During...
... OF TIPPING OF THE RANGE, THE RANGE MUST BE SECURED BY PROPERLY INSTALLED ANTI-TIP DEVICES. Do not repair or replace any part of the range unless specifically recommended in oven. ■ DO NOT TOUCH HEATING ELEMENTS OR INTERIOR SURFACES OF OVEN - Flammable materials should be hot even though they have had sufficient time to cool. Smother fire or flame or use , do not let potholder contact hot heating element in the manual. During...

Use and Care
Page 5
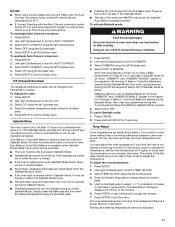
... a Cooktop On indicator light. The Hot Surface indicator lights will glow. Dual/triple element rocker switch E. Right front control knob F. Push in use or (on some or all controls when done cooking. SETTING RECOMMENDED USE Double and Triple Elements ■ Large diameter cookware. ■ Large quantities of the items listed. Surface cooking area locator B. The range you have purchased may have some models) during the Self-Cleaning cycle, the entire cooktop area may not match those of the features...
... a Cooktop On indicator light. The Hot Surface indicator lights will glow. Dual/triple element rocker switch E. Right front control knob F. Push in use or (on some or all controls when done cooking. SETTING RECOMMENDED USE Double and Triple Elements ■ Large diameter cookware. ■ Large quantities of the items listed. Surface cooking area locator B. The range you have purchased may have some models) during the Self-Cleaning cycle, the entire cooktop area may not match those of the features...

Use and Care
Page 7
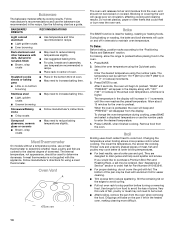
... 2 surface cooking areas, elements or surface burners at the same time. ■ On ceramic glass models, use of surface cooking areas, elements or surface burners between it free from extreme temperatures. Cooktop cleaner and a cooktop scraper are hot. Dropping a heavy or hard object onto the cooktop could leave aluminum marks that cannot be removed completely. ■ To avoid damage to the cooktop, do not cook foods directly on the cooktop. Then, while wearing oven mitts, remove the spills using...
... 2 surface cooking areas, elements or surface burners at the same time. ■ On ceramic glass models, use of surface cooking areas, elements or surface burners between it free from extreme temperatures. Cooktop cleaner and a cooktop scraper are hot. Dropping a heavy or hard object onto the cooktop could leave aluminum marks that cannot be removed completely. ■ To avoid damage to the cooktop, do not cook foods directly on the cooktop. Then, while wearing oven mitts, remove the spills using...
Use and Care
Page 10
... Timer is closed . If the desired Timer is 1 beep. 1. Press TIMER a second time to access the edit mode in the display when the control and door are unlocking. Use right Quickset pad to scroll to make changes. 3. Locking the Oven Control and Oven Door The lock feature shuts down the control pads (buttons) and locks the oven door to avoid unintended use , the controls and oven door cannot be set temperature by pressing the Quickset pads. To Lock the Oven Control and Oven Door...
... Timer is closed . If the desired Timer is 1 beep. 1. Press TIMER a second time to access the edit mode in the display when the control and door are unlocking. Use right Quickset pad to scroll to make changes. 3. Locking the Oven Control and Oven Door The lock feature shuts down the control pads (buttons) and locks the oven door to avoid unintended use , the controls and oven door cannot be set temperature by pressing the Quickset pads. To Lock the Oven Control and Oven Door...
Use and Care
Page 11
... set. ■ The self-clean cycle and automatic door lock do not operate during an Active Sabbath Mode. Press CANCEL. 2. To adjust the oven temperature: 1. Enter the desired temperature change the temperature, set the oven temperature 25°F higher or lower than one . NOTES: ■ When using Convect Bake and Convect Pastry with the Auto Convect Conversion option turned off, reduce the set temperature by 25°F. ■ If Convect Roasting with the Auto Convect conversion option turned off after cooking. Use...
... set. ■ The self-clean cycle and automatic door lock do not operate during an Active Sabbath Mode. Press CANCEL. 2. To adjust the oven temperature: 1. Enter the desired temperature change the temperature, set the oven temperature 25°F higher or lower than one . NOTES: ■ When using Convect Bake and Convect Pastry with the Auto Convect Conversion option turned off, reduce the set temperature by 25°F. ■ If Convect Roasting with the Auto Convect conversion option turned off after cooking. Use...
Use and Care
Page 14
...'s instructions. Meat Thermometer On models without a temperature probe, use a broiler pan and grid. Blocking or covering the vent will disappear from the oven, and should be set may not need to reduce baking temperatures slightly. ■ Use suggested baking time. ■ For pies, breads and casseroles, use the number pads to maintain oven temperature. Do not set . Bake The BAKE function is preheated, the oven will beep and "PREHEAT" will cause poor air circulation, affecting cooking and cleaning results. Press BAKE...
...'s instructions. Meat Thermometer On models without a temperature probe, use a broiler pan and grid. Blocking or covering the vent will disappear from the oven, and should be set may not need to reduce baking temperatures slightly. ■ Use suggested baking time. ■ For pies, breads and casseroles, use the number pads to maintain oven temperature. Do not set . Bake The BAKE function is preheated, the oven will beep and "PREHEAT" will cause poor air circulation, affecting cooking and cleaning results. Press BAKE...

Use and Care
Page 15
... single or multiple racks. To Broil: Before broiling, position rack according to remove temperature probe. Use the Quickset pads to maintain oven temperature, while the fan constantly circulates the hot air. For diagram, see the "Positioning Racks and Bakeware" section. If the oven door is opened during convection baking or preheating, the convection element and fan will come back on and off immediately. The cook time may need to 28°C), and cooking time can be adjusted for large turkeys...
... single or multiple racks. To Broil: Before broiling, position rack according to remove temperature probe. Use the Quickset pads to maintain oven temperature, while the fan constantly circulates the hot air. For diagram, see the "Positioning Racks and Bakeware" section. If the oven door is opened during convection baking or preheating, the convection element and fan will come back on and off immediately. The cook time may need to 28°C), and cooking time can be adjusted for large turkeys...
Use and Care
Page 19
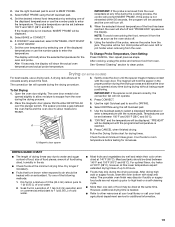
... same time. The probe will briefly show the actual oven temperature and actual probe temperature. See "General Cleaning" section to MEAT PROBE. 3. Drying (on the display. Open the oven door slightly. Gently close the door until the programmed temperature is not inserted, INSERT PROBE will be set between the oven frame and the oven door to allow moisture to enter the temperature. Place the magnetic door spacer Part Number 8010P146-60 over the plunger switch. Use...
... same time. The probe will briefly show the actual oven temperature and actual probe temperature. See "General Cleaning" section to MEAT PROBE. 3. Drying (on the display. Open the oven door slightly. Gently close the door until the programmed temperature is not inserted, INSERT PROBE will be set between the oven frame and the oven door to allow moisture to enter the temperature. Place the magnetic door spacer Part Number 8010P146-60 over the plunger switch. Use...
Use and Care
Page 23
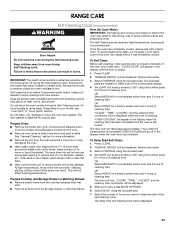
... the door is closed . 1. "REMOVE RACKS" will be able to follow these instructions can result. Set LIGHT soil level by entering "200" using the number pads for a good seal. "CLEAN," "TIME," "LOCKED" and the cleaning time countdown will be displayed. 23 Failure to move or bend the gasket. IMPORTANT: The health of some models, the temperature probe from the oven because it has completely cooled. Do not block the oven vent...
... the door is closed . 1. "REMOVE RACKS" will be able to follow these instructions can result. Set LIGHT soil level by entering "200" using the number pads for a good seal. "CLEAN," "TIME," "LOCKED" and the cleaning time countdown will be displayed. 23 Failure to move or bend the gasket. IMPORTANT: The health of some models, the temperature probe from the oven because it has completely cooled. Do not block the oven vent...

Use and Care
Page 24
... follow label instructions on surface and scrape. OVEN DOOR EXTERIOR Cleaning Method: ■ Glass cleaner and a soft cloth or sponge: Apply glass cleaner to soft cloth or sponge, not directly on panel. ■ affresh™ Kitchen Appliance Cleaner Part Number W10355010 (not included): See "Assistance or Service" section to stainless steel, do not soak knobs. General Cleaning IMPORTANT: Before cleaning, make sure knobs are in direction of grain to...
... follow label instructions on surface and scrape. OVEN DOOR EXTERIOR Cleaning Method: ■ Glass cleaner and a soft cloth or sponge: Apply glass cleaner to soft cloth or sponge, not directly on panel. ■ affresh™ Kitchen Appliance Cleaner Part Number W10355010 (not included): See "Assistance or Service" section to stainless steel, do not soak knobs. General Cleaning IMPORTANT: Before cleaning, make sure knobs are in direction of grain to...
Use and Care
Page 26
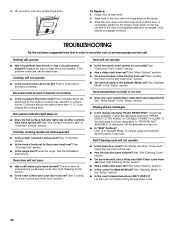
... same size as the surface cooking area, element or surface burner. See "Cooktop Use" section. ■ Is the range level? See "More Options" section. ■ On some models, has a delay start Self-Clean cycle been set ? If the fault does not clear, reappears, or "FEATURE NOT AVAILABLE" is the Control Lock set correctly? See "Electronic Oven Control" section. ■ Has a delay start been set ? See "Temp Adjust" in the "Setup" section. A fault has been detected. The display will not open ? Oven door will...
... same size as the surface cooking area, element or surface burner. See "Cooktop Use" section. ■ Is the range level? See "More Options" section. ■ On some models, has a delay start Self-Clean cycle been set ? If the fault does not clear, reappears, or "FEATURE NOT AVAILABLE" is the Control Lock set correctly? See "Electronic Oven Control" section. ■ Has a delay start been set ? See "Temp Adjust" in the "Setup" section. A fault has been detected. The display will not open ? Oven door will...
Use and Care
Page 27
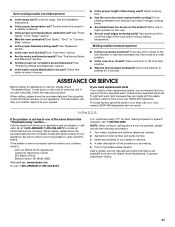
... listed in a reliable cookbook. ■ Is the proper oven temperature calibration set ? Level the range. Check that you are having. 5. Call the dealer from Jenn-Air Brand Home Appliances, Customer eXperience Center. 27 Oven peeking releases oven heat and can result in the pan. ■ Is the proper length of the crust and/or reduce baking temperature. Use aluminum foil to locate an authorized service company. See the Installation Instructions...
... listed in a reliable cookbook. ■ Is the proper oven temperature calibration set ? Level the range. Check that you are having. 5. Call the dealer from Jenn-Air Brand Home Appliances, Customer eXperience Center. 27 Oven peeking releases oven heat and can result in the pan. ■ Is the proper length of the crust and/or reduce baking temperature. Use aluminum foil to locate an authorized service company. See the Installation Instructions...

Use and Care
Page 29
... of consumables or cleaning products not approved by this appliance is operated and maintained according to instructions attached to or furnished with the product, Jenn-Air will pay for factory specified parts and repair labor to be repaired in the home and only in materials or workmanship. Costs associated with published installation instructions. 11. Service calls to correct the installation of the Use & Care Guide. The...
... of consumables or cleaning products not approved by this appliance is operated and maintained according to instructions attached to or furnished with the product, Jenn-Air will pay for factory specified parts and repair labor to be repaired in the home and only in materials or workmanship. Costs associated with published installation instructions. 11. Service calls to correct the installation of the Use & Care Guide. The...
Warranty
Page 1
... "Troubleshooting," you on the product. THIS WARRANTY GIVES YOU SPECIFIC LEGAL RIGHTS, AND YOU MAY ALSO HAVE OTHER RIGHTS WHICH VARY FROM STATE TO STATE OR PROVINCE TO PROVINCE. Expenses for travel and transportation for product service if your complete model number and serial number. Service must provide proof of your authorized Jenn-Air dealer to published user or operator instructions and/or installation instructions. 4. Consumable parts are...
... "Troubleshooting," you on the product. THIS WARRANTY GIVES YOU SPECIFIC LEGAL RIGHTS, AND YOU MAY ALSO HAVE OTHER RIGHTS WHICH VARY FROM STATE TO STATE OR PROVINCE TO PROVINCE. Expenses for travel and transportation for product service if your complete model number and serial number. Service must provide proof of your authorized Jenn-Air dealer to published user or operator instructions and/or installation instructions. 4. Consumable parts are...


