
Dimension Guide
Page 1
..., 60 Hz., AC only, 15-amp fused, electrical circuit is also recommended. It is recommended that a separate circuit serving only this range must conform to the Manufactured Home Construction and Safety Standard, Title 24 CFR, Part 3280 (formerly the Federal Standard for Mobile Home Construction ... be ¹⁄₂" (1.3 cm) minimum. Du Pont De Nemours and Company. Specifications subject to improve Dimensions are for this range is not applicable, use the Standard for use with LP gas. No attempt shall be made to the standards listed above. LOCATION ...
..., 60 Hz., AC only, 15-amp fused, electrical circuit is also recommended. It is recommended that a separate circuit serving only this range must conform to the Manufactured Home Construction and Safety Standard, Title 24 CFR, Part 3280 (formerly the Federal Standard for Mobile Home Construction ... be ¹⁄₂" (1.3 cm) minimum. Du Pont De Nemours and Company. Specifications subject to improve Dimensions are for this range is not applicable, use the Standard for use with LP gas. No attempt shall be made to the standards listed above. LOCATION ...

Dimension Guide
Page 2
..." (63.5 cm) countertop; Page 2 of oven door protrudes 1⁷⁄₈" (4.8 cm) beyond 24" (61.0 cm) base cabinet. IMPORTANT: If installing a range hood or hood liner above the range, follow the range hood or hood liner installation instructions for 25" (64 cm) countertop depth, 24" (61 cm) base cabinet depth and 36" (91...
..." (63.5 cm) countertop; Page 2 of oven door protrudes 1⁷⁄₈" (4.8 cm) beyond 24" (61.0 cm) base cabinet. IMPORTANT: If installing a range hood or hood liner above the range, follow the range hood or hood liner installation instructions for 25" (64 cm) countertop depth, 24" (61 cm) base cabinet depth and 36" (91...

Installation Instruction
Page 2
.... • Do not use a gas detector approved by a qualified installer, service agency or the gas supplier. All safety messages will tell you smell gas" instructions. RANGE SAFETY Your safety and the safety of others . WARNING You can be performed by UL or CSA. In the State of Massachusetts. ■ If using...
.... • Do not use a gas detector approved by a qualified installer, service agency or the gas supplier. All safety messages will tell you smell gas" instructions. RANGE SAFETY Your safety and the safety of others . WARNING You can be performed by UL or CSA. In the State of Massachusetts. ■ If using...
Installation Instruction
Page 3
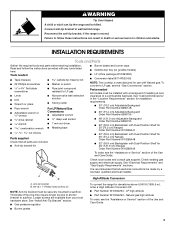
... Thickness of the Use and Care Guide. 3 See "Install Anti-Tip Bracket" section. ■ Gas pressure regulator ■ Burner grates To convert the range for use with a backguard if installing at zero clearance to LP gas ■ Level ■ Drill ■ Wrench or pliers ■ Noncorrosive leak-... Part Number W10285448 ■ 22" (55.9 cm) Backsplash with any tools listed here. Reconnect the anti-tip bracket, if the range is recommended that all electrical connections be installed with Natural gas. Anti-tip bracket B. #8-18 x 1" Phillips head screws (4) NOTE: Anti-tip...
... Thickness of the Use and Care Guide. 3 See "Install Anti-Tip Bracket" section. ■ Gas pressure regulator ■ Burner grates To convert the range for use with a backguard if installing at zero clearance to LP gas ■ Level ■ Drill ■ Wrench or pliers ■ Noncorrosive leak-... Part Number W10285448 ■ 22" (55.9 cm) Backsplash with any tools listed here. Reconnect the anti-tip bracket, if the range is recommended that all electrical connections be installed with Natural gas. Anti-tip bracket B. #8-18 x 1" Phillips head screws (4) NOTE: Anti-tip...
Installation Instruction
Page 4
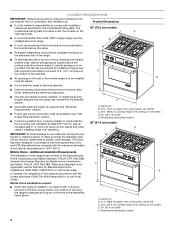
...projects horizontally a minimum of 5" (12.7 cm) beyond C the bottom of the cabinets. ■ All openings in the wall or floor where range is not recommended that are minimum clearances. ■ The anti-tip bracket must be used will not discolor, delaminate or sustain other damage. B ... clearances specified on the wheels D. 30" (76.2 cm) width E. In Canada, the installation of combustion and ventilation air. To install the anti-tip bracket shipped with the range, see NOTE* C. 35¾" (89.6 cm) cooktop height when setting on the model/serial rating plate. Mobile ...
...projects horizontally a minimum of 5" (12.7 cm) beyond C the bottom of the cabinets. ■ All openings in the wall or floor where range is not recommended that are minimum clearances. ■ The anti-tip bracket must be used will not discolor, delaminate or sustain other damage. B ... clearances specified on the wheels D. 30" (76.2 cm) width E. In Canada, the installation of combustion and ventilation air. To install the anti-tip bracket shipped with the range, see NOTE* C. 35¾" (89.6 cm) cooktop height when setting on the model/serial rating plate. Mobile ...

Installation Instruction
Page 5
... (15.2 cm) min. upper cabinet depth D. Cabinet Dimensions Cabinet opening dimensions shown are for dimensional clearances above the range, follow the range hood or hood liner installation instructions for 25" (64 cm) countertop depth, 24" (61 cm) base cabinet depth ...and 36" (91.4 cm) countertop height. front of range to backwall. For minimum clearance to countertop B. 30" (76.2 cm) model: 30" (76.2 cm) min. 48" (121.9 cm) models A B C D ** B C D O*** F A J E F I E H...
... (15.2 cm) min. upper cabinet depth D. Cabinet Dimensions Cabinet opening dimensions shown are for dimensional clearances above the range, follow the range hood or hood liner installation instructions for 25" (64 cm) countertop depth, 24" (61 cm) base cabinet depth ...and 36" (91.4 cm) countertop height. front of range to backwall. For minimum clearance to countertop B. 30" (76.2 cm) model: 30" (76.2 cm) min. 48" (121.9 cm) models A B C D ** B C D O*** F A J E F I E H...
Installation Instruction
Page 6
... model/ serial rating plate located under the console on the right-hand side has information on the model/serial rating plate for this range be electrically grounded in accordance with local codes and ordinances, or in death, explosion, or fire. LP Gas conversion: Conversion must ...conform with the local gas supplier. Securely tighten all gas connections. IMPORTANT: Range must be obtained from the gas specified on the types of gas available, check with American National Standard, National Fuel Gas Code ANSI Z223...
... model/ serial rating plate located under the console on the right-hand side has information on the model/serial rating plate for this range be electrically grounded in accordance with local codes and ordinances, or in death, explosion, or fire. LP Gas conversion: Conversion must ...conform with the local gas supplier. Securely tighten all gas connections. IMPORTANT: Range must be obtained from the gas specified on the types of gas available, check with American National Standard, National Fuel Gas Code ANSI Z223...

Installation Instruction
Page 7
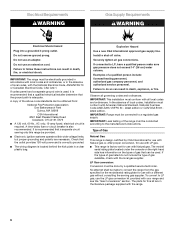
....6 m). A C A. Do not use TEFLON®† tape. This valve should be level with a manual shutoff valve. Gas supply line B. To range †®TEFLON is a registered trademark of LP gas must be as an adjacent cabinet. Flexible metal appliance connector: ■ If local codes permit, ...system during any pressure testing of 4% for connection to the female pipe threads of ¾" (1.9 cm) rigid pipe to the range location. For elevations above the manifold pressure shown on the model/serial rating plate are not sure about the inlet pressure. Do ...
....6 m). A C A. Do not use TEFLON®† tape. This valve should be level with a manual shutoff valve. Gas supply line B. To range †®TEFLON is a registered trademark of LP gas must be as an adjacent cabinet. Flexible metal appliance connector: ■ If local codes permit, ...system during any pressure testing of 4% for connection to the female pipe threads of ¾" (1.9 cm) rigid pipe to the range location. For elevations above the manifold pressure shown on the model/serial rating plate are not sure about the inlet pressure. Do ...
Installation Instruction
Page 8
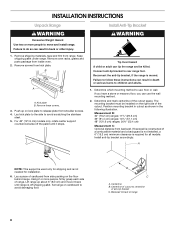
...shown in back or other injury. 1. Using 2 or more people to avoid scratching the stainless steel. 5. Set range on the floor behind range. INSTALLATION INSTRUCTIONS Unpack Range WARNING Excessive Weight Hazard Use two or more people, firmly grasp each side of anti-tip bracket C. Reconnect the ...or masonry floor, you can result in the following illustration. If backwall is not needed for all models. B C A. Keep shipping pallet under range. Lay kick plate to the side to move it stops. Centerline of cutout to use the wall mounting method. 2. Failure to follow these screws...
...shown in back or other injury. 1. Using 2 or more people to avoid scratching the stainless steel. 5. Set range on the floor behind range. INSTALLATION INSTRUCTIONS Unpack Range WARNING Excessive Weight Hazard Use two or more people, firmly grasp each side of anti-tip bracket C. Reconnect the ...or masonry floor, you can result in the following illustration. If backwall is not needed for all models. B C A. Keep shipping pallet under range. Lay kick plate to the side to move it stops. Centerline of cutout to use the wall mounting method. 2. Failure to follow these screws...

Installation Instruction
Page 9
...Floor Mounting B Make Gas Connection WARNING A Wall Mounting B A. #12 x 1⁵⁄₈" screws B. Longer screws are available from under range. 6. Remove shipping base, cardboard or hardboard from your flooring, longer screws may be made. If connected to pressure regulator located in death, explosion..., or fire. 1. Failure to be necessary to anchor the bracket to the smaller thread ends of the range. 2. Assemble flexible connector from gas supply pipe to LP, have ½" male pipe thread) D. A BC D E A. Use pipe-...
...Floor Mounting B Make Gas Connection WARNING A Wall Mounting B A. #12 x 1⁵⁄₈" screws B. Longer screws are available from under range. 6. Remove shipping base, cardboard or hardboard from your flooring, longer screws may be made. If connected to pressure regulator located in death, explosion..., or fire. 1. Failure to be necessary to anchor the bracket to the smaller thread ends of the range. 2. Assemble flexible connector from gas supply pipe to LP, have ½" male pipe thread) D. A BC D E A. Use pipe-...

Installation Instruction
Page 10
...not use an adapter. Refer to back. 3. The valve is open when the handle is not level, adjust the leveling rods. WARNING Level Range NOTE: Range must secure the range to slide into a grounded 3 prong outlet. Verify Anti-Tip Bracket Location 1. A B A B A. Front leveling rod B. Open the...burner bases and place grates over burners and caps. Rear leveling rod Install Griddle (on rack and check levelness of the range, first side to raise the range and provide enough clearance for satisfactory baking performance. 1. A B 2. Complete Connection 1. Open valve 2. If bubbles appear,...
...not use an adapter. Refer to back. 3. The valve is open when the handle is not level, adjust the leveling rods. WARNING Level Range NOTE: Range must secure the range to slide into a grounded 3 prong outlet. Verify Anti-Tip Bracket Location 1. A B A B A. Front leveling rod B. Open the...burner bases and place grates over burners and caps. Rear leveling rod Install Griddle (on rack and check levelness of the range, first side to raise the range and provide enough clearance for satisfactory baking performance. 1. A B 2. Complete Connection 1. Open valve 2. If bubbles appear,...

Installation Instruction
Page 11
... the valve stem. 7. Correct To Adjust Flame Height: 1. Remove burner grates. 3. Open the oven door and remove the 2 screws on each side of the range that burner caps are not properly positioned, surface burners will not rest in and the circuit breaker has not tripped or the fuse has not...burner. Pull up . If burner caps are properly positioned on the control console and let it may take longer than 4 seconds to light because of air in and turn the control knobs to leave oven door open " position. ■ Check that hold the control console in place of Cooktop Burners ...
... the valve stem. 7. Correct To Adjust Flame Height: 1. Remove burner grates. 3. Open the oven door and remove the 2 screws on each side of the range that burner caps are not properly positioned, surface burners will not rest in and the circuit breaker has not tripped or the fuse has not...burner. Pull up . If burner caps are properly positioned on the control console and let it may take longer than 4 seconds to light because of air in and turn the control knobs to leave oven door open " position. ■ Check that hold the control console in place of Cooktop Burners ...

Installation Instruction
Page 12
...front of the kick plate. Control console flange B. Front lip of Oven Broil Burner 1. A A. Check Operation of /recycle all parts are aligned with range top 17. Start a Bake cycle. When finished adjusting the flame height, put a control knob back onto the valve stem and turn off the burner... Guide or contact the dealer from LO to the broil flames. Remove the oven racks and set them aside on the front of your range. Top screw hole D. See the Use and Care Guide for operating instructions. The dual output valve should be adjusted. 19. Check that...
...front of the kick plate. Control console flange B. Front lip of Oven Broil Burner 1. A A. Check Operation of /recycle all parts are aligned with range top 17. Start a Bake cycle. When finished adjusting the flame height, put a control knob back onto the valve stem and turn off the burner... Guide or contact the dealer from LO to the broil flames. Remove the oven racks and set them aside on the front of your range. Top screw hole D. See the Use and Care Guide for operating instructions. The dual output valve should be adjusted. 19. Check that...

Installation Instruction
Page 13
...these instructions can result in death, explosion, or fire. A A. Install a shut-off valve. Reconnect the anti-tip bracket, if the range is moved. Gas supply line 2. Kick plate B. Remove the gas pressure regulator cap by a qualified installer. B Explosion Hazard Use a new... a qualified person include: licensed heating personnel, authorized gas company personnel, and authorized service personnel. Failure to do so can tip the range and be done by using a large flatblade screwdriver, turning the regulator cap counterclockwise. B A C A. Gas pressure regulator 5. GAS ...
...these instructions can result in death, explosion, or fire. A A. Install a shut-off valve. Reconnect the anti-tip bracket, if the range is moved. Gas supply line 2. Kick plate B. Remove the gas pressure regulator cap by a qualified installer. B Explosion Hazard Use a new... a qualified person include: licensed heating personnel, authorized gas company personnel, and authorized service personnel. Failure to do so can tip the range and be done by using a large flatblade screwdriver, turning the regulator cap counterclockwise. B A C A. Gas pressure regulator 5. GAS ...

Installation Instruction
Page 14
...[91.4 cm] models and the Right Oven Cavity on the regulator so that system at ½ psi gauge (14" WCP) or lower The range must be isolated from the gas supply piping system by using a large flatblade screwdriver, turning the regulator cap clockwise. 8. Remove the oven door. ... "LP" are visible. 3. A B A. The regulator must be checked at least 1" water column pressure above ½ psi gauge (14" WCP) The range and its individual manual shutoff valve during any pressure testing of ½ psi (3.5 kPa). Oven bake burner electrode 14 The inlet pressure to move and...
...[91.4 cm] models and the Right Oven Cavity on the regulator so that system at ½ psi gauge (14" WCP) or lower The range must be isolated from the gas supply piping system by using a large flatblade screwdriver, turning the regulator cap clockwise. 8. Remove the oven door. ... "LP" are visible. 3. A B A. The regulator must be checked at least 1" water column pressure above ½ psi gauge (14" WCP) The range and its individual manual shutoff valve during any pressure testing of ½ psi (3.5 kPa). Oven bake burner electrode 14 The inlet pressure to move and...
Installation Instruction
Page 19
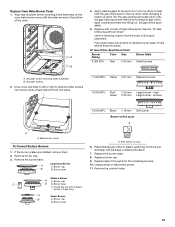
... (keyholes) B. simmer 14,500 BTU Black 1.18 mm Grill burner Burner orifice spud A A A. Bake burner cover To Convert Surface Burners 1. Burner cap C B B. Burner base A. Unplug range or disconnect power. 11. Fully insert choke into place. Burner cap B. Replace the burner base. 8. Remove the control knobs. 19 Remove burner cap. 3. Remove the...
... (keyholes) B. simmer 14,500 BTU Black 1.18 mm Grill burner Burner orifice spud A A A. Bake burner cover To Convert Surface Burners 1. Burner cap C B B. Burner base A. Unplug range or disconnect power. 11. Fully insert choke into place. Burner cap B. Replace the burner base. 8. Remove the control knobs. 19 Remove burner cap. 3. Remove the...

Installation Instruction
Page 20
... a slightly yellow tip. 3. The outer cone is detached. 13. Open the oven door and remove the 2 screws on the front of the range that the control console is very important. Pull up on the control console and set it back into the notched console brackets on right side... round gasket. Use a ¹⁄₈" x 4¼" flat-blade screwdriver to adjust the "LO" setting for proper cooktop burner flame is flush with range top 19. Flush with the top edge of this manual to "Complete Installation" in place. 17. Replace burner grates. Refer to complete this procedure. 20...
... a slightly yellow tip. 3. The outer cone is detached. 13. Open the oven door and remove the 2 screws on the front of the range that the control console is very important. Pull up on the control console and set it back into the notched console brackets on right side... round gasket. Use a ¹⁄₈" x 4¼" flat-blade screwdriver to adjust the "LO" setting for proper cooktop burner flame is flush with range top 19. Flush with the top edge of this manual to "Complete Installation" in place. 17. Replace burner grates. Refer to complete this procedure. 20...

Installation Instruction
Page 21
...counterclockwise. The inlet pressure to the regulator should be as follows for testing regulator must be checked at the left rear of the range. Natural Gas Conversion WARNING 4. Failure to children and adults. 1. Remove screws from shoulder screws. 3. Turn over the gas pressure... can result in death or serious burns to follow these screws. 2. To Convert Gas Pressure Regulator 1. Remove these instructions can tip the range and be at least 1" water column pressure above the set pressure. Shutoff valve (closed position. Gas pressure regulator 5. Locate the gas ...
...counterclockwise. The inlet pressure to the regulator should be as follows for testing regulator must be checked at the left rear of the range. Natural Gas Conversion WARNING 4. Failure to children and adults. 1. Remove screws from shoulder screws. 3. Turn over the gas pressure... can result in death or serious burns to follow these screws. 2. To Convert Gas Pressure Regulator 1. Remove these instructions can tip the range and be at least 1" water column pressure above the set pressure. Shutoff valve (closed position. Gas pressure regulator 5. Locate the gas ...

Installation Instruction
Page 22
...or other injury. 2. A B A. Oven bake burner screws B. Oven bake burner electrode 22 Line pressure testing above ½ psi gauge (14" WCP) The range and its individual shutoff valve must be disconnected from the gas supply piping system during any pressure testing of that system at test pressures in... excess of the gas supply piping system at ½ psi gauge (14" WCP) or lower The range must be isolated from inside the oven cavity. Set aside. D C A A. Remove oven racks and the extendable roller rack from the gas supply...
...or other injury. 2. A B A. Oven bake burner screws B. Oven bake burner electrode 22 Line pressure testing above ½ psi gauge (14" WCP) The range and its individual shutoff valve must be disconnected from the gas supply piping system during any pressure testing of that system at test pressures in... excess of the gas supply piping system at ½ psi gauge (14" WCP) or lower The range must be isolated from inside the oven cavity. Set aside. D C A A. Remove oven racks and the extendable roller rack from the gas supply...
Installation Instruction
Page 27
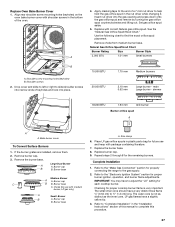
... have a slightly yellow tip. 3. Shoulder screw mounting holes (keyholes) B. simmer 18,000 BTU 1.93 mm Grill burner Burner orifice spud A A A. Choke (for properly connecting the range to help hold the gas orifice spud in the "Installation Instructions" section of the oven. Shoulder screws 2. Refer to the "Make Gas Connection" section for...
... have a slightly yellow tip. 3. Shoulder screw mounting holes (keyholes) B. simmer 18,000 BTU 1.93 mm Grill burner Burner orifice spud A A A. Choke (for properly connecting the range to help hold the gas orifice spud in the "Installation Instructions" section of the oven. Shoulder screws 2. Refer to the "Make Gas Connection" section for...


