
Warranty
Page 1
... repair labor. ■■ Electric element ■■ Touch Pad and microprocessor ■■ Glass ceramic cooktop: if due to review the Troubleshooting or Problem Solver section of purchase, when this major appliance is installed, operated and maintained according to instructions attached to or furnished with the product, Jenn-Air will be addressed without service. light bulbs, batteries, air or water filters, preservation solutions, etc.). 5. The cost of repair or replacement...
... repair labor. ■■ Electric element ■■ Touch Pad and microprocessor ■■ Glass ceramic cooktop: if due to review the Troubleshooting or Problem Solver section of purchase, when this major appliance is installed, operated and maintained according to instructions attached to or furnished with the product, Jenn-Air will be addressed without service. light bulbs, batteries, air or water filters, preservation solutions, etc.). 5. The cost of repair or replacement...
Owners Manual
Page 3
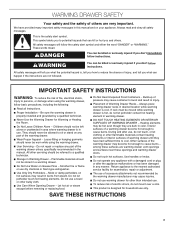
... clothing or other flammable materials contact heating elements or interior surfaces of warming drawer until they are not followed. WARNING You can happen if the instructions are dark in Warming Drawer - IMPORTANT SAFETY INSTRUCTIONS WARNING: To reduce the risk of fire, electrical shock, injury to cause burns. Proper Installation - Do not repair or replace any part of the warming drawer. Use Care When Opening Drawer - Return appliance to sit or...
... clothing or other flammable materials contact heating elements or interior surfaces of warming drawer until they are not followed. WARNING You can happen if the instructions are dark in Warming Drawer - IMPORTANT SAFETY INSTRUCTIONS WARNING: To reduce the risk of fire, electrical shock, injury to cause burns. Proper Installation - Do not repair or replace any part of the warming drawer. Use Care When Opening Drawer - Return appliance to sit or...
Owners Manual
Page 4
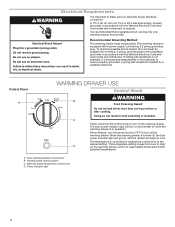
... required. Power indicator light 4 It is equipped with the National Electrical Code and local codes and ordinances. C Push in accordance with a power supply cord having a 3 prong grounding plug. The temperature setting ranges from Low to High D on while the warming drawer is in food poisoning or sickness. This warming drawer is recommended that a separate circuit, serving only your warming drawer, be grounded. When finished, turn the control knob to OFF to turn...
... required. Power indicator light 4 It is equipped with the National Electrical Code and local codes and ordinances. C Push in accordance with a power supply cord having a 3 prong grounding plug. The temperature setting ranges from Low to High D on while the warming drawer is in food poisoning or sickness. This warming drawer is recommended that a separate circuit, serving only your warming drawer, be grounded. When finished, turn the control knob to OFF to turn...
Owners Manual
Page 5
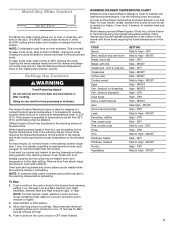
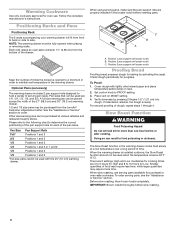
... in the warming drawer. Place foods requiring the highest temperature on inner surfaces. NOTE: To conserve heat, place cookware and positioning rack in and turn the control knob to open or close the vent slots in the warming drawer longer than 32°F (0°C), performance may form on the bottom of food hot, use the setting for keeping hot cooked foods at temperatures down to operate properly...
... in the warming drawer. Place foods requiring the highest temperature on inner surfaces. NOTE: To conserve heat, place cookware and positioning rack in and turn the control knob to open or close the vent slots in the warming drawer longer than 32°F (0°C), performance may form on the bottom of food hot, use the setting for keeping hot cooked foods at temperatures down to operate properly...
Owners Manual
Page 6
... setting. 3. Follow the cookware manufacturer's instructions. For second proofing of the 27" (68.6 cm) and 30" (76.2 cm) warming drawer. 1/2 and 1/3 size pans may require more than one hour before or after cooking. Set control knob to 10 hours for Low. Position 1 pan support rail locator notch B. Keep the number of the pan sizes. Warming Cookware Use only cookware approved for oven use serving pans (available for purchase) or oven-safe cookware. Pan Size Pan Support...
... setting. 3. Follow the cookware manufacturer's instructions. For second proofing of the 27" (68.6 cm) and 30" (76.2 cm) warming drawer. 1/2 and 1/3 size pans may require more than one hour before or after cooking. Set control knob to 10 hours for Low. Position 1 pan support rail locator notch B. Keep the number of the pan sizes. Warming Cookware Use only cookware approved for oven use serving pans (available for purchase) or oven-safe cookware. Pan Size Pan Support...
Owners Manual
Page 7
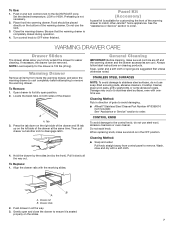
...; Stainless Steel Cleaner Part Number W10355016 (not included): See "Assistance or Service" section to remove the warming drawer. Panel Kit (Accessory) A panel kit is seated properly on cleaning products. NOTE: Load capacity for the drawer is in direction of the warming drawer to remove. A A. Press the tab down on the right side of the drawer and lift tab up on the left side of the warming drawer. When replacing knob, make...
...; Stainless Steel Cleaner Part Number W10355016 (not included): See "Assistance or Service" section to remove the warming drawer. Panel Kit (Accessory) A panel kit is seated properly on cleaning products. NOTE: Load capacity for the drawer is in direction of the warming drawer to remove. A A. Press the tab down on the right side of the drawer and lift tab up on the left side of the warming drawer. When replacing knob, make...
Owners Manual
Page 8
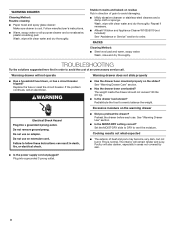
... in direction of grain to vent the moisture. The interior will not operate Warming drawer does not slide properly ■■ Has a household fuse blown, or has a circuit breaker tripped? Repeat if necessary. ■■ Affresh® Kitchen and Appliance Cleaner W10355010 (not included): See "Assistance or Service" section to evenly balance the weight. Warming drawer will remain tender and juicy. Preheat the drawer before each use. RACKS Cleaning...
... in direction of grain to vent the moisture. The interior will not operate Warming drawer does not slide properly ■■ Has a household fuse blown, or has a circuit breaker tripped? Repeat if necessary. ■■ Affresh® Kitchen and Appliance Cleaner W10355010 (not included): See "Assistance or Service" section to evenly balance the weight. Warming drawer will remain tender and juicy. Preheat the drawer before each use. RACKS Cleaning...
Owners Manual
Page 9
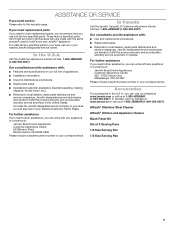
... Panel Kit Set of appliances. ■■ Installation information. ■■ Use and maintenance procedures. ■■ Repair parts sales. ■■ Specialized customer assistance (Spanish speaking, hearing impaired, limited vision, etc.). ■■ Referrals to local dealers, repair parts distributors and service companies. Our consultants provide assistance with: ■■ Features and specifications on our full line of 5 Serving Pans 1/2 Size Serving Pan 1/3 Size...
... Panel Kit Set of appliances. ■■ Installation information. ■■ Use and maintenance procedures. ■■ Repair parts sales. ■■ Specialized customer assistance (Spanish speaking, hearing impaired, limited vision, etc.). ■■ Referrals to local dealers, repair parts distributors and service companies. Our consultants provide assistance with: ■■ Features and specifications on our full line of 5 Serving Pans 1/2 Size Serving Pan 1/3 Size...

Installation Instructions
Page 2
WARMING DRAWER SAFETY 2
WARMING DRAWER SAFETY 2
Installation Instructions
Page 3
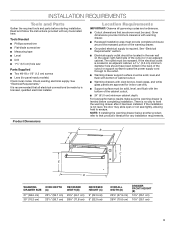
... the cutout or support surface to pass the power supply cord through to that are approved for panel ready models) Check local codes. Product Dimensions Location Requirements IMPORTANT: Observe all electrical connections be recessed. It is no way to escape. There is recommended that all governing codes and ordinances. ■■ Cutout dimensions that product's literature for any tools listed here. If the installation is leveled before starting installation. Check existing electrical...
... the cutout or support surface to pass the power supply cord through to that are approved for panel ready models) Check local codes. Product Dimensions Location Requirements IMPORTANT: Observe all electrical connections be recessed. It is no way to escape. There is recommended that all governing codes and ordinances. ■■ Cutout dimensions that product's literature for any tools listed here. If the installation is leveled before starting installation. Check existing electrical...
Installation Instructions
Page 4
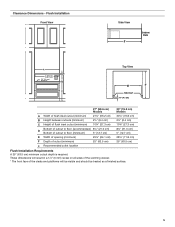
...) Warming drawer can be installed as an indoor single or double installation or installed under a single oven are shown. Clearance Dimensions Front view 120 V grounded outlet (or located in a permanent fixture. For outdoor installation, follow the cutout dimensions above. NOTE: The warming drawer cannot be sealed to match your cabinets, we recommend consulting a qualified cabinetmaker or carpenter. Custom Wood Drawer Front If you plan to install a custom wood panel to...
...) Warming drawer can be installed as an indoor single or double installation or installed under a single oven are shown. Clearance Dimensions Front view 120 V grounded outlet (or located in a permanent fixture. For outdoor installation, follow the cutout dimensions above. NOTE: The warming drawer cannot be sealed to match your cabinets, we recommend consulting a qualified cabinetmaker or carpenter. Custom Wood Drawer Front If you plan to install a custom wood panel to...
Installation Instructions
Page 5
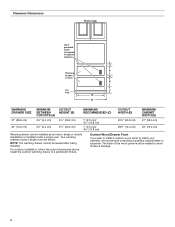
... cm) Models A Width of flush inset cutout (minimum) 271/4" (69.2 cm) B Height between cutouts (minimum) 21/2" (6.4 cm) C Height of flush inset cutout (minimum) 103/4" (27.3 cm) Bottom of cutout to floor (recommended) 81/4" (21.0 cm) D Bottom of cutout to floor (minimum) 5" (12.7 cm) E Width of opening (minimum)... of the warming drawer. * The front face of cutout (minimum) 25" (63.5 cm) e Recommended outlet location 30" (76.2 cm) Models 301/4" (76.8 cm) 21/2" (6.4 cm) 103/4" (27.3 cm) 81/4" (21.0 cm) 5" (12.7 cm) 281/4" (71.8 cm) 25" (63.5 cm) Flush Installation Requirements A 25"...
... cm) Models A Width of flush inset cutout (minimum) 271/4" (69.2 cm) B Height between cutouts (minimum) 21/2" (6.4 cm) C Height of flush inset cutout (minimum) 103/4" (27.3 cm) Bottom of cutout to floor (recommended) 81/4" (21.0 cm) D Bottom of cutout to floor (minimum) 5" (12.7 cm) E Width of opening (minimum)... of the warming drawer. * The front face of cutout (minimum) 25" (63.5 cm) e Recommended outlet location 30" (76.2 cm) Models 301/4" (76.8 cm) 21/2" (6.4 cm) 103/4" (27.3 cm) 81/4" (21.0 cm) 5" (12.7 cm) 281/4" (71.8 cm) 25" (63.5 cm) Flush Installation Requirements A 25"...
Installation Instructions
Page 6
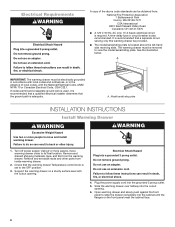
... warming drawer Temperature control knob is set aside racks and other injury. Do not use an extension cord. Failure to the OFF position. 3. If codes permit and a separate ground wire is used, it is recommended that a qualified electrical installer determine that a separate circuit serving only this warming drawer be provided. ■■ The model/serial/rating plate is required. Failure to move warming drawer close to its final location. Do not remove ground prong. Plug the power...
... warming drawer Temperature control knob is set aside racks and other injury. Do not use an extension cord. Failure to the OFF position. 3. If codes permit and a separate ground wire is used, it is recommended that a qualified electrical installer determine that a separate circuit serving only this warming drawer be provided. ■■ The model/serial/rating plate is required. Failure to move warming drawer close to its final location. Do not remove ground prong. Plug the power...

Installation Instructions
Page 7
... surrounding cabinets. CUSTOM DRAWER FRONT INSTALLATION INSTRUCTIONS FOR WARMING DRAWERS Tools and Parts Gather the required tools and parts before starting installation. Check that will vary in order to the cabinet. For warming drawer use and cleaning, read the Use and Care Guide. 5. It is an extra part, go back through the steps to the specific installation. 7. Check that a qualified carpenter make and install the custom drawer front and handle(s) to HI, and the light should...
... surrounding cabinets. CUSTOM DRAWER FRONT INSTALLATION INSTRUCTIONS FOR WARMING DRAWERS Tools and Parts Gather the required tools and parts before starting installation. Check that will vary in order to the cabinet. For warming drawer use and cleaning, read the Use and Care Guide. 5. It is an extra part, go back through the steps to the specific installation. 7. Check that a qualified carpenter make and install the custom drawer front and handle(s) to HI, and the light should...
Installation Instructions
Page 8
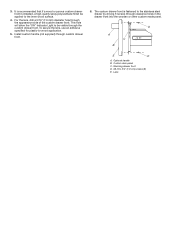
... into the wooden or other custom made panel. Lens D A C B E D A. This hole will allow the "ON" Indicator Light to be applied to the inner wood surface. 4. Warming drawer front D. #8-18 x 3/4" (1.9 cm) screws (6) E. Optional handle B. It is recommended that if a wood or porous custom drawer front is fastened to -wood application. 5. Install custom handle (not supplied) through the appearance side...
... into the wooden or other custom made panel. Lens D A C B E D A. This hole will allow the "ON" Indicator Light to be applied to the inner wood surface. 4. Warming drawer front D. #8-18 x 3/4" (1.9 cm) screws (6) E. Optional handle B. It is recommended that if a wood or porous custom drawer front is fastened to -wood application. 5. Install custom handle (not supplied) through the appearance side...


