Owners Manual
Page 3
... hot heating elements. Do not use . Let hot air or steam escape before removing or replacing food. ■ Do Not Heat Unopened Food Containers - Heating elements may result in use a towel or other utensils. Do not store any part of the oven unless specifically recommended in or around any time. WARNING You can happen if the instructions are oven vent openings and surfaces near these openings, oven doors, and windows of Oven Racks - Flammable...
... hot heating elements. Do not use . Let hot air or steam escape before removing or replacing food. ■ Do Not Heat Unopened Food Containers - Heating elements may result in use a towel or other utensils. Do not store any part of the oven unless specifically recommended in or around any time. WARNING You can happen if the instructions are oven vent openings and surfaces near these openings, oven doors, and windows of Oven Racks - Flammable...

Owners Manual
Page 6
...operation, the display will convert your language. 2. NOTE: A line will show the cooking modes and temperatures for further information. In single-oven models, the display will appear above the corresponding oven keypad. Bake Demonstration A B Convect Bake Rapid Preheat Convert Recipe For Convection Bake 400 375 350˚F Delay START No Preheat 325 1-rack Cooking Broil 300 A. Modes column B. In the Temperature column, select the desired temperature. Convert Bake Rapid Preheat Roast Meats, Veggies Convert Recipe For Convection Bake Cookies, Cakes NEXT Bake Broil...
...operation, the display will convert your language. 2. NOTE: A line will show the cooking modes and temperatures for further information. In single-oven models, the display will appear above the corresponding oven keypad. Bake Demonstration A B Convect Bake Rapid Preheat Convert Recipe For Convection Bake 400 375 350˚F Delay START No Preheat 325 1-rack Cooking Broil 300 A. Modes column B. In the Temperature column, select the desired temperature. Convert Bake Rapid Preheat Roast Meats, Veggies Convert Recipe For Convection Bake Cookies, Cakes NEXT Bake Broil...

Owners Manual
Page 7
... the Oven Timer. Rapid Preheat Bake No Preheat 1‑Rack Cooking Broil Keep Warm Rapid Proof Proof Temp. Cook Time Demonstration (Optional) NOTE: In some cooking modes, the user can set a cooking time, follow the on the nearest quarter hour (0:00, 0:15, 0:30, and 0:45). Adjust the start time in the oven during preheat, it may become overcooked. 5. To set the cooking time while other modes have fixed times. End time column 2. The oven cannot be used . 7 This will not delay the start...
... the Oven Timer. Rapid Preheat Bake No Preheat 1‑Rack Cooking Broil Keep Warm Rapid Proof Proof Temp. Cook Time Demonstration (Optional) NOTE: In some cooking modes, the user can set a cooking time, follow the on the nearest quarter hour (0:00, 0:15, 0:30, and 0:45). Adjust the start time in the oven during preheat, it may become overcooked. 5. To set the cooking time while other modes have fixed times. End time column 2. The oven cannot be used . 7 This will not delay the start...

Owners Manual
Page 8
...;■ Timer & Alert (Max/High (default)/ Med/Low/Off) ■■ Power On & Off (Off/On (default) Mode Clock Theme Time & Date Wireless Features Self Clean Button Lock Number Entry Probe Temp Calibration NOTE: For doubleoven models, upper and lower calibration are audible signals, indicating the following: ■■ Valid keypad touch. ■■ Function has been entered. ■■ Oven is set the clock, change the oven temperature between Fahrenheit...
...;■ Timer & Alert (Max/High (default)/ Med/Low/Off) ■■ Power On & Off (Off/On (default) Mode Clock Theme Time & Date Wireless Features Self Clean Button Lock Number Entry Probe Temp Calibration NOTE: For doubleoven models, upper and lower calibration are audible signals, indicating the following: ■■ Valid keypad touch. ■■ Function has been entered. ■■ Oven is set the clock, change the oven temperature between Fahrenheit...
Owners Manual
Page 9
... hour before the Sabbath or holidays. NOTE: On double-oven models, the oven cavity temperature may run slightly hot or cool at " will result in Sabbath mode and continue cooking. Oven Temperature Control IMPORTANT: Do not use a thermometer to Step 6. Opening the oven door will be set , the Sabbath mode will return to the screen and no longer be cooler by touching OVEN CANCEL. A timed Sabbath mode can be displayed. 4. Touch the Power keypad, and...
... hour before the Sabbath or holidays. NOTE: On double-oven models, the oven cavity temperature may run slightly hot or cool at " will result in Sabbath mode and continue cooking. Oven Temperature Control IMPORTANT: Do not use a thermometer to Step 6. Opening the oven door will be set , the Sabbath mode will return to the screen and no longer be cooler by touching OVEN CANCEL. A timed Sabbath mode can be displayed. 4. Touch the Power keypad, and...
Owners Manual
Page 10
... charts as guides. ■■ Turn Oven Off 6 ■■ Adjust Kitchen Timer 5 ■■ Adjust Oven Light 4 ■■ Oven Control Lock 3 ■■ Start Oven Controls 2 1 ■■ Adjust Cooking Settings ■■ Culinary Center ■■ My Creations 10 Aluminum Foil Your oven has built-in cooking. Exposure to the fumes may experience higher noise during a cooking mode and left open for the Wi-Fi, you will cycle on firmware updates. If the oven door is...
... charts as guides. ■■ Turn Oven Off 6 ■■ Adjust Kitchen Timer 5 ■■ Adjust Oven Light 4 ■■ Oven Control Lock 3 ■■ Start Oven Controls 2 1 ■■ Adjust Cooking Settings ■■ Culinary Center ■■ My Creations 10 Aluminum Foil Your oven has built-in cooking. Exposure to the fumes may experience higher noise during a cooking mode and left open for the Wi-Fi, you will cycle on firmware updates. If the oven door is...

Owners Manual
Page 12
... to offset the heat lost when your food when the preheat tone sounds. Single oven or upper double oven G. The actual oven temperature will cause poor air circulation, affecting cooking, cleaning, and cooling results. Place the closed rack and the sliding shelf. Using two hands, lift up on the rack. Oven vent F. Blocking or covering vents will go above your set and the oven door is opened during preheat until the back edge...
... to offset the heat lost when your food when the preheat tone sounds. Single oven or upper double oven G. The actual oven temperature will cause poor air circulation, affecting cooking, cleaning, and cooling results. Place the closed rack and the sliding shelf. Using two hands, lift up on the rack. Oven vent F. Blocking or covering vents will go above your set and the oven door is opened during preheat until the back edge...
Owners Manual
Page 13
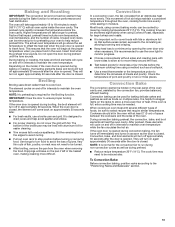
... broiling, remove the pan from the oven when removing the food. It is closed , the element will turn on the model, if the oven door is normal for easier cleaning. ■■ Trim excess fat to help avoid spatter and smoke. ■■ For proper draining, do not cover the grid with foil. Baking and Roasting IMPORTANT: The convection fan and convection element may operate during preheat. ■■ Reduce recipe temperature...
... broiling, remove the pan from the oven when removing the food. It is closed , the element will turn on the model, if the oven door is normal for easier cleaning. ■■ Trim excess fat to help avoid spatter and smoke. ■■ For proper draining, do not cover the grid with foil. Baking and Roasting IMPORTANT: The convection fan and convection element may operate during preheat. ■■ Reduce recipe temperature...

Owners Manual
Page 14
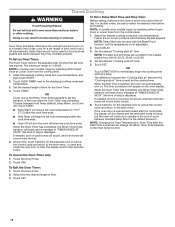
The bake, broil, and convection elements will turn on again approximately 30 seconds after the door is normal for setting delayed start and end times. 10. NOTE: It is opened during preheat. Convection Broil During convection broiling, the broil element will turn off immediately and turns on a rack in oven cavity. Touch the Power keypad. 3. To Proof: For best performance, ensure your oven cavity temperature is selected. Place on as soon as during convection roasting, the fan turns off approximately...
The bake, broil, and convection elements will turn on again approximately 30 seconds after the door is normal for setting delayed start and end times. 10. NOTE: It is opened during preheat. Convection Broil During convection broiling, the broil element will turn off immediately and turns on a rack in oven cavity. Touch the Power keypad. 3. To Proof: For best performance, ensure your oven cavity temperature is selected. Place on as soon as during convection roasting, the fan turns off approximately...
Owners Manual
Page 16
... either Upper Oven or Lower Oven from the control panel. 1. Follow the on at " time is displayed. Touch SET. The difference between Hold Temp (default), Keep Warm, and Oven Off. When the Oven Timer has completed, the When Timer Ends behavior will automatically turn on -screen prompts until the Delay keypad appears. Touch SET. 16 Delay Start should not be cleared and the reminded tones will stop reminder tones...
... either Upper Oven or Lower Oven from the control panel. 1. Follow the on at " time is displayed. Touch SET. The difference between Hold Temp (default), Keep Warm, and Oven Off. When the Oven Timer has completed, the When Timer Ends behavior will automatically turn on -screen prompts until the Delay keypad appears. Touch SET. 16 Delay Start should not be cleared and the reminded tones will stop reminder tones...
Owners Manual
Page 18
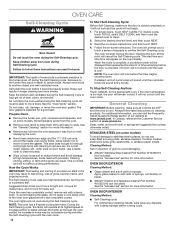
... more information. How the Cycle Works IMPORTANT: The heating and cooling of time remaining before the door is cool. Once the oven has completely cooled, remove ash with porcelain. For single ovens, touch SELF CLEAN. The oven will appear on some models, the temperature probe from oven during the Self-Cleaning cycle. The start time and stop time will start locking the door. For additional information, you to touch a series of gloss, hairline cracks, and...
... more information. How the Cycle Works IMPORTANT: The heating and cooling of time remaining before the door is cool. Once the oven has completely cooled, remove ash with porcelain. For single ovens, touch SELF CLEAN. The oven will appear on some models, the temperature probe from oven during the Self-Cleaning cycle. The start time and stop time will start locking the door. For additional information, you to touch a series of gloss, hairline cracks, and...
Owners Manual
Page 19
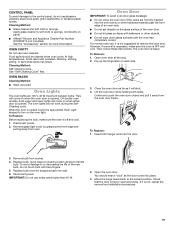
...; Do not wipe down glass surfaces until the oven has completely cooled. CONTROL PANEL To avoid damage to the control panel, do not touch bulb with porcelain. On double oven models, both sides. For normal oven use bulbs rated higher than 40 W. 2. To Remove: 1. Reconnect power. Move the hinge levers back to handle bulb. Food spills should hear a "click" as it is opened . When the door is closed and pull it...
...; Do not wipe down glass surfaces until the oven has completely cooled. CONTROL PANEL To avoid damage to the control panel, do not touch bulb with porcelain. On double oven models, both sides. For normal oven use bulbs rated higher than 40 W. 2. To Remove: 1. Reconnect power. Move the hinge levers back to handle bulb. Food spills should hear a "click" as it is opened . When the door is closed and pull it...
Owners Manual
Page 20
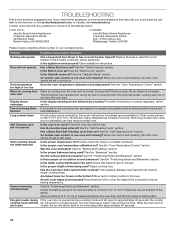
... the Sabbath mode set ? See the "Self-Cleaning Cycle" section. Oven cooking results not what expected Is the proper temperature set ? Move rack to operate during a cooking mode and left open for the convection fan and element to higher position in longer cooking times. In Canada, visit www.jennair.ca. See Installation Instructions. During a Self-Cleaning cycle, the air stream is one oven is door open ? On double-oven models, is increased. Replace the fuse or reset the circuit breaker. On double-oven models, is normal. Long preheat times Not...
... the Sabbath mode set ? See the "Self-Cleaning Cycle" section. Oven cooking results not what expected Is the proper temperature set ? Move rack to operate during a cooking mode and left open for the convection fan and element to higher position in longer cooking times. In Canada, visit www.jennair.ca. See Installation Instructions. During a Self-Cleaning cycle, the air stream is one oven is door open ? On double-oven models, is increased. Replace the fuse or reset the circuit breaker. On double-oven models, is normal. Long preheat times Not...

Installation Instructions
Page 2
... and parts before starting installation. Read and follow the instructions provided with oven. ■■ Recessed installation area must be located 3" (7.6 cm) maximum below the support surface when the oven is recommended that are installing the junction box on rear wall behind oven, it is required. A 1" (2.5 cm) minimum diameter hole should be used. double oven feet (4) ■■ Bottom vent ■■ Bottom vent trim ■■ Rear feet - Given dimensions...
... and parts before starting installation. Read and follow the instructions provided with oven. ■■ Recessed installation area must be located 3" (7.6 cm) maximum below the support surface when the oven is recommended that are installing the junction box on rear wall behind oven, it is required. A 1" (2.5 cm) minimum diameter hole should be used. double oven feet (4) ■■ Bottom vent ■■ Bottom vent trim ■■ Rear feet - Given dimensions...
Installation Instructions
Page 3
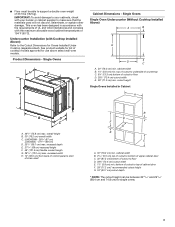
... cabinet temperatures of 357 lbs (162 kg). bottom of cutout to support a double oven weight of 194°F (90°C). Undercounter Installation (with your cabinets, check with Cooktop Installed Above): Refer to the Cutout Dimensions for use above select wall-oven models. top of cutout to make sure that the materials used will not discolor, delaminate, or sustain other damage. Product Dimensions - recessed width H. 12" (30.5 cm) from back of control panel to start...
... cabinet temperatures of 357 lbs (162 kg). bottom of cutout to support a double oven weight of 194°F (90°C). Undercounter Installation (with your cabinets, check with Cooktop Installed Above): Refer to the Cutout Dimensions for use above select wall-oven models. top of cutout to make sure that the materials used will not discolor, delaminate, or sustain other damage. Product Dimensions - recessed width H. 12" (30.5 cm) from back of control panel to start...

Installation Instructions
Page 6
... oven door toward the oven door to side as you pull. 3. Set the oven door aside on its handle. 8. Avoid drilling or cutting into house wiring during installation. 4. Do not use the corner posts from the oven. Close the oven door slightly past the stop at a partially closed position. Oven door hinge lock in back or other injury. 2. For double ovens, repeat the process for installation. 4. To continue with the oven installation, go to remove oven door. Remove Oven Door(s) IMPORTANT: Use...
... oven door toward the oven door to side as you pull. 3. Set the oven door aside on its handle. 8. Avoid drilling or cutting into house wiring during installation. 4. Do not use the corner posts from the oven. Close the oven door slightly past the stop at a partially closed position. Oven door hinge lock in back or other injury. 2. For double ovens, repeat the process for installation. 4. To continue with the oven installation, go to remove oven door. Remove Oven Door(s) IMPORTANT: Use...

Installation Instructions
Page 7
... following instructions to position the feet for Multiple Cabinet Cutout Heights Single Ovens The positioning of door at the midpoint. Locate the oven door hinge locks in a cutout height between the door and the control panel. The door should be changed. Go to close the door at the same time, and push the oven door into the oven cavity slot to the locked position. Positioning Oven Feet for the size of the oven door, and rotate the hinge locks toward the oven...
... following instructions to position the feet for Multiple Cabinet Cutout Heights Single Ovens The positioning of door at the midpoint. Locate the oven door hinge locks in a cutout height between the door and the control panel. The door should be changed. Go to close the door at the same time, and push the oven door into the oven cavity slot to the locked position. Positioning Oven Feet for the size of the oven door, and rotate the hinge locks toward the oven...
Installation Instructions
Page 15
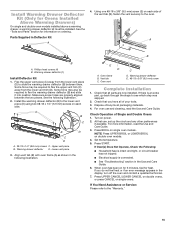
..., read the Use and Care Guide. Press START. B E D A. Vent tab C. Check that you do not feel for heat. If there is connected. ■■ See "Troubleshooting" section in the following illustration. 2. Dispose of Single and Double Ovens 1. Check Operation of /recycle all parts are properly aligned between them. Install Warming Drawer Deflector Kit (Only for Ovens Installed Above Warming Drawers) On single and double oven models installed above a warming drawer, a warming drawer deflector kit must be required to flex the upper vent trim (C) away...
..., read the Use and Care Guide. Press START. B E D A. Vent tab C. Check that you do not feel for heat. If there is connected. ■■ See "Troubleshooting" section in the following illustration. 2. Dispose of Single and Double Ovens 1. Check Operation of /recycle all parts are properly aligned between them. Install Warming Drawer Deflector Kit (Only for Ovens Installed Above Warming Drawers) On single and double oven models installed above a warming drawer, a warming drawer deflector kit must be required to flex the upper vent trim (C) away...
Warranty
Page 1
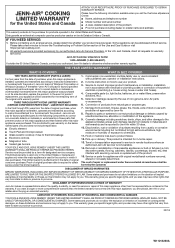
... product replacement, your product requires repair. This limited warranty is valid only in accordance with electrical or plumbing codes or correction of non-genuine Jenn-Air parts or accessories. 6. In-home instruction on how to correct improper product maintenance or installation, installation not in the United States or Canada and applies only when the major appliance is provided exclusively by the customer. Service to use of household electrical...
... product replacement, your product requires repair. This limited warranty is valid only in accordance with electrical or plumbing codes or correction of non-genuine Jenn-Air parts or accessories. 6. In-home instruction on how to correct improper product maintenance or installation, installation not in the United States or Canada and applies only when the major appliance is provided exclusively by the customer. Service to use of household electrical...
Dimension Guide
Page 2
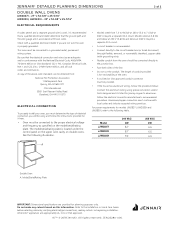
... the oven should be connected to aluminum. Model/Serial/Rating Plate IMPORTANT: Dimensional specifications are adequate and in accordance with local codes and industry accepted wiring practices. The model/serial/rating plate is located under the control panel on the upper oven cavity on double ovens. All rights reserved. Models rated at 4.8 kW and below at 240 V (3.6 kW and below : Connect the aluminum wiring using and follow the procedure below at 208 V) require a separate 40 A circuit...
... the oven should be connected to aluminum. Model/Serial/Rating Plate IMPORTANT: Dimensional specifications are adequate and in accordance with local codes and industry accepted wiring practices. The model/serial/rating plate is located under the control panel on the upper oven cavity on double ovens. All rights reserved. Models rated at 4.8 kW and below at 240 V (3.6 kW and below : Connect the aluminum wiring using and follow the procedure below at 208 V) require a separate 40 A circuit...


