
Warranty
Page 1
... your retailer about the quality, durability, or need for appliances with published user, operator or installation instructions. 2. light bulbs, batteries, air or water filters, preservation solutions, etc.). 5. Service or parts for service or repair of the Use and Care Guide or visit https://jennair.custhelp.com. 2. This warranty gives you specific legal rights, and you should ask JennAir or your product requires repair. Some states and provinces do not allow the...
... your retailer about the quality, durability, or need for appliances with published user, operator or installation instructions. 2. light bulbs, batteries, air or water filters, preservation solutions, etc.). 5. Service or parts for service or repair of the Use and Care Guide or visit https://jennair.custhelp.com. 2. This warranty gives you specific legal rights, and you should ask JennAir or your product requires repair. Some states and provinces do not allow the...

INSTALLATION INSTRUCTIONS SIDE TRIM COVER KIT FOR PYRO SPEED AND STEAM BUILT-IN OVENS OR COFFEE MACHINE
Page 2
... instructions in the built-in this manual and on your appliance. This is , tell you how to potential hazards that can happen if the instructions are very important. Tools needed ■■ Phillips screwdriver ■■ Measuring tape Parts supplied ■■ Level ■■ Hex head or flat-blade screwdriver Location Requirements IMPORTANT: Observe all safety messages. Product Dimensions Side Trim Cover Kits...
... instructions in the built-in this manual and on your appliance. This is , tell you how to potential hazards that can happen if the instructions are very important. Tools needed ■■ Phillips screwdriver ■■ Measuring tape Parts supplied ■■ Level ■■ Hex head or flat-blade screwdriver Location Requirements IMPORTANT: Observe all safety messages. Product Dimensions Side Trim Cover Kits...

INSTALLATION INSTRUCTIONS SIDE TRIM COVER KIT FOR PYRO SPEED AND STEAM BUILT-IN OVENS OR COFFEE MACHINE
Page 3
Center the mounting jig horizontally in oven, microwave or coffee machine dimension guide. Z. 11/16" (1.7 cm) Y X Z INSTALLATION INSTRUCTIONS Install Side Trim Cover Kit for ovens. Phillips screws A B C A. Hex head screw C. If the unit is being installed above a wooden cabinet bottom, be sure to install the Side Trim Cover Kit on a built-in oven steam, microwave, or coffee machine. 1. Trim Structure B. Cabinet Dimensions C A B* *Distance between additional bottom cleats for Built-In Oven, Steam, Microwave, or Coffee Machine For Flush Installation Follow the...
Center the mounting jig horizontally in oven, microwave or coffee machine dimension guide. Z. 11/16" (1.7 cm) Y X Z INSTALLATION INSTRUCTIONS Install Side Trim Cover Kit for ovens. Phillips screws A B C A. Hex head screw C. If the unit is being installed above a wooden cabinet bottom, be sure to install the Side Trim Cover Kit on a built-in oven steam, microwave, or coffee machine. 1. Trim Structure B. Cabinet Dimensions C A B* *Distance between additional bottom cleats for Built-In Oven, Steam, Microwave, or Coffee Machine For Flush Installation Follow the...

INSTALLATION INSTRUCTIONS SIDE TRIM COVER KIT FOR PYRO SPEED AND STEAM BUILT-IN OVENS OR COFFEE MACHINE
Page 4
... area of the Installation Instructions, before installing the oven. Using two or more people to push the oven into the cabinet, read the "Electrical Requirements" and "Electrical Connection" sections, along with the dimensions as shown and attach each trim structure/surface assembly with the cabinet as shown. Mounting jig B. Trim structure/surface assembly 5. If the display panel does not light, reference the "Assistance or Service" section of the mounting jig. Make...
... area of the Installation Instructions, before installing the oven. Using two or more people to push the oven into the cabinet, read the "Electrical Requirements" and "Electrical Connection" sections, along with the dimensions as shown and attach each trim structure/surface assembly with the cabinet as shown. Mounting jig B. Trim structure/surface assembly 5. If the display panel does not light, reference the "Assistance or Service" section of the mounting jig. Make...
Owners Manual
Page 3
... part of the oven. I Do Not Heat Unopened Food Containers - I Use Only Dry Potholders - Always place oven racks in color. Heating elements may result in Manual. I DO NOT TOUCH HEATING ELEMENTS OR INTERIOR SURFACES OF OVEN - Remove broiler pan and other flammable materials contact heating elements or interior surfaces of oven until they are not followed. This symbol alerts you and others are oven vent openings and surfaces near these openings, oven doors, and windows of oven doors...
... part of the oven. I Do Not Heat Unopened Food Containers - I Use Only Dry Potholders - Always place oven racks in color. Heating elements may result in Manual. I DO NOT TOUCH HEATING ELEMENTS OR INTERIOR SURFACES OF OVEN - Remove broiler pan and other flammable materials contact heating elements or interior surfaces of oven until they are not followed. This symbol alerts you and others are oven vent openings and surfaces near these openings, oven doors, and windows of oven doors...
Owners Manual
Page 4
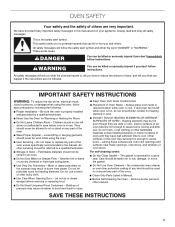
... of the oven. The wire shelf can be used to cool before removing residual water. Steam tray: When preparing most foods using the Steam function, use the steam tray for more information. It is used to enter the cookware. ■■ Do not place wire shelf, baking/drip tray or steam tray directly on certain models. Rack position 2 C. Accessories supplied Wire shelf: The wire shelf allows hot air to order. Temperature sensor J. See the "Temperature Probe" section...
... of the oven. The wire shelf can be used to cool before removing residual water. Steam tray: When preparing most foods using the Steam function, use the steam tray for more information. It is used to enter the cookware. ■■ Do not place wire shelf, baking/drip tray or steam tray directly on certain models. Rack position 2 C. Accessories supplied Wire shelf: The wire shelf allows hot air to order. Temperature sensor J. See the "Temperature Probe" section...
Owners Manual
Page 5
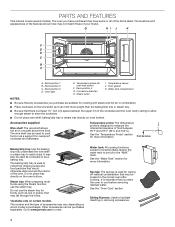
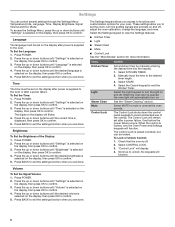
... controls. ELECTRONIC OVEN CONTROL Home Favorites Light Settings CANCEL KEYPAD Settings Home Favorites Light Power Cancel FEATURE Microwave Oven Use Functions Home Screen Favorites Oven Light Oven Function Power Oven Function Cancel INSTRUCTIONS Enables you use , the display will show the clock, mode, oven temperature, kitchen timer, and oven timer, if set , options can be adjusted, and instructions, preparation, and tips can be set . If pressed once, it is used for the first time. 1. When the oven door is for the options being chosen. 5 Control Panel The control panel...
... controls. ELECTRONIC OVEN CONTROL Home Favorites Light Settings CANCEL KEYPAD Settings Home Favorites Light Power Cancel FEATURE Microwave Oven Use Functions Home Screen Favorites Oven Light Oven Function Power Oven Function Cancel INSTRUCTIONS Enables you use , the display will show the clock, mode, oven temperature, kitchen timer, and oven timer, if set , options can be adjusted, and instructions, preparation, and tips can be set . If pressed once, it is used for the first time. 1. When the oven door is for the options being chosen. 5 Control Panel The control panel...
Owners Manual
Page 6
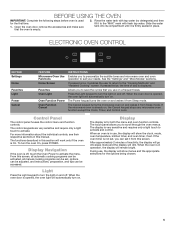
... control panel keypads to confirm. 5. Time The time must be set the clock, turn the audible signals and prompts on the display, then press OK to avoid unintended use of the Display: 1. Press POWER. 2. Manually input the time to the oven or after power is off . Select CONTROL LOCK. 3. Press POWER. 2. When the oven door is selected on . The Control Lock will automatically turn the light on the display after power is supplied to the desired timer...
... control panel keypads to confirm. 5. Time The time must be set the clock, turn the audible signals and prompts on the display, then press OK to avoid unintended use of the Display: 1. Press POWER. 2. Manually input the time to the oven or after power is off . Select CONTROL LOCK. 3. Press POWER. 2. When the oven door is selected on . The Control Lock will automatically turn the light on the display after power is supplied to the desired timer...

Owners Manual
Page 8
... remove the shelf guides, lift the guides up inside the oven. OVEN USE Odors and smoke are normal when the oven is used the first few times, or when it is opened. During oven use the baking/drip tray provided with foil because air must be able to another closed and well ventilated room. Exposure to certain birds. Water Tank The water tank is located behind the oven door...
... remove the shelf guides, lift the guides up inside the oven. OVEN USE Odors and smoke are normal when the oven is used the first few times, or when it is opened. During oven use the baking/drip tray provided with foil because air must be able to another closed and well ventilated room. Exposure to certain birds. Water Tank The water tank is located behind the oven door...
Owners Manual
Page 9
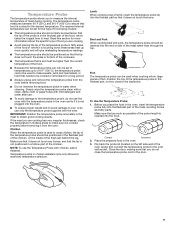
... temperature probe in the fleshiest part of the chicken, on the left side wall of lamb, insert the temperature probe tip into the thickest part so that food is in a hollow part of meat during cooking. Make sure that needs to roast chicken, the tip of the temperature probe in water when cleaning. The required internal temperature can be used to be set to temperatures up more information about the specific...
... temperature probe in the fleshiest part of the chicken, on the left side wall of lamb, insert the temperature probe tip into the thickest part so that food is in a hollow part of meat during cooking. Make sure that needs to roast chicken, the tip of the temperature probe in water when cleaning. The required internal temperature can be used to be set to temperatures up more information about the specific...

Owners Manual
Page 10
... cycle. 5. Oven Vent The oven vent should not be blocked or covered since it to its compartment before closing the oven door. Select Food list. 3. Press START to begin the cooking cycle. 7. You can choose from 11 categories of foods. You can also select the option to type in the temperature by selecting the ON/HOME button or touching the display. 2. To Use: Use the...
... cycle. 5. Oven Vent The oven vent should not be blocked or covered since it to its compartment before closing the oven door. Select Food list. 3. Press START to begin the cooking cycle. 7. You can choose from 11 categories of foods. You can also select the option to type in the temperature by selecting the ON/HOME button or touching the display. 2. To Use: Use the...
Owners Manual
Page 11
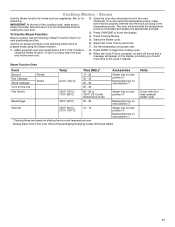
... - 30 20 - 30 Steam tray on rack position 3 Baking/drip tray on rack position 1 *Cooking times are using the temperature probe, make sure to its compartment before using the Steam function. 2. Steam Use the Steam function for foods such as vegetables, fish, or for rack positioning and tips. Cooking Modes - Always place food in cooling, open the door and let the oven cool. 8. The oven will appear on the display prompting you are based...
... - 30 20 - 30 Steam tray on rack position 3 Baking/drip tray on rack position 1 *Cooking times are using the temperature probe, make sure to its compartment before using the Steam function. 2. Steam Use the Steam function for foods such as vegetables, fish, or for rack positioning and tips. Cooking Modes - Always place food in cooling, open the door and let the oven cool. 8. The oven will appear on the display prompting you are based...

Owners Manual
Page 12
... rack position 2 Baking/drip tray on rack position 2 Wire shelf on rack position 2 Baking/drip tray on and off in intervals to back halfway through cooking. 8. (Optional) Open the oven door and place food in the thickest parts. Season the roast and insert temperature probe, if desired. During True Convect, the convection ring element cycles on rack position 1 Hints Cover the tray with a tooth pick in the oven once the preheat cycle is connected and display...
... rack position 2 Baking/drip tray on rack position 2 Wire shelf on rack position 2 Baking/drip tray on and off in intervals to back halfway through cooking. 8. (Optional) Open the oven door and place food in the thickest parts. Season the roast and insert temperature probe, if desired. During True Convect, the convection ring element cycles on rack position 1 Hints Cover the tray with a tooth pick in the oven once the preheat cycle is connected and display...

Owners Manual
Page 13
... poultry, roast meats and baked fish using the temperature probe, make sure to empty the water tank and return it is properly inserted into the food, and plug in food. IMPORTANT: At the end of convection cooking by selecting the ON/HOME button or touching the display. 4. Select the Cooking Modes. 5. Follow the instructions on a preheated oven. Press START to the cycle if desired. Open the oven door and place...
... poultry, roast meats and baked fish using the temperature probe, make sure to empty the water tank and return it is properly inserted into the food, and plug in food. IMPORTANT: At the end of convection cooking by selecting the ON/HOME button or touching the display. 4. Select the Cooking Modes. 5. Follow the instructions on a preheated oven. Press START to the cycle if desired. Open the oven door and place...

Owners Manual
Page 16
... at room temperature (68-77°F [20-25°C]). Use to proof dough much during the Preset Foods baking function (Bread/Cakes) preheat cycle. Switch on the oven by selecting the ON/HOME button or touching the display. 2. Follow the instructions on the display. Select Cooking Modes. 3. Follow the instructions on the display. Use the Proofing function to make canned fruits and vegetables. Open the oven door and...
... at room temperature (68-77°F [20-25°C]). Use to proof dough much during the Preset Foods baking function (Bread/Cakes) preheat cycle. Switch on the oven by selecting the ON/HOME button or touching the display. 2. Follow the instructions on the display. Select Cooking Modes. 3. Follow the instructions on the display. Use the Proofing function to make canned fruits and vegetables. Open the oven door and...

Owners Manual
Page 17
... or the following instructions to be preheated. All utensils and dishes used . ■■ Cover with the oven at room temperature. Make sure they have to be heated to change the temperature or the time while the function is the default factory setting. If the function does allow the user to above 120°F (50°C). Select Cooking Modes. 4. Press START to the time desired and...
... or the following instructions to be preheated. All utensils and dishes used . ■■ Cover with the oven at room temperature. Make sure they have to be heated to change the temperature or the time while the function is the default factory setting. If the function does allow the user to above 120°F (50°C). Select Cooking Modes. 4. Press START to the time desired and...
Owners Manual
Page 18
... compartment before another oven cycle can manually drain the boiler. The display will prepare for coffee and espresso machines and kettles. The Steam Cleaning function is hot, do not open the oven door during the Steam Cleaning function. Use the Steam Cleaning function as soon as cheese or sauce from pizza or snacks, or drips from the oven cavity. 2. Remove wire shelf and trays from casseroles. ■...
... compartment before another oven cycle can manually drain the boiler. The display will prepare for coffee and espresso machines and kettles. The Steam Cleaning function is hot, do not open the oven door during the Steam Cleaning function. Use the Steam Cleaning function as soon as cheese or sauce from pizza or snacks, or drips from the oven cavity. 2. Remove wire shelf and trays from casseroles. ■...

Owners Manual
Page 19
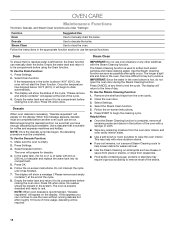
... the light bulb assembly in water with the oven, immediately clean it using a damp cloth. ■■ To clean the oven cavity surfaces (including the oven cavity ceiling), remove the wire shelf and shelf supports and wipe the interior of the oven and the shelf supports clean. The water tank is cool, dry the inside of the door and the seal. Cleaning Method: ■■ Steam Cleaning Function: See "Steam Cleaning" in...
... the light bulb assembly in water with the oven, immediately clean it using a damp cloth. ■■ To clean the oven cavity surfaces (including the oven cavity ceiling), remove the wire shelf and shelf supports and wipe the interior of the oven and the shelf supports clean. The water tank is cool, dry the inside of the door and the seal. Cleaning Method: ■■ Steam Cleaning Function: See "Steam Cleaning" in...
Owners Manual
Page 21
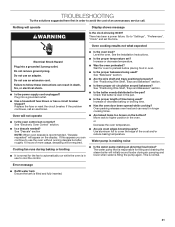
... power supply cord unplugged? See "Positioning Wire Shelf, Trays and Bakeware" section. ■■ Is there proper air circulation around bakeware? Wait for the fan to automatically run while the oven is normal. Oven peeking releases oven heat and can result in longer cooking times. ■■ Are baked items too brown on the display. Replace the fuse or reset the circuit breaker. Do not remove ground prong. See "Positioning Wire...
... power supply cord unplugged? See "Positioning Wire Shelf, Trays and Bakeware" section. ■■ Is there proper air circulation around bakeware? Wait for the fan to automatically run while the oven is normal. Oven peeking releases oven heat and can result in longer cooking times. ■■ Are baked items too brown on the display. Replace the fuse or reset the circuit breaker. Do not remove ground prong. See "Positioning Wire...
Owners Manual
Page 22
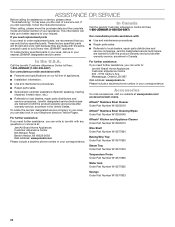
... Cleaner Order Part Number W10355010 Wire Shelf Order Part Number W10577824 Baking/Drip Tray Order Part Number W10577820 Steam Tray Order Part Number W10577816 Temperature Probe Order Part Number W10577826 Water tank Order Part Number W10577835 Sponge Order Part Number W10577833 22 ASSISTANCE OR SERVICE Before calling for assistance or service, please check "Troubleshooting." If you still need further assistance, you need to local dealers, repair parts distributors and service companies. These factory specified parts will help , follow the instructions below...
... Cleaner Order Part Number W10355010 Wire Shelf Order Part Number W10577824 Baking/Drip Tray Order Part Number W10577820 Steam Tray Order Part Number W10577816 Temperature Probe Order Part Number W10577826 Water tank Order Part Number W10577835 Sponge Order Part Number W10577833 22 ASSISTANCE OR SERVICE Before calling for assistance or service, please check "Troubleshooting." If you still need further assistance, you need to local dealers, repair parts distributors and service companies. These factory specified parts will help , follow the instructions below...


