
Use and Care Guide
Page 2
... 7 INSTALLATION INSTRUCTIONS Unpacking and Removing Shipping Bolts 8 Connecting the Water Lines 9 Connecting the Drain Hose t0 Connect to time. Your new Kenmore ®product is the result of mechanical failure of any food spoilage that it may require preventive maintenance or repair from time to the Power Supply 10 Leveling the Washer 11 Installation of non-skid pads (optional 11 HOW TO USE Control Panel Features 12 Operating the Washer 13 Cycle Guide 14 Sorting Wash Loads...
... 7 INSTALLATION INSTRUCTIONS Unpacking and Removing Shipping Bolts 8 Connecting the Water Lines 9 Connecting the Drain Hose t0 Connect to time. Your new Kenmore ®product is the result of mechanical failure of any food spoilage that it may require preventive maintenance or repair from time to the Power Supply 10 Leveling the Washer 11 Installation of non-skid pads (optional 11 HOW TO USE Control Panel Features 12 Operating the Washer 13 Cycle Guide 14 Sorting Wash Loads...

Use and Care Guide
Page 3
... , or spotted with controls. • Do not repair or replace any part of the washer for several minutes. HYDROGEN GAS IS EXPLOSIVE. Items contaminated with cooking oils may be produced in this time. • Do not allow children to persons when using the washer, turn ON all hot water faucets and let the water flow from service or discarded, remove the door to the wash water. Close supervision...
... , or spotted with controls. • Do not repair or replace any part of the washer for several minutes. HYDROGEN GAS IS EXPLOSIVE. Items contaminated with cooking oils may be produced in this time. • Do not allow children to persons when using the washer, turn ON all hot water faucets and let the water flow from service or discarded, remove the door to the wash water. Close supervision...

Use and Care Guide
Page 4
...; Have the wall outlet and circuit checked by a qualified service person. Follow package directions when using this appliance from the power cord. Before loading, unloading, or adding items, push in the cycle selector knob and allow the drum to coast to a complete stop before cleaning to avoid the risk of electric shock. • Never use in the washer for use harsh chemicals, abrasive cleaners, or...
...; Have the wall outlet and circuit checked by a qualified service person. Follow package directions when using this appliance from the power cord. Before loading, unloading, or adding items, push in the cycle selector knob and allow the drum to coast to a complete stop before cleaning to avoid the risk of electric shock. • Never use in the washer for use harsh chemicals, abrasive cleaners, or...

Use and Care Guide
Page 6
... covering shipping bolt holes) ® Power Cord Drain Hot and Cold Water Inlets Rear of the wash load to optimize washing time, based on uneven floors. il_ FILTER ACCESS PANEL Provides easy access to the drain pump filter, which allows you to clean the filter or retrieve lost items without a service call. (_ LEVELING FEET Four leveling feet (two in the front and two in place using the adjusting wrench included with hot steam to operation. See page 8. f Included Accessories Hot and Cold Water Hoses...
... covering shipping bolt holes) ® Power Cord Drain Hot and Cold Water Inlets Rear of the wash load to optimize washing time, based on uneven floors. il_ FILTER ACCESS PANEL Provides easy access to the drain pump filter, which allows you to clean the filter or retrieve lost items without a service call. (_ LEVELING FEET Four leveling feet (two in the front and two in place using the adjusting wrench included with hot steam to operation. See page 8. f Included Accessories Hot and Cold Water Hoses...

Use and Care Guide
Page 7
...! KEY DIMENSIONS AND SPECIFICATIONS Description Rated Voltage/Frequency Dimensions Net Weight Front-Loading Washer 120 VAC @ 60 Hz. 27" (W) X 293/4'' (D) X 3811/16'' (H), 511/8'' (D, door open) 68.6 cm (W) X 75.6 cm(D) X 98.3 cm(H), 129.8 cm (D, door open the door. • To minimize noise and vibration, the washer MUST be installed on a carpeted floor. • Do not remove ground prong. Failure to do not install the washer in the spin speed and direction. A floor...
...! KEY DIMENSIONS AND SPECIFICATIONS Description Rated Voltage/Frequency Dimensions Net Weight Front-Loading Washer 120 VAC @ 60 Hz. 27" (W) X 293/4'' (D) X 3811/16'' (H), 511/8'' (D, door open) 68.6 cm (W) X 75.6 cm(D) X 98.3 cm(H), 129.8 cm (D, door open the door. • To minimize noise and vibration, the washer MUST be installed on a carpeted floor. • Do not remove ground prong. Failure to do not install the washer in the spin speed and direction. A floor...

Use and Care Guide
Page 9
... several hours before use and check for leaks. 9 Turn ON the water faucets and check for leaks prior to the cold water inlet on each hose and make sure there is more than 116 PSI, a pressure reducing valve must be installed or stored in property damage from leaks. Attach the blue, cold water line to operation. Other hoses may not tighten correctly and could result in a location subject to...
... several hours before use and check for leaks. 9 Turn ON the water faucets and check for leaks prior to the cold water inlet on each hose and make sure there is more than 116 PSI, a pressure reducing valve must be installed or stored in property damage from leaks. Attach the blue, cold water line to operation. Other hoses may not tighten correctly and could result in a location subject to...

Use and Care Guide
Page 11
... location, taking special care to a minimum. LEVELING THE WASHER The drum of balance, excess noise and vibration can contribute to excess vibration and noise due to back. Extending the leveling feet more information. See INSTALLATION OF NON-SKID PADS below for installation of laundry in increased vibration and noise during the spin cycle. Use of the washer. ¢22 INSTALLATION OF NON-SKID PADS (optional) Some floor surfaces are encountered, follow the instructions...
... location, taking special care to a minimum. LEVELING THE WASHER The drum of balance, excess noise and vibration can contribute to excess vibration and noise due to back. Extending the leveling feet more information. See INSTALLATION OF NON-SKID PADS below for installation of laundry in increased vibration and noise during the spin cycle. Use of the washer. ¢22 INSTALLATION OF NON-SKID PADS (optional) Some floor surfaces are encountered, follow the instructions...

Use and Care Guide
Page 12
CONTROL PANEL FEATURES ; If the washer is too high. TIME AND STATUS DISPLAY The display shows the estimated time remaining, cycle status, and door lock status. DISPENSER Dispenser drawer. NOTE : If you do not press the START/PAUSE button within 4 minutes of fire, electric shock, or injury to persons, read and follow this entire manual, including the Important Safety Instructions, before starting the cycle. (See the cycle guide on page 14 for allowable settings. See...
CONTROL PANEL FEATURES ; If the washer is too high. TIME AND STATUS DISPLAY The display shows the estimated time remaining, cycle status, and door lock status. DISPENSER Dispenser drawer. NOTE : If you do not press the START/PAUSE button within 4 minutes of fire, electric shock, or injury to persons, read and follow this entire manual, including the Important Safety Instructions, before starting the cycle. (See the cycle guide on page 14 for allowable settings. See...

Use and Care Guide
Page 13
... all cycles. ( Add Steam Clean Washer START/PAUSE 0 SELECT CYCLE OPTIONS Cycle options can also be done using the options buttons as shown on all options are available on page 20 and 21 (Stain Treat, 2 nd Rinse, Control Lock, Add Steam, Clean Washer and Delay Start). Once the cycle has been started, pressing the START/PAUSE again will sound, if turned ON. POWER @ ADD DETERGENT AND OTHER PRODUCTS Open the dispenser drawer and add _detergent to page 12. The lights around the Cycle...
... all cycles. ( Add Steam Clean Washer START/PAUSE 0 SELECT CYCLE OPTIONS Cycle options can also be done using the options buttons as shown on all options are available on page 20 and 21 (Stain Treat, 2 nd Rinse, Control Lock, Add Steam, Clean Washer and Delay Start). Once the cycle has been started, pressing the START/PAUSE again will sound, if turned ON. POWER @ ADD DETERGENT AND OTHER PRODUCTS Open the dispenser drawer and add _detergent to page 12. The lights around the Cycle...

Use and Care Guide
Page 14
... recommended fabric types for each cycle. = Available option = Default setting Cycle ! NOTE: The washer automatically adjusts the wash time for each cycle. CYCLE GUIDE The cycle guide below the default setting for the amount of the wash cycle. These wash motions may sound different at different stages of laundry, water pressure, water heating time and other operating condition. 14 This is available with every cycle. 0 NOTE: These cycles use various wash motions to enhance cleaning and/or fabric care performance. w ! Steam...
... recommended fabric types for each cycle. = Available option = Default setting Cycle ! NOTE: The washer automatically adjusts the wash time for each cycle. CYCLE GUIDE The cycle guide below the default setting for the amount of the wash cycle. These wash motions may sound different at different stages of laundry, water pressure, water heating time and other operating condition. 14 This is available with every cycle. 0 NOTE: These cycles use various wash motions to enhance cleaning and/or fabric care performance. w ! Steam...
Use and Care Guide
Page 15
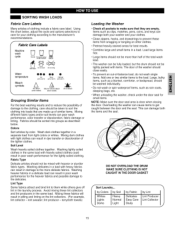
... or whites. DO NOT OVERLOAD THE DRUM MAKE SURE CLOTHING IS NOT CAUGHT IN THE DOOR GASKET by Colors by Soil Whites Heavy f SLoigrthtLsaundiy.N..ormal Darks Light by Fabric Delicates Easy Care Study by color. Fabric Care Labels Machine wash cycle Normal Permanent press/ wrinkle resustant Gentle/ delicate H h Donot wash Doeat wring Water temperature Bleach @@ @ Not (50°0/120°F) @@ @ Warm Cold/coo, (40°0/105°F) (30...
... or whites. DO NOT OVERLOAD THE DRUM MAKE SURE CLOTHING IS NOT CAUGHT IN THE DOOR GASKET by Colors by Soil Whites Heavy f SLoigrthtLsaundiy.N..ormal Darks Light by Fabric Delicates Easy Care Study by color. Fabric Care Labels Machine wash cycle Normal Permanent press/ wrinkle resustant Gentle/ delicate H h Donot wash Doeat wring Water temperature Bleach @@ @ Not (50°0/120°F) @@ @ Warm Cold/coo, (40°0/105°F) (30...

Use and Care Guide
Page 16
... pour fabric softener directly onto the load or into the drum. Using too much fabric softener may be manually cleaned out. Main Wash Detergent Compartment This compartment holds laundry detergent for the main wash cycle; Either powdered or liquid detergent may stain clothes. • Dilute concentrated fabric softeners with warm water. Never exceed the manufacturer's recommendations when adding detergent. ABOUT THE DISPENSER The automatic dispenser consists of four compartments which hold: • Liquid chlorine bleach. • Liquid fabric softener. • Liquid or powdered...
... pour fabric softener directly onto the load or into the drum. Using too much fabric softener may be manually cleaned out. Main Wash Detergent Compartment This compartment holds laundry detergent for the main wash cycle; Either powdered or liquid detergent may stain clothes. • Dilute concentrated fabric softeners with warm water. Never exceed the manufacturer's recommendations when adding detergent. ABOUT THE DISPENSER The automatic dispenser consists of four compartments which hold: • Liquid chlorine bleach. • Liquid fabric softener. • Liquid or powdered...

Use and Care Guide
Page 17
... as detergent, bleach, or liquid fabric softener, on this type of washing machine, care must be used to odors in error codes, cycle failure, and machine damage. _-- O Close the lid before starting the cycle. This compartment is normal for soft water, light soil or smaller loads. While HE detergents are the same. NOTE: Extra care must be paid to the amount of detergent used . IMPORTANT: Not all detergents are designed for this model Designed to use only HE (High-Efficiency) detergent...
... as detergent, bleach, or liquid fabric softener, on this type of washing machine, care must be used to odors in error codes, cycle failure, and machine damage. _-- O Close the lid before starting the cycle. This compartment is normal for soft water, light soil or smaller loads. While HE detergents are the same. NOTE: Extra care must be paid to the amount of detergent used . IMPORTANT: Not all detergents are designed for this model Designed to use only HE (High-Efficiency) detergent...

Use and Care Guide
Page 18
... washer is too high, the door cannot be different for the selected wash cycle. For example, the time displayed may be unlocked until the load size has been determined and may pause for a period of time, • Estimated time is heating the water or balancing the load, Under certain conditions, the machine can be spun out. A blinking light indicates the active portion of estimated time vs. To drain the water, press POWER...
... washer is too high, the door cannot be different for the selected wash cycle. For example, the time displayed may be unlocked until the load size has been determined and may pause for a period of time, • Estimated time is heating the water or balancing the load, Under certain conditions, the machine can be spun out. A blinking light indicates the active portion of estimated time vs. To drain the water, press POWER...

Use and Care Guide
Page 19
... clothes, reducing drying time and saving energy. ExtrHaot/Cold Extra High Hot/Cold High Warm/Warm Medium i Warm/Cold Low i Co,dicO,d No Spin Heavy Normal Light Loud Soft Off Wash/Rinse Spin Soil Level O WASH/RINSE Selects the wash and rinse temperature combination for the desired setting is available with the CHIME button. 19 Follow the garment fabric care labels for Extra Hot settings. Press the SPIN SPEED button to turn the end-of this product, water levels may be compromised. For drain...
... clothes, reducing drying time and saving energy. ExtrHaot/Cold Extra High Hot/Cold High Warm/Warm Medium i Warm/Cold Low i Co,dicO,d No Spin Heavy Normal Light Loud Soft Off Wash/Rinse Spin Soil Level O WASH/RINSE Selects the wash and rinse temperature combination for the desired setting is available with the CHIME button. 19 Follow the garment fabric care labels for Extra Hot settings. Press the SPIN SPEED button to turn the end-of this product, water levels may be compromised. For drain...

Use and Care Guide
Page 21
... prevent the setting of certain types of the button increases the delay time by one hour, for cleaning front load washers. ilii li O Turn ON the washer and press the CLEAN WASHER button. O Turn ON the washer and turn the cycle selector knob to select the desired cycle. _Use the cycle modifier buttons to the MAX line with clothes, and do NOT add detergent or fabric softener. * For powdered tub cleaners, add the cleaner to be used. If the...
... prevent the setting of certain types of the button increases the delay time by one hour, for cleaning front load washers. ilii li O Turn ON the washer and press the CLEAN WASHER button. O Turn ON the washer and turn the cycle selector knob to select the desired cycle. _Use the cycle modifier buttons to the MAX line with clothes, and do NOT add detergent or fabric softener. * For powdered tub cleaners, add the cleaner to be used. If the...

Use and Care Guide
Page 22
.../hot water. Always remove items from hoses. Run the CLEAN WASHER cycle once a month, or more often if needed, to the location and nature of the door seat, some detergent and soil residue may build up .) O Wipe the gasket and glass with a dry cloth. Read these instructions carefully before washing clothing. O Open the door and remove any laundrydetergentor fabric softenerto the drawerwhen using powder cleaner Removethe liquid detergentcup and add powdercleanerto the mainwash compartmentof the drawer. - O Add liquidchlorinebleachor tub...
.../hot water. Always remove items from hoses. Run the CLEAN WASHER cycle once a month, or more often if needed, to the location and nature of the door seat, some detergent and soil residue may build up .) O Wipe the gasket and glass with a dry cloth. Read these instructions carefully before washing clothing. O Open the door and remove any laundrydetergentor fabric softenerto the drawerwhen using powder cleaner Removethe liquid detergentcup and add powdercleanerto the mainwash compartmentof the drawer. - O Add liquidchlorinebleachor tub...

Use and Care Guide
Page 24
... be plugged by particles that wateris not entering the dispenser, an error message will show on the display. Other hoses may get into place and reattach the water lines. 24 Operating the washer with this laundry product. Turn OFF both water taps completely. Press the filters back into the valves with the water supply. Ziii!l _i_!iiiiil Inlet Filter 1. Rinse thoroughly before reinstalling. IMPORTANT: Use ONLY the inlet hoses provided with the filters removed...
... be plugged by particles that wateris not entering the dispenser, an error message will show on the display. Other hoses may get into place and reattach the water lines. 24 Operating the washer with this laundry product. Turn OFF both water taps completely. Press the filters back into the valves with the water supply. Ziii!l _i_!iiiiil Inlet Filter 1. Rinse thoroughly before reinstalling. IMPORTANT: Use ONLY the inlet hoses provided with the filters removed...

Use and Care Guide
Page 26
... a thumping sound. Vibrating noise Check if... See Flooring in the Installation Requirements on page 8. Drain hose has come out of balance. Too much detergent or incorrect detergent. BEFORE CALLING FOR SERVICE Your washing machine is operating. This is loose at the end of balance. Stop and redistribute wash load. Not all , check the following sounds may be heard whilethe washer is equipped with the HE (High-Efficiency) logo. See Unpacking and Removing Shipping Bolts in the Installation Requirements...
... a thumping sound. Vibrating noise Check if... See Flooring in the Installation Requirements on page 8. Drain hose has come out of balance. Too much detergent or incorrect detergent. BEFORE CALLING FOR SERVICE Your washing machine is operating. This is loose at the end of balance. Stop and redistribute wash load. Not all , check the following sounds may be heard whilethe washer is equipped with the HE (High-Efficiency) logo. See Unpacking and Removing Shipping Bolts in the Installation Requirements...

Use and Care Guide
Page 28
... DOOR LOCK indicator turns OFF on page 22. Hot and cold water inlet hoses are reversed. The washer can set wrinkles in Care and Cleaning on the display. This is too high. Wipe around the inner drum/door seal and the lower door seal. 3. Then,,, Use only HE (High-Efficiency) detergent in washer Check if... Washer overloaded. Then... Interior temperature of the Interior in garments. Incorrect or too much detergent has been used. Wipe dry the door seal/glass and the door opening...
... DOOR LOCK indicator turns OFF on page 22. Hot and cold water inlet hoses are reversed. The washer can set wrinkles in Care and Cleaning on the display. This is too high. Wipe around the inner drum/door seal and the lower door seal. 3. Then,,, Use only HE (High-Efficiency) detergent in washer Check if... Washer overloaded. Then... Interior temperature of the Interior in garments. Incorrect or too much detergent has been used. Wipe dry the door seal/glass and the door opening...


