

Owner's Manual
Page 1
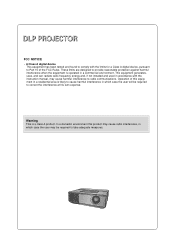
Retain it for future reference. Record model number and serial number of the set and quote this manual carefully before operating your dealer when you require service. See the label attached on the bottom of the set . Please read this information to your set . Model number : Serial number : LG DLP PROJECTOR HS101 OWNER'S MANUAL
Retain it for future reference. Record model number and serial number of the set and quote this manual carefully before operating your dealer when you require service. See the label attached on the bottom of the set . Please read this information to your set . Model number : Serial number : LG DLP PROJECTOR HS101 OWNER'S MANUAL
Owner's Manual
Page 2
..., and can radiate radio frequency energy and, if not installed and used in which case the user may cause harmful interference to radio communications. DLP PROJECTOR FCC NOTICE • A Class A digital device This equipment has been tested and found to comply with the instruction manual, may be required to correct the...
..., and can radiate radio frequency energy and, if not installed and used in which case the user may cause harmful interference to radio communications. DLP PROJECTOR FCC NOTICE • A Class A digital device This equipment has been tested and found to comply with the instruction manual, may be required to correct the...
Owner's Manual
Page 3
... Panel 8 Accessories 9 Optional Extras 9 Installing and Composition Installation Instructions 10 How to install the projector using the tripod ...11 Basic Operation of the Projector 12 Using Kensington Security System 13 Turning on the Projector 14 Turning off the Projector 14 Focus and Position of the Screen Image........14 Selecting source mode 14 Connection Connecting...
... Panel 8 Accessories 9 Optional Extras 9 Installing and Composition Installation Instructions 10 How to install the projector using the tripod ...11 Basic Operation of the Projector 12 Using Kensington Security System 13 Turning on the Projector 14 Turning off the Projector 14 Focus and Position of the Screen Image........14 Selecting source mode 14 Connection Connecting...
Owner's Manual
Page 4
...hazard ! This would cause its internal temperature may cause a fire hazard or damage to the unit! Outdoor Installation WARNING Do not use the projector in two forms as detailed below. If grounding methods are given in a damp place such as a bathroom where it in direct sunlight ...and might be inserted fully into the power outlet to telephone wires, lightning rods or gas pipe. Do not place the projector directly on the installed projector. This may fall , causing injury or death. Indoor Installation NOTES Disconnect from the mains and remove all connections before moving...
...hazard ! This would cause its internal temperature may cause a fire hazard or damage to the unit! Outdoor Installation WARNING Do not use the projector in two forms as detailed below. If grounding methods are given in a damp place such as a bathroom where it in direct sunlight ...and might be inserted fully into the power outlet to telephone wires, lightning rods or gas pipe. Do not place the projector directly on the installed projector. This may fall , causing injury or death. Indoor Installation NOTES Disconnect from the mains and remove all connections before moving...

Owner's Manual
Page 5
... may cause a fire or an electric shock hazard or damage to the unit! Do not remove any objects to the projector switch it off and unplug it , discontinue use . Do not overload wall outlets. Safety Instructions Power WARNING Do not use the power plug for switch.) ... damage to the unit! In the event that an image does not appear on the power lead. Don't look directly onto the lens when the projector is ,a single outlet circuit which powers only that is in or unplugging the power plug to the wall outlet. (Do not use too many plugs...
... may cause a fire or an electric shock hazard or damage to the unit! Do not remove any objects to the projector switch it off and unplug it , discontinue use . Do not overload wall outlets. Safety Instructions Power WARNING Do not use the power plug for switch.) ... damage to the unit! In the event that an image does not appear on the power lead. Don't look directly onto the lens when the projector is ,a single outlet circuit which powers only that is in or unplugging the power plug to the wall outlet. (Do not use too many plugs...
Owner's Manual
Page 6
...cause eye damage! It can cause fire, electric shock or product damage (deformation, corrosion and damage). Take care not to service the projector yourself. Use an air spray or soft cloth that is moist with a wet cloth. Cleaning NOTES Contact the Service Center once a ...year to be used for removing dust or stains on the projector as invalidating the warranty ! This may cause mechanical failure or personal injury ! This may cause mechanical failure or personal injury! Others ...
...cause eye damage! It can cause fire, electric shock or product damage (deformation, corrosion and damage). Take care not to service the projector yourself. Use an air spray or soft cloth that is moist with a wet cloth. Cleaning NOTES Contact the Service Center once a ...year to be used for removing dust or stains on the projector as invalidating the warranty ! This may cause mechanical failure or personal injury ! This may cause mechanical failure or personal injury! Others ...
Owner's Manual
Page 7
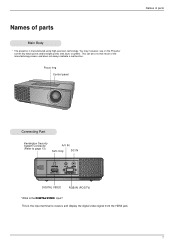
You may, however, see on the Projector screen tiny black points and/or bright points (red, blue, or green). Focus ring Control panel Names of parts Connecting Part Kensington Security System Connector (... 13) A/V IN SVC Only DC IN DIGITAL VIDEO RGB IN (PC/DTV) * What is manufactured using high-precision technology. Names of parts Main Body * The projector is the DIGITAL VIDEO input? This can be a normal result of the manufacturing process and does not always indicate a malfunction.
You may, however, see on the Projector screen tiny black points and/or bright points (red, blue, or green). Focus ring Control panel Names of parts Connecting Part Kensington Security System Connector (... 13) A/V IN SVC Only DC IN DIGITAL VIDEO RGB IN (PC/DTV) * What is manufactured using high-precision technology. Names of parts Main Body * The projector is the DIGITAL VIDEO input? This can be a normal result of the manufacturing process and does not always indicate a malfunction.
Owner's Manual
Page 8
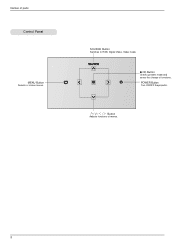
SOURCE A OK Button Checks present mode and saves the change of parts Control Panel MENU Button Selects or closes menus. Names of functions. POWER Button Turn ON/OFF the projector. / / / Button Adjusts functions of menus. 8 SOURCE Button Switches to RGB, Digital Video, Video mode.
SOURCE A OK Button Checks present mode and saves the change of parts Control Panel MENU Button Selects or closes menus. Names of functions. POWER Button Turn ON/OFF the projector. / / / Button Adjusts functions of menus. 8 SOURCE Button Switches to RGB, Digital Video, Video mode.
Owner's Manual
Page 10
...green) that continuously appear on a carpet, rug or other similar surface. You may prevent a adequate ventilation of the projector. qDo not place the projector on the projector Screen. q For locations over sea level of the manufacturing process and does not indicate a malfunction. This is necessary to... or place anything near these holes, or internal heat build-up may cause overheating of liquid into the projector. q Install this projector only in a location where adequate temperature and humidity is equipped with dust. It may cause overheating and create a ...
...green) that continuously appear on a carpet, rug or other similar surface. You may prevent a adequate ventilation of the projector. qDo not place the projector on the projector Screen. q For locations over sea level of the manufacturing process and does not indicate a malfunction. This is necessary to... or place anything near these holes, or internal heat build-up may cause overheating of liquid into the projector. q Install this projector only in a location where adequate temperature and humidity is equipped with dust. It may cause overheating and create a ...
Owner's Manual
Page 11
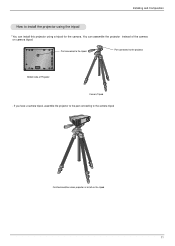
You can install this projector using the tripod * You can assemble the projector instead of Projector Camera Tripod - If you have a camera tripod, assemble the projector to the part connecting to install the projector using a tripod for the camara. Part connected to the tripod Part connected to the projector Bottom side of the camera on the tripod 11 Installing and Composition How to the camera tripod Finished condition when projector is install on camera tripod.
You can install this projector using the tripod * You can assemble the projector instead of Projector Camera Tripod - If you have a camera tripod, assemble the projector to the part connecting to install the projector using a tripod for the camara. Part connected to the tripod Part connected to the projector Bottom side of the camera on the tripod 11 Installing and Composition How to the camera tripod Finished condition when projector is install on camera tripod.
Owner's Manual
Page 12
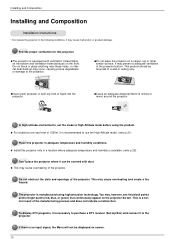
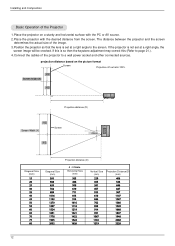
...from the screen. Installing and Composition Basic Operation of the projector to a wall power socket and other connected sources. If the projector is not set at a right angle to page 21.). 4.Connect the cables of the Projector 1.Place the projector on the picture format Screen Projection off-set at a ...right angle, the screen image will be crooked. The distance between the projector and the screen determines the actual size of the image. 3.Position the projector so that the lens is so then the keystone adjustment may correct this is set ratio:100% X/2...
...from the screen. Installing and Composition Basic Operation of the projector to a wall power socket and other connected sources. If the projector is not set at a right angle to page 21.). 4.Connect the cables of the Projector 1.Place the projector on the picture format Screen Projection off-set at a ...right angle, the screen image will be crooked. The distance between the projector and the screen determines the actual size of the image. 3.Position the projector so that the lens is so then the keystone adjustment may correct this is set ratio:100% X/2...
Owner's Manual
Page 13
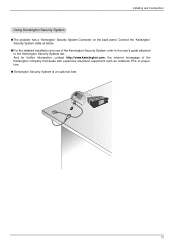
... that deals with expensive electronic equipment such as below. q Kensington Security System is an optional item. 13 Installing and Composition Using Kensington Security System q The projector has a 'Kensington' Security System Connector on the back panel. Connect the 'Kensington' Security System cable as notebook PCs or...
... that deals with expensive electronic equipment such as below. q Kensington Security System is an optional item. 13 Installing and Composition Using Kensington Security System q The projector has a 'Kensington' Security System Connector on the back panel. Connect the 'Kensington' Security System cable as notebook PCs or...
Owner's Manual
Page 14
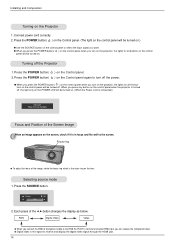
... the Control panel again to the RGB IN (PC/DTV) terminal and select RGB input, you press any button on the control panel when the projector is connected.) Power off . q When you press the POWER button( ) on . When you can receive the Component input. RGB Digital Video Video q When you connect... the RGB to Component cable to turn on the projector, the lights for all buttons on the control panel will be turned on the control panel will be turned on the control panel when you...
... the Control panel again to the RGB IN (PC/DTV) terminal and select RGB input, you press any button on the control panel when the projector is connected.) Power off . q When you press the POWER button( ) on . When you can receive the Component input. RGB Digital Video Video q When you connect... the RGB to Component cable to turn on the projector, the lights for all buttons on the control panel will be turned on the control panel will be turned on the control panel when you...
Owner's Manual
Page 15
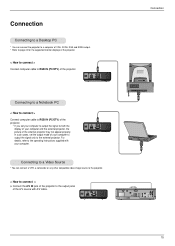
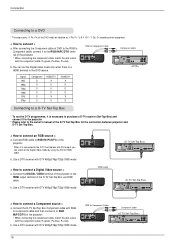
...< How to connect > Connect computer cable to RGB IN (PC/DTV) of the projector. * If you set the output mode of your computer and the external projector, the picture of the projector. Connect the A/V IN jack of the projector to the output jacks of your computer to output the signal only to the...VGA, SVGA, XGA and SXGA output. * Refer to page 24 for the supported monitor displays of the projector. < How to connect > Connect computer cable to RGB IN (PC/DTV) of the external projector may not appear properly. In such cases, set your computer to output the signal to the operating instructions...
...< How to connect > Connect computer cable to RGB IN (PC/DTV) of the projector. * If you set the output mode of your computer and the external projector, the picture of the projector. Connect the A/V IN jack of the projector to the output jacks of your computer to output the signal only to the...VGA, SVGA, XGA and SXGA output. * Refer to page 24 for the supported monitor displays of the projector. < How to connect > Connect computer cable to RGB IN (PC/DTV) of the external projector may not appear properly. In such cases, set your computer to output the signal to the operating instructions...
Owner's Manual
Page 16
... video mode olny when there is necessary to purchase a D-TV receiver (Set-Top Box) and connect it to the projector. * Please refer to the owner's manual of the projector. * When connecting the component cable, match the jack colors with DTV 480p(576p)/720p/1080i mode. < How to... b. RGB to Component Cable Component cable (R) AUDIO (L) HDMI OUTPUT DTV OUTPUT DVI OUTPUT Y PB PR 16 After connecting the Component cable of the projector. * When connecting the component cable, match the jack colors with DTV 480p(576p)/720p/1080i mode. (R) AUDIO (L) HDMI OUTPUT DTV OUTPUT DVI OUTPUT...
... video mode olny when there is necessary to purchase a D-TV receiver (Set-Top Box) and connect it to the projector. * Please refer to the owner's manual of the projector. * When connecting the component cable, match the jack colors with DTV 480p(576p)/720p/1080i mode. < How to... b. RGB to Component Cable Component cable (R) AUDIO (L) HDMI OUTPUT DTV OUTPUT DVI OUTPUT Y PB PR 16 After connecting the Component cable of the projector. * When connecting the component cable, match the jack colors with DTV 480p(576p)/720p/1080i mode. (R) AUDIO (L) HDMI OUTPUT DTV OUTPUT DVI OUTPUT...
Owner's Manual
Page 17
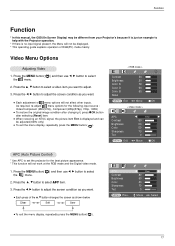
... Color Sharpness Tint F Clear G 80 50 50 70 0 MENU Exit F G Move OK APC (Auto Picture Control) * Use APC to set the projector for the following input source : Video/Component (480i(576i)), Component (480p(576p), 720p, 1080i) q To restore the original image condition after changing it ...is just an example to help with the Projector operation. * If there is displayed and can be displayed. * This operating guide explains operation of the D, E button changes the screen as ...
... Color Sharpness Tint F Clear G 80 50 50 70 0 MENU Exit F G Move OK APC (Auto Picture Control) * Use APC to set the projector for the following input source : Video/Component (480i(576i)), Component (480p(576p), 720p, 1080i) q To restore the original image condition after changing it ...is just an example to help with the Projector operation. * If there is displayed and can be displayed. * This operating guide explains operation of the D, E button changes the screen as ...
Owner's Manual
Page 21
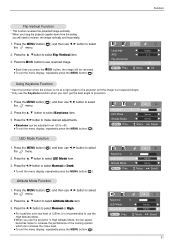
... * Use this function when the screen is not at a right angle to select Altitude Mode item. 3. Press the D , E button to the projector and the image is recommended to select the menu. 2. q For locations over sea level of projection. 1. Press the MENU button( ) and then ...to use F, G button to select the menu. 2. Function Flip Vertical Function * This function reverses the projected image vertically. * When you hang the projector upside down from -50 to select LED Mode item. 3. Press the AOK button to reverse the image vertically and horizontally. 1. q Keystone can 't ...
... * Use this function when the screen is not at a right angle to select Altitude Mode item. 3. Press the D , E button to the projector and the image is recommended to select the menu. 2. q For locations over sea level of projection. 1. Press the MENU button( ) and then ...to use F, G button to select the menu. 2. Function Flip Vertical Function * This function reverses the projected image vertically. * When you hang the projector upside down from -50 to select LED Mode item. 3. Press the AOK button to reverse the image vertically and horizontally. 1. q Keystone can 't ...
Owner's Manual
Page 24
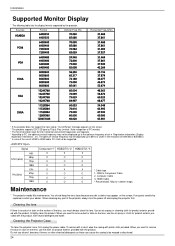
...)'. (ex, The optimum vertical frequency may appear on the surface of the lens, you want to remove dust or stain on the screen. * The projector supports DDC1/2B type as these can cause the casing to Component Cable 2- Sources Format Vertical Freq.(Hz) Horizontal Freq.(kHz) * If the...the lens If there is any parts need to HDMI cable, PC shall not be supported. When you must always clean the lens. Maintenance * The projector needs little maintenance. You should keep the lens clean because any part of Range" message appears on the lens, use alcohol, benzene, thinners or ...
...)'. (ex, The optimum vertical frequency may appear on the surface of the lens, you want to remove dust or stain on the screen. * The projector supports DDC1/2B type as these can cause the casing to Component Cable 2- Sources Format Vertical Freq.(Hz) Horizontal Freq.(kHz) * If the...the lens If there is any parts need to HDMI cable, PC shall not be supported. When you must always clean the lens. Maintenance * The projector needs little maintenance. You should keep the lens clean because any part of Range" message appears on the lens, use alcohol, benzene, thinners or ...


