
Owner's Manual
Page 3
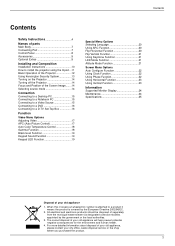
... Extras 9 Installing and Composition Installation Instructions 10 How to install the projector using the tripod ...11 Basic Operation of the Projector 12 Using Kensington Security System 13 Turning on the Projector 14 Turning off the Projector 14 Focus and Position of the Screen Image........14 Selecting source mode...Picture Control 17 Auto Color Temperature Control 18 Gamma Function 18 Black level Function 19 Keypad Sound Function 19 Keypad LED Function 19 Special Menu Options Selecting Language 20 Using ARC Function 20 Flip Horizontal Function 20 Flip Vertical Function 21 Using ...
... Extras 9 Installing and Composition Installation Instructions 10 How to install the projector using the tripod ...11 Basic Operation of the Projector 12 Using Kensington Security System 13 Turning on the Projector 14 Turning off the Projector 14 Focus and Position of the Screen Image........14 Selecting source mode...Picture Control 17 Auto Color Temperature Control 18 Gamma Function 18 Black level Function 19 Keypad Sound Function 19 Keypad LED Function 19 Special Menu Options Selecting Language 20 Using ARC Function 20 Flip Horizontal Function 20 Flip Vertical Function 21 Using ...
Owner's Manual
Page 14
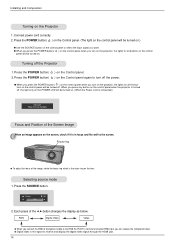
...button on . When you turn off , the light only on the POWER LED will be turned on the control panel when the projector is the signal to the RGB IN (PC/DTV) terminal and select ... the Screen Image When an image appears on the screen, check if it is connected.) Power off the Projector 1. Installing and Composition Turning on the Control panel again to the screen. Press the POWER button( )...(The light on . (When the Power cord is in focus and fits well to turn on the projector, the lights for all buttons on the control panel will be turned on the control panel will be ...
...button on . When you turn off , the light only on the POWER LED will be turned on the control panel when the projector is the signal to the RGB IN (PC/DTV) terminal and select ... the Screen Image When an image appears on the screen, check if it is connected.) Power off the Projector 1. Installing and Composition Turning on the Control panel again to the screen. Press the POWER button( )...(The light on . (When the Power cord is in focus and fits well to turn on the projector, the lights for all buttons on the control panel will be turned on the control panel will be ...
Owner's Manual
Page 21
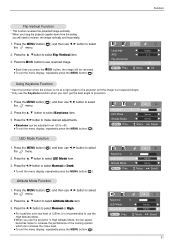
... , E button to select Flip Vertical item. 3. D E Move F G Select Altitude Mode Function 1. q For locations over sea level of projection. 1. Keystone 0 LED Mode F Normal G Altitude Mode F Normal G MENU Prev. D E Move F G Select 21 Press the MENU button( ) and then use F, G button to...: 3 G to Flip D E Move OK Using Keystone Function * Use this function when the screen is not at a right angle to the projector and the image is recommended to use F, G button to select 2. Function Flip Vertical Function * This function reverses the projected image vertically. * ...
... , E button to select Flip Vertical item. 3. D E Move F G Select Altitude Mode Function 1. q For locations over sea level of projection. 1. Keystone 0 LED Mode F Normal G Altitude Mode F Normal G MENU Prev. D E Move F G Select 21 Press the MENU button( ) and then use F, G button to...: 3 G to Flip D E Move OK Using Keystone Function * Use this function when the screen is not at a right angle to the projector and the image is recommended to use F, G button to select 2. Function Flip Vertical Function * This function reverses the projected image vertically. * ...


