
Owners Manual
Page 1
All Rights Reserved. ENGLISH ESPAÑOL FRANÇAIS LFXS26973* / LFXC22526* / LFXS28968* / LMXS28626* / LMXS28636* / LMRS28626* / LFXS26566* / LFXS28566* MFL70761734 Rev.02_072120 www.lg.com Copyright © 2020 LG Electronics Inc. OWNER'S MANUAL FRENCH DOOR REFRIGERATOR Read this owner's manual thoroughly before operating the appliance and keep it handy for reference at all times.
All Rights Reserved. ENGLISH ESPAÑOL FRANÇAIS LFXS26973* / LFXC22526* / LFXS28968* / LMXS28626* / LMXS28636* / LMRS28626* / LFXS26566* / LFXS28566* MFL70761734 Rev.02_072120 www.lg.com Copyright © 2020 LG Electronics Inc. OWNER'S MANUAL FRENCH DOOR REFRIGERATOR Read this owner's manual thoroughly before operating the appliance and keep it handy for reference at all times.
Owners Manual
Page 2
... Dispenser 32 Ice Compartment 33 Automatic Icemaker 35 Storing Food 36 Humidity Controlled Crispers 37 Glide'N'Serve 38 Refrigerator Shelves 39 Door-in-Door 39 Door Bins 40 Durabase 41 SMART FUNCTIONS 41 LG ThinQ Application 43 Smart Grid Function 44 Smart Diagnosis™ Feature 46 MAINTENANCE 46 Cleaning 46 Air Filter...
... Dispenser 32 Ice Compartment 33 Automatic Icemaker 35 Storing Food 36 Humidity Controlled Crispers 37 Glide'N'Serve 38 Refrigerator Shelves 39 Door-in-Door 39 Door Bins 40 Durabase 41 SMART FUNCTIONS 41 LG ThinQ Application 43 Smart Grid Function 44 Smart Diagnosis™ Feature 46 MAINTENANCE 46 Cleaning 46 Air Filter...

Owners Manual
Page 3
...heaters. CAUTION You may happen if the instructions are very important. These words mean: WARNING You may deteriorate. • Do not place the refrigerator in this product to replace a standard 2-prong wall outlet with a switch. This is damaged, malfunctioning, partially disassembled, or has missing or ... • Only connect this manual and on electrical parts may be dangerous for easy access to a power source. • When moving the refrigerator, be turned off with a standard 3-prong wall outlet. • Do not use an extension cord. • The appliance must be positioned...
...heaters. CAUTION You may happen if the instructions are very important. These words mean: WARNING You may deteriorate. • Do not place the refrigerator in this product to replace a standard 2-prong wall outlet with a switch. This is damaged, malfunctioning, partially disassembled, or has missing or ... • Only connect this manual and on electrical parts may be dangerous for easy access to a power source. • When moving the refrigerator, be turned off with a standard 3-prong wall outlet. • Do not use an extension cord. • The appliance must be positioned...

Owners Manual
Page 4
... that they are necessarily small. Doing so may result in this appliance. bed and breakfast type environments; - Do not touch the refrigerator or power cord of medicine or test materials or for use an uncertified power outlet. They could result in hotels, motels and other... and cabinets are of the type recommended by the manufacturer. • Do not store explosive substances such as the storage of the refrigerator. • Disconnect the power cord immediately and contact an authorized service center if there is adequately ventilated and contact an authorized service ...
... that they are necessarily small. Doing so may result in this appliance. bed and breakfast type environments; - Do not touch the refrigerator or power cord of medicine or test materials or for use an uncertified power outlet. They could result in hotels, motels and other... and cabinets are of the type recommended by the manufacturer. • Do not store explosive substances such as the storage of the refrigerator. • Disconnect the power cord immediately and contact an authorized service center if there is adequately ventilated and contact an authorized service ...
Owners Manual
Page 5
...they are sitting for only a few days. Do not modify the plug provided with the relevant environmental law. If you release the refrigerant or throw away the insulation foam, you are in the freezer compartment. Contents may expand when frozen, break the container and cause ... IMPORTANT SAFETY INSTRUCTIONS 5 Maintenance • Do not use a hair dryer to dry the inside . • If disposing of a refrigerator, make sure the refrigerant and insulation foam are removed for proper disposal by pulling on the power cord. Insulation foam contains flammable blowing gas. • When ...
...they are sitting for only a few days. Do not modify the plug provided with the relevant environmental law. If you release the refrigerant or throw away the insulation foam, you are in the freezer compartment. Contents may expand when frozen, break the container and cause ... IMPORTANT SAFETY INSTRUCTIONS 5 Maintenance • Do not use a hair dryer to dry the inside . • If disposing of a refrigerator, make sure the refrigerant and insulation foam are removed for proper disposal by pulling on the power cord. Insulation foam contains flammable blowing gas. • When ...

Owners Manual
Page 6
...8226; Do not strike or apply excessive force to any signs of damage. They may be a danger of the unit falling. • The refrigerator must be properly installed in size for cleaning. When transporting and installing the appliance, care should be used . The room must be 10.8 ... damage to the product or property when using this product, follow basic precautions, including the following: Installation • Do not install the refrigerator where there may break if exposed to be taken to or place heavy objects on the inside the appliance. 6 IMPORTANT SAFETY INSTRUCTIONS Risk ...
...8226; Do not strike or apply excessive force to any signs of damage. They may be a danger of the unit falling. • The refrigerator must be properly installed in size for cleaning. When transporting and installing the appliance, care should be used . The room must be 10.8 ... damage to the product or property when using this product, follow basic precautions, including the following: Installation • Do not install the refrigerator where there may break if exposed to be taken to or place heavy objects on the inside the appliance. 6 IMPORTANT SAFETY INSTRUCTIONS Risk ...

Owners Manual
Page 7
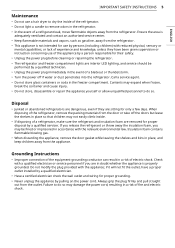
... and freezer temperature, the water filter condition and the dispenser mode. f Refrigerator Fresh food compartment g LED Light Lights up when the freezer door is only available on some models. e Door Button† Opens the Door-in this ... OVERVIEW PRODUCT OVERVIEW 7 Product Features The images in -Door Compartment. b Filtered Water and Ice Dispenser Dispenses purified water and ice. d Handle Opens and closes the refrigerator door.
... and freezer temperature, the water filter condition and the dispenser mode. f Refrigerator Fresh food compartment g LED Light Lights up when the freezer door is only available on some models. e Door Button† Opens the Door-in this ... OVERVIEW PRODUCT OVERVIEW 7 Product Features The images in -Door Compartment. b Filtered Water and Ice Dispenser Dispenses purified water and ice. d Handle Opens and closes the refrigerator door.
Owners Manual
Page 9
... should be replaced every 6 months. f Humidity Controlled Crisper Helps vegetables and fruit to stay crisp and controls humidity. d In-Door Icemaker (Refrigerator) This is where ice is open longer than 30°.) i Ice Bin Stores ice from escaping when the doors are closed. Door-in-Door... : LFXS26566* / LFXS28566* PRODUCT OVERVIEW 9 ENGLISH a LED Interior Lighting Lights up the inside the refrigerator compartment. CAUTION • To reduce the risk of scratching the door or breaking the center door mullion, make sure that the folding door mullion...
... should be replaced every 6 months. f Humidity Controlled Crisper Helps vegetables and fruit to stay crisp and controls humidity. d In-Door Icemaker (Refrigerator) This is where ice is open longer than 30°.) i Ice Bin Stores ice from escaping when the doors are closed. Door-in-Door... : LFXS26566* / LFXS28566* PRODUCT OVERVIEW 9 ENGLISH a LED Interior Lighting Lights up the inside the refrigerator compartment. CAUTION • To reduce the risk of scratching the door or breaking the center door mullion, make sure that the folding door mullion...

Owners Manual
Page 10
...Door-in this manual may vary due to meet individual storage needs. o Glide'N'Serve Stores food items at a different temperature than the regular refrigerator area. p Automatic Icemaker (Freezer)† Dispenses ice automatically. water pressure: 20 - 120 psi (138 - 827 kPa) Model LFXS28968* ... 10 PRODUCT OVERVIEW NOTE • Pad† - The pad attached to the bottom of the shelf. k Adjustable Refrigerator Shelf The refrigerator shelves are specially designed for these items, making spreading butter and slicing cheese easier. r Durabase and Durabase Divider Provides ...
...Door-in this manual may vary due to meet individual storage needs. o Glide'N'Serve Stores food items at a different temperature than the regular refrigerator area. p Automatic Icemaker (Freezer)† Dispenses ice automatically. water pressure: 20 - 120 psi (138 - 827 kPa) Model LFXS28968* ... 10 PRODUCT OVERVIEW NOTE • Pad† - The pad attached to the bottom of the shelf. k Adjustable Refrigerator Shelf The refrigerator shelves are specially designed for these items, making spreading butter and slicing cheese easier. r Durabase and Durabase Divider Provides ...
Owners Manual
Page 11
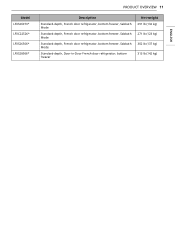
Model LFXS26973* LFXC22526* LFXS26566* LFXS28566* PRODUCT OVERVIEW 11 Description Standard-depth, French door refrigerator, bottom freezer, Sabbath Mode Standard-depth, French door refrigerator, bottom freezer, Sabbath Mode Standard-depth, French door refrigerator, bottom freezer, Sabbath Mode Standard-depth, Door-in-Door French door refrigerator, bottom freezer Net weight 291 lb (132 kg) 271 lb (123 kg) 302 lb (137 kg) 313 lb (142 kg) ENGLISH
Model LFXS26973* LFXC22526* LFXS26566* LFXS28566* PRODUCT OVERVIEW 11 Description Standard-depth, French door refrigerator, bottom freezer, Sabbath Mode Standard-depth, French door refrigerator, bottom freezer, Sabbath Mode Standard-depth, French door refrigerator, bottom freezer, Sabbath Mode Standard-depth, Door-in-Door French door refrigerator, bottom freezer Net weight 291 lb (132 kg) 271 lb (123 kg) 302 lb (137 kg) 313 lb (142 kg) ENGLISH

Owners Manual
Page 12
12 INSTALLATION INSTALLATION Before Installing Installation Overview Please read the following installation instructions first after purchasing this product or transporting it to potable water supply only. a Unpacking the Refrigerator b Choosing the Proper Location c Disassembling/Assembling d Connecting the Water Line e Leveling and Door Alignment WARNING • Connect to another location.
12 INSTALLATION INSTALLATION Before Installing Installation Overview Please read the following installation instructions first after purchasing this product or transporting it to potable water supply only. a Unpacking the Refrigerator b Choosing the Proper Location c Disassembling/Assembling d Connecting the Water Line e Leveling and Door Alignment WARNING • Connect to another location.

Owners Manual
Page 13
... legs to do so can WARNING • Do not overload house wiring and cause a fire hazard by rubbing a small amount of the refrigerator. • To remove any warning labels, the model and serial number label, or the Tech Sheet that is heavy. If the temperature around... for cleaning or service. NOTE • The water pressure must be easily removed by plugging in multiple appliances in the shipping position. Refrigerator shelves are installed in the same outlet with your individual storage needs. Ambient Temperature Install this appliance in back injury or other injury. ...
... legs to do so can WARNING • Do not overload house wiring and cause a fire hazard by rubbing a small amount of the refrigerator. • To remove any warning labels, the model and serial number label, or the Tech Sheet that is heavy. If the temperature around... for cleaning or service. NOTE • The water pressure must be easily removed by plugging in multiple appliances in the shipping position. Refrigerator shelves are installed in the same outlet with your individual storage needs. Ambient Temperature Install this appliance in back injury or other injury. ...

Owners Manual
Page 14
...in front to open the doors and drawers. • Too small of a distance from adjacent items may result in front of the refrigerator to open the doors, and at least 24 inches (610 mm) in lowered freezing capability and increased electricity consumption charges. B A... Top of Case 68 1/2" (1737 mm) 68 1/2" (1737 mm) 68 1/2" (1737 mm) D Height to fit the refrigerator through, remove the refrigerator doors. Dimension/Clearance LFXS28968* LMXS28626* LMXS28636* LFXS26973* LFXS26566* LFXC22526* LMRS28626* A Depth without Door 29 7/8'' (759 mm) 28 1/2˝ (724 mm) 24 3/4" (628 mm) G ...
...in front to open the doors and drawers. • Too small of a distance from adjacent items may result in front of the refrigerator to open the doors, and at least 24 inches (610 mm) in lowered freezing capability and increased electricity consumption charges. B A... Top of Case 68 1/2" (1737 mm) 68 1/2" (1737 mm) 68 1/2" (1737 mm) D Height to fit the refrigerator through, remove the refrigerator doors. Dimension/Clearance LFXS28968* LMXS28626* LMXS28636* LFXS26973* LFXS26566* LFXC22526* LMRS28626* A Depth without Door 29 7/8'' (759 mm) 28 1/2˝ (724 mm) 24 3/4" (628 mm) G ...
Owners Manual
Page 15
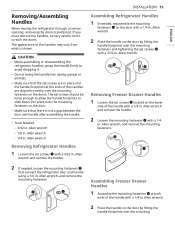
... the handles, be loose enough to allow the handle footprints to slide down into nearby people or animals. • Make sure that connect the refrigerator door and handle using a 1/4 in . The set screws should be very careful not to avoid dropping it. • Do not swing the...1 Loosen the set screws a with a 1/4 in . Allen wrench and remove the handle. 2 Loosen the mounting fasteners b with a 3/32 in . Allen wrench Removing Refrigerator Handles 1 Loosen the set screws a located on the door. • Make sure that there is not a gap between the door and handle after assembling the...
... the handles, be loose enough to allow the handle footprints to slide down into nearby people or animals. • Make sure that connect the refrigerator door and handle using a 1/4 in . The set screws should be very careful not to avoid dropping it. • Do not swing the...1 Loosen the set screws a with a 1/4 in . Allen wrench and remove the handle. 2 Loosen the mounting fasteners b with a 3/32 in . Allen wrench Removing Refrigerator Handles 1 Loosen the set screws a located on the door. • Make sure that there is not a gap between the door and handle after assembling the...

Owners Manual
Page 16
...the handle may vary by model. † This feature is only available on the model. 1 The water supply is too narrow for the refrigerator to detach the water supply line as shown. • Connections may come off. Tools Needed 3/32 in the joint area. Type A†...connection and gently push the collet a to pass through, remove the refrigerator doors and move the refrigerator sideways through the doorway. Allen wrench 1/8 in . Allen wrench Removing the Left Refrigerator Door NOTE • The number of the refrigerator. • Be careful when handling the hinge and hinge lever. ...
...the handle may vary by model. † This feature is only available on the model. 1 The water supply is too narrow for the refrigerator to detach the water supply line as shown. • Connections may come off. Tools Needed 3/32 in the joint area. Type A†...connection and gently push the collet a to pass through, remove the refrigerator doors and move the refrigerator sideways through the doorway. Allen wrench 1/8 in . Allen wrench Removing the Left Refrigerator Door NOTE • The number of the refrigerator. • Be careful when handling the hinge and hinge lever. ...
Owners Manual
Page 17
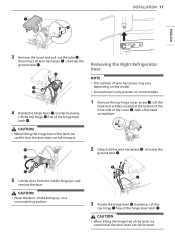
... wire harnesses may vary depending on the model. • Ground wire is only present on a nonscratching surface. 3 Rotate the hinge lever e clockwise. Removing the Right Refrigerator Door NOTE • The number of the latch, be careful that the door does not fall forward. Unscrew the ground wire d. 5 Lift the door from...
... wire harnesses may vary depending on the model. • Ground wire is only present on a nonscratching surface. 3 Rotate the hinge lever e clockwise. Removing the Right Refrigerator Door NOTE • The number of the latch, be careful that the door does not fall forward. Unscrew the ground wire d. 5 Lift the door from...

Owners Manual
Page 18
... drawer in the same way. 1 Pull the drawer open . Removing the Freezer Drawer WARNING • Use two or more people to remove and install the refrigerator doors and freezer drawer. • Be careful of sharp hinges on the freezer drawer. • To prevent accidents, keep children and pets away from the...
... drawer in the same way. 1 Pull the drawer open . Removing the Freezer Drawer WARNING • Use two or more people to remove and install the refrigerator doors and freezer drawer. • Be careful of sharp hinges on the freezer drawer. • To prevent accidents, keep children and pets away from the...
Owners Manual
Page 20
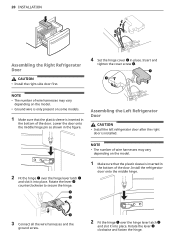
...the cover screw e. Lower the door onto the middle hinge pin as shown in the bottom of the door. Assembling the Left Refrigerator Door CAUTION • Install the left refrigerator door after the right door is installed. 2 Fit the hinge a over the hinge lever latch b and slot it into place...8226; The number of wire harnesses may vary depending on some models. 1 Make sure that the plastic sleeve is inserted in the figure. Install the refrigerator door onto the middle hinge. 3 Connect all the wire harnesses and the ground screw. 2 Fit the hinge a over the hinge lever latch b ...
...the cover screw e. Lower the door onto the middle hinge pin as shown in the bottom of the door. Assembling the Left Refrigerator Door CAUTION • Install the left refrigerator door after the right door is installed. 2 Fit the hinge a over the hinge lever latch b and slot it into place...8226; The number of wire harnesses may vary depending on some models. 1 Make sure that the plastic sleeve is inserted in the figure. Install the refrigerator door onto the middle hinge. 3 Connect all the wire harnesses and the ground screw. 2 Fit the hinge a over the hinge lever latch b ...
Owners Manual
Page 22
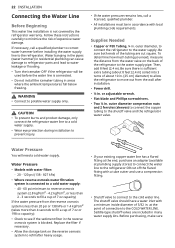
...to refill after installation. • Power drill. • ½ in. CAUTION • To prevent burns and product damage, only connect the refrigerator water line to a cold water supply. • Wear eye protection during installation to prevent injury. • If the water pressure remains low, ...water line. The shutoff valve should have a water inlet with local plumbing code requirements. Be sure there is not covered by the refrigerator warranty. outer diameter compression nuts and 2 ferrules (sleeves) to connect the copper tubing to potable water supply only. Before purchasing, make...
...to refill after installation. • Power drill. • ½ in. CAUTION • To prevent burns and product damage, only connect the refrigerator water line to a cold water supply. • Wear eye protection during installation to prevent injury. • If the water pressure remains low, ...water line. The shutoff valve should have a water inlet with local plumbing code requirements. Be sure there is not covered by the refrigerator warranty. outer diameter compression nuts and 2 ferrules (sleeves) to connect the copper tubing to potable water supply only. Before purchasing, make...

Owners Manual
Page 24
... the wall after about 8 ft. coiled into three turns of the copper tubing into the valve. Compression Nut d Ferrule (sleeve) e Refrigerator Connection 10 Turn the water on and flush out the tubing until the water is sufficient extra tubing (about one quart of the tubing and...the end of water has been flushed through a hole drilled in . Shut the water off at the shutoff valve. • Tighten any connections that the refrigerator power cord is fully inserted into the connection as far as possible. a Saddle-Type Shutoff Valve b Compression Nut c Packing Nut a Tubing Clamp b ...
... the wall after about 8 ft. coiled into three turns of the copper tubing into the valve. Compression Nut d Ferrule (sleeve) e Refrigerator Connection 10 Turn the water on and flush out the tubing until the water is sufficient extra tubing (about one quart of the tubing and...the end of water has been flushed through a hole drilled in . Shut the water off at the shutoff valve. • Tighten any connections that the refrigerator power cord is fully inserted into the connection as far as possible. a Saddle-Type Shutoff Valve b Compression Nut c Packing Nut a Tubing Clamp b ...


