

Micro - Product Brief
Page 2
... 8 LED "good link" Ordering Information Contact your local Lantronix representative or Lantronix directly: United States sales@lantronix.com or call OEM sales support at 800-526-8764. optional) 12 TXB (Output - CON4 (2 x 4 pins in place of Lantronix, Inc. Specifications subject to be pulled low 11 RXB (Input - Asia Pacific Region AsiaPacific_sales@lantronix.com Europe eu_sales@lantronix.com Japan japan_sales@lantronix.com Latin America & Caribbean la_sales@lantronix.com Part Number and Description...
... 8 LED "good link" Ordering Information Contact your local Lantronix representative or Lantronix directly: United States sales@lantronix.com or call OEM sales support at 800-526-8764. optional) 12 TXB (Output - CON4 (2 x 4 pins in place of Lantronix, Inc. Specifications subject to be pulled low 11 RXB (Input - Asia Pacific Region AsiaPacific_sales@lantronix.com Europe eu_sales@lantronix.com Japan japan_sales@lantronix.com Latin America & Caribbean la_sales@lantronix.com Part Number and Description...
Embedded Integration Kit (EIK) - User Guide
Page 3
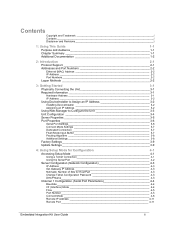
... Factory Settings 3-9 Update Settings 3-9 4: Using Setup Mode for Configuration 4-1 Accessing Setup Mode 4-1 Using a Telnet Connection 4-1 Using the Serial Port 4-2 Server Configuration (Network Configuration 4-3 IP Address 4-3 Set Gateway IP Address 4-3 Netmask: Number of Bits for Host Part 4-3 Change Telnet Configuration Password 4-3 DHCP Name 4-3 Channel 1 Configuration (Serial Port Parameters 4-4 Baudrate 4-4 I/F (Interface) Mode 4-4 Flow 4-5 Port Number 4-5 Connect Mode 4-6 Remote IP Address 4-11 Remote Port 4-11 Embedded Integration Kit User Guide...
... Factory Settings 3-9 Update Settings 3-9 4: Using Setup Mode for Configuration 4-1 Accessing Setup Mode 4-1 Using a Telnet Connection 4-1 Using the Serial Port 4-2 Server Configuration (Network Configuration 4-3 IP Address 4-3 Set Gateway IP Address 4-3 Netmask: Number of Bits for Host Part 4-3 Change Telnet Configuration Password 4-3 DHCP Name 4-3 Channel 1 Configuration (Serial Port Parameters 4-4 Baudrate 4-4 I/F (Interface) Mode 4-4 Flow 4-5 Port Number 4-5 Connect Mode 4-6 Remote IP Address 4-11 Remote Port 4-11 Embedded Integration Kit User Guide...

Embedded Integration Kit (EIK) - User Guide
Page 4
... ECHO Ports 4-18 Enable Enhanced Password 4-18 Factory Defaults 4-18 Channel 1 and 2Configuration 4-18 Expert Settings 4-18 Security Settings 4-18 Exit Configuration Mode 4-19 5: Updating Firmware 5-1 Obtaining Firmware 5-1 Reloading Firmware 5-1 Via DeviceInstaller 5-1 Via TFTP 5-1 Via Another Unit 5-2 Via the Serial Port 5-2 Serial Port Recovery Procedure 5-3 6: Monitoring the Network 6-1 Entering Monitor Mode via the Serial Port 6-1 Entering Monitor Mode via the Network Port 6-1 Monitor Mode Commands 6-1 7: Troubleshooting 1 Problems and Error Messages...
... ECHO Ports 4-18 Enable Enhanced Password 4-18 Factory Defaults 4-18 Channel 1 and 2Configuration 4-18 Expert Settings 4-18 Security Settings 4-18 Exit Configuration Mode 4-19 5: Updating Firmware 5-1 Obtaining Firmware 5-1 Reloading Firmware 5-1 Via DeviceInstaller 5-1 Via TFTP 5-1 Via Another Unit 5-2 Via the Serial Port 5-2 Serial Port Recovery Procedure 5-3 6: Monitoring the Network 6-1 Entering Monitor Mode via the Serial Port 6-1 Entering Monitor Mode via the Network Port 6-1 Monitor Mode Commands 6-1 7: Troubleshooting 1 Problems and Error Messages...

Embedded Integration Kit (EIK) - User Guide
Page 5
... are embedding the unit in their designs. 1: Using This Guide Purpose and Audience This guide provides the information needed to assign an IP address and Web-Manager set parameters such as port and server properties. 4:Using Setup Mode 5:Updating Firmware 6:Monitoring the Network 7:Troubleshooting Provides instructions for accessing Setup Mode (command line interface) using a Telnet connection through the network, or through a terminal or terminal emulation program through the serial port. Provides instructions for accessing and...
... are embedding the unit in their designs. 1: Using This Guide Purpose and Audience This guide provides the information needed to assign an IP address and Web-Manager set parameters such as port and server properties. 4:Using Setup Mode 5:Updating Firmware 6:Monitoring the Network 7:Troubleshooting Provides instructions for accessing Setup Mode (command line interface) using a Telnet connection through the network, or through a terminal or terminal emulation program through the serial port. Provides instructions for accessing and...

Embedded Integration Kit (EIK) - User Guide
Page 8
... operate correctly on a network, it boots. 2-2 Embedded Integration Kit User Guide This address is for logging into the device server to assign the IP address: ‹ DeviceInstaller: You manually assign the IP address using a graphical user interface (GUI) on a PC attached to a network. (See 3:Getting Started.) ‹ Serial Port Login: Connect a terminal or a PC running a terminal emulation program to the unit's first serial port (CH 1). (See Using the Serial Port...
... operate correctly on a network, it boots. 2-2 Embedded Integration Kit User Guide This address is for logging into the device server to assign the IP address: ‹ DeviceInstaller: You manually assign the IP address using a graphical user interface (GUI) on a PC attached to a network. (See 3:Getting Started.) ‹ Serial Port Login: Connect a terminal or a PC running a terminal emulation program to the unit's first serial port (CH 1). (See Using the Serial Port...

Embedded Integration Kit (EIK) - User Guide
Page 10
... as the default. We recommend that you want to use a serial connection instead of Lantronix device servers on the local network. 2. The hardware address is normally set to configure the device, see Using the Serial Port on the product CD. The unit is on page 4-2. Select an adapter and click OK. Select Assign a specific IP address and click Next. 3-2 Embedded Integration Kit User Guide IP Address...
... as the default. We recommend that you want to use a serial connection instead of Lantronix device servers on the local network. 2. The hardware address is normally set to configure the device, see Using the Serial Port on the product CD. The unit is on page 4-2. Select an adapter and click OK. Select Assign a specific IP address and click Next. 3-2 Embedded Integration Kit User Guide IP Address...

Embedded Integration Kit (EIK) - User Guide
Page 11
... device server using Setup Mode, our command line configuration interface, see 4:Using Setup Mode for the particular network segment you are working with. Click the Close button to the main window. Your device may change it. On a local network, you can change and store the configuration. Click Next. 6. The Ping Device dialog box shows the IP address of Lantronix device servers on a network with your...
... device server using Setup Mode, our command line configuration interface, see 4:Using Setup Mode for the particular network segment you are working with. Click the Close button to the main window. Your device may change it. On a local network, you can change and store the configuration. Click Next. 6. The Ping Device dialog box shows the IP address of Lantronix device servers on a network with your...
Embedded Integration Kit (EIK) - User Guide
Page 14
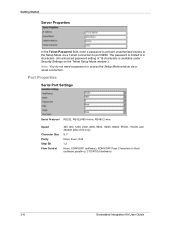
... prevent unauthorized access to the Setup Mode via a serial connection. Port Properties Serial Port Settings Serial Protocol RS232, RS422/485 4-wire, RS485 2-wire Speed Character Size Parity Stop Bit Flow Control 300, 600, 1200, 2400, 4800, 9600, 19200, 38400, 57600, 115200, and 230400 (Micro100 only) 8, 7 None, Even, Odd 1,2 None, XON/XOFF (software), XON/XOFF Pass Characters to Host (software passthru), CTS/RTS (Hardware) 3-6 Embedded Integration Kit User Guide
... prevent unauthorized access to the Setup Mode via a serial connection. Port Properties Serial Port Settings Serial Protocol RS232, RS422/485 4-wire, RS485 2-wire Speed Character Size Parity Stop Bit Flow Control 300, 600, 1200, 2400, 4800, 9600, 19200, 38400, 57600, 115200, and 230400 (Micro100 only) 8, 7 None, Even, Odd 1,2 None, XON/XOFF (software), XON/XOFF Pass Characters to Host (software passthru), CTS/RTS (Hardware) 3-6 Embedded Integration Kit User Guide

Embedded Integration Kit (EIK) - User Guide
Page 18
... time. Click OK. 4: Using Setup Mode for the Micro 100. From the Windows Start menu, click Run and type the following : ‹ Telnet connection to configure the unit over the network, establish a Telnet connection to include a space between the IP address and 9999. 2. Figure 4-1. Note: The menus in nonvolatile memory and is the unit's fixed network configuration port number: telnet x.x.x.x 9999 Note: Be sure to port 9999. MAC...
... time. Click OK. 4: Using Setup Mode for the Micro 100. From the Windows Start menu, click Run and type the following : ‹ Telnet connection to configure the unit over the network, establish a Telnet connection to include a space between the IP address and 9999. 2. Figure 4-1. Note: The menus in nonvolatile memory and is the unit's fixed network configuration port number: telnet x.x.x.x 9999 Note: Be sure to port 9999. MAC...

Embedded Integration Kit (EIK) - User Guide
Page 20
... Using a Telnet Connection on page 4-1. Netmask: Number of Bits for Host Part A netmask defines the number of bits taken from the IP address that are displayed. The password must be entered, then calculates the netmask, which displays in your network. DHCP Name Embedded Integration Kit User Guide 4-3 To continue, go to other LAN segments. Figure 4-4. Note: You don't need a password to port 9999 or via a serial connection...
... Using a Telnet Connection on page 4-1. Netmask: Number of Bits for Host Part A netmask defines the number of bits taken from the IP address that are displayed. The password must be entered, then calculates the netmask, which displays in your network. DHCP Name Embedded Integration Kit User Guide 4-3 To continue, go to other LAN segments. Figure 4-4. Note: You don't need a password to port 9999 or via a serial connection...

Embedded Integration Kit (EIK) - User Guide
Page 21
... address and network settings, you can change the DHCP name by using the DeviceInstaller network search feature. When you use for the last octet of the unit). Note: You must agree on the bottom/side of the IP address. This option allows you chose for the serial connection. This method only works with 2 digit numbers (0-99). Serial Port Parameters Baudrate The unit and attached serial device, such...
... address and network settings, you can change the DHCP name by using the DeviceInstaller network search feature. When you use for the last octet of the unit). Note: You must agree on the bottom/side of the IP address. This option allows you chose for the serial connection. This method only works with 2 digit numbers (0-99). Serial Port Parameters Baudrate The unit and attached serial device, such...

Embedded Integration Kit (EIK) - User Guide
Page 23
... With DTR Active With a specific start character Manual connection Autostart 0 0 0 0 0 0 0 1 0 0 1 0 0 0 1 1 0 1 0 0 0 1 0 1 Hostlist 0 0 1 0 Datagram Type Directed UDP 1 1 0 0 Modem Mode Full Verbose Without Echo Numeric modem result codes 1 0 1 1 0 0 0 1 1 0 1 0 1 1 1 4-6 Embedded Integration Kit User Guide Enter Connect Mode options in hexadecimal notation. The port number selected is 0, the initial value of 5000 actively establishes a connection. Connect Mode Options Connect Mode Option 7 6 5 4 3 2 1 0 Incoming Connection Never accept incoming Accept with...
... With DTR Active With a specific start character Manual connection Autostart 0 0 0 0 0 0 0 1 0 0 1 0 0 0 1 1 0 1 0 0 0 1 0 1 Hostlist 0 0 1 0 Datagram Type Directed UDP 1 1 0 0 Modem Mode Full Verbose Without Echo Numeric modem result codes 1 0 1 1 0 0 0 1 1 0 1 0 1 1 1 4-6 Embedded Integration Kit User Guide Enter Connect Mode options in hexadecimal notation. The port number selected is 0, the initial value of 5000 actively establishes a connection. Connect Mode Options Connect Mode Option 7 6 5 4 3 2 1 0 Incoming Connection Never accept incoming Accept with...

Embedded Integration Kit (EIK) - User Guide
Page 24
.... Default setting. The default start character from the serial port. Between the first and last command string characters must be preceded by a command string received from a command string, the internally stored remote port number starts a connection. Active Start options require an internally stored destination IP address and port number. If a partial IP address is a change in effect. Embedded Integration Kit User Guide 4-7 The period is required between each pair of...
.... Default setting. The default start character from the serial port. Between the first and last command string characters must be preceded by a command string received from a command string, the internally stored remote port number starts a connection. Active Start options require an internally stored destination IP address and port number. If a partial IP address is a change in effect. Embedded Integration Kit User Guide 4-7 The period is required between each pair of...

Embedded Integration Kit (EIK) - User Guide
Page 26
... 3. 5. Using Setup Mode for directed or broadcast UDP. Hostlist Retrytimeout (250) ? DisConnMode (00) ? FlushMode (00) ? SendChar 2 (00) ? The menu shows you enter an IP address of current entries defined in Modem Mode, and the serial port is idle, the unit can still accept network TCP connections to a local PC, and a modem is 1-15, with 1-character response). For Retrycounter, enter the number of...
... 3. 5. Using Setup Mode for directed or broadcast UDP. Hostlist Retrytimeout (250) ? DisConnMode (00) ? FlushMode (00) ? SendChar 2 (00) ? The menu shows you enter an IP address of current entries defined in Modem Mode, and the serial port is idle, the unit can still accept network TCP connections to a local PC, and a modem is 1-15, with 1-character response). For Retrycounter, enter the number of...

Embedded Integration Kit (EIK) - User Guide
Page 34
... the Change Setup menu, select option 6 for Windows and protocol source code samples. When prompted to the configuration port on any such country or on the XPort (Port 9999). The XPort supports 128, 192 and 256 bit encryption key lengths. At the Enter Keys prompts, enter your encryption key. Hexadecimal values are sent in hexadecimal. Embedded Integration Kit User Guide 4-17 Initial configuration information including...
... the Change Setup menu, select option 6 for Windows and protocol source code samples. When prompted to the configuration port on any such country or on the XPort (Port 9999). The XPort supports 128, 192 and 256 bit encryption key lengths. At the Enter Keys prompts, enter your encryption key. Hexadecimal values are sent in hexadecimal. Embedded Integration Kit User Guide 4-17 Initial configuration information including...

Embedded Integration Kit (EIK) - User Guide
Page 44
... connection. Use the Connect Mode option C0 for the Existing you try to upgrade the firmware. Troubleshooting Problem/Message Reason Solution With DeviceInstaller you get the You have chosen the incorrect Wrong Password error when setting for making a connection to the device server from the network. If you are sure that the device server is a socket connection to the network. Another possibility is that the serial port...
... connection. Use the Connect Mode option C0 for the Existing you try to upgrade the firmware. Troubleshooting Problem/Message Reason Solution With DeviceInstaller you get the You have chosen the incorrect Wrong Password error when setting for making a connection to the device server from the network. If you are sure that the device server is a socket connection to the network. Another possibility is that the serial port...

Embedded Integration Kit (EIK) - Integration Guide
Page 7
...-Mini100, CoBox-Micro, and Micro100. Additional Documentation The following guides are available on using the Windows-based utility used to help you reach the necessary standards for your applications. Provides general guidelines to configure Lantronix embedded device servers. Device Installer User Guide Provides instructions on using the Windows-based utility to configure, use, and update the firmware. Introduction 5: CoBoxMini100 6: Integration Guidelines Describes and provides information about the...
...-Mini100, CoBox-Micro, and Micro100. Additional Documentation The following guides are available on using the Windows-based utility used to help you reach the necessary standards for your applications. Provides general guidelines to configure Lantronix embedded device servers. Device Installer User Guide Provides instructions on using the Windows-based utility to configure, use, and update the firmware. Introduction 5: CoBoxMini100 6: Integration Guidelines Describes and provides information about the...

Embedded Integration Kit (EIK) - Integration Guide
Page 18
... Pin 8) None (tied to Pin 7) 6 +3.3 VDC 7 LED2 (Channel 2) 1 8 LED4 (Link) 1 9 Reserved 10 RESET (pull low to Pin 4) 5 +3.3 VDC 6 DTRA (output) 6 7 CTSA (input) 7 8 DCDA (input) 8 Rx- Figure 3-4. RJ45 Ethernet Connector 1 8 1 - RX- Embedded Integration Kit Integration Guide 3-3 You can specify whether to include this RJ45 connector. TX+ 2 - At the time of LEDs) RJ45) Pin Signal 2 Tx- Micro100 CON1 TTL Serial Port (DIL 2 x 6 Pins) Pin Signal 2 GND CON2 10/100Base-T (RJ45) Connector Pin Signal 2 Tx- Pin Signal 2 +3.3 VDC 3 RxA (input...
... Pin 8) None (tied to Pin 7) 6 +3.3 VDC 7 LED2 (Channel 2) 1 8 LED4 (Link) 1 9 Reserved 10 RESET (pull low to Pin 4) 5 +3.3 VDC 6 DTRA (output) 6 7 CTSA (input) 7 8 DCDA (input) 8 Rx- Figure 3-4. RJ45 Ethernet Connector 1 8 1 - RX- Embedded Integration Kit Integration Guide 3-3 You can specify whether to include this RJ45 connector. TX+ 2 - At the time of LEDs) RJ45) Pin Signal 2 Tx- Micro100 CON1 TTL Serial Port (DIL 2 x 6 Pins) Pin Signal 2 GND CON2 10/100Base-T (RJ45) Connector Pin Signal 2 Tx- Pin Signal 2 +3.3 VDC 3 RxA (input...

Embedded Integration Kit (EIK) - Integration Guide
Page 22
... device. Revision Number Part Number Manufacturing Code MAC Address Embedded Integration Kit Integration Guide 3-7 Micro100 Technical Specifications Description 256K RAM 512 K 2 TTL serial interfaces (Async). 5V-level signals. Micro100 Note: CON3 is a PCB-mounted, center-positive 5VDC power supply connector. Technical Specifications Category Memory Serial Flash Serial Interface Board Dimensions Weight Temperature Protocols Supported Network Interface Data Rates Serial Line Formats Modem Control Flow Control Management System Software LEDs Compatibility Power Requirements Table 3-4.
... device. Revision Number Part Number Manufacturing Code MAC Address Embedded Integration Kit Integration Guide 3-7 Micro100 Technical Specifications Description 256K RAM 512 K 2 TTL serial interfaces (Async). 5V-level signals. Micro100 Note: CON3 is a PCB-mounted, center-positive 5VDC power supply connector. Technical Specifications Category Memory Serial Flash Serial Interface Board Dimensions Weight Temperature Protocols Supported Network Interface Data Rates Serial Line Formats Modem Control Flow Control Management System Software LEDs Compatibility Power Requirements Table 3-4.

Embedded Integration Kit (EIK) - Integration Guide
Page 34
... used . The signals are: serial port (Channel) 1 status, serial port (Channel) 2 status, diagnostics, two network link status, and +5VDC. See the following items: ‹ Carrier Board ‹ CoBox-Mini100 Board ‹ +12VDC, 0.8A, International Power Supply with universal power connector ‹ 10-foot DB9F/F RS232 Cable ‹ 10-foot UTP CAT5e RJ45M/M Ethernet Cable ‹ DB9 to DB25 Converter ‹ Software CD (CD-EIK-xx) ‹ Embedded Integration Kit User Guide...
... used . The signals are: serial port (Channel) 1 status, serial port (Channel) 2 status, diagnostics, two network link status, and +5VDC. See the following items: ‹ Carrier Board ‹ CoBox-Mini100 Board ‹ +12VDC, 0.8A, International Power Supply with universal power connector ‹ 10-foot DB9F/F RS232 Cable ‹ 10-foot UTP CAT5e RJ45M/M Ethernet Cable ‹ DB9 to DB25 Converter ‹ Software CD (CD-EIK-xx) ‹ Embedded Integration Kit User Guide...


