Users Guide PDF
Page 17
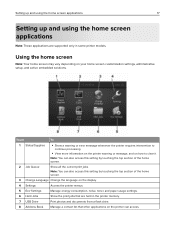
... section of the home screen. 3 Change Language Change the language on the display. 4 Settings Access the printer menus. 5 Eco‑Settings Manage energy consumption, noise, toner, and paper usage settings. 6 Held Jobs Show the print jobs that are supported only in the printer memory. 7 USB Drive Print photos and documents from...
... section of the home screen. 3 Change Language Change the language on the display. 4 Settings Access the printer menus. 5 Eco‑Settings Manage energy consumption, noise, toner, and paper usage settings. 6 Held Jobs Show the print jobs that are supported only in the printer memory. 7 USB Drive Print photos and documents from...
Users Guide PDF
Page 45
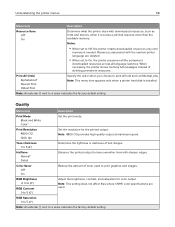
... asterisk (*) next to a value indicates the factory default setting. Alarm Control Off Single* Continuous Set the number of times that the alarm sounds when the toner cartridge is low. Authentication Type None* Standard Authentication Set the authentication type when accessing the VNC client server. Supplies Cartridge Alarm Off Single* Continuous Set...
... asterisk (*) next to a value indicates the factory default setting. Alarm Control Off Single* Continuous Set the number of times that the alarm sounds when the toner cartridge is low. Authentication Type None* Standard Authentication Set the authentication type when accessing the VNC client server. Supplies Cartridge Alarm Off Single* Continuous Set...
Users Guide PDF
Page 54
...Clear all remotely‑installed messages Erase messages that contains information on the home screen for a length of toner to the Screen Timeout setting. Toner patch sensor setup Calibration frequency preference Disabled Fewest color adjustment Fewer color adjustment Normal* Better color accuracy Best .... • When set to a value indicates the factory default setting. App Configuration LES Applications Off On* Enable the Lexmark Embedded Solutions (LES) applications. Notes: • This menu item is nonfunctional, the printer performs one‑sided printing for the ...
...Clear all remotely‑installed messages Erase messages that contains information on the home screen for a length of toner to the Screen Timeout setting. Toner patch sensor setup Calibration frequency preference Disabled Fewest color adjustment Fewer color adjustment Normal* Better color accuracy Best .... • When set to a value indicates the factory default setting. App Configuration LES Applications Off On* Enable the Lexmark Embedded Solutions (LES) applications. Notes: • This menu item is nonfunctional, the printer performs one‑sided printing for the ...
Users Guide PDF
Page 58
...First Specify the order when you choose to a value indicates the factory default setting. Color Saver Off* On Reduce the amount of toner used . Quality Menu item Description Print Mode Black and White Color* Set the print mode. RGB Saturation 0 to 5 (0*) ... edges. RGB Brightness ‑6 to 6 (0*) RGB Contrast 0 to 5 (0*) Adjust the brightness, contrast, and saturation for the printed output. Toner Darkness 1 to 5 (4*) Determine the lightness or darkness of deleting permanent resources. When necessary, the printer shows memory full messages instead of text ...
...First Specify the order when you choose to a value indicates the factory default setting. Color Saver Off* On Reduce the amount of toner used . Quality Menu item Description Print Mode Black and White Color* Set the print mode. RGB Saturation 0 to 5 (0*) ... edges. RGB Brightness ‑6 to 6 (0*) RGB Contrast 0 to 5 (0*) Adjust the brightness, contrast, and saturation for the printed output. Toner Darkness 1 to 5 (4*) Determine the lightness or darkness of deleting permanent resources. When necessary, the printer shows memory full messages instead of text ...
Users Guide PDF
Page 59
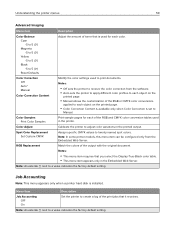
...: • This menu item requires that is used in the printer. Menu item Description Job Accounting Off* On Set the printer to create a log of toner that you select the Display‑True‑Black color table. • This menu item appears only in the printed output. Color Samples Print Color...
...: • This menu item requires that is used in the printer. Menu item Description Job Accounting Off* On Set the printer to create a log of toner that you select the Display‑True‑Black color table. • This menu item appears only in the printed output. Color Samples Print Color...
Users Guide PDF
Page 96
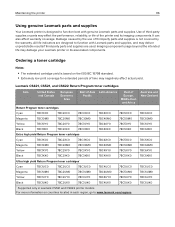
... is not covered by the use of third-party parts and supplies is designed to function best with Lexmark parts and supplies, and may negatively affect actual yield. Ordering a toner cartridge Notes: • The estimated cartridge yield is based on countries located in Lexmark CS521 and CS622 printer models. All life indicators are used.
... is not covered by the use of third-party parts and supplies is designed to function best with Lexmark parts and supplies, and may negatively affect actual yield. Ordering a toner cartridge Notes: • The estimated cartridge yield is based on countries located in Lexmark CS521 and CS622 printer models. All life indicators are used.
Users Guide PDF
Page 97
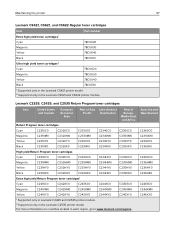
... the printer 97 Lexmark CS421, CS521, and CS622 Regular toner cartridges Item Part number Extra high yield toner cartridges1 Cyan 78C0X20 Magenta 78C0X30 Yellow 78C0X40 Black 78C0X10 Ultra high yield toner cartridges2 Cyan 78C0U20 Magenta 78C0U30 Yellow 78C0U40 Black 78C0U10 1 Supported only in the Lexmark CS421 printer model. 2 Supported only in the Lexmark CS521 and CS622 printer models...
... the printer 97 Lexmark CS421, CS521, and CS622 Regular toner cartridges Item Part number Extra high yield toner cartridges1 Cyan 78C0X20 Magenta 78C0X30 Yellow 78C0X40 Black 78C0X10 Ultra high yield toner cartridges2 Cyan 78C0U20 Magenta 78C0U30 Yellow 78C0U40 Black 78C0U10 1 Supported only in the Lexmark CS421 printer model. 2 Supported only in the Lexmark CS521 and CS622 printer models...

Users Guide PDF
Page 98
... 24B7182 24B7206 24B7234 24B7159 24B7183 24B7207 24B7235 24B7160 24B7184 24B7208 24B7236 24B7161 24B7185 24B7209 24B7237 Lexmark C2325, C2425, and C2535 Regular toner cartridges Item Part number High yield toner cartridges1 Cyan C230H20 Magenta C230H30 Yellow C230H40 Black C230H10 Extra high yield toner cartridges Cyan2 C240X20 Magenta2 C240X30 Yellow2 C240X40 Black3 C240X10 Ultra high yield...
... 24B7182 24B7206 24B7234 24B7159 24B7183 24B7207 24B7235 24B7160 24B7184 24B7208 24B7236 24B7161 24B7185 24B7209 24B7237 Lexmark C2325, C2425, and C2535 Regular toner cartridges Item Part number High yield toner cartridges1 Cyan C230H20 Magenta C230H30 Yellow C230H40 Black C230H10 Extra high yield toner cartridges Cyan2 C240X20 Magenta2 C240X30 Yellow2 C240X40 Black3 C240X10 Ultra high yield...
Users Guide PDF
Page 99
... color Return Program imaging kit Regular imaging kit Black imaging kit Black and color imaging kit Part number 78C0ZK0 78C0ZV0 78C0Z10 78C0Z50 Ordering a waste toner bottle Item Waste toner bottle Part number 78C0W00 Ordering a maintenance kit Match the maintenance kit to load the web page correctly. 2 Click Settings > Device > Notifications...
... color Return Program imaging kit Regular imaging kit Black imaging kit Black and color imaging kit Part number 78C0ZK0 78C0ZV0 78C0Z10 78C0Z50 Ordering a waste toner bottle Item Waste toner bottle Part number 78C0W00 Ordering a maintenance kit Match the maintenance kit to load the web page correctly. 2 Click Settings > Device > Notifications...
Users Guide PDF
Page 100
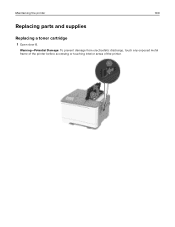
Maintaining the printer 100 Replacing parts and supplies Replacing a toner cartridge 1 Open door B. Warning-Potential Damage: To prevent damage from electrostatic discharge, touch any exposed metal frame of the printer before accessing or touching interior areas of the printer.
Maintaining the printer 100 Replacing parts and supplies Replacing a toner cartridge 1 Open door B. Warning-Potential Damage: To prevent damage from electrostatic discharge, touch any exposed metal frame of the printer before accessing or touching interior areas of the printer.
Users Guide PDF
Page 101
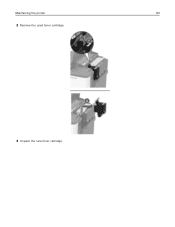
Maintaining the printer 101 2 Remove the used toner cartridge. 3 Unpack the new toner cartridge.
Maintaining the printer 101 2 Remove the used toner cartridge. 3 Unpack the new toner cartridge.
Users Guide PDF
Page 102
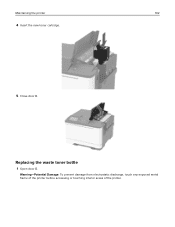
Maintaining the printer 102 4 Insert the new toner cartridge. 5 Close door B. Warning-Potential Damage: To prevent damage from electrostatic discharge, touch any exposed metal frame of the printer before accessing or touching interior areas of the printer. Replacing the waste toner bottle 1 Open door B.
Maintaining the printer 102 4 Insert the new toner cartridge. 5 Close door B. Warning-Potential Damage: To prevent damage from electrostatic discharge, touch any exposed metal frame of the printer before accessing or touching interior areas of the printer. Replacing the waste toner bottle 1 Open door B.

Users Guide PDF
Page 104
Maintaining the printer 104 3 Remove the right side cover. 4 Remove the used waste toner bottle. Note: To avoid spilling the toner, place the bottle in an upright position. 5 Unpack the new waste toner bottle.
Maintaining the printer 104 3 Remove the right side cover. 4 Remove the used waste toner bottle. Note: To avoid spilling the toner, place the bottle in an upright position. 5 Unpack the new waste toner bottle.

Users Guide PDF
Page 105
Maintaining the printer 105 6 Insert the new waste toner bottle. 7 Insert the right side cover. 8 Close door B. 9 Close door A. Replacing an imaging kit 1 Open door B.
Maintaining the printer 105 6 Insert the new waste toner bottle. 7 Insert the right side cover. 8 Close door B. 9 Close door A. Replacing an imaging kit 1 Open door B.

Users Guide PDF
Page 107
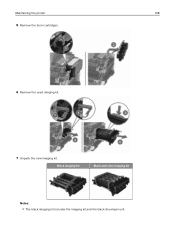
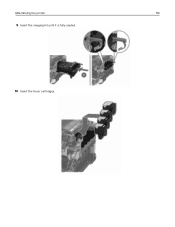
Maintaining the printer 107 3 Remove the right side cover. 4 Remove the waste toner bottle.
Maintaining the printer 107 3 Remove the right side cover. 4 Remove the waste toner bottle.
Users Guide PDF
Page 108
Maintaining the printer 108 5 Remove the toner cartridges. 6 Remove the used imaging kit. 7 Unpack the new imaging kit. Black imaging kit Black and color imaging kit Notes: • The black imaging kit includes the imaging kit and the black developer unit.
Maintaining the printer 108 5 Remove the toner cartridges. 6 Remove the used imaging kit. 7 Unpack the new imaging kit. Black imaging kit Black and color imaging kit Notes: • The black imaging kit includes the imaging kit and the black developer unit.
Users Guide PDF
Page 110
Maintaining the printer 110 9 Insert the imaging kit until it is fully seated. 10 Insert the toner cartridges.
Maintaining the printer 110 9 Insert the imaging kit until it is fully seated. 10 Insert the toner cartridges.
Users Guide PDF
Page 111
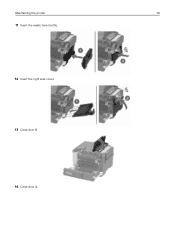
Maintaining the printer 111 11 Insert the waste toner bottle. 12 Insert the right side cover. 13 Close door B. 14 Close door A.
Maintaining the printer 111 11 Insert the waste toner bottle. 12 Insert the right side cover. 13 Close door B. 14 Close door A.

Users Guide PDF
Page 128
... or parts can affect warranty coverage. Imaging component usage beyond the intended life may damage your printer and install a genuine Lexmark supply or part. Damage caused by the use of these risks, then remove the third-party supply or part from the..."Using genuine Lexmark parts and supplies" on your printer model, from your Lexmark printer or associated components. If you want to : Settings > Troubleshooting > Print Quality Test Pages. Warning-Potential Damage: Use of the printer and its imaging components. Troubleshooting 128 Printer and toner cartridge regions ...
... or parts can affect warranty coverage. Imaging component usage beyond the intended life may damage your printer and install a genuine Lexmark supply or part. Damage caused by the use of these risks, then remove the third-party supply or part from the..."Using genuine Lexmark parts and supplies" on your printer model, from your Lexmark printer or associated components. If you want to : Settings > Troubleshooting > Print Quality Test Pages. Warning-Potential Damage: Use of the printer and its imaging components. Troubleshooting 128 Printer and toner cartridge regions ...
Users Guide PDF
Page 133
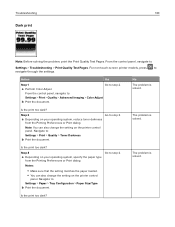
...from the Printing Preferences or Print dialog. From the control panel, navigate to step 4. a Depending on your operating system, reduce toner darkness from the Printing Preferences or Print dialog. Is the print too dark? Step 3 Go to Settings > Troubleshooting > Print Quality... change the setting on the printer control panel. Is the print too dark? From the control panel, navigate to : Settings > Print > Quality > Toner Darkness b Print the document. Navigate to : Settings > Print > Quality > Advanced Imaging > Color Adjust b Print the document. Action Yes Step ...
...from the Printing Preferences or Print dialog. From the control panel, navigate to step 4. a Depending on your operating system, reduce toner darkness from the Printing Preferences or Print dialog. Is the print too dark? Step 3 Go to Settings > Troubleshooting > Print Quality... change the setting on the printer control panel. Is the print too dark? From the control panel, navigate to : Settings > Print > Quality > Toner Darkness b Print the document. Navigate to : Settings > Print > Quality > Advanced Imaging > Color Adjust b Print the document. Action Yes Step ...


