
User's Guide
Page 5
...shock when cleaning the exterior of the paper path. Do not pinch the power cord between objects such as part of the printer, unplug the power cord from the wall outlet and disconnect all cables from the electrical outlet before proceeding. Refer service or repairs, other replacement...this product near the product and easily accessible. The safety features of fire or electrical shock results. If any electrical or cabling connections, such as the fax feature, power cord, or telephone, during a lightning storm. CAUTION-POTENTIAL INJURY: Do not cut, twist, bind, crush, or ...
...shock when cleaning the exterior of the paper path. Do not pinch the power cord between objects such as part of the printer, unplug the power cord from the wall outlet and disconnect all cables from the electrical outlet before proceeding. Refer service or repairs, other replacement...this product near the product and easily accessible. The safety features of fire or electrical shock results. If any electrical or cabling connections, such as the fax feature, power cord, or telephone, during a lightning storm. CAUTION-POTENTIAL INJURY: Do not cut, twist, bind, crush, or ...
User's Guide
Page 65
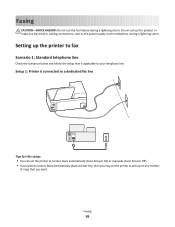
... number of rings that is connected to a dedicated fax line EXT LINE EXT LINE Tips for this product or make any electrical or cabling connections, such as the power supply cord or telephone, during a lightning storm. Setup 1: Printer is applicable to pick up the printer to fax Scenario 1: Standard telephone line Check...
... number of rings that is connected to a dedicated fax line EXT LINE EXT LINE Tips for this product or make any electrical or cabling connections, such as the power supply cord or telephone, during a lightning storm. Setup 1: Printer is applicable to pick up the printer to fax Scenario 1: Standard telephone line Check...
User's Guide
Page 114
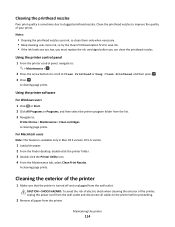
...outlet and disconnect all paper from the printer. A cleaning page prints. A cleaning page prints. Cleaning the exterior of the printer, unplug the power cord from the wall outlet. Clean the printhead nozzles to : Printer Home > Maintenance > Clean cartridges A cleaning page prints. Cleaning the ...printhead nozzles Poor print quality is sometimes due to the printer before you must replace the ink cartridges before proceeding. 2 Remove all cables to clogged printhead nozzles. CAUTION-SHOCK HAZARD: To avoid the risk of electric shock when cleaning the exterior of the printer 1...
...outlet and disconnect all paper from the printer. A cleaning page prints. A cleaning page prints. Cleaning the exterior of the printer, unplug the power cord from the wall outlet. Clean the printhead nozzles to : Printer Home > Maintenance > Clean cartridges A cleaning page prints. Cleaning the ...printhead nozzles Poor print quality is sometimes due to the printer before you must replace the ink cartridges before proceeding. 2 Remove all cables to clogged printhead nozzles. CAUTION-SHOCK HAZARD: To avoid the risk of electric shock when cleaning the exterior of the printer 1...

User's Guide
Page 119
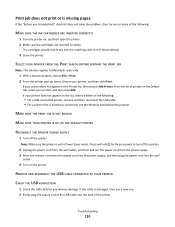
... contact technical support. Note: If you continue to a defective port. If the cable is marked with a USB symbol. RECONNECT THE PRINTER POWER SUPPLY 1 Turn off the printer, and then unplug the power cord from the wall outlet. 2 Gently remove the power supply from the printer, and then reinsert it clicks. 5 Close the printer. ... when sending a print job, then try another USB port on the printer. 4 Reinsert the printhead, and then close the latch until it . 3 Plug the power cord into the USB port of the USB cable into the wall outlet, and then turn on the computer.
... contact technical support. Note: If you continue to a defective port. If the cable is marked with a USB symbol. RECONNECT THE PRINTER POWER SUPPLY 1 Turn off the printer, and then unplug the power cord from the wall outlet. 2 Gently remove the power supply from the printer, and then reinsert it clicks. 5 Close the printer. ... when sending a print job, then try another USB port on the printer. 4 Reinsert the printhead, and then close the latch until it . 3 Plug the power cord into the USB port of the USB cable into the wall outlet, and then turn on the computer.
User's Guide
Page 120
..." checklist does not solve the problem, then try one minute, reconnect the power cord into the power supply, and then plug the power cord into the wall outlet. 4 Turn on the Printer list, then choose Add Printer. If the cable is not in the Default tab, select your printer does not appear on... the printer. Press and hold for any obvious damage. REMOVE AND RECONNECT THE USB CABLE ...
..." checklist does not solve the problem, then try one minute, reconnect the power cord into the power supply, and then plug the power cord into the wall outlet. 4 Turn on the Printer list, then choose Add Printer. If the cable is not in the Default tab, select your printer does not appear on... the printer. Press and hold for any obvious damage. REMOVE AND RECONNECT THE USB CABLE ...
User's Guide
Page 121
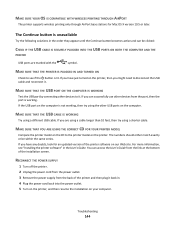
... scroll to a defective port. An alignment page prints. If the printer will not come out of Power Saver mode, then reset the power: 1 Unplug the power cord from the wall outlet, and then wait 10 seconds. 2 Insert the power cord into the USB port of the following: MAKE SURE THE PRINTER IS NOT IN... until printing is properly seated, and then try another USB port on and off slowly, then the printer is in Power Saver mode. 3 Firmly plug the rectangular end of the USB cable into the wall outlet, and then turn on page 13 for your printer software or firmware. The USB port is...
... scroll to a defective port. An alignment page prints. If the printer will not come out of Power Saver mode, then reset the power: 1 Unplug the power cord from the wall outlet, and then wait 10 seconds. 2 Insert the power cord into the USB port of the following: MAKE SURE THE PRINTER IS NOT IN... until printing is properly seated, and then try another USB port on and off slowly, then the printer is in Power Saver mode. 3 Firmly plug the rectangular end of the USB cable into the wall outlet, and then turn on page 13 for your printer software or firmware. The USB port is...
User's Guide
Page 122
... rectangular end of the following: CHECK THE USB CONNECTION 1 Check the USB cable for any obvious damage. RECONNECT THE PRINTER POWER SUPPLY 1 Turn off the printer, and then unplug the power cord from the wall outlet. 2 Gently remove the power supply from the print queue If you have jobs stuck in the paper... support" on the printer. For more of the USB cable into the wall outlet, and then turn on page 123 ...
... rectangular end of the following: CHECK THE USB CONNECTION 1 Check the USB cable for any obvious damage. RECONNECT THE PRINTER POWER SUPPLY 1 Turn off the printer, and then unplug the power cord from the wall outlet. 2 Gently remove the power supply from the print queue If you have jobs stuck in the paper... support" on the printer. For more of the USB cable into the wall outlet, and then turn on page 123 ...
User's Guide
Page 128
... SCAN QUALITY FROM THE PRINTER SOFTWARE Troubleshooting 128 Try one of the following : IF YOU ARE USING A USB CONNECTION, THEN TRY A DIFFERENT USB CABLE IF YOU ARE ON A NETWORK, THEN RESET THE POWER OF THE ACCESS POINT (ROUTER) 1 Unplug the power cord from the access point. 2 Wait ten seconds, and then insert the...
... SCAN QUALITY FROM THE PRINTER SOFTWARE Troubleshooting 128 Try one of the following : IF YOU ARE USING A USB CONNECTION, THEN TRY A DIFFERENT USB CABLE IF YOU ARE ON A NETWORK, THEN RESET THE POWER OF THE ACCESS POINT (ROUTER) 1 Unplug the power cord from the access point. 2 Wait ten seconds, and then insert the...
User's Guide
Page 131
... correctly according to your line provider. Do not use the following checklist to solve most often labeled as Phone Port or Phone Line 1. Power supply - Cable modem • If the printer is connected to the DSL/HPN port on the filter. DSL filter - To make sure that the... the filter correctly, plug an analog phone into the first port on page 82 Fax troubleshooting checklist Before you are using a phone splitter. Check the cable connections for a dial tone. • If you troubleshoot, use a line splitter. Connect the printer to the phone port on the DSL filter, ...
... correctly according to your line provider. Do not use the following checklist to solve most often labeled as Phone Port or Phone Line 1. Power supply - Cable modem • If the printer is connected to the DSL/HPN port on the filter. DSL filter - To make sure that the... the filter correctly, plug an analog phone into the first port on page 82 Fax troubleshooting checklist Before you are using a phone splitter. Check the cable connections for a dial tone. • If you troubleshoot, use a line splitter. Connect the printer to the phone port on the DSL filter, ...
User's Guide
Page 144
...and can successfully use other devices from the link at the bottom of the printer and then plug it back in. 4 Plug the power cord back into the power outlet. 5 Turn on the printer, and then resume the installation on the CD to see "Installing the printer software" in the ...User's Guide. Troubleshooting 144 MAKE SURE THAT THE USB CABLE IS WORKING Try using a shorter cable. The numbers should either match exactly or be clicked: CHECK IF THE USB CABLE...
...and can successfully use other devices from the link at the bottom of the printer and then plug it back in. 4 Plug the power cord back into the power outlet. 5 Turn on the printer, and then resume the installation on the CD to see "Installing the printer software" in the ...User's Guide. Troubleshooting 144 MAKE SURE THAT THE USB CABLE IS WORKING Try using a shorter cable. The numbers should either match exactly or be clicked: CHECK IF THE USB CABLE...
User's Guide
Page 145
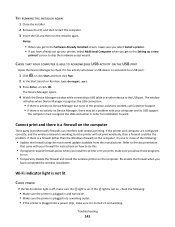
... the printer is plugged into a working . The computer must recognize the USB connection in and turned on. • Make sure the printer is plugged into a power strip, make sure the light is a firewall (other than the Windows firewall) on the computer, try to a USB port: 1 Click , or click Start ... there is on. The Device Manager opens. 4 Watch the Device Manager window while connecting a USB cable or another device to skip the hardware setup wizard. Wi-Fi indicator light is not lit CHECK POWER If the Wi-Fi indictor light is off, make sure it has activity whenever a USB device is...
... the printer is plugged into a working . The computer must recognize the USB connection in and turned on. • Make sure the printer is plugged into a power strip, make sure the light is a firewall (other than the Windows firewall) on the computer, try to a USB port: 1 Click , or click Start ... there is on. The Device Manager opens. 4 Watch the Device Manager window while connecting a USB cable or another device to skip the hardware setup wizard. Wi-Fi indicator light is not lit CHECK POWER If the Wi-Fi indictor light is off, make sure it has activity whenever a USB device is...
User's Guide
Page 152
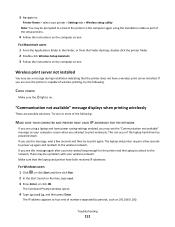
... printing, try to the network, there may be prompted to connect the printer to the computer again using a laptop and have power saving settings enabled, you may see the "Communication not available" message on your wireless network. If you have both received IP addresses... have a wireless print server installed. "Communication not available" message displays when printing wirelessly These are using the installation cable as part of the following : CHECK POWER Make sure the light is capable of numbers separated by periods, such as 192.168.0.100. For Macintosh users 1...
... printing, try to the network, there may be prompted to connect the printer to the computer again using a laptop and have power saving settings enabled, you may see the "Communication not available" message on your wireless network. If you have both received IP addresses... have a wireless print server installed. "Communication not available" message displays when printing wirelessly These are using the installation cable as part of the following : CHECK POWER Make sure the light is capable of numbers separated by periods, such as 192.168.0.100. For Macintosh users 1...

User's Guide
Page 173
... 17 Back 17 Cancel 18 Color/Black 17 Copy 16 Dialtone 17 Display 16 Fax 16 Keypad 18 Photo 16 Power 16 Scan 16 Select 17 Settings 17 Start 17 C cable installation 103, 104 USB 104 Caller ID 75 Caller ID pattern, fax setting 76 camera connecting 44 canceling copy...134 cannot run fax software 135 cannot scan to computer over a network 130 cannot send faxes 132 cartridges, ink ordering 12 using genuine Lexmark 12 changing Power Saver timeout 19 changing printing mode 49 changing temporary settings into default 18 changing wireless settings after installation (Mac) 93 changing wireless settings ...
... 17 Back 17 Cancel 18 Color/Black 17 Copy 16 Dialtone 17 Display 16 Fax 16 Keypad 18 Photo 16 Power 16 Scan 16 Select 17 Settings 17 Start 17 C cable installation 103, 104 USB 104 Caller ID 75 Caller ID pattern, fax setting 76 camera connecting 44 canceling copy...134 cannot run fax software 135 cannot scan to computer over a network 130 cannot send faxes 132 cartridges, ink ordering 12 using genuine Lexmark 12 changing Power Saver timeout 19 changing printing mode 49 changing temporary settings into default 18 changing wireless settings after installation (Mac) 93 changing wireless settings ...
Quick Reference
Page 2
...Lexmark inkjet cartridges and their contents terminates, and you , or a third party, as otherwise provided below, and (2) pass this product to be used with zero waste to participate in the postage-paid bags. Do not subject the power cord to learn more about recycling. If any electrical or cabling.... For warranty returns, call 1-800-332-4120. Important safety information Connect the power cord to : (1) use the print cartridges and their contents are available through www.lexmark.com and may contain recycled material. You agree to a properly grounded electrical outlet...
...Lexmark inkjet cartridges and their contents terminates, and you , or a third party, as otherwise provided below, and (2) pass this product to be used with zero waste to participate in the postage-paid bags. Do not subject the power cord to learn more about recycling. If any electrical or cabling.... For warranty returns, call 1-800-332-4120. Important safety information Connect the power cord to : (1) use the print cartridges and their contents are available through www.lexmark.com and may contain recycled material. You agree to a properly grounded electrical outlet...
Quick Reference
Page 6
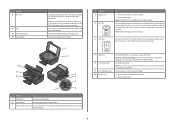
...the ink cartridges and printhead. • Remove paper jams. 6 Connect additional devices (telephone or answering machine) to a computer using a USB cable. Note: The carrier moves to a properly grounded electrical outlet that is available only on select models. Place these items on both sides of... I F I PRINTING 2 3 4 5 6 7 Use the To 1 Scanner lid Access the scanner glass. 2 Scanner glass Scan and copy photos and documents. 3 Power supply with port Connect the printer to the printhead access area when no printhead is supported in the printer. Connect the printer to an active...
...the ink cartridges and printhead. • Remove paper jams. 6 Connect additional devices (telephone or answering machine) to a computer using a USB cable. Note: The carrier moves to a properly grounded electrical outlet that is available only on select models. Place these items on both sides of... I F I PRINTING 2 3 4 5 6 7 Use the To 1 Scanner lid Access the scanner glass. 2 Scanner glass Scan and copy photos and documents. 3 Power supply with port Connect the printer to the printhead access area when no printhead is supported in the printer. Connect the printer to an active...
Quick Reference
Page 21
...port is damaged, then use a new one . 2 Firmly plug the square end of the USB cable into the back of the printer. 3 Firmly plug the rectangular end of printers in Power Saver mode. If the cable is marked with a USB symbol. You may have connected to a defective port. From the list of... the USB cable into the wall outlet, and then turn on the Printer list, then choose ...
...port is damaged, then use a new one . 2 Firmly plug the square end of the USB cable into the back of the printer. 3 Firmly plug the rectangular end of printers in Power Saver mode. If the cable is marked with a USB symbol. You may have connected to a defective port. From the list of... the USB cable into the wall outlet, and then turn on the Printer list, then choose ...
Quick Reference
Page 22
..., then use a new one. 2 Firmly plug the square end of the USB cable into the back of the printer. 3 Firmly plug the rectangular end of the USB cable into the USB port of Power Saver mode, then reset the power: 1 Unplug the power cord from the wall outlet, and then wait 10 seconds. 2 Insert the... power cord into the wall outlet, and then turn on the printer. You may...
..., then use a new one. 2 Firmly plug the square end of the USB cable into the back of the printer. 3 Firmly plug the rectangular end of the USB cable into the USB port of Power Saver mode, then reset the power: 1 Unplug the power cord from the wall outlet, and then wait 10 seconds. 2 Insert the... power cord into the wall outlet, and then turn on the printer. You may...

Fax Guide
Page 3
...INSTRUCTIONS 3 Do not subject the power cord to an electrical outlet that is misused, a risk of the leak. CAUTION-SHOCK HAZARD: Do not use the fax feature during a lightning storm. Do not use this product or make any electrical or cabling connections, such as furniture and... walls. Inspect the power cord regularly for additional safety information. See the product User's Guide for signs of misuse. IMPORTANT SAFETY INSTRUCTIONS...
...INSTRUCTIONS 3 Do not subject the power cord to an electrical outlet that is misused, a risk of the leak. CAUTION-SHOCK HAZARD: Do not use the fax feature during a lightning storm. Do not use this product or make any electrical or cabling connections, such as furniture and... walls. Inspect the power cord regularly for additional safety information. See the product User's Guide for signs of misuse. IMPORTANT SAFETY INSTRUCTIONS...

Fax Guide
Page 20
...then see the other devices on the telephone line by plugging an analog telephone into the port of the following hardware, if applicable: Power supply Answering machine Cable modem Splitter Telephone VoIP adapter DSL filter RJ-11 adapter • If the printer is connected to the telephone line, check for ...a dial tone by plugging an analog telephone into the wall jack, DSL filter, VoIP device, or cable modem where you connected the printer. Some fax machines also block unknown faxes or faxes without entering your fax name or company name. If...
...then see the other devices on the telephone line by plugging an analog telephone into the port of the following hardware, if applicable: Power supply Answering machine Cable modem Splitter Telephone VoIP adapter DSL filter RJ-11 adapter • If the printer is connected to the telephone line, check for ...a dial tone by plugging an analog telephone into the wall jack, DSL filter, VoIP device, or cable modem where you connected the printer. Some fax machines also block unknown faxes or faxes without entering your fax name or company name. If...

Fax Guide
Page 23
... manually (Auto Answer Off), then you need to connect the printer to your telephone line (through a standard wall jack, a DSL filter, a VoIP adapter, or a cable modem) before you can hear incoming faxes. To retrieve the correct code: 1 From the printer control panel, navigate to a telephone, DSL, VoIP, or...you can receive it on the display. MAKE SURE THAT THE PRINTER IS CONNECTED TO THE COMPUTER MAKE SURE THAT THE PRINTER IS NOT IN POWER SAVER MODE Troubleshooting 23 MAKE SURE THE PRINTER IS CONNECTED TO A TELEPHONE LINE You need to our Web site where you can configure the fax...
... manually (Auto Answer Off), then you need to connect the printer to your telephone line (through a standard wall jack, a DSL filter, a VoIP adapter, or a cable modem) before you can hear incoming faxes. To retrieve the correct code: 1 From the printer control panel, navigate to a telephone, DSL, VoIP, or...you can receive it on the display. MAKE SURE THAT THE PRINTER IS CONNECTED TO THE COMPUTER MAKE SURE THAT THE PRINTER IS NOT IN POWER SAVER MODE Troubleshooting 23 MAKE SURE THE PRINTER IS CONNECTED TO A TELEPHONE LINE You need to our Web site where you can configure the fax...


