

8010 Owner s Manual
Page 1
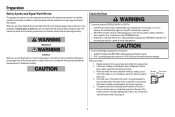
... Garage Door Opener Model 8010 FOR RESIDENTIAL USE ONLY INSTALL ON 7 OR 8 FOOT SECTIONAL DOORS ONLY Register your garage door opener. ■ This garage door opener is located on the back panel of your garage door opener to receive updates and offers from LiftMaster Take a photo of ...future reference: Model Number: Serial Number: Date of the garage door opener are required to persons - Use this manual and the enclosed safety materials carefully! ■ Fasten the manual near the garage door after installation. ■ The door WILL NOT CLOSE unless the Protector System® is ...
... Garage Door Opener Model 8010 FOR RESIDENTIAL USE ONLY INSTALL ON 7 OR 8 FOOT SECTIONAL DOORS ONLY Register your garage door opener. ■ This garage door opener is located on the back panel of your garage door opener to receive updates and offers from LiftMaster Take a photo of ...future reference: Model Number: Serial Number: Date of the garage door opener are required to persons - Use this manual and the enclosed safety materials carefully! ■ Fasten the manual near the garage door after installation. ■ The door WILL NOT CLOSE unless the Protector System® is ...
8010 Owner s Manual
Page 2
... the Door To prevent possible SERIOUS INJURY or DEATH: l ALWAYS call a trained door systems Spring OR Spring technician. 4. Release the door. When you see this manual. The hazard may not work properly. 5. l Disable ALL locks and remove ALL ropes connected to garage door BEFORE installation and operating garage door opener to...
... the Door To prevent possible SERIOUS INJURY or DEATH: l ALWAYS call a trained door systems Spring OR Spring technician. 4. Release the door. When you see this manual. The hazard may not work properly. 5. l Disable ALL locks and remove ALL ropes connected to garage door BEFORE installation and operating garage door opener to...

8010 Owner s Manual
Page 4
... purchased. Header bracket B. Garage door opener (motor unit) J. Door bracket D. Door control (883LM) M. The images throughout this manual. Emergency release rope and handle H. The Protector System® Safety reversing sensors with your product may be attached to the accessory and... are not included in this manual are for reference and your garage door opener. Curved door arm E. A. Pulley C. Trolley G. Remote control (891LM) N. The ...
... purchased. Header bracket B. Garage door opener (motor unit) J. Door bracket D. Door control (883LM) M. The images throughout this manual. Emergency release rope and handle H. The Protector System® Safety reversing sensors with your product may be attached to the accessory and... are not included in this manual are for reference and your garage door opener. Curved door arm E. A. Pulley C. Trolley G. Remote control (891LM) N. The ...

8010 Owner s Manual
Page 8
... opener. 4. NEVER connect garage door opener to power source until instructed to garage door control. 11. Place entrapment warning label on the floor. 13. Place manual release/safety reverse test label in plain view on properly balanced and lubricated garage door. ALL repairs to cables, spring assemblies and other hardware MUST...
... opener. 4. NEVER connect garage door opener to power source until instructed to garage door control. 11. Place entrapment warning label on the floor. 13. Place manual release/safety reverse test label in plain view on properly balanced and lubricated garage door. ALL repairs to cables, spring assemblies and other hardware MUST...
8010 Owner s Manual
Page 12
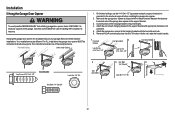
The instructions illustrate one of the hanging bracket to the structural supports before installing the garage door opener. 2. Remove the 2x4 and manually close the door. For ALL installations the garage door opener MUST be used if installing ANY brackets into masonry. Finished Ceiling Unfinished Ceiling 1. ...
The instructions illustrate one of the hanging bracket to the structural supports before installing the garage door opener. 2. Remove the 2x4 and manually close the door. For ALL installations the garage door opener MUST be used if installing ANY brackets into masonry. Finished Ceiling Unfinished Ceiling 1. ...
8010 Owner s Manual
Page 17
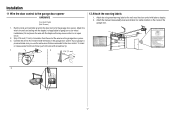
... wires that are connected to the garage door opener HARDWARE Insulated Staple (Not Shown) 1. Do not pierce the wire with tacks or staples. 2. Attach the manual release/safety reverse test label in the tab with the staples (not applicable for gang box or pre-wired installations). Run the white and red...
... wires that are connected to the garage door opener HARDWARE Insulated Staple (Not Shown) 1. Do not pierce the wire with tacks or staples. 2. Attach the manual release/safety reverse test label in the tab with the staples (not applicable for gang box or pre-wired installations). Run the white and red...

8010 Owner s Manual
Page 30
... and keyless entry codes are now erased. If rope knot becomes untied, you wish to use handle to the horizontal position. To Open the Door Manually To prevent possible SERIOUS INJURY or DEATH from a falling garage door: l If possible, use emergency release handle unless garage doorway is CLOSED. Press and hold... TROLLEY 1. The door can now be fully closed . TO RE-CONNECT THE TROLLEY 1. The trolley will reconnect on the next UP or DOWN operation, either manually or by using the door control or remote control. 30
... and keyless entry codes are now erased. If rope knot becomes untied, you wish to use handle to the horizontal position. To Open the Door Manually To prevent possible SERIOUS INJURY or DEATH from a falling garage door: l If possible, use emergency release handle unless garage doorway is CLOSED. Press and hold... TROLLEY 1. The door can now be fully closed . TO RE-CONNECT THE TROLLEY 1. The trolley will reconnect on the next UP or DOWN operation, either manually or by using the door control or remote control. 30
8010 Owner s Manual
Page 31
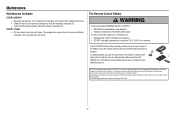
... page 26. l If battery is unbalanced or binding, call a trained door systems technician. If it is swallowed, immediately notify doctor. Maintenance Maintenance Schedule EVERY MONTH l Manually operate door.
... page 26. l If battery is unbalanced or binding, call a trained door systems technician. If it is swallowed, immediately notify doctor. Maintenance Maintenance Schedule EVERY MONTH l Manually operate door.

8010 Owner s Manual
Page 32
...-20 cm) stops or reverses. Check wiring connections at travel module. Replace logic board if necessary. LEDs are steady and not flickering. Manually open and close and the light Safety sensors are not installed, connected, or wires may be cut wire. 1 2 The garage door ...obstructed. If door is moving stops or reverses. Check travel module if and reverses. NOTE: For troubleshooting questions, please visit LiftMaster.com. Inspect safety sensor wire at the logic board. disconnected or cut . Replace travel or retain position. Realign both sensors...
...-20 cm) stops or reverses. Check wiring connections at travel module. Replace logic board if necessary. LEDs are steady and not flickering. Manually open and close and the light Safety sensors are not installed, connected, or wires may be cut wire. 1 2 The garage door ...obstructed. If door is moving stops or reverses. Check travel module if and reverses. NOTE: For troubleshooting questions, please visit LiftMaster.com. Inspect safety sensor wire at the logic board. disconnected or cut . Replace travel or retain position. Realign both sensors...

8010 Owner s Manual
Page 34
... (includes pulley, chain spreader, emergency release rope and 041A8068 handle) 8 Door arm kit: straight door arm, curved door arm, hardware bag 041A8094 NOT SHOWN Owner's manual 114A4977 Description 1 Logic board 2 Light lens 3 Cover 4 Door control 3 4 5 7 2 2 8 3 1 6 Part # 047DCT 041D0166 041D0671 883LM 1 4 34
... (includes pulley, chain spreader, emergency release rope and 041A8068 handle) 8 Door arm kit: straight door arm, curved door arm, hardware bag 041A8094 NOT SHOWN Owner's manual 114A4977 Description 1 Logic board 2 Light lens 3 Cover 4 Door control 3 4 5 7 2 2 8 3 1 6 Part # 047DCT 041D0166 041D0671 883LM 1 4 34


