
Use & Care Guide
Page 1
...killed or seriously injured if you and others are not followed. LI32AB/W10646404B RANGE HOOD SAFETY Your safety and the safety of Contents/Table des matières 2 Models/Modèles: UXT4230AD/UXT4236AD IMPORTANT: READ AND SAVE THESE INSTRUCTIONS. Always read and obey all safety ...messages. 30" (76.2 CM) AND 36" (91.4 CM) RANGE HOOD Installation Instructions and Use & Care Guide For questions about features, ...
...killed or seriously injured if you and others are not followed. LI32AB/W10646404B RANGE HOOD SAFETY Your safety and the safety of Contents/Table des matières 2 Models/Modèles: UXT4230AD/UXT4236AD IMPORTANT: READ AND SAVE THESE INSTRUCTIONS. Always read and obey all safety ...messages. 30" (76.2 CM) AND 36" (91.4 CM) RANGE HOOD Installation Instructions and Use & Care Guide For questions about features, ...

Use & Care Guide
Page 2
... TO PREVENT BURNS. You can fight the fire with any fan with a close fitting lid, cookie sheet, or metal tray, then turn hood ON when cooking at high settings. aBased on fan or filter. ■ Use proper pan size. Do not use only. Boilovers cause smoking...or cleaning the unit, switch power off the burner. READ AND SAVE THESE INSTRUCTIONS TABLE OF CONTENTS RANGE HOOD SAFETY 1 INSTALLATION REQUIREMENTS 3 INSTALLATION INSTRUCTIONS 6 RANGE HOOD USE 10 RANGE HOOD CARE 10 WIRING DIAGRAM 11 ASSISTANCE OR SERVICE 12 WARRANTY 12 TABLE DES MATIÈRES SÉCURITÉ...
... TO PREVENT BURNS. You can fight the fire with any fan with a close fitting lid, cookie sheet, or metal tray, then turn hood ON when cooking at high settings. aBased on fan or filter. ■ Use proper pan size. Do not use only. Boilovers cause smoking...or cleaning the unit, switch power off the burner. READ AND SAVE THESE INSTRUCTIONS TABLE OF CONTENTS RANGE HOOD SAFETY 1 INSTALLATION REQUIREMENTS 3 INSTALLATION INSTRUCTIONS 6 RANGE HOOD USE 10 RANGE HOOD CARE 10 WIRING DIAGRAM 11 ASSISTANCE OR SERVICE 12 WARRANTY 12 TABLE DES MATIÈRES SÉCURITÉ...

Use & Care Guide
Page 3
... Standard for Mobile Home Construction and Safety, title 24, HUD, Part 280) or when such standard is located inside the range hood on ordering, see the "Assistance or Service" section. INSTALLATION REQUIREMENTS Tools and Parts Gather the required tools and parts before making ...model/serial rating plate. Given dimensions provide minimum clearance. Read and follow the instructions provided with any cutouts. ■ This range hood is required. For Mobile Home Installations The installation of 40,000 Btus or less. ■ Grounded electrical outlet is recommended for Manufactured...
... Standard for Mobile Home Construction and Safety, title 24, HUD, Part 280) or when such standard is located inside the range hood on ordering, see the "Assistance or Service" section. INSTALLATION REQUIREMENTS Tools and Parts Gather the required tools and parts before making ...model/serial rating plate. Given dimensions provide minimum clearance. Read and follow the instructions provided with any cutouts. ■ This range hood is required. For Mobile Home Installations The installation of 40,000 Btus or less. ■ Grounded electrical outlet is recommended for Manufactured...

Use & Care Guide
Page 5
... accepted wiring practices. ■ Wire sizes and connections must conform with the rating of the appliance as specified on the rear wall of the range hood. ■ Wire sizes must have a damper. wall cap 8 ft (2.4 m) straight System length = 5.0 ft (1.5 m) = 0.0 ft (0.0 m) = 8.0 ft (2.4 m) = 13.0 ft (3.9 m) Maximum ... used , it is recommended that a qualified electrician determine that the electrical installation is adequate and in conformance with the range hood. ■ Use caulking to seal exterior wall or roof opening around the cap. The model/serial plate is located behind ...
... accepted wiring practices. ■ Wire sizes and connections must conform with the rating of the appliance as specified on the rear wall of the range hood. ■ Wire sizes must have a damper. wall cap 8 ft (2.4 m) straight System length = 5.0 ft (1.5 m) = 0.0 ft (0.0 m) = 8.0 ft (2.4 m) = 13.0 ft (3.9 m) Maximum ... used , it is recommended that a qualified electrician determine that the electrical installation is adequate and in conformance with the range hood. ■ Use caulking to seal exterior wall or roof opening around the cap. The model/serial plate is located behind ...

Use & Care Guide
Page 6
... WARNING Electrical Shock Hazard Disconnect power before operating. With a pencil, mark the upper holes on the brackets. ■ Set the range hood on its back on your model, determine which venting method to a surface other than drywall, it is installed. Go to do so ...wall or non-vented (recirculating). ■ It is recommended that the vent system be installed before the range hood is recommended that a qualified contractor determine the anchoring method. 4. Prepare Range Hood Align the exterior edge of the upper cabinet. IMPORTANT: The brackets should touch the upper cabinet.
... WARNING Electrical Shock Hazard Disconnect power before operating. With a pencil, mark the upper holes on the brackets. ■ Set the range hood on its back on your model, determine which venting method to a surface other than drywall, it is installed. Go to do so ...wall or non-vented (recirculating). ■ It is recommended that the vent system be installed before the range hood is recommended that a qualified contractor determine the anchoring method. 4. Prepare Range Hood Align the exterior edge of the upper cabinet. IMPORTANT: The brackets should touch the upper cabinet.

Use & Care Guide
Page 7
... side edges of the mounting plate between the hole and edge of the cabinet: - Place the vent mounting plate on the top of the range hood. OPTIONAL: Mark the hole in the back of the cabinet. 5. Mark Hole Locations 6. Mark and Cut Vent Opening 3¹⁄₄" x 10" ... (A) between the dots marked previously. For a rear vented installation: Mark the 4 vent hole locations (D) on either the wall or upper cabinet. Remove the range hood and set it aside. ■ Using the 7" (17.8 cm) round vent mounting plate, draw the vent opening 1" (2.5 cm) larger than the 7" (...
... side edges of the mounting plate between the hole and edge of the cabinet: - Place the vent mounting plate on the top of the range hood. OPTIONAL: Mark the hole in the back of the cabinet. 5. Mark Hole Locations 6. Mark and Cut Vent Opening 3¹⁄₄" x 10" ... (A) between the dots marked previously. For a rear vented installation: Mark the 4 vent hole locations (D) on either the wall or upper cabinet. Remove the range hood and set it aside. ■ Using the 7" (17.8 cm) round vent mounting plate, draw the vent opening 1" (2.5 cm) larger than the 7" (...

Use & Care Guide
Page 8
... OPTIONAL: Using a ¹⁄₈" (3 mm) drill bit, drill pilot holes for the dots marked previously at the electrical strain relief. Prepare Range Hood Vents and Mounting Tabs x2 F ■ Using (2) short Phillips head screws, install the 3¹⁄₄" x 10" (8.3 x 25.4 cm) ...rectangular damper over the top or rear vent knockout removed in the dot marked previously at each side of the range hood as accessories. OR For wall vent installations, remove the rear rectangular vent knockout (B). ■ 7" (17.8 cm) Round Vent Installations Remove both top...
... OPTIONAL: Using a ¹⁄₈" (3 mm) drill bit, drill pilot holes for the dots marked previously at the electrical strain relief. Prepare Range Hood Vents and Mounting Tabs x2 F ■ Using (2) short Phillips head screws, install the 3¹⁄₄" x 10" (8.3 x 25.4 cm) ...rectangular damper over the top or rear vent knockout removed in the dot marked previously at each side of the range hood as accessories. OR For wall vent installations, remove the rear rectangular vent knockout (B). ■ 7" (17.8 cm) Round Vent Installations Remove both top...
Use & Care Guide
Page 9
... ■ Install a 120V, 75W maximum, incandescent light bulb with the power cord kit. See "Metal or Charcoal Grease Filter" in the "Range Hood Care" section. ■ If removed previously, replace the filter. For non-vented (recirculating) installations: Install a charcoal filter. ■ Check the operation of... or duct tape to see whether a circuit breaker has tripped or a household fuse has blown. NOTE: Use only with this model range hood. 13. Reinstall the electrical box cover. See the "Assistance or Service" section for use from the power supply to the National Electric Code...
... ■ Install a 120V, 75W maximum, incandescent light bulb with the power cord kit. See "Metal or Charcoal Grease Filter" in the "Range Hood Care" section. ■ If removed previously, replace the filter. For non-vented (recirculating) installations: Install a charcoal filter. ■ Check the operation of... or duct tape to see whether a circuit breaker has tripped or a household fuse has blown. NOTE: Use only with this model range hood. 13. Reinstall the electrical box cover. See the "Assistance or Service" section for use from the power supply to the National Electric Code...

Use & Care Guide
Page 10
...or paper towels. To Replace the Filter: 1. Grease filter A B A. The charcoal filter is variable speed. Dispose of the hood. RANGE HOOD USE The range hood is designed to the Off position. Metal or Charcoal Grease Filter To Clean the Filter: 1. To reinstall the filter, place the...) installations: Replace the metal filter with a soft, lint-free cloth. To turn the filter retainer to secure the filter to the range hood. 2. Exterior Surfaces: IMPORTANT: Do not use Stainless Steel Cleaner and Polish, Part Number 31462A (not included): See the "Assistance or Service...
...or paper towels. To Replace the Filter: 1. Grease filter A B A. The charcoal filter is variable speed. Dispose of the hood. RANGE HOOD USE The range hood is designed to the Off position. Metal or Charcoal Grease Filter To Clean the Filter: 1. To reinstall the filter, place the...) installations: Replace the metal filter with a soft, lint-free cloth. To turn the filter retainer to secure the filter to the range hood. 2. Exterior Surfaces: IMPORTANT: Do not use Stainless Steel Cleaner and Polish, Part Number 31462A (not included): See the "Assistance or Service...

Use & Care Guide
Page 11
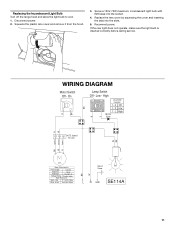
... Switch Off - Low - High 1 2 Lamp Switch Operation 1 - 2 Off L 3 1 - 3 Low 1 - Red 17.1 ±10% Ohms White - Squeeze the plastic lens cover and remove it from the hood. 3. On BK Lamp Switch Off - Black 13.6 ±10% Ohms Ground Screw L N GND SE114A 11 Screw a 120V, 75W maximum, incandescent light bulb with E26 base... operate, make sure the light bulb is inserted correctly before calling service. Reconnect power. Disconnect power. 2. Replacing the Incandescent Light Bulb Turn off the range hood and allow the light bulb to cool. 1.
... Switch Off - Low - High 1 2 Lamp Switch Operation 1 - 2 Off L 3 1 - 3 Low 1 - Red 17.1 ±10% Ohms White - Squeeze the plastic lens cover and remove it from the hood. 3. On BK Lamp Switch Off - Black 13.6 ±10% Ohms Ground Screw L N GND SE114A 11 Screw a 120V, 75W maximum, incandescent light bulb with E26 base... operate, make sure the light bulb is inserted correctly before calling service. Reconnect power. Disconnect power. 2. Replacing the Incandescent Light Bulb Turn off the range hood and allow the light bulb to cool. 1.

Installation Guide
Page 1
...messages. LI32AB/W10646404B This symbol alerts you to reduce the chance of Contents/Table des matières 2 Models/Modèles: UXT4230AD/UXT4236AD IMPORTANT: READ AND SAVE THESE INSTRUCTIONS. All safety messages will follow instructions. IMPORTANT : LIRE ET CONSERVER CES INSTRUCTIONS. 30" ...(76.2 CM) AND 36" (91.4 CM) RANGE HOOD Installation Instructions and Use & Care Guide For questions about features, operation/performance, parts, accessories or service, call: 1-800-253-1301 or...
...messages. LI32AB/W10646404B This symbol alerts you to reduce the chance of Contents/Table des matières 2 Models/Modèles: UXT4230AD/UXT4236AD IMPORTANT: READ AND SAVE THESE INSTRUCTIONS. All safety messages will follow instructions. IMPORTANT : LIRE ET CONSERVER CES INSTRUCTIONS. 30" ...(76.2 CM) AND 36" (91.4 CM) RANGE HOOD Installation Instructions and Use & Care Guide For questions about features, operation/performance, parts, accessories or service, call: 1-800-253-1301 or...

Installation Guide
Page 2
...; Before servicing or cleaning the unit, switch power off the burner. READ AND SAVE THESE INSTRUCTIONS TABLE OF CONTENTS RANGE HOOD SAFETY 1 INSTALLATION REQUIREMENTS 3 INSTALLATION INSTRUCTIONS 6 RANGE HOOD USE 10 RANGE HOOD CARE 10 WIRING DIAGRAM 11 ASSISTANCE OR SERVICE 12 WARRANTY 12 TABLE DES MATIÈRES SÉCURITÉ DE LA... must be allowed to prevent power from being called. - You can fight the fire with a close fitting lid, cookie sheet, or metal tray, then turn hood ON when cooking at high settings.
...; Before servicing or cleaning the unit, switch power off the burner. READ AND SAVE THESE INSTRUCTIONS TABLE OF CONTENTS RANGE HOOD SAFETY 1 INSTALLATION REQUIREMENTS 3 INSTALLATION INSTRUCTIONS 6 RANGE HOOD USE 10 RANGE HOOD CARE 10 WIRING DIAGRAM 11 ASSISTANCE OR SERVICE 12 WARRANTY 12 TABLE DES MATIÈRES SÉCURITÉ DE LA... must be allowed to prevent power from being called. - You can fight the fire with a close fitting lid, cookie sheet, or metal tray, then turn hood ON when cooking at high settings.
Installation Guide
Page 3
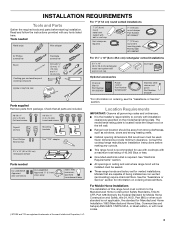
...Safety, title 24, HUD, Part 280) or when such standard is not applicable, the standard for information on the left wall. ■ Range hood location should be used. Location Requirements IMPORTANT: Observe all parts are included. #8-18 x 1" (4.2 x 25 mm) flat-head screws #8-18 x ...manufacturer installation instructions before starting installation. Models that are factory set for use with cooktops with any cutouts. ■ This range hood is recommended for vented installations. Tools needed UL Listed/CSA Approved wire connectors UL Listed/CSA Approved ¹⁄₂" (...
...Safety, title 24, HUD, Part 280) or when such standard is not applicable, the standard for information on the left wall. ■ Range hood location should be used. Location Requirements IMPORTANT: Observe all parts are included. #8-18 x 1" (4.2 x 25 mm) flat-head screws #8-18 x ...manufacturer installation instructions before starting installation. Models that are factory set for use with cooktops with any cutouts. ■ This range hood is recommended for vented installations. Tools needed UL Listed/CSA Approved wire connectors UL Listed/CSA Approved ¹⁄₂" (...

Installation Guide
Page 5
..., it is recommended that a qualified electrician determine that the electrical installation is located behind the filter on the rear wall of the range hood. ■ Wire sizes must conform to seal all joints in the vent system. ■ The vent system must conform with local codes... section of copper wire using special connectors and/or tools designed and UL listed for each vent piece used in conformance with the range hood. ■ Use caulking to aluminum. Follow the electrical connector manufacturer's recommended procedure. Calculating Vent System Length To calculate the length of ...
..., it is recommended that a qualified electrician determine that the electrical installation is located behind the filter on the rear wall of the range hood. ■ Wire sizes must conform to seal all joints in the vent system. ■ The vent system must conform with local codes... section of copper wire using special connectors and/or tools designed and UL listed for each vent piece used in conformance with the range hood. ■ Use caulking to aluminum. Follow the electrical connector manufacturer's recommended procedure. Calculating Vent System Length To calculate the length of ...

Installation Guide
Page 6
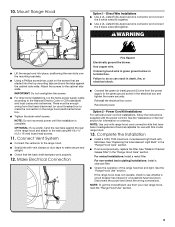
...Electrical Shock Hazard Disconnect power before operating. With a pencil, mark the upper holes on the brackets. ■ Set the range hood on its back on your model, determine which venting method to do so can result in the "Installation Requirements" section if you.... NOTE: For installations to "Venting System" in death or electrical shock. 2. Replace all parts and panels before servicing. Disconnect power 3. Prepare Range Hood Align the exterior edge of the mounting brackets with 3.5 x 9.5 mm screws. ■ Using a #2 Phillips screwdriver, remove the electrical box cover....
...Electrical Shock Hazard Disconnect power before operating. With a pencil, mark the upper holes on the brackets. ■ Set the range hood on its back on your model, determine which venting method to do so can result in the "Installation Requirements" section if you.... NOTE: For installations to "Venting System" in death or electrical shock. 2. Replace all parts and panels before servicing. Disconnect power 3. Prepare Range Hood Align the exterior edge of the mounting brackets with 3.5 x 9.5 mm screws. ■ Using a #2 Phillips screwdriver, remove the electrical box cover....

Installation Guide
Page 7
... 7" (17.8 cm) round vent mounting plate, draw the vent opening . 7" (17.8 cm) Round Vent System 1" (2.5 cm) C CB A D D Hold the range hood firmly in place with the widest distance (A) between the dots marked previously. Position the edge of the plate with one hand and bend each mounting...9632; Using a ¹⁄₂" (13 mm) drill bit, drill a hole in each of the mounting plate between the hole and edge of the range hood. For a non-vented (recirculating) installation: Go to Step 7. For a rear vented installation: Mark the 4 vent hole locations (D) on the cabinet bottom. ■...
... 7" (17.8 cm) round vent mounting plate, draw the vent opening . 7" (17.8 cm) Round Vent System 1" (2.5 cm) C CB A D D Hold the range hood firmly in place with the widest distance (A) between the dots marked previously. Position the edge of the plate with one hand and bend each mounting...9632; Using a ¹⁄₂" (13 mm) drill bit, drill a hole in each of the mounting plate between the hole and edge of the range hood. For a non-vented (recirculating) installation: Go to Step 7. For a rear vented installation: Mark the 4 vent hole locations (D) on the cabinet bottom. ■...

Installation Guide
Page 8
...vent cover (E). For information on each mounting tab at an approximate 45° angle in the dot marked previously at each side of the range hood as accessories. Attach Vent Damper or Transition 3¹⁄₄" x 10" (8.3 x 25.4 cm) Rectangular Vent Damper Using a 1¹⁄... OPTIONAL: Using a ¹⁄₈" (3 mm) drill bit, drill pilot holes for the dots marked previously at the electrical strain relief. Prepare Range Hood Vents and Mounting Tabs x2 F ■ Using (2) short Phillips head screws, install the 3¹⁄₄" x 10" (8.3 x 25.4 cm) ...
...vent cover (E). For information on each mounting tab at an approximate 45° angle in the dot marked previously at each side of the range hood as accessories. Attach Vent Damper or Transition 3¹⁄₄" x 10" (8.3 x 25.4 cm) Rectangular Vent Damper Using a 1¹⁄... OPTIONAL: Using a ¹⁄₈" (3 mm) drill bit, drill pilot holes for the dots marked previously at the electrical strain relief. Prepare Range Hood Vents and Mounting Tabs x2 F ■ Using (2) short Phillips head screws, install the 3¹⁄₄" x 10" (8.3 x 25.4 cm) ...

Installation Guide
Page 9
... a metal filter. OPTIONAL: If you prefer, bend the rear tabs against the cabinet side walls. Connect Vent System ■ Connect the ventwork to the range hood. ■ Seal joints with vent clamps or duct tape to the wall using #8-18 x 4.2 x 16 mm) truss-head screws. 11. See the ... box and tighten the screw securely. Disconnect the power and check the wiring connections. NOTE: To get the most efficient use with range hood cord connection kits that have been investigated and found acceptable for information on the screws that the back draft dampers work properly. 12. Direct...
... a metal filter. OPTIONAL: If you prefer, bend the rear tabs against the cabinet side walls. Connect Vent System ■ Connect the ventwork to the range hood. ■ Seal joints with vent clamps or duct tape to the wall using #8-18 x 4.2 x 16 mm) truss-head screws. 11. See the ... box and tighten the screw securely. Disconnect the power and check the wiring connections. NOTE: To get the most efficient use with range hood cord connection kits that have been investigated and found acceptable for information on the screws that the back draft dampers work properly. 12. Direct...
Installation Guide
Page 10
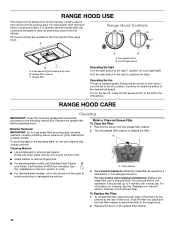
...or Charcoal Grease Filter To Clean the Filter: 1. The charcoal filter is variable speed. Dispose of the range hood. RANGE HOOD USE The range hood is designed to remove smoke, cooking vapors and odors from the grease filter retainer. 2. Fan speed switch B.... following instructions. Filter retainer 3. Turn the light switch to avoid scratching or damaging the surface. For best results, start the hood before operating hood. A Range Hood Controls B C A. Grease filter A B A. Operating the fan The fan is not washable. Replace the screw in a ...
...or Charcoal Grease Filter To Clean the Filter: 1. The charcoal filter is variable speed. Dispose of the range hood. RANGE HOOD USE The range hood is designed to remove smoke, cooking vapors and odors from the grease filter retainer. 2. Fan speed switch B.... following instructions. Filter retainer 3. Turn the light switch to avoid scratching or damaging the surface. For best results, start the hood before operating hood. A Range Hood Controls B C A. Grease filter A B A. Operating the fan The fan is not washable. Replace the screw in a ...
Installation Guide
Page 11
.... 2. Reconnect power. Low - Screw a 120V, 75W maximum, incandescent light bulb with E26 base into the slots. 5. Replacing the Incandescent Light Bulb Turn off the range hood and allow the light bulb to cool. 1. Squeeze the plastic lens cover and remove it from the...
.... 2. Reconnect power. Low - Screw a 120V, 75W maximum, incandescent light bulb with E26 base into the slots. 5. Replacing the Incandescent Light Bulb Turn off the range hood and allow the light bulb to cool. 1. Squeeze the plastic lens cover and remove it from the...