
Use & Care Guide
Page 2
... OF A RANGE TOP GREASE FIRE: ■ Never leave surface units unattended at high heat or when flambeing food (i.e. Crepes Suzette, Cherries Jubilee, Peppercorn Beef Flambé). ■ Clean ventilating fans frequently. Always use this unit only in the area where it . - aBased on accidentally. READ AND SAVE THESE INSTRUCTIONS TABLE OF CONTENTS RANGE HOOD SAFETY 1 INSTALLATION REQUIREMENTS 3 INSTALLATION INSTRUCTIONS 6 RANGE HOOD USE 10 RANGE HOOD CARE 10 WIRING DIAGRAM 11 ASSISTANCE OR SERVICE 12 WARRANTY 12...
... OF A RANGE TOP GREASE FIRE: ■ Never leave surface units unattended at high heat or when flambeing food (i.e. Crepes Suzette, Cherries Jubilee, Peppercorn Beef Flambé). ■ Clean ventilating fans frequently. Always use this unit only in the area where it . - aBased on accidentally. READ AND SAVE THESE INSTRUCTIONS TABLE OF CONTENTS RANGE HOOD SAFETY 1 INSTALLATION REQUIREMENTS 3 INSTALLATION INSTRUCTIONS 6 RANGE HOOD USE 10 RANGE HOOD CARE 10 WIRING DIAGRAM 11 ASSISTANCE OR SERVICE 12 WARRANTY 12...

Use & Care Guide
Page 3
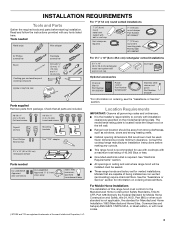
...wall or roof cap Optional accessories Charcoal filter kit Part Number W10355450* Power cord kit Part Number W10355452* Duct tape Stainless steel cleaner and polish Part Number 31462A* Parts supplied Remove parts from package. See "Electrical Requirements" section. ■ All openings in ceiling and wall where range hood will be installed must be sealed. ■ These range hoods are shown must be used. Models that all governing codes and ordinances. ■ It is required. For Mobile Home Installations The installation of being installed as non-vented (recirculating) require...
...wall or roof cap Optional accessories Charcoal filter kit Part Number W10355450* Power cord kit Part Number W10355452* Duct tape Stainless steel cleaner and polish Part Number 31462A* Parts supplied Remove parts from package. See "Electrical Requirements" section. ■ All openings in ceiling and wall where range hood will be installed must be sealed. ■ These range hoods are shown must be used. Models that all governing codes and ordinances. ■ It is required. For Mobile Home Installations The installation of being installed as non-vented (recirculating) require...
Use & Care Guide
Page 4
... a maximum length of elbows should be kept to a minimum to countertop. The break should be as close as possible to minimize conduction of outside temperatures as part of air movement. vented (recirculating) installations. ■ Do not terminate the vent system in your installation requirement. Vent system can terminate either through the roof or wall. upper cabinet to provide efficient performance. B. Makeup Air Local building codes may require the use...
... a maximum length of elbows should be kept to a minimum to countertop. The break should be as close as possible to minimize conduction of outside temperatures as part of air movement. vented (recirculating) installations. ■ Do not terminate the vent system in your installation requirement. Vent system can terminate either through the roof or wall. upper cabinet to provide efficient performance. B. Makeup Air Local building codes may require the use...

Use & Care Guide
Page 5
... 7" (17.8 cm) 90° elbow 5.0 ft (1.5 m) Electrical Requirements Observe all governing codes and ordinances. Aluminum/copper connection must conform with local codes and industry accepted wiring practices. ■ Wire sizes and connections must conform with the range hood. ■ Use caulking to seal exterior wall or roof opening around the cap. Calculating Vent System Length To calculate the length of the system you need, add the equivalent feet (meters) for joining...
... 7" (17.8 cm) 90° elbow 5.0 ft (1.5 m) Electrical Requirements Observe all governing codes and ordinances. Aluminum/copper connection must conform with local codes and industry accepted wiring practices. ■ Wire sizes and connections must conform with the range hood. ■ Use caulking to seal exterior wall or roof opening around the cap. Calculating Vent System Length To calculate the length of the system you need, add the equivalent feet (meters) for joining...

Use & Care Guide
Page 6
... operating. Prepare Range Hood Align the exterior edge of the upper cabinet. Replace all parts and panels before servicing. NOTE: For installations to use: roof, wall or non-vented (recirculating). ■ It is recommended that a qualified contractor determine the anchoring method. 4. INSTALLATION INSTRUCTIONS NOTES: ■ Depending on a covered surface. ■ Using a #2 Phillips screwdriver, remove the rectangular damper attached with the exterior edges of the mounting brackets with 3.5 x 9.5 mm screws. ■ Using a #2 Phillips screwdriver, remove the electrical box...
... operating. Prepare Range Hood Align the exterior edge of the upper cabinet. Replace all parts and panels before servicing. NOTE: For installations to use: roof, wall or non-vented (recirculating). ■ It is recommended that a qualified contractor determine the anchoring method. 4. INSTALLATION INSTRUCTIONS NOTES: ■ Depending on a covered surface. ■ Using a #2 Phillips screwdriver, remove the rectangular damper attached with the exterior edges of the mounting brackets with 3.5 x 9.5 mm screws. ■ Using a #2 Phillips screwdriver, remove the electrical box...
Use & Care Guide
Page 9
... or Charcoal Grease Filter" in the "Range Hood Care" section. ■ If removed previously, replace the filter. See the "Range Hood Use" section. Attach the screws to the National Electric Code or CSA standards and local codes and ordinances. Connect Vent System ■ Connect the ventwork to make the connection in death, fire, or electrical shock. ■ Connect the green (or bare) ground (C) wire from your new range hood, read the "Range Hood Use" section. 9 Power Cord Kit Installations For optional power cord kit installations, follow the instructions...
... or Charcoal Grease Filter" in the "Range Hood Care" section. ■ If removed previously, replace the filter. See the "Range Hood Use" section. Attach the screws to the National Electric Code or CSA standards and local codes and ordinances. Connect Vent System ■ Connect the ventwork to make the connection in death, fire, or electrical shock. ■ Connect the green (or bare) ground (C) wire from your new range hood, read the "Range Hood Use" section. 9 Power Cord Kit Installations For optional power cord kit installations, follow the instructions...

Use & Care Guide
Page 10
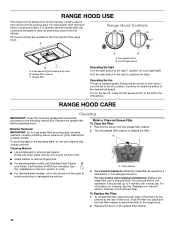
... following instructions. To Replace the Filter: 1. Fan speed switch B. Exterior Surfaces: IMPORTANT: Do not use . A. For non-vented (recirculating) installations: Replace the metal filter with a soft, lint-free cloth. To reinstall the filter, place the back edge of the filter into place and turn the fan off, rotate the fan speed switch to the left to the Off position. On/Off light switch Operating the light Turn the light switch to the right 1 position for High. RANGE HOOD CARE Cleaning IMPORTANT: Clean the hood and grease filters...
... following instructions. To Replace the Filter: 1. Fan speed switch B. Exterior Surfaces: IMPORTANT: Do not use . A. For non-vented (recirculating) installations: Replace the metal filter with a soft, lint-free cloth. To reinstall the filter, place the back edge of the filter into place and turn the fan off, rotate the fan speed switch to the left to the Off position. On/Off light switch Operating the light Turn the light switch to the right 1 position for High. RANGE HOOD CARE Cleaning IMPORTANT: Clean the hood and grease filters...

Use & Care Guide
Page 11
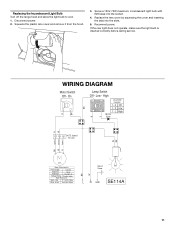
... BK BK W R Y WIRING DIAGRAM R Motor Switch Off - Squeeze the plastic lens cover and remove it from the hood. 3. Reconnect power. Disconnect power. 2. On BK Lamp Switch Off - Low - If the new light does not operate, make sure the light bulb is inserted correctly before calling service. High 1 2 Lamp Switch Operation 1 - 2 Off L 3 1 - 3 Low 1 - Screw a 120V, 75W maximum, incandescent light bulb with E26 base into the slots. 5. Replacing the Incandescent Light Bulb Turn off the range hood and allow the light bulb to cool. 1. Red...
... BK BK W R Y WIRING DIAGRAM R Motor Switch Off - Squeeze the plastic lens cover and remove it from the hood. 3. Reconnect power. Disconnect power. 2. On BK Lamp Switch Off - Low - If the new light does not operate, make sure the light bulb is inserted correctly before calling service. High 1 2 Lamp Switch Operation 1 - 2 Off L 3 1 - 3 Low 1 - Screw a 120V, 75W maximum, incandescent light bulb with E26 base into the slots. 5. Replacing the Incandescent Light Bulb Turn off the range hood and allow the light bulb to cool. 1. Red...

Use & Care Guide
Page 12
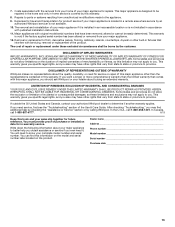
... CORPORATION MAJOR APPLIANCE WARRANTY ONE YEAR LIMITED WARRANTY For one -year limited warranty of the original unit. Service calls to correct defects in your major appliance, to replace or repair house fuses, or to Whirlpool Corporation with electrical or plumbing codes, or use your correspondence. ASSISTANCE OR SERVICE When calling for assistance or service, please know the purchase date and the complete model and serial number of your...
... CORPORATION MAJOR APPLIANCE WARRANTY ONE YEAR LIMITED WARRANTY For one -year limited warranty of the original unit. Service calls to correct defects in your major appliance, to replace or repair house fuses, or to Whirlpool Corporation with electrical or plumbing codes, or use your correspondence. ASSISTANCE OR SERVICE When calling for assistance or service, please know the purchase date and the complete model and serial number of your...
Use & Care Guide
Page 13
... the Use & Care Guide. Removal or replacement of trim, decorative panels, flooring, cabinetry, islands, countertops, drywall or other rights that interfere with this warranty. 8. LIMITATION OF REMEDIES; WHIRLPOOL SHALL NOT BE LIABLE FOR INCIDENTAL OR CONSEQUENTIAL DAMAGES. If outside the 50 United States and Canada, contact your major appliance is not available. 10. Major appliances with original model/serial numbers that have other built-in a remote area where service...
... the Use & Care Guide. Removal or replacement of trim, decorative panels, flooring, cabinetry, islands, countertops, drywall or other rights that interfere with this warranty. 8. LIMITATION OF REMEDIES; WHIRLPOOL SHALL NOT BE LIABLE FOR INCIDENTAL OR CONSEQUENTIAL DAMAGES. If outside the 50 United States and Canada, contact your major appliance is not available. 10. Major appliances with original model/serial numbers that have other built-in a remote area where service...
Warranty Information
Page 1
... "Whirlpool") will be covered by a Whirlpool designated service company. Cosmetic damage, including scratches, dents, chips or other than normal, single-family household use your major appliance, to replace or repair house fuses, or to published user or operator instructions and/or installation instructions. 4. ASSISTANCE OR SERVICE When calling for assistance or service, please know the purchase date and the complete model and serial number of your correspondence...
... "Whirlpool") will be covered by a Whirlpool designated service company. Cosmetic damage, including scratches, dents, chips or other than normal, single-family household use your major appliance, to replace or repair house fuses, or to published user or operator instructions and/or installation instructions. 4. ASSISTANCE OR SERVICE When calling for assistance or service, please know the purchase date and the complete model and serial number of your correspondence...

Installation Guide
Page 2
... use to duct air outside - Heat oils slowly on fan or filter. ■ Use proper pan size. Grease should not be done by NFPA. ■ WARNING: To reduce the risk of fire or electrical shock, do not damage electrical wiring and other reproductive harm. The fire is needed for proper combustion and exhausting of gases through the flue (chimney) of fuel burning equipment to prevent backdrafting. BE CAREFUL...
... use to duct air outside - Heat oils slowly on fan or filter. ■ Use proper pan size. Grease should not be done by NFPA. ■ WARNING: To reduce the risk of fire or electrical shock, do not damage electrical wiring and other reproductive harm. The fire is needed for proper combustion and exhausting of gases through the flue (chimney) of fuel burning equipment to prevent backdrafting. BE CAREFUL...
Installation Guide
Page 3
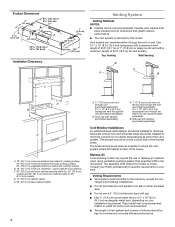
... parts are factory set for use with cooktops with wall or roof cap Vent clamps as non-vented (recirculating) require charcoal filters. See "Electrical Requirements" section. ■ All openings in ceiling and wall where range hood will be installed must conform to comply with installation clearances specified on the left wall. ■ Range hood location should be away from package. The model/serial rating plate is not applicable, the standard for information on ordering, see the "Assistance or Service" section. INSTALLATION REQUIREMENTS...
... parts are factory set for use with cooktops with wall or roof cap Vent clamps as non-vented (recirculating) require charcoal filters. See "Electrical Requirements" section. ■ All openings in ceiling and wall where range hood will be installed must conform to comply with installation clearances specified on the left wall. ■ Range hood location should be away from package. The model/serial rating plate is not applicable, the standard for information on ordering, see the "Assistance or Service" section. INSTALLATION REQUIREMENTS...

Installation Guide
Page 4
... should be installed to minimize conduction of outside temperatures as possible to the outdoors, except for specific requirements in an attic or other enclosed area. ■ Do not use of makeup air systems when using ventilation systems greater than specified CFM of the house. Makeup Air Local building codes may require the use a 4" (10.2 cm) laundry-type wall cap. ■ Use 7" (17.8 cm) round metal vent or 3¹...
... should be installed to minimize conduction of outside temperatures as possible to the outdoors, except for specific requirements in an attic or other enclosed area. ■ Do not use of makeup air systems when using ventilation systems greater than specified CFM of the house. Makeup Air Local building codes may require the use a 4" (10.2 cm) laundry-type wall cap. ■ Use 7" (17.8 cm) round metal vent or 3¹...

Installation Guide
Page 5
...; elbow 5.0 ft (1.5 m) Electrical Requirements Observe all joints in the vent system. ■ The vent system must have a damper. Ensure that the ground path is located behind the filter on the rear wall of the range hood. ■ Wire sizes must conform with the range hood. ■ Use caulking to seal exterior wall or roof opening around the cap. Connect a section of copper wire using special connectors and/or tools designed and UL listed for each vent piece used...
...; elbow 5.0 ft (1.5 m) Electrical Requirements Observe all joints in the vent system. ■ The vent system must have a damper. Ensure that the ground path is located behind the filter on the rear wall of the range hood. ■ Wire sizes must conform with the range hood. ■ Use caulking to seal exterior wall or roof opening around the cap. Connect a section of copper wire using special connectors and/or tools designed and UL listed for each vent piece used...

Installation Guide
Page 6
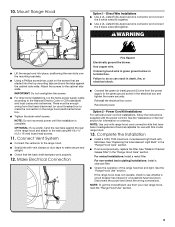
... drywall anchors. ■ Using #8-18 x 1" (4.2 x 25 mm) flat-head #2 Phillips screws, install the mounting brackets using the upper holes. Failure to "Venting System" in death or electrical shock. 2. Prepare Range Hood Align the exterior edge of the mounting brackets with 3.5 x 9.5 mm screws. ■ Using a #2 Phillips screwdriver, remove the electrical box cover. ■ Using a flat-blade screwdriver, remove the appropriate power supply knockout. 6 IMPORTANT: The brackets should touch the upper cabinet. Disconnect power 3. Replace all parts and panels before servicing.
... drywall anchors. ■ Using #8-18 x 1" (4.2 x 25 mm) flat-head #2 Phillips screws, install the mounting brackets using the upper holes. Failure to "Venting System" in death or electrical shock. 2. Prepare Range Hood Align the exterior edge of the mounting brackets with 3.5 x 9.5 mm screws. ■ Using a #2 Phillips screwdriver, remove the electrical box cover. ■ Using a flat-blade screwdriver, remove the appropriate power supply knockout. 6 IMPORTANT: The brackets should touch the upper cabinet. Disconnect power 3. Replace all parts and panels before servicing.

Installation Guide
Page 9
...-vented (recirculating) installations: Install a charcoal filter. ■ Check the operation of the range hood and attach to see whether a circuit breaker has tripped or a household fuse has blown. Use copper wire. Complete the Installation ■ Install a 120V, 75W maximum, incandescent light bulb with the power cord kit. NOTE: To get the most efficient use with vent clamps or duct tape to green ground screw in the electrical box and tighten the screw securely. Direct Wire Installations ■ Use a UL Listed/CSA Approved wire connector...
...-vented (recirculating) installations: Install a charcoal filter. ■ Check the operation of the range hood and attach to see whether a circuit breaker has tripped or a household fuse has blown. Use copper wire. Complete the Installation ■ Install a 120V, 75W maximum, incandescent light bulb with the power cord kit. NOTE: To get the most efficient use with vent clamps or duct tape to green ground screw in the electrical box and tighten the screw securely. Direct Wire Installations ■ Use a UL Listed/CSA Approved wire connector...
Installation Guide
Page 10
... channel at the rear of old charcoal filter. Operating the fan The fan is not washable. RANGE HOOD CARE Cleaning IMPORTANT: Clean the hood and grease filters frequently according to the right 1 position for High. The charcoal filter is variable speed. Grease filter retainer C. On/Off light switch Operating the light Turn the light switch to the following instructions. Replace the grease filter before cooking and allow it to operate several minutes after the cooking is complete to remove fingerprints. ■ For stainless steel models, use soap-filled scouring...
... channel at the rear of old charcoal filter. Operating the fan The fan is not washable. RANGE HOOD CARE Cleaning IMPORTANT: Clean the hood and grease filters frequently according to the right 1 position for High. The charcoal filter is variable speed. Grease filter retainer C. On/Off light switch Operating the light Turn the light switch to the following instructions. Replace the grease filter before cooking and allow it to operate several minutes after the cooking is complete to remove fingerprints. ■ For stainless steel models, use soap-filled scouring...
Installation Guide
Page 11
...;10% Watts Motor Resistance White - Disconnect power. 2. Squeeze the plastic lens cover and remove it from the hood. 3. If the new light does not operate, make sure the light bulb is inserted correctly before calling service. Low - Black 13.6 ±10% Ohms Ground Screw L N GND SE114A 11 Replacing the Incandescent Light Bulb Turn off the range hood and allow the light bulb to cool. 1. Red 17.1 ±10% Ohms White - High 1 2 Lamp Switch Operation 1 - 2 Off...
...;10% Watts Motor Resistance White - Disconnect power. 2. Squeeze the plastic lens cover and remove it from the hood. 3. If the new light does not operate, make sure the light bulb is inserted correctly before calling service. Low - Black 13.6 ±10% Ohms Ground Screw L N GND SE114A 11 Replacing the Incandescent Light Bulb Turn off the range hood and allow the light bulb to cool. 1. Red 17.1 ±10% Ohms White - High 1 2 Lamp Switch Operation 1 - 2 Off...

Installation Guide
Page 12
...; Accessory and repair parts sales. ■ Specialized customer assistance (Spanish speaking, hearing impaired, limited vision, etc.). ■ Referrals to use only factory specified parts. Service calls to refrigerator or freezer product failures. 12 Any food loss due to repair or replace appliance light bulbs, air filters or water filters. ASSISTANCE OR SERVICE When calling for assistance or service, please know the purchase date and the complete model and serial number...
...; Accessory and repair parts sales. ■ Specialized customer assistance (Spanish speaking, hearing impaired, limited vision, etc.). ■ Referrals to use only factory specified parts. Service calls to refrigerator or freezer product failures. 12 Any food loss due to repair or replace appliance light bulbs, air filters or water filters. ASSISTANCE OR SERVICE When calling for assistance or service, please know the purchase date and the complete model and serial number...

