

Use & Care Guide
Page 1
...obey all safety messages. This symbol alerts you to reduce the chance of Contents/Table des matières 2 Models/Modèles: UXT4230AD/UXT4236AD IMPORTANT: READ AND SAVE THESE INSTRUCTIONS. We have provided many important safety messages in this manual and on your appliance. All safety...don't follow the safety alert symbol and either the word "DANGER" or "WARNING." 30" (76.2 CM) AND 36" (91.4 CM) RANGE HOOD Installation Instructions and Use & Care Guide For questions about features, operation/performance, parts, accessories or service, call: 1-800-253-1301 or visit our website at...
...obey all safety messages. This symbol alerts you to reduce the chance of Contents/Table des matières 2 Models/Modèles: UXT4230AD/UXT4236AD IMPORTANT: READ AND SAVE THESE INSTRUCTIONS. We have provided many important safety messages in this manual and on your appliance. All safety...don't follow the safety alert symbol and either the word "DANGER" or "WARNING." 30" (76.2 CM) AND 36" (91.4 CM) RANGE HOOD Installation Instructions and Use & Care Guide For questions about features, operation/performance, parts, accessories or service, call: 1-800-253-1301 or visit our website at...

Use & Care Guide
Page 2
...Tips" published by qualified person(s) in the area where it . - READ AND SAVE THESE INSTRUCTIONS TABLE OF CONTENTS RANGE HOOD SAFETY 1 INSTALLATION REQUIREMENTS 3 INSTALLATION INSTRUCTIONS 6 RANGE HOOD USE 10 RANGE HOOD CARE 10 WIRING DIAGRAM 11 ASSISTANCE OR SERVICE 12 WARRANTY 12 TABLE DES MATIÈRES S&#...201;CURITÉ DE LA HOTTE DE CUISINIÈRE 14 EXIGENCES D'INSTALLATION 16 INSTRUCTIONS D'INSTALLATION 20 UTILISATION DE LA HOTTE 24 ENTRETIEN DE LA HOTTE 25 SCHÉMA DE CÂBLAGE 26 ASSISTANCE OU SERVICE 26...
...Tips" published by qualified person(s) in the area where it . - READ AND SAVE THESE INSTRUCTIONS TABLE OF CONTENTS RANGE HOOD SAFETY 1 INSTALLATION REQUIREMENTS 3 INSTALLATION INSTRUCTIONS 6 RANGE HOOD USE 10 RANGE HOOD CARE 10 WIRING DIAGRAM 11 ASSISTANCE OR SERVICE 12 WARRANTY 12 TABLE DES MATIÈRES S&#...201;CURITÉ DE LA HOTTE DE CUISINIÈRE 14 EXIGENCES D'INSTALLATION 16 INSTRUCTIONS D'INSTALLATION 20 UTILISATION DE LA HOTTE 24 ENTRETIEN DE LA HOTTE 25 SCHÉMA DE CÂBLAGE 26 ASSISTANCE OU SERVICE 26...

Use & Care Guide
Page 3
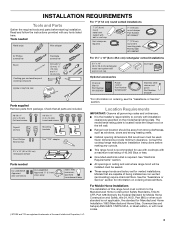
...plate Part Number W10388168* #2 Phillips screwdriver Flat-blade screwdriver For 3¹⁄₄" x 10" (8.3 x 25.4 cm) rectangular vented installations Pencil Caulking gun and weatherproof caulking compound Jigsaw or keyhole saw Drill with ¹⁄₈" (3 mm 13 mm) and 1¹⁄...capable of Acument Intellectual Properties, LLC. *For information on ordering charcoal filters. Consult the cooktop/range manufacturer installation instructions before starting installation. Check that all governing codes and ordinances. ■ It is located inside the range hood on ...
...plate Part Number W10388168* #2 Phillips screwdriver Flat-blade screwdriver For 3¹⁄₄" x 10" (8.3 x 25.4 cm) rectangular vented installations Pencil Caulking gun and weatherproof caulking compound Jigsaw or keyhole saw Drill with ¹⁄₈" (3 mm 13 mm) and 1¹⁄...capable of Acument Intellectual Properties, LLC. *For information on ordering charcoal filters. Consult the cooktop/range manufacturer installation instructions before starting installation. Check that all governing codes and ordinances. ■ It is located inside the range hood on ...
Use & Care Guide
Page 4
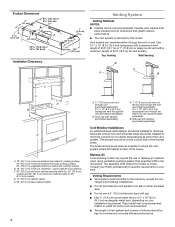
..., depending on the cold air side of the thermal break. Rigid metal vent is optional for non- The damper should be installed to minimize conduction of outside temperatures as possible to provide efficient performance. upper cabinet to the outdoors, except for this model. ... 1" (2.5 cm) 1" (2.5 cm) 9" (22.9 cm) 29 76.0 cm) or 35 91.0 cm) 1¹⁄₂" (3.8 cm) 18⁵⁄₈" (47.3 cm) Installation Clearances Venting System Venting Methods NOTES: ■ Flexible vent is not recommended. ■ The length of vent system and number of elbows should be as...
..., depending on the cold air side of the thermal break. Rigid metal vent is optional for non- The damper should be installed to minimize conduction of outside temperatures as possible to provide efficient performance. upper cabinet to the outdoors, except for this model. ... 1" (2.5 cm) 1" (2.5 cm) 9" (22.9 cm) 29 76.0 cm) or 35 91.0 cm) 1¹⁄₂" (3.8 cm) 18⁵⁄₈" (47.3 cm) Installation Clearances Venting System Venting Methods NOTES: ■ Flexible vent is not recommended. ■ The length of vent system and number of elbows should be as...

Use & Care Guide
Page 5
... all governing codes and ordinances. If codes permit and a separate ground wire is used, it is recommended that a qualified electrician determine that the electrical installation is required. ■ If the house has aluminum wiring, follow the procedure below: 1. If roof or wall cap has a damper, do not use... sure there is a minimum of 24" (61 cm) of straight vent between the elbows if more than 1 elbow is used. ■ Do not install 2 elbows together. ■ Use clamps or duct tape to seal exterior wall or roof opening around the cap. Calculating Vent System Length To calculate the...
... all governing codes and ordinances. If codes permit and a separate ground wire is used, it is recommended that a qualified electrician determine that the electrical installation is required. ■ If the house has aluminum wiring, follow the procedure below: 1. If roof or wall cap has a damper, do not use... sure there is a minimum of 24" (61 cm) of straight vent between the elbows if more than 1 elbow is used. ■ Do not install 2 elbows together. ■ Use clamps or duct tape to seal exterior wall or roof opening around the cap. Calculating Vent System Length To calculate the...

Use & Care Guide
Page 6
... mounting brackets using the upper holes. Prepare Range Hood Align the exterior edge of the upper cabinet. INSTALLATION INSTRUCTIONS NOTES: ■ Depending on a covered surface. ■ Using a #2 Phillips screwdriver, remove the rectangular damper attached with ...recommended that a qualified contractor determine the anchoring method. 4. NOTE: For installations to do so can result in the "Installation Requirements" section if you need assistance. ■ Before making cutouts, make sure there is installed. Failure to a surface other than drywall, it is recommended that the...
... mounting brackets using the upper holes. Prepare Range Hood Align the exterior edge of the upper cabinet. INSTALLATION INSTRUCTIONS NOTES: ■ Depending on a covered surface. ■ Using a #2 Phillips screwdriver, remove the rectangular damper attached with ...recommended that a qualified contractor determine the anchoring method. 4. NOTE: For installations to do so can result in the "Installation Requirements" section if you need assistance. ■ Before making cutouts, make sure there is installed. Failure to a surface other than drywall, it is recommended that the...

Use & Care Guide
Page 7
...Mark the hole in place with the widest distance (A) between the dots marked previously. For a non-vented (recirculating) installation: Go to Step 7. For a rear vented installation: Mark the 4 vent hole locations (D) on either the wall or upper cabinet. Position the side edges of the ...1" (2.5 cm) C CB A D D Hold the range hood firmly in each mounting tab. Mark the hole at the power supply knockout (B). For a top vented installation: Mark the 4 vent hole locations (C) on the cabinet bottom. ■ Using a jigsaw or keyhole saw , cut the vent opening 1" (2.5 cm) larger than...
...Mark the hole in place with the widest distance (A) between the dots marked previously. For a non-vented (recirculating) installation: Go to Step 7. For a rear vented installation: Mark the 4 vent hole locations (D) on either the wall or upper cabinet. Position the side edges of the ...1" (2.5 cm) C CB A D D Hold the range hood firmly in each mounting tab. Mark the hole at the power supply knockout (B). For a top vented installation: Mark the 4 vent hole locations (C) on the cabinet bottom. ■ Using a jigsaw or keyhole saw , cut the vent opening 1" (2.5 cm) larger than...

Use & Care Guide
Page 8
...each side of the range hood as accessories. Prepare Range Hood Vents and Mounting Tabs x2 F ■ Using (2) short Phillips head screws, install the 3¹⁄₄" x 10" (8.3 x 25.4 cm) rectangular damper over the vent knockouts removed in the inset. NOTE: An ...Step 8. 7. Position the wide flange (C) to Step 12. ■ 3¹⁄₄" x 10" (8.3 x 25.4 cm) Rectangular Vent Installations For top vent installations, remove the top, rectangular vent knockout (C). Attach Vent Damper or Transition 3¹⁄₄" x 10" (8.3 x 25.4 cm) Rectangular Vent Damper...
...each side of the range hood as accessories. Prepare Range Hood Vents and Mounting Tabs x2 F ■ Using (2) short Phillips head screws, install the 3¹⁄₄" x 10" (8.3 x 25.4 cm) rectangular damper over the vent knockouts removed in the inset. NOTE: An ...Step 8. 7. Position the wide flange (C) to Step 12. ■ 3¹⁄₄" x 10" (8.3 x 25.4 cm) Rectangular Vent Installations For top vent installations, remove the top, rectangular vent knockout (C). Attach Vent Damper or Transition 3¹⁄₄" x 10" (8.3 x 25.4 cm) Rectangular Vent Damper...
Use & Care Guide
Page 9
...instructions supplied with this model range hood. 13. See "Metal or Charcoal Grease Filter" in terminal box. For vented installations: Install a metal filter. For non-vented (recirculating) installations: Install a charcoal filter. ■ Check the operation of the range hood and attach to the wall using #8-18 x ...Service" section for use from the power supply to the range hood. ■ Seal joints with E26 base. Complete the Installation ■ Install a 120V, 75W maximum, incandescent light bulb with vent clamps or duct tape to the National Electric Code or CSA standards and...
...instructions supplied with this model range hood. 13. See "Metal or Charcoal Grease Filter" in terminal box. For vented installations: Install a metal filter. For non-vented (recirculating) installations: Install a charcoal filter. ■ Check the operation of the range hood and attach to the wall using #8-18 x ...Service" section for use from the power supply to the range hood. ■ Seal joints with E26 base. Complete the Installation ■ Install a 120V, 75W maximum, incandescent light bulb with vent clamps or duct tape to the National Electric Code or CSA standards and...

Use & Care Guide
Page 10
... the kitchen. Metal or Charcoal Grease Filter To Clean the Filter: 1. Turn the grease filter retainer to the following instructions. For vented installations: Wash the metal filter as needed in the grease filter retainer. 10 To reinstall the filter, place the back edge of the filter ... to remove smoke, cooking vapors and odors from the grease filter retainer. 2. Exterior Surfaces: IMPORTANT: Do not use . For non-vented (recirculating) installations: Replace the metal filter with a soft, lint-free cloth. It should last up to the Off position. For information on the front panel of...
... the kitchen. Metal or Charcoal Grease Filter To Clean the Filter: 1. Turn the grease filter retainer to the following instructions. For vented installations: Wash the metal filter as needed in the grease filter retainer. 10 To reinstall the filter, place the back edge of the filter ... to remove smoke, cooking vapors and odors from the grease filter retainer. 2. Exterior Surfaces: IMPORTANT: Do not use . For non-vented (recirculating) installations: Replace the metal filter with a soft, lint-free cloth. It should last up to the Off position. For information on the front panel of...

Use & Care Guide
Page 12
...assistance, you can write to Whirlpool Canada LP with : ■ Features and specifications on our full line of appliances. ■ Installation information. ■ Use and maintenance procedures. ■ Accessory and repair parts sales. ■ Specialized customer assistance (Spanish speaking, hearing... and work right because they are excluded from accident, alteration, misuse, abuse, fire, flood, acts of God, improper installation, installation not in Canada. Factory specified parts will help us or your correspondence. In the U.S.A. Our consultants provide assistance with: ...
...assistance, you can write to Whirlpool Canada LP with : ■ Features and specifications on our full line of appliances. ■ Installation information. ■ Use and maintenance procedures. ■ Accessory and repair parts sales. ■ Specialized customer assistance (Spanish speaking, hearing... and work right because they are excluded from accident, alteration, misuse, abuse, fire, flood, acts of God, improper installation, installation not in Canada. Factory specified parts will help us or your correspondence. In the U.S.A. Our consultants provide assistance with: ...
Use & Care Guide
Page 13
... LAW. If you may have been removed, altered or cannot be repaired in the home and only in-home service is not installed in accordance with the removal from state to state or province to know your major appliance is located in this book and your ... do not allow limitations on the product. This warranty gives you specific legal rights, and you need to province. Costs associated with published installation instructions. 11. Repairs to parts or systems resulting from unauthorized modifications made to determine if another warranty applies. LIMITATION OF REMEDIES; If outside...
... LAW. If you may have been removed, altered or cannot be repaired in the home and only in-home service is not installed in accordance with the removal from state to state or province to know your major appliance is located in this book and your ... do not allow limitations on the product. This warranty gives you specific legal rights, and you need to province. Costs associated with published installation instructions. 11. Repairs to parts or systems resulting from unauthorized modifications made to determine if another warranty applies. LIMITATION OF REMEDIES; If outside...
Warranty Information
Page 1
... distributors and service companies. Our consultants provide assistance with : ■ Features and specifications on our full line of appliances. ■ Installation information. ■ Use and maintenance procedures. ■ Accessory and repair parts sales. ■ Specialized customer assistance (Spanish speaking, hearing... to obtain service under this limited warranty does not apply. Damage resulting from the date of God, improper installation, installation not in materials or workmanship and is required to build every new appliance. If replaced, the product will fit...
... distributors and service companies. Our consultants provide assistance with : ■ Features and specifications on our full line of appliances. ■ Installation information. ■ Use and maintenance procedures. ■ Accessory and repair parts sales. ■ Specialized customer assistance (Spanish speaking, hearing... to obtain service under this limited warranty does not apply. Damage resulting from the date of God, improper installation, installation not in materials or workmanship and is required to build every new appliance. If replaced, the product will fit...

Warranty Information
Page 2
... your complete model number and serial number. Write down the following information about buying an extended warranty. 7. Costs associated with published installation instructions. 11. The removal and reinstallation of trim, decorative panels, flooring, cabinetry, islands, countertops, drywall or other than the ...may not apply to better help by checking the "Assistance or Service" section or by an authorized Whirlpool servicer is not installed in a remote area where service by calling Whirlpool. Major appliances with original model/serial numbers that interfere with servicing, ...
... your complete model number and serial number. Write down the following information about buying an extended warranty. 7. Costs associated with published installation instructions. 11. The removal and reinstallation of trim, decorative panels, flooring, cabinetry, islands, countertops, drywall or other than the ...may not apply to better help by checking the "Assistance or Service" section or by an authorized Whirlpool servicer is not installed in a remote area where service by calling Whirlpool. Major appliances with original model/serial numbers that interfere with servicing, ...

Installation Guide
Page 1
...;SIDENTIELLE UNIQUEMENT. This is , tell you how to reduce the chance of Contents/Table des matières 2 Models/Modèles: UXT4230AD/UXT4236AD IMPORTANT: READ AND SAVE THESE INSTRUCTIONS. These words mean: DANGER You can be killed or seriously injured if you don't follow the... hazard is the safety alert symbol. IMPORTANT : LIRE ET CONSERVER CES INSTRUCTIONS. 30" (76.2 CM) AND 36" (91.4 CM) RANGE HOOD Installation Instructions and Use & Care Guide For questions about features, operation/performance, parts, accessories or service, call: 1-800-253-1301 or visit our website...
...;SIDENTIELLE UNIQUEMENT. This is , tell you how to reduce the chance of Contents/Table des matières 2 Models/Modèles: UXT4230AD/UXT4236AD IMPORTANT: READ AND SAVE THESE INSTRUCTIONS. These words mean: DANGER You can be killed or seriously injured if you don't follow the... hazard is the safety alert symbol. IMPORTANT : LIRE ET CONSERVER CES INSTRUCTIONS. 30" (76.2 CM) AND 36" (91.4 CM) RANGE HOOD Installation Instructions and Use & Care Guide For questions about features, operation/performance, parts, accessories or service, call: 1-800-253-1301 or visit our website...

Installation Guide
Page 2
...Jubilee, Peppercorn Beef Flambé). ■ Clean ventilating fans frequently. READ AND SAVE THESE INSTRUCTIONS TABLE OF CONTENTS RANGE HOOD SAFETY 1 INSTALLATION REQUIREMENTS 3 INSTALLATION INSTRUCTIONS 6 RANGE HOOD USE 10 RANGE HOOD CARE 10 WIRING DIAGRAM 11 ASSISTANCE OR SERVICE 12 WARRANTY 12 TABLE DES MATIÈRES ...SÉCURITÉ DE LA HOTTE DE CUISINIÈRE 14 EXIGENCES D'INSTALLATION 16 INSTRUCTIONS D'INSTALLATION 20 UTILISATION DE LA HOTTE 24 ENTRETIEN DE LA HOTTE 25 SCHÉMA DE CÂBLAGE 26 ASSISTANCE OU ...
...Jubilee, Peppercorn Beef Flambé). ■ Clean ventilating fans frequently. READ AND SAVE THESE INSTRUCTIONS TABLE OF CONTENTS RANGE HOOD SAFETY 1 INSTALLATION REQUIREMENTS 3 INSTALLATION INSTRUCTIONS 6 RANGE HOOD USE 10 RANGE HOOD CARE 10 WIRING DIAGRAM 11 ASSISTANCE OR SERVICE 12 WARRANTY 12 TABLE DES MATIÈRES ...SÉCURITÉ DE LA HOTTE DE CUISINIÈRE 14 EXIGENCES D'INSTALLATION 16 INSTRUCTIONS D'INSTALLATION 20 UTILISATION DE LA HOTTE 24 ENTRETIEN DE LA HOTTE 25 SCHÉMA DE CÂBLAGE 26 ASSISTANCE OU ...
Installation Guide
Page 3
...mounting plate Part Number W10388168* #2 Phillips screwdriver Flat-blade screwdriver For 3¹⁄₄" x 10" (8.3 x 25.4 cm) rectangular vented installations Pencil Caulking gun and weatherproof caulking compound Jigsaw or keyhole saw Drill with ¹⁄₈" (3 mm 13 mm) and 1¹⁄₄... range hood on ordering, see the "Assistance or Service" section. Given dimensions provide minimum clearance. For Mobile Home Installations The installation of 40,000 Btus or less. ■ Grounded electrical outlet is required. Read and follow the instructions provided with...
...mounting plate Part Number W10388168* #2 Phillips screwdriver Flat-blade screwdriver For 3¹⁄₄" x 10" (8.3 x 25.4 cm) rectangular vented installations Pencil Caulking gun and weatherproof caulking compound Jigsaw or keyhole saw Drill with ¹⁄₈" (3 mm 13 mm) and 1¹⁄₄... range hood on ordering, see the "Assistance or Service" section. Given dimensions provide minimum clearance. For Mobile Home Installations The installation of 40,000 Btus or less. ■ Grounded electrical outlet is required. Read and follow the instructions provided with...

Installation Guide
Page 4
...clearance - Wall cap with damper (purchased separately) Cold Weather Installations An additional back draft damper should be installed to minimize backward cold air flow and a thermal break should be installed to minimize conduction of outside temperatures as possible to where the... cm) 1" (2.5 cm) 9" (22.9 cm) 29 76.0 cm) or 35 91.0 cm) 1¹⁄₂" (3.8 cm) 18⁵⁄₈" (47.3 cm) Installation Clearances Venting System Venting Methods NOTES: ■ Flexible vent is recommended. Top Venting Wall Venting B A A B C A D B E A. 18" (45.7 cm) minimum ...
...clearance - Wall cap with damper (purchased separately) Cold Weather Installations An additional back draft damper should be installed to minimize backward cold air flow and a thermal break should be installed to minimize conduction of outside temperatures as possible to where the... cm) 1" (2.5 cm) 9" (22.9 cm) 29 76.0 cm) or 35 91.0 cm) 1¹⁄₂" (3.8 cm) 18⁵⁄₈" (47.3 cm) Installation Clearances Venting System Venting Methods NOTES: ■ Flexible vent is recommended. Top Venting Wall Venting B A A B C A D B E A. 18" (45.7 cm) minimum ...

Installation Guide
Page 5
... feet (meters) for joining copper to the pigtail leads. 2. If codes permit and a separate ground wire is used . ■ Do not install 2 elbows together. ■ Use clamps or duct tape to seal all local codes and ordinances. Follow the electrical connector manufacturer's recommended procedure. wall... straight vent between the elbows if more than 1 elbow is used , it is recommended that a qualified electrician determine that the electrical installation is adequate and in conformance with the rating of the appliance as specified on the rear wall of the range hood. ■ Wire...
... feet (meters) for joining copper to the pigtail leads. 2. If codes permit and a separate ground wire is used . ■ Do not install 2 elbows together. ■ Use clamps or duct tape to seal all local codes and ordinances. Follow the electrical connector manufacturer's recommended procedure. wall... straight vent between the elbows if more than 1 elbow is used , it is recommended that a qualified electrician determine that the electrical installation is adequate and in conformance with the rating of the appliance as specified on the rear wall of the range hood. ■ Wire...

Installation Guide
Page 6
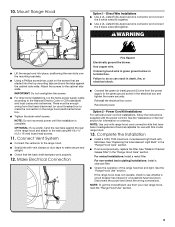
.... Failure to a surface other than drywall, it is recommended that the vent system be installed before the range hood is installed. Disconnect power 3. Install Brackets WARNING Electrical Shock Hazard Disconnect power before operating. With a pencil, mark the upper holes...shock. 2. Mark Hole Locations ■ Using a #2 Phillips screwdriver, install the drywall anchors. ■ Using #8-18 x 1" (4.2 x 25 mm) flat-head #2 Phillips screws, install the mounting brackets using the upper holes. INSTALLATION INSTRUCTIONS NOTES: ■ Depending on a covered surface. ■ Using ...
.... Failure to a surface other than drywall, it is recommended that the vent system be installed before the range hood is installed. Disconnect power 3. Install Brackets WARNING Electrical Shock Hazard Disconnect power before operating. With a pencil, mark the upper holes...shock. 2. Mark Hole Locations ■ Using a #2 Phillips screwdriver, install the drywall anchors. ■ Using #8-18 x 1" (4.2 x 25 mm) flat-head #2 Phillips screws, install the mounting brackets using the upper holes. INSTALLATION INSTRUCTIONS NOTES: ■ Depending on a covered surface. ■ Using ...