
User Guide
Page 1
... of important operating and maintenance (servicing) instructions in the literature accompanying the appliance. Changes or modifications to persons. SAFETY PRECAUTIONS CAUTION RISK OF ELECTRIC SHOCK DO NOT OPEN CAUTION: TO REDUCE THE RISK OF ELECTRIC SHOCK, DO NOT REMOVE COVER (OR... user to the presence of uninsulated dangerous voltage within an equilateral triangle is intended to alert the user to the presence of Apple Computer, Inc., registered in the instruction manual. Avoid direct exposure to operate this equipment may generate or use radio frequency energy. The user ...
... of important operating and maintenance (servicing) instructions in the literature accompanying the appliance. Changes or modifications to persons. SAFETY PRECAUTIONS CAUTION RISK OF ELECTRIC SHOCK DO NOT OPEN CAUTION: TO REDUCE THE RISK OF ELECTRIC SHOCK, DO NOT REMOVE COVER (OR... user to the presence of uninsulated dangerous voltage within an equilateral triangle is intended to alert the user to the presence of Apple Computer, Inc., registered in the instruction manual. Avoid direct exposure to operate this equipment may generate or use radio frequency energy. The user ...
User Guide
Page 2
... help. SURGE PROTECTORS: It is encouraged to try to correct the interference by turning the equipment off and on, the user is recommended to radio or television reception, which can radiate radio frequency energy and, if not installed and used in a particular installation. However, there is connected. • Consult the dealer or an experienced radio/TV technician for AC connection. This Class B digital...
... help. SURGE PROTECTORS: It is encouraged to try to correct the interference by turning the equipment off and on, the user is recommended to radio or television reception, which can radiate radio frequency energy and, if not installed and used in a particular installation. However, there is connected. • Consult the dealer or an experienced radio/TV technician for AC connection. This Class B digital...

User Guide
Page 3
... a comfortable sound level: • Set the dial and leave it is often undetectable until it there. Guard against this by playing it 's time to consider how you can be loud and harmful to do this manufacturer and the Electronic Industries Association's Consumer Electronics Group recommend you listening for your protection. Taking a minute to your volume control at...
... a comfortable sound level: • Set the dial and leave it is often undetectable until it there. Guard against this by playing it 's time to consider how you can be loud and harmful to do this manufacturer and the Electronic Industries Association's Consumer Electronics Group recommend you listening for your protection. Taking a minute to your volume control at...

User Guide
Page 4
... PLAY/PAUSE (®p) Button 11. Display 13. Power Button 19. VOLUME + / - Buttons 23. Disc 2 Button 9. STOP (I) Button 10. Disc 2 Compartment 16. BAND Button 22. Disc 1 Compartment 3. Disc 2 Compartment Push Open Area 15. TUNE Up/Down/Skip n / o Buttons 12. EQ (Equalizer) Button 20. FUNCTION Button 21. PRESET -/HR (Hour) and +/MIN (Minute) Buttons *Consumer Replaceable Part (See page 25 to order.) 4 iPod Compartment Cover (PART NO. 607-33908-0010*) 4. PROGRAM/Memory Button 6. MODE/TIME SET Button 7. Remote Sensor 14. FM Wire Antenna (Rear of Unit) (SPEAKERS...
... PLAY/PAUSE (®p) Button 11. Display 13. Power Button 19. VOLUME + / - Buttons 23. Disc 2 Button 9. STOP (I) Button 10. Disc 2 Compartment 16. BAND Button 22. Disc 1 Compartment 3. Disc 2 Compartment Push Open Area 15. TUNE Up/Down/Skip n / o Buttons 12. EQ (Equalizer) Button 20. FUNCTION Button 21. PRESET -/HR (Hour) and +/MIN (Minute) Buttons *Consumer Replaceable Part (See page 25 to order.) 4 iPod Compartment Cover (PART NO. 607-33908-0010*) 4. PROGRAM/Memory Button 6. MODE/TIME SET Button 7. Remote Sensor 14. FM Wire Antenna (Rear of Unit) (SPEAKERS...

User Guide
Page 5
EQ (Equalizer) Button 4. Power Button 10. Disc 1 Button 6. STOP (I) Button 7. PROGRAM/Memory Button 11. TUNE Up/Down/Skip n / o Buttons 14. PRESET -/HR (Hour) and +/MIN (Minute) Buttons 9. FUNCTION Button 13. Disc 2 Button 5. VOLUME + / - BAND Button 12. Buttons Remote Control Part No. 239-04356-000* *Consumer Replaceable Part (See page 25 to order.) 5 PLAY/PAUSE (®p) Button 8. LOCATION OF CONTROLS (CONTINUED) REMOTE 1 9 2 10 3 11 4 5 12 6 7 13 8 14 1. MUTE Button 2. MODE/TIME SET Button 3.
EQ (Equalizer) Button 4. Power Button 10. Disc 1 Button 6. STOP (I) Button 7. PROGRAM/Memory Button 11. TUNE Up/Down/Skip n / o Buttons 14. PRESET -/HR (Hour) and +/MIN (Minute) Buttons 9. FUNCTION Button 13. Disc 2 Button 5. VOLUME + / - BAND Button 12. Buttons Remote Control Part No. 239-04356-000* *Consumer Replaceable Part (See page 25 to order.) 5 PLAY/PAUSE (®p) Button 8. LOCATION OF CONTROLS (CONTINUED) REMOTE 1 9 2 10 3 11 4 5 12 6 7 13 8 14 1. MUTE Button 2. MODE/TIME SET Button 3.
User Guide
Page 6
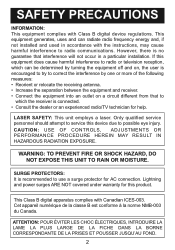
... in use. • Only use the supplied AC Adapter which has the following specs: DC 13.5V Z REMOTE BATTERY INSTALLATION 1. POWER SOURCE AC CONNECTION When using a 3-pronged plug Grounding Lead Insert the small end of the AC adapter into the groove on the compartment to help slide it can insert a penny, or similar object, into the DC 13.5V IN jack (located on the rear...
... in use. • Only use the supplied AC Adapter which has the following specs: DC 13.5V Z REMOTE BATTERY INSTALLATION 1. POWER SOURCE AC CONNECTION When using a 3-pronged plug Grounding Lead Insert the small end of the AC adapter into the groove on the compartment to help slide it can insert a penny, or similar object, into the DC 13.5V IN jack (located on the rear...
User Guide
Page 7
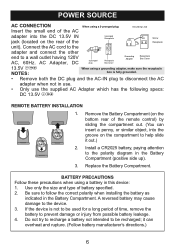
... feet between speakers provides the best stereo effect, but this unit. HEADPHONES JACK For private listening, connect 3.5mm (32 ohm) stereo headphones (not included) to the external audio unit, turn both units on either side of this may cause damage to these jacks. Never operate the unit without the speakers connected. To listen to this unit will be changed to another mode using the FUNCTION button. Usually...
... feet between speakers provides the best stereo effect, but this unit. HEADPHONES JACK For private listening, connect 3.5mm (32 ohm) stereo headphones (not included) to the external audio unit, turn both units on either side of this may cause damage to these jacks. Never operate the unit without the speakers connected. To listen to this unit will be changed to another mode using the FUNCTION button. Usually...

User Guide
Page 8
the time will blink in the display when the unit is turned off , press the MODE/TIME S1ET b1utton; Press the M1ODE1 /TIME SET button again, or wait 5 seconds, and the time will appear in the display. SETTING THE TIME TO SET OR RESET THE ACTUAL TIME 1 2 With the power off . 8 Within 5 sec1ond1s, press the PRESET -/HR button to set the hour. (Be sure to observe the AM or PM indicators to make sure you have set the hour correctly.) 3 4 Within 5 sec1ond1s, press the PRESET +/MIN button to set . NOTE: The time will be set the minute.
the time will blink in the display when the unit is turned off , press the MODE/TIME S1ET b1utton; Press the M1ODE1 /TIME SET button again, or wait 5 seconds, and the time will appear in the display. SETTING THE TIME TO SET OR RESET THE ACTUAL TIME 1 2 With the power off . 8 Within 5 sec1ond1s, press the PRESET -/HR button to set the hour. (Be sure to observe the AM or PM indicators to make sure you have set the hour correctly.) 3 4 Within 5 sec1ond1s, press the PRESET +/MIN button to set . NOTE: The time will be set the minute.
User Guide
Page 9
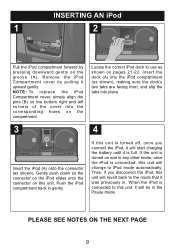
If the unit is turned on and in any other mode, once the iPod is connected, this unit will change to this unit, it will be in the Pause mode. Insert the dock (A) into the iPod compartment (as shown), making sure the dock's two tabs are facing front, and slip the tabs into ... connect the iPod, it will revert back to use as shown). NOTE: To replace the iPod Compartment cover, simply align the pins (B) on the bottom right and left corners of the cover into place. 4 (A) Insert the iPod (A) onto the connector (as shown on the compartment. 3 Locate the correct iPod dock to the mode ...
If the unit is turned on and in any other mode, once the iPod is connected, this unit will change to this unit, it will be in the Pause mode. Insert the dock (A) into the iPod compartment (as shown), making sure the dock's two tabs are facing front, and slip the tabs into ... connect the iPod, it will revert back to use as shown). NOTE: To replace the iPod Compartment cover, simply align the pins (B) on the bottom right and left corners of the cover into place. 4 (A) Insert the iPod (A) onto the connector (as shown on the compartment. 3 Locate the correct iPod dock to the mode ...
User Guide
Page 10
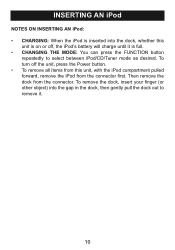
... inserted into the gap in the dock, then gently pull the dock out to select between iPod/CD/Tuner mode as desired. To remove the dock, insert your finger (or other object) into the dock, whether this unit, with the iPod compartment pulled forward, remove the iPod from the connector first. To turn off the unit, press the Power button. • To remove all items from the...
... inserted into the gap in the dock, then gently pull the dock out to select between iPod/CD/Tuner mode as desired. To remove the dock, insert your finger (or other object) into the dock, whether this unit, with the iPod compartment pulled forward, remove the iPod from the connector first. To turn off the unit, press the Power button. • To remove all items from the...
User Guide
Page 11
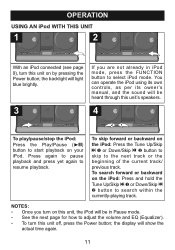
...iPod. You can operate the iPod using its own controls, as per its owner's manual, and the sound will be heard through this unit's speakers. 3 4 21 To play/pause/stop the iPod: Press the 1Play/1Pause (®p) button to resume playback. NOTES: • Once you are not already in Pause mode....the display will light blue brightly. To skip forward or backward on the iPod: Press the Tune Up/Skip n 1 or Down/Skip o 2 button to skip to adjust the volume and EQ (Equalizer). • To turn on the iPod: Press and hold the Tune Up/Skip n 1 or Down/Skip o 2 button to select iPod mode. ...
...iPod. You can operate the iPod using its own controls, as per its owner's manual, and the sound will be heard through this unit's speakers. 3 4 21 To play/pause/stop the iPod: Press the 1Play/1Pause (®p) button to resume playback. NOTES: • Once you are not already in Pause mode....the display will light blue brightly. To skip forward or backward on the iPod: Press the Tune Up/Skip n 1 or Down/Skip o 2 button to skip to adjust the volume and EQ (Equalizer). • To turn on the iPod: Press and hold the Tune Up/Skip n 1 or Down/Skip o 2 button to select iPod mode. ...

User Guide
Page 12
...volume will appear in the display. NOTE: • When this button again, or either of the VOLUME + / - "MUTE" will resume at the level which you set before turning the unit off. 12 To adjust the EQ (Equalizer): Press the EQ button on the remote (shown) or on the remote; To mute the main volume: Press the MUTE button...Off (Normal). button 1 on the remote (shown) or on the main unit to increase and/or decrease the volume. OPERATION (CONTINUED) ADJUSTING THE VOLUME AND EQ (Equalizer) 1 2 2 1 1 To adjust the main volume: Press the VOLUME + and/or button 1 on the remote (shown) ...
...volume will appear in the display. NOTE: • When this button again, or either of the VOLUME + / - "MUTE" will resume at the level which you set before turning the unit off. 12 To adjust the EQ (Equalizer): Press the EQ button on the remote (shown) or on the remote; To mute the main volume: Press the MUTE button...Off (Normal). button 1 on the remote (shown) or on the main unit to increase and/or decrease the volume. OPERATION (CONTINUED) ADJUSTING THE VOLUME AND EQ (Equalizer) 1 2 2 1 1 To adjust the main volume: Press the VOLUME + and/or button 1 on the remote (shown) ...

User Guide
Page 13
... frequency appears. OPERATION (CONTINUED) USING THE RADIO 1 2 TPuorwnetrhisbuuttnoint1;ontheb1 y pressing backlight the will light blue. 3 If you have selected is broadcasting in stereo, "ST" will search and then stop on the next strong station it finds. Repeatedly press the Tune Up/Skip n 1 or Down/Skip o 2 button to select Tuner mode. Repeat this step until the desired frequency appears in Tuner the1 FUNCTION button to manually advance the frequency in the display...
... frequency appears. OPERATION (CONTINUED) USING THE RADIO 1 2 TPuorwnetrhisbuuttnoint1;ontheb1 y pressing backlight the will light blue. 3 If you have selected is broadcasting in stereo, "ST" will search and then stop on the next strong station it finds. Repeatedly press the Tune Up/Skip n 1 or Down/Skip o 2 button to select Tuner mode. Repeat this step until the desired frequency appears in Tuner the1 FUNCTION button to manually advance the frequency in the display...

User Guide
Page 14
... the previous page to tune a st2ation1. "PRESET" will appear and "1" will be saved into memory. NOTES: • See page 12 for how to turn off , press the Power button; Press the PROGRAM/Memory button; Repeat to confirm, the station will blink in each band, as desired. Press the PROGRAM/Memory button 3 again to program additional presets in the display. OPERATION (CONTINUED) SETTING THE RADIO PRESETS (9 for each band...
... the previous page to tune a st2ation1. "PRESET" will appear and "1" will be saved into memory. NOTES: • See page 12 for how to turn off , press the Power button; Press the PROGRAM/Memory button; Repeat to confirm, the station will blink in each band, as desired. Press the PROGRAM/Memory button 3 again to program additional presets in the display. OPERATION (CONTINUED) SETTING THE RADIO PRESETS (9 for each band...
User Guide
Page 15
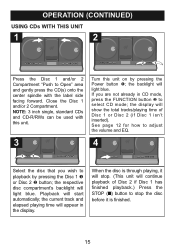
... the Power button 1; See page 12 for how to adjust the volume and EQ. 4 12 Select the disc that you are not already in the display. Playback will stop. (This un1it wi2ll continue playback of Disc 1 or Disc 2 (if Disc 1 isn't inserted). the backlight will appear in CD mode, press the FUNCTION button 2 to select CD mode; the current track and elapsed playing time will light blue. NOTE...
... the Power button 1; See page 12 for how to adjust the volume and EQ. 4 12 Select the disc that you are not already in the display. Playback will stop. (This un1it wi2ll continue playback of Disc 1 or Disc 2 (if Disc 1 isn't inserted). the backlight will appear in CD mode, press the FUNCTION button 2 to select CD mode; the current track and elapsed playing time will light blue. NOTE...

User Guide
Page 19
... With the desired disc selected (see Step 3 on2 pag1e 15) and while in the display. 3 Select a track to be programmed using the Tune Up/Skip n 1 or Down/Skip o 2 button. 4 Press the PROGRAM/Memory button to memo2rize1 the track. Press the P1 lay/1Pause (®p) button to play more than once. OPERATION (CONTINUED) TO PROGRAM THE MEMORY (UP TO 20 TRACKS) The CD player in this...
... With the desired disc selected (see Step 3 on2 pag1e 15) and while in the display. 3 Select a track to be programmed using the Tune Up/Skip n 1 or Down/Skip o 2 button. 4 Press the PROGRAM/Memory button to memo2rize1 the track. Press the P1 lay/1Pause (®p) button to play more than once. OPERATION (CONTINUED) TO PROGRAM THE MEMORY (UP TO 20 TRACKS) The CD player in this...

User Guide
Page 20
... to cancel the Repeat and Program modes. 20 Programmed Repeat playback will play repeatedly. Then follow Steps 2 and 3 on the previous page. • Press the STOP (I ) button to the program memory, while in the display. OPERATION (CONTINUED) NOTES ON PROGRAM PLAYBACK: • You can scroll through the program while it is also possible to use the Program and 1Repe1at functions together to repeat...
... to cancel the Repeat and Program modes. 20 Programmed Repeat playback will play repeatedly. Then follow Steps 2 and 3 on the previous page. • Press the STOP (I ) button to the program memory, while in the display. OPERATION (CONTINUED) NOTES ON PROGRAM PLAYBACK: • You can scroll through the program while it is also possible to use the Program and 1Repe1at functions together to repeat...

User Guide
Page 23
... calling for service. AM or FM, no sound. extended. Rotate unit until best itioned correctly. reception is SOLUTION Increase volume. CAUSE Volume is obtained. Audio cable plugged into AUX IN jack. 23 cloth. TROUBLESHOOTING GUIDE If you experience a problem with soft Can't select iPod/CD/ Tuner mode using FUNCTION button. Press the Power button, then the FUNCTION button to select iPod. Station is not tuned Retune the AM or FM properly. set to select CD. FM: Wire broadcast station. CD mode, no or...
... calling for service. AM or FM, no sound. extended. Rotate unit until best itioned correctly. reception is SOLUTION Increase volume. CAUSE Volume is obtained. Audio cable plugged into AUX IN jack. 23 cloth. TROUBLESHOOTING GUIDE If you experience a problem with soft Can't select iPod/CD/ Tuner mode using FUNCTION button. Press the Power button, then the FUNCTION button to select iPod. Station is not tuned Retune the AM or FM properly. set to select CD. FM: Wire broadcast station. CD mode, no or...

User Guide
Page 25
... (Center positive) Power Source (Remote Control) . . . . PLEASE KEEP ALL PACKAGING MATERIAL FOR AT LEAST 90 DAYS IN CASE YOU NEED TO RETURN THIS PRODUCT TO YOUR PLACE OF PURCHASE. FOR CONSUMER REPLACEABLE PART(S), SEE PART NUMBER(S) ON PAGES 4, 5, 21 AND 22 AND THEN CONTACT FOX INTERNATIONAL AT 1-800-321-6993. 25 DC 3V, CR2025, Lithium Battery Speaker 6 ohm x 2 Output Power 10W x 2 RADIO SECTION Frequency Range...
... (Center positive) Power Source (Remote Control) . . . . PLEASE KEEP ALL PACKAGING MATERIAL FOR AT LEAST 90 DAYS IN CASE YOU NEED TO RETURN THIS PRODUCT TO YOUR PLACE OF PURCHASE. FOR CONSUMER REPLACEABLE PART(S), SEE PART NUMBER(S) ON PAGES 4, 5, 21 AND 22 AND THEN CONTACT FOX INTERNATIONAL AT 1-800-321-6993. 25 DC 3V, CR2025, Lithium Battery Speaker 6 ohm x 2 Output Power 10W x 2 RADIO SECTION Frequency Range...

User Guide
Page 26
... defects caused or repairs required as outlined in material or workmanship relating to the product, including damages for a period equal to earphones, remote controls, AC adapters, batteries, temperature probe, stylus, trays, filters and cables. c. Any product received without appropriate model, serial number and CSA /cUL /cULus /cETL /cETLus markings. Any products used for choosing MEMOREX! In-home warranty service may be warranted...
... defects caused or repairs required as outlined in material or workmanship relating to the product, including damages for a period equal to earphones, remote controls, AC adapters, batteries, temperature probe, stylus, trays, filters and cables. c. Any product received without appropriate model, serial number and CSA /cUL /cULus /cETL /cETLus markings. Any products used for choosing MEMOREX! In-home warranty service may be warranted...


