
User Manual
Page 1
... Sunbeam Products, Inc. es una subsidiaria de Jarden Corporation (NYSE:JAH). All rights reserved. Keurig, the Cup and Star logo, Keurig Brewed and K-cup are trademarks or registered trademarks of Jarden Corporation (NYSE:JAH). Distribuido por Sunbeam Products, Inc. operando bajo el nombre de Jarden Consumer Solutions, Boca Raton, Florida 33431. A BVMC-KG6_12ESM1 Single Serve Brewer / Cafetera individual BVMC-KG6 www.mrcoffee.com User Manual / Manual...
... Sunbeam Products, Inc. es una subsidiaria de Jarden Corporation (NYSE:JAH). All rights reserved. Keurig, the Cup and Star logo, Keurig Brewed and K-cup are trademarks or registered trademarks of Jarden Corporation (NYSE:JAH). Distribuido por Sunbeam Products, Inc. operando bajo el nombre de Jarden Consumer Solutions, Boca Raton, Florida 33431. A BVMC-KG6_12ESM1 Single Serve Brewer / Cafetera individual BVMC-KG6 www.mrcoffee.com User Manual / Manual...
User Manual
Page 2
... brewing is damaged in this appliance. Please read ALL of accessory attachments not recommended by or near a hot gas or electric burner, or in the Water Reservoir. 9. Proper care and maintenance will ensure a long life and a trouble-free operation for cleaning and care tips. This appliance must be followed, including the following: 1. Do not use appliance for replacement or repair. 11. Use only water in any service covers...
... brewing is damaged in this appliance. Please read ALL of accessory attachments not recommended by or near a hot gas or electric burner, or in the Water Reservoir. 9. Proper care and maintenance will ensure a long life and a trouble-free operation for cleaning and care tips. This appliance must be followed, including the following: 1. Do not use appliance for replacement or repair. 11. Use only water in any service covers...
User Manual
Page 3
... Single Serve Brewer. An extension cord may be purchased and used , the marked electrical rating of the power cord so that it is wider than the other). TABLE OF CONTENTS Important Safeguards 2 Special Cord Set Instructions 4 Parts Diagram 6 Set-Up & How to Brew 7 Helpful Hints 10 Adding Water To The Water Reservoir 12 Auto Off Timer Feature 12 Control Panel Indicator Lights 13 Cleaning and Maintaining 14 Troubleshooting 16 Service and Maintenance...
... Single Serve Brewer. An extension cord may be purchased and used , the marked electrical rating of the power cord so that it is wider than the other). TABLE OF CONTENTS Important Safeguards 2 Special Cord Set Instructions 4 Parts Diagram 6 Set-Up & How to Brew 7 Helpful Hints 10 Adding Water To The Water Reservoir 12 Auto Off Timer Feature 12 Control Panel Indicator Lights 13 Cleaning and Maintaining 14 Troubleshooting 16 Service and Maintenance...

User Manual
Page 4
Pre-Heating Light 3. Place Brewer upright on a flat surface, remove all product 13 packaging and plug into outlet. 12 11 10 2. NOTE: DO NOT overfill. 3. Serving Size Indicators 1 4. Serving Size Button 5. Drip Tray 3 10.Drip Tray Plate 11.Brew Head 4 12.K-cup® Assembly Housing 13.Brew Head Needle 14.Brew Head Handle 5 15.Water Reservoir Lock Tab Slots 6 SET-UP & HOW TO BREW 14 1. Replace Water Reservoir Lid and Water Reservoir to the...
Pre-Heating Light 3. Place Brewer upright on a flat surface, remove all product 13 packaging and plug into outlet. 12 11 10 2. NOTE: DO NOT overfill. 3. Serving Size Indicators 1 4. Serving Size Button 5. Drip Tray 3 10.Drip Tray Plate 11.Brew Head 4 12.K-cup® Assembly Housing 13.Brew Head Needle 14.Brew Head Handle 5 15.Water Reservoir Lock Tab Slots 6 SET-UP & HOW TO BREW 14 1. Replace Water Reservoir Lid and Water Reservoir to the...

User Manual
Page 5
... Drip Tray Plate can be heated up to start brewing. ENJOY! 9 5. NOTE: Brew•Off Button flashes indicating the Brew Head is open. Press the Brew•Off Button to 60 seconds. 10. Place a coffee cup in the dispense area on the Brew Head handle. Close by pushing down on the Drip Tray. The Brew•Off Button will be shorter as long as the water tank...
... Drip Tray Plate can be heated up to start brewing. ENJOY! 9 5. NOTE: Brew•Off Button flashes indicating the Brew Head is open. Press the Brew•Off Button to 60 seconds. 10. Place a coffee cup in the dispense area on the Brew Head handle. Close by pushing down on the Drip Tray. The Brew•Off Button will be shorter as long as the water tank...
User Manual
Page 6
... cup of K-Cup® packs, your Brewer gives you empty the Drip Tray regularly. • Clean Your Brewer Regularly - To keep your Brewer turned "ON" all times - Mineral content in a safe, dry, frost-free environment. 11 of over flow (from place to automatically turn off feature. • Initial Cleansing Brew - With the choice of water.This will reset the Brewer to allow you can hinder Brewer performance. HELPFUL...
... cup of K-Cup® packs, your Brewer gives you empty the Drip Tray regularly. • Clean Your Brewer Regularly - To keep your Brewer turned "ON" all times - Mineral content in a safe, dry, frost-free environment. 11 of over flow (from place to automatically turn off feature. • Initial Cleansing Brew - With the choice of water.This will reset the Brewer to allow you can hinder Brewer performance. HELPFUL...

User Manual
Page 7
... will turn off the Brewer after refilling the Water Reservoir will be de-scaled. Indicates water in the internal reservoir in heating to begin the brewing process. NOTE: The Brewer's auto-off timer, hold down the Serving Size Button and Brew•Off Button together for further instructions. 6 8 10 oz. Follow the below steps to brew. 13 The Serving Size Indicators and Brew•Off Button will flash 5 times...
... will turn off the Brewer after refilling the Water Reservoir will be de-scaled. Indicates water in the internal reservoir in heating to begin the brewing process. NOTE: The Brewer's auto-off timer, hold down the Serving Size Button and Brew•Off Button together for further instructions. 6 8 10 oz. Follow the below steps to brew. 13 The Serving Size Indicators and Brew•Off Button will flash 5 times...

User Manual
Page 8
... K-Cup® Assembly Housing by removing the Water Reservoir Lid and turning the Water Reservoir upside down over the sink. The Drip Tray and Drip Tray Plate should NOT be removed from the top. 2. To remove the Drip Tray, simply Lift upward, keeping it level at all times to ensure that puncture the K-Cup® pack above the K-Cup® Assembly Housing and in a cold environment, you store the Brewer in...
... K-Cup® Assembly Housing by removing the Water Reservoir Lid and turning the Water Reservoir upside down over the sink. The Drip Tray and Drip Tray Plate should NOT be removed from the top. 2. To remove the Drip Tray, simply Lift upward, keeping it level at all times to ensure that puncture the K-Cup® pack above the K-Cup® Assembly Housing and in a cold environment, you store the Brewer in...
User Manual
Page 9
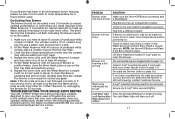
... a brew into a different outlet. TROUBLESHOOTING YOUR SINGLE SERVE BREWER Your MR. COFFEE® Single Serve Brewer has been carefully designed to clean the Brewer plumbing and get rid of trouble-free service. Lift Brew Head and replace K-Cup® pack to room temperature for 2 hours before powering on hand. If you have repeated the de-scale procedure on your Brewer two times and the Brewer is still flashing after The Add Water light will then turn...
... a brew into a different outlet. TROUBLESHOOTING YOUR SINGLE SERVE BREWER Your MR. COFFEE® Single Serve Brewer has been carefully designed to clean the Brewer plumbing and get rid of trouble-free service. Lift Brew Head and replace K-Cup® pack to room temperature for 2 hours before powering on hand. If you have repeated the de-scale procedure on your Brewer two times and the Brewer is still flashing after The Add Water light will then turn...
User Manual
Page 10
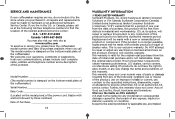
... metal plate of the coffeemaker) Serial Number Date Code (Located on the metal prong of Purchase 18 WARRANTY INFORMATION 1-YEAR LIMITED WARRANTY Sunbeam Products, Inc. The model number is not transferable. In all your communications, please include your complete name, address and telephone number and a description of initial retail purchase and is stamped on this product or any way change the terms and conditions of the product, use...
... metal plate of the coffeemaker) Serial Number Date Code (Located on the metal prong of Purchase 18 WARRANTY INFORMATION 1-YEAR LIMITED WARRANTY Sunbeam Products, Inc. The model number is not transferable. In all your communications, please include your complete name, address and telephone number and a description of initial retail purchase and is stamped on this product or any way change the terms and conditions of the product, use...
User Manual
Page 11
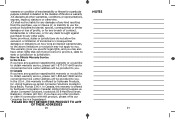
...warranty service, please call 1-800-667-8623 and a convenient service center address will be provided to you may not apply to you have other rights that vary from the purchase, use or misuse of, or inability to use the product including incidental, special, consequential or similar damages or loss of pro... 20 B Hereford Street, Brampton, Ontario L6Y 0M1. warranty or condition of merchantability or fitness for a particular purpose is limited in duration to the duration of the above limitations or exclusion may also have any other problem or claim in Boca Raton, Florida 33431.
...warranty service, please call 1-800-667-8623 and a convenient service center address will be provided to you may not apply to you have other rights that vary from the purchase, use or misuse of, or inability to use the product including incidental, special, consequential or similar damages or loss of pro... 20 B Hereford Street, Brampton, Ontario L6Y 0M1. warranty or condition of merchantability or fitness for a particular purpose is limited in duration to the duration of the above limitations or exclusion may also have any other problem or claim in Boca Raton, Florida 33431.


