
User Manual
Page 16
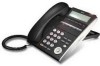
... Administrator sets "OneTouch Speed Dial key" on the screen according to the terminal. Also, when using Voice Mail service, the Lamp lights steadily when a message has been left. (3) LCD LCD (Liquid Crystal Display) provides DT Series activity information plus date, time and Soft Key Operation. (4) Exit To exit Menu or Help mode and go back to the time display. (5) Soft Keys Any feature shown at the bottom of DT Series Display flashes when a call terminates to the call handling process. (6) Help Explanations...
... Administrator sets "OneTouch Speed Dial key" on the screen according to the terminal. Also, when using Voice Mail service, the Lamp lights steadily when a message has been left. (3) LCD LCD (Liquid Crystal Display) provides DT Series activity information plus date, time and Soft Key Operation. (4) Exit To exit Menu or Help mode and go back to the time display. (5) Soft Keys Any feature shown at the bottom of DT Series Display flashes when a call terminates to the call handling process. (6) Help Explanations...

User Manual
Page 17
...-Touch Speed Dial key", you can access to respond hands free. Press redial and scroll back through numbers that have been dialed. Details on A side and B side of DT750, such as terminal setup functions, etc. For details on this key lights during ringing. (b) Redial (Last Number Call, Speed Calling-Station/Group) Press key to activate any features as Call History, Directory or Terminal Setting. (13) Cursor By using this key opens Directory menu. LED on Directory service, see 6.DIRECTORY OPERATION. 9
...-Touch Speed Dial key", you can access to respond hands free. Press redial and scroll back through numbers that have been dialed. Details on A side and B side of DT750, such as terminal setup functions, etc. For details on this key lights during ringing. (b) Redial (Last Number Call, Speed Calling-Station/Group) Press key to activate any features as Call History, Directory or Terminal Setting. (13) Cursor By using this key opens Directory menu. LED on Directory service, see 6.DIRECTORY OPERATION. 9
User Manual
Page 23
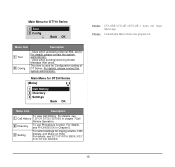
... Message (Not used for ringing volume, LCD display, and Music on Hold. Main Menu for DT710 Series 1 Tool 0 Config Back OK Menu Item Description 1 Tool 0 Config - For details, see 1 Call History 7.2FOR DT330 SERIES in Chapter 5. 3 Setting To control settings for Configuration setting of DT Series. Note: DTL-6DE-1/ITL-2E-1/DTL-2E-1 does not have Menu key. For details, please contact the system administrator. For details, see SETUP WITH MENU KEY FOR DT300 SERIES. Main Menu for DT330 Series [Menu] 1 Call History 2 Directory 3 Settings...
... Message (Not used for ringing volume, LCD display, and Music on Hold. Main Menu for DT710 Series 1 Tool 0 Config Back OK Menu Item Description 1 Tool 0 Config - For details, see 1 Call History 7.2FOR DT330 SERIES in Chapter 5. 3 Setting To control settings for Configuration setting of DT Series. Note: DTL-6DE-1/ITL-2E-1/DTL-2E-1 does not have Menu key. For details, please contact the system administrator. For details, see SETUP WITH MENU KEY FOR DT300 SERIES. Main Menu for DT330 Series [Menu] 1 Call History 2 Directory 3 Settings...

User Manual
Page 27
... Calls" feature. AICM: Press key to leave message waiting indication on boss' station from secretary's station. MW-SET: Press key to activate "Automatic Intercom". PROGRAMMABLE FEATURE KEYS These are examples of extra extension. DICM: Press key to store a number or redial a stored number. S&R (Save and Repeat): Press key to activate "Dial Intercom". NAME: Press key to register name for the key to release "Privacy" feature. Don't Answer" feature. Busy Line" feature. P-RLS: Press key to One-Touch Speed Calling key. FDA: Press key to activate "Manual Intercom...
... Calls" feature. AICM: Press key to leave message waiting indication on boss' station from secretary's station. MW-SET: Press key to activate "Automatic Intercom". PROGRAMMABLE FEATURE KEYS These are examples of extra extension. DICM: Press key to store a number or redial a stored number. S&R (Save and Repeat): Press key to activate "Dial Intercom". NAME: Press key to register name for the key to release "Privacy" feature. Don't Answer" feature. Busy Line" feature. P-RLS: Press key to One-Touch Speed Calling key. FDA: Press key to activate "Manual Intercom...

User Manual
Page 31
... be forwarded to toggle between pages when two numbers are registered on ISDN calls only. PAGE (Button Page) Allows you to turn the microphone on hands-free. HSET (Headset) Allows you to make a call . Cancel) Allows a station to an already existing conversation. FLASH (Flash) Provides the station with other lines in speaker. DND (Do Not Disturb) Allows a station user to deny access to call certain frequently dialed numbers using the headset. 23 MWOFF (Message Waiting - S-SPD (Speed Calling - MWSET (Message Waiting...
... be forwarded to toggle between pages when two numbers are registered on ISDN calls only. PAGE (Button Page) Allows you to turn the microphone on hands-free. HSET (Headset) Allows you to make a call . Cancel) Allows a station to an already existing conversation. FLASH (Flash) Provides the station with other lines in speaker. DND (Do Not Disturb) Allows a station user to deny access to call certain frequently dialed numbers using the headset. 23 MWOFF (Message Waiting - S-SPD (Speed Calling - MWSET (Message Waiting...

User Manual
Page 50
... SERIES • TO ENABLE/DISABLE OFF-HOOK RINGING DT730/DT710 The procedure below shows how to open the Menu screen. Select an item by either of the following operations. • Highlight an item by using , and then press , or OK soft key. • Press 1 key. [Setting] 1 User Setting 2 Download 3 Data Backup/Restore Back OK STEP 4: Select 1 Incoming Call. STEP 1: While indicating the current time on LCD, press Menu key...
... SERIES • TO ENABLE/DISABLE OFF-HOOK RINGING DT730/DT710 The procedure below shows how to open the Menu screen. Select an item by either of the following operations. • Highlight an item by using , and then press , or OK soft key. • Press 1 key. [Setting] 1 User Setting 2 Download 3 Data Backup/Restore Back OK STEP 4: Select 1 Incoming Call. STEP 1: While indicating the current time on LCD, press Menu key...

User Manual
Page 52
... SET RINGING OF HEADSET DT730 The procedure below shows how to open the Menu screen. STEP 1: While indicating the current time on LCD, press Menu key to enable/disable the ringing of the following operations. • Highlight an item by either of headset. Select an item by using , and then press , or OK soft key. • Press 1 key. [User Setting] 1 Incoming Call 2 Talk 3 Display 4 Change Password 5 Security 6 Peripherals 0 Setting Reset Back OK STEP 5: Select 3 Headset Ring...
... SET RINGING OF HEADSET DT730 The procedure below shows how to open the Menu screen. STEP 1: While indicating the current time on LCD, press Menu key to enable/disable the ringing of the following operations. • Highlight an item by either of headset. Select an item by using , and then press , or OK soft key. • Press 1 key. [User Setting] 1 Incoming Call 2 Talk 3 Display 4 Change Password 5 Security 6 Peripherals 0 Setting Reset Back OK STEP 5: Select 3 Headset Ring...

User Manual
Page 54
STEP 1: While indicating the current time on LCD, press Menu key to change the ringer tone for internal call and external call. Select an item by either of the following operations. • Highlight an item by using , and then press , or OK soft key. • Press 1 key. [User Setting] 1 Incoming Call 2 Talk 3 Display 4 Change Password 5 Security 6 Peripherals 0 Setting Reset Back OK STEP 5: Select 4 Ring Tone (DT730) / 2 Ring Tone (DT710) Select an item by either of the...
STEP 1: While indicating the current time on LCD, press Menu key to change the ringer tone for internal call and external call. Select an item by either of the following operations. • Highlight an item by using , and then press , or OK soft key. • Press 1 key. [User Setting] 1 Incoming Call 2 Talk 3 Display 4 Change Password 5 Security 6 Peripherals 0 Setting Reset Back OK STEP 5: Select 4 Ring Tone (DT730) / 2 Ring Tone (DT710) Select an item by either of the...
User Manual
Page 57
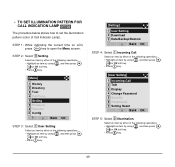
... key. • Press 1 key. [Setting] 1 User Setting 2 Download 3 Data Backup/Restore Back OK STEP 4: Select 1 Incoming Call. • TO SET ILLUMINATION PATTERN FOR CALL INDICATION LAMP DT730 The procedure below shows how to open the Menu screen. Select an item by either of the following operations. • Highlight an item by using , and then press , or OK soft key. • Press 5 key. [Menu] 1 History 2 Directory 3 Tool 4 Call Func. 5 Setting...
... key. • Press 1 key. [Setting] 1 User Setting 2 Download 3 Data Backup/Restore Back OK STEP 4: Select 1 Incoming Call. • TO SET ILLUMINATION PATTERN FOR CALL INDICATION LAMP DT730 The procedure below shows how to open the Menu screen. Select an item by either of the following operations. • Highlight an item by using , and then press , or OK soft key. • Press 5 key. [Menu] 1 History 2 Directory 3 Tool 4 Call Func. 5 Setting...

User Manual
Page 65
... operations. • Highlight an item by DT Series user. • TO SET MUSIC ON HOLD DT730/DT710 The procedure below shows how to set Music on LCD, press Menu key to be heard by using , and then press , or OK soft key. • Press 2 key. [User Setting] 1 Incoming Call 2 Talk 3 Display 4 Change Password 5 Security 6 Peripherals 0 Setting Reset Back OK STEP 5: Select 4 Hold Music. STEP 1: While indicating the current time on Hold to open the Menu screen...
... operations. • Highlight an item by DT Series user. • TO SET MUSIC ON HOLD DT730/DT710 The procedure below shows how to set Music on LCD, press Menu key to be heard by using , and then press , or OK soft key. • Press 2 key. [User Setting] 1 Incoming Call 2 Talk 3 Display 4 Change Password 5 Security 6 Peripherals 0 Setting Reset Back OK STEP 5: Select 4 Hold Music. STEP 1: While indicating the current time on Hold to open the Menu screen...

User Manual
Page 71
... service, contact the Sys- If the latest contents can not be downloaded from XML server, default Screen Saver will be displayed. STEP 1: While indicating the current time on LCD, press Menu key to open the Menu screen. Select an item by either of the following operations. • Highlight an item by using , and then press , or OK soft key. • Press 3 key. [User Setting] 1 Incoming Call 2 Talk 3 Display 4 Change Password 5 Security 6 Peripherals 0 Setting Reset...
... service, contact the Sys- If the latest contents can not be downloaded from XML server, default Screen Saver will be displayed. STEP 1: While indicating the current time on LCD, press Menu key to open the Menu screen. Select an item by either of the following operations. • Highlight an item by using , and then press , or OK soft key. • Press 3 key. [User Setting] 1 Incoming Call 2 Talk 3 Display 4 Change Password 5 Security 6 Peripherals 0 Setting Reset...

User Manual
Page 73
... any key or lifts the handset. STEP 2: Select 5 Setting. Select an item by either of the following operations. • Highlight an item by using , and then press , or OK soft key. • Press 3 key. [User Setting] 1 Incoming Call 2 Talk 3 Display 4 Change Password 5 Security 6 Peripherals 0 Setting Reset Back OK STEP 5: Select 4 Back Light. • TO ENABLE/DISABLE BACKLIGHT DT730 The following explains how to open the Menu screen.
... any key or lifts the handset. STEP 2: Select 5 Setting. Select an item by either of the following operations. • Highlight an item by using , and then press , or OK soft key. • Press 3 key. [User Setting] 1 Incoming Call 2 Talk 3 Display 4 Change Password 5 Security 6 Peripherals 0 Setting Reset Back OK STEP 5: Select 4 Back Light. • TO ENABLE/DISABLE BACKLIGHT DT730 The following explains how to open the Menu screen.

User Manual
Page 77
... then press , or OK soft key. • Press 6 key (DT730) / 4 key (DT710) 69 STEP 1: While indicating the current time on LCD, press Menu key to be displayed on LCD. Select an item by either of the following operations. • Highlight an item by using , and then press , or OK soft key. • Press 3 key. [User Setting] 1 Incoming Call 2 Talk 3 Display 4 Change Password 5 Security 6 Peripherals 0 Setting Reset Back OK STEP 5: Select 6 Language...
... then press , or OK soft key. • Press 6 key (DT730) / 4 key (DT710) 69 STEP 1: While indicating the current time on LCD, press Menu key to be displayed on LCD. Select an item by either of the following operations. • Highlight an item by using , and then press , or OK soft key. • Press 3 key. [User Setting] 1 Incoming Call 2 Talk 3 Display 4 Change Password 5 Security 6 Peripherals 0 Setting Reset Back OK STEP 5: Select 6 Language...
User Manual
Page 79
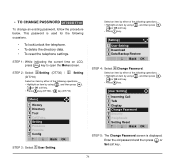
... CHANGE PASSWORD DT730/DT710 To change an existing password, follow the procedure below. STEP 1: While indicating the current time on LCD, press Menu key to open the Menu screen. Enter the old password and then press or Set soft key. 71 Select an item by either of the following occasions. • To lock/unlock the telephone. • To delete the directory data. • To reset the telephone settings. This password is displayed...
... CHANGE PASSWORD DT730/DT710 To change an existing password, follow the procedure below. STEP 1: While indicating the current time on LCD, press Menu key to open the Menu screen. Enter the old password and then press or Set soft key. 71 Select an item by either of the following occasions. • To lock/unlock the telephone. • To delete the directory data. • To reset the telephone settings. This password is displayed...

User Manual
Page 80
... OK soft key. [Change Password] 1 Old Pass **** New Pass **** Retry Pass BK Set Cancel OK Note: A maximum of 32 digits (0-9, * and #) can be set as follows. STEP 8: When the password entry completes successfully, the display changes as a password. When changing the password for the first time, enter "0000" as the old password. In that case, press OK soft key and try again. [Password] 1 Password Error OK 72 [Change Password] 1 Old Pass New Pass...
... OK soft key. [Change Password] 1 Old Pass **** New Pass **** Retry Pass BK Set Cancel OK Note: A maximum of 32 digits (0-9, * and #) can be set as follows. STEP 8: When the password entry completes successfully, the display changes as a password. When changing the password for the first time, enter "0000" as the old password. In that case, press OK soft key and try again. [Password] 1 Password Error OK 72 [Change Password] 1 Old Pass New Pass...

User Manual
Page 81
... press , or OK soft key. • Press 0 key. [User Setting] 1 Incoming Call 2 Talk 3 Display 4 Change Password 5 Security 6 Peripherals 0 Setting Reset Back OK STEP 5: Enter the password and then press or OK soft key. 73 STEP 1: While indicating the current time on LCD, press Menu key to clear the personal data off the telephone. Select an item by either of the following explains how to open the Menu screen. Select an item by...
... press , or OK soft key. • Press 0 key. [User Setting] 1 Incoming Call 2 Talk 3 Display 4 Change Password 5 Security 6 Peripherals 0 Setting Reset Back OK STEP 5: Enter the password and then press or OK soft key. 73 STEP 1: While indicating the current time on LCD, press Menu key to clear the personal data off the telephone. Select an item by either of the following explains how to open the Menu screen. Select an item by...

User Manual
Page 131
... soft key, the telephone prompts for the Security mode cancellation password. When telephone numbers other than the predetermined emergency number are dialed, the following message appears (after a few seconds, the display goes back to be made with Security key. Dial Emergency Number Only Unlock Note: Note: Emergency call to only the predetermined number. Note: You can make a call cannot be set in Security mode). STEP 3: After a conversation, replace the handset. Invalid Dial. 911...
... soft key, the telephone prompts for the Security mode cancellation password. When telephone numbers other than the predetermined emergency number are dialed, the following message appears (after a few seconds, the display goes back to be made with Security key. Dial Emergency Number Only Unlock Note: Note: Emergency call to only the predetermined number. Note: You can make a call cannot be set in Security mode). STEP 3: After a conversation, replace the handset. Invalid Dial. 911...
User Manual
Page 145
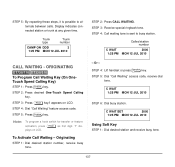
...12 JUL 2010 CALL WAITING - appears on LCD. STEP 4: Dial "Call Waiting" feature access code. STEP 5: Press Feature key. displays on LCD. STEP 5: Dial "Call Waiting" access code, receive dial tone. STEP 4: Lift handset or press Speaker key. Trunk type Trunk number CAMP ON DDD 3 1:25 PM MON 12 JUL 2010 STEP 2: Press CALL WAITING. STEP 3: Receive special ringback tone. Display indicates connected station or trunk at any given time. STEP 4: Call waiting tone is possible to busy station. Originating STEP 1: Dial desired station number, receive busy tone...
...12 JUL 2010 CALL WAITING - appears on LCD. STEP 4: Dial "Call Waiting" feature access code. STEP 5: Press Feature key. displays on LCD. STEP 5: Dial "Call Waiting" access code, receive dial tone. STEP 4: Lift handset or press Speaker key. Trunk type Trunk number CAMP ON DDD 3 1:25 PM MON 12 JUL 2010 STEP 2: Press CALL WAITING. STEP 3: Receive special ringback tone. Display indicates connected station or trunk at any given time. STEP 4: Call waiting tone is possible to busy station. Originating STEP 1: Dial desired station number, receive busy tone...

User Manual
Page 239
... 1 Time Format 2 Local Volume 3 Screen Saver Description Make the user setting of headset. Settings for External Call and Internal Call. Determines whether time is off-hook. Set key touch tone generated when the digit keys are pressed while the telephone is displayed with a 12-hour or 24hour clock format. Select a Music on Hold to display the following volume levels: handset receiver volume, speaker volume, ringer tone volume and LCD contrast. Automatic / Tone Type 1~14 / Download 1~3 Set the illumination pattern for External Call and Internal Call. Sets Screen Saver related data...
... 1 Time Format 2 Local Volume 3 Screen Saver Description Make the user setting of headset. Settings for External Call and Internal Call. Determines whether time is off-hook. Set key touch tone generated when the digit keys are pressed while the telephone is displayed with a 12-hour or 24hour clock format. Select a Music on Hold to display the following volume levels: handset receiver volume, speaker volume, ringer tone volume and LCD contrast. Automatic / Tone Type 1~14 / Download 1~3 Set the illumination pattern for External Call and Internal Call. Sets Screen Saver related data...

User Manual
Page 243
... Screen Saver 1 Screen Saver Mode 2 Wait Time 4 Language 4 Change Password 0 Setting Reset 2 Download Description Make the user setting of DT Series. Settings for incoming call. Set key touch tone generated when the digit keys are pressed while the telephone is displayed with a 12-hour or 24hour clock format. Change the password to display the following volume levels: handset receiver volume, speaker volume, ringer tone volume and LCD contrast. Settings for telephone conversation. Automatic / Tone Type 1~14 Not used. Determines whether time is off-hook. Set the data...
... Screen Saver 1 Screen Saver Mode 2 Wait Time 4 Language 4 Change Password 0 Setting Reset 2 Download Description Make the user setting of DT Series. Settings for incoming call. Set key touch tone generated when the digit keys are pressed while the telephone is displayed with a 12-hour or 24hour clock format. Change the password to display the following volume levels: handset receiver volume, speaker volume, ringer tone volume and LCD contrast. Settings for telephone conversation. Automatic / Tone Type 1~14 Not used. Determines whether time is off-hook. Set the data...


