User Manual
Page 3
INTRODUCTION FACE LAYOUT 1 KEYS AND PARTS 8 MENU KEY 14 SIMPLE OPERATION BY MENU KEY AND CURSOR KEY 16 ICON DISPLAY 16 SHORTCUT MENU 17 PROGRAMMABLE FEATURE KEYS 19 SOFT KEYS 21 CONDITIONS FOR DT700 SERIES 25 2.INSTALLATION PROCEDURE ADJUSTING ANGLE OF TILT LEG 27 TO ... SETUP SETUP WITH UP/DOWN KEY 37 SETUP WITH FEATURE KEY 38 SETUP WITH MENU KEY FOR DT700 SERIES 42 SETUP WITH MENU KEY FOR DT300 SERIES 91 i TABLE OF CONTENTS 1.
INTRODUCTION FACE LAYOUT 1 KEYS AND PARTS 8 MENU KEY 14 SIMPLE OPERATION BY MENU KEY AND CURSOR KEY 16 ICON DISPLAY 16 SHORTCUT MENU 17 PROGRAMMABLE FEATURE KEYS 19 SOFT KEYS 21 CONDITIONS FOR DT700 SERIES 25 2.INSTALLATION PROCEDURE ADJUSTING ANGLE OF TILT LEG 27 TO ... SETUP SETUP WITH UP/DOWN KEY 37 SETUP WITH FEATURE KEY 38 SETUP WITH MENU KEY FOR DT700 SERIES 42 SETUP WITH MENU KEY FOR DT300 SERIES 91 i TABLE OF CONTENTS 1.
User Manual
Page 23
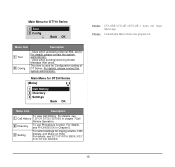
... system administrator. 1. Note: DTL-6DE-1/ITL-2E-1/DTL-2E-1 does not have Menu key. For details, see PHONEBOOK in chapter 7Call History Operation. 2 Directory To use Phonebook function. For details, please contact the system administrator. - Main Menu for Configuration setting of DT Series. Main Menu for ringing volume, LCD display, and Music on Hold...
... system administrator. 1. Note: DTL-6DE-1/ITL-2E-1/DTL-2E-1 does not have Menu key. For details, see PHONEBOOK in chapter 7Call History Operation. 2 Directory To use Phonebook function. For details, please contact the system administrator. - Main Menu for Configuration setting of DT Series. Main Menu for ringing volume, LCD display, and Music on Hold...
User Manual
Page 42
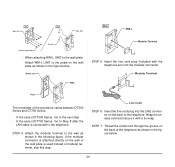
In the case of DT300 Series: Go to the telephone. Line Code STEP 6: Insert the line cord plug into the modular connector. STEP 4: Attach the modular terminal to the wall ... 8 after the LAN cable is used instead of the telephone. If the modular connector is attached directly on the back of the procedure varies between DT300 Series and DT700 Series. - STEP 7: Thread the coiled cord through the groove on the wall or the wall plate is connected to the next step...
In the case of DT300 Series: Go to the telephone. Line Code STEP 6: Insert the line cord plug into the modular connector. STEP 4: Attach the modular terminal to the wall ... 8 after the LAN cable is used instead of the telephone. If the modular connector is attached directly on the back of the procedure varies between DT300 Series and DT700 Series. - STEP 7: Thread the coiled cord through the groove on the wall or the wall plate is connected to the next step...
User Manual
Page 99
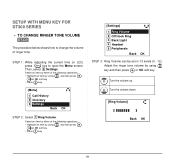
... volume up. Adjust the ringer tone volume by using key and then press or OK soft key. Then, select 3 Settings. SETUP WITH MENU KEY FOR DT300 SERIES • TO CHANGE RINGER TONE VOLUME DT330 The procedure below shows how to open the Menu screen.
... volume up. Adjust the ringer tone volume by using key and then press or OK soft key. Then, select 3 Settings. SETUP WITH MENU KEY FOR DT300 SERIES • TO CHANGE RINGER TONE VOLUME DT330 The procedure below shows how to open the Menu screen.


