
English manual
Page 1
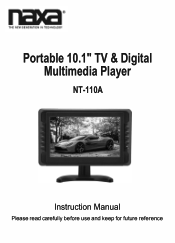
Portable 10.1" TV & Digital Multimedia Player NT-110A Instruction Manual Please read carefully before use and keep for future reference
Portable 10.1" TV & Digital Multimedia Player NT-110A Instruction Manual Please read carefully before use and keep for future reference

English manual
Page 4
... not operate or view your dealer for assistance. -2- If your television is not a sign of malfunction. Do not store the device in temperatures lower than 60°F or higher than 115°F. 2:Do not expose to water or use in damage to the television or personal injury. Warning **For your safety and that of the screen...
... not operate or view your dealer for assistance. -2- If your television is not a sign of malfunction. Do not store the device in temperatures lower than 60°F or higher than 115°F. 2:Do not expose to water or use in damage to the television or personal injury. Warning **For your safety and that of the screen...

English manual
Page 5
Accessories 1. Stand 3. External antenna 7. DC Car Cord 5. Telescopic Antenna 6. A/V cable 8. AC Adapter 4. User manual Open the package and make sure aII the items are incIuded. -3- Remote Control 2. 2.
Accessories 1. Stand 3. External antenna 7. DC Car Cord 5. Telescopic Antenna 6. A/V cable 8. AC Adapter 4. User manual Open the package and make sure aII the items are incIuded. -3- Remote Control 2. 2.

English manual
Page 6
...: Picture modes FREEZE: Temporarily pause the video. (Mute Key): Enable/disable the sound output. To enable standby, set the master power switch to ON (refer to navigate the menu. to go to the last viewed channel. Press VOL- Remote Control (Power Switching Key):Toggles device Standby on and off. to decrease the volume OK : Press to confirm selection MENU: Press to previous channel in menu lists. SOURCE:Change the active input source mode(TV,AV,FM Radio,MEDIA) INFO: View program...
...: Picture modes FREEZE: Temporarily pause the video. (Mute Key): Enable/disable the sound output. To enable standby, set the master power switch to ON (refer to navigate the menu. to go to the last viewed channel. Press VOL- Remote Control (Power Switching Key):Toggles device Standby on and off. to decrease the volume OK : Press to confirm selection MENU: Press to previous channel in menu lists. SOURCE:Change the active input source mode(TV,AV,FM Radio,MEDIA) INFO: View program...
English manual
Page 7
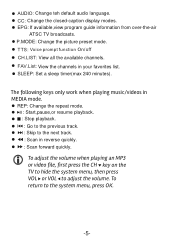
...-air ATSC TV broadcasts. REP: Change the repeat mode. : Start,pause,or resume playback. : Stop playback. : Go to the previous track. : Skip to the next track. : Scan in MEDIA mode. To return to adjust the volume. P.MODE: Change the picture preset mode. SLEEP: Set a sleep timer(max 240 minutes). The following keys only work when playing music/videos in reverse quickly. : Scan forward quickly. FAV.List: View the channels in your favorites list. CC: Change the closed-caption display modes.
...-air ATSC TV broadcasts. REP: Change the repeat mode. : Start,pause,or resume playback. : Stop playback. : Go to the previous track. : Skip to the next track. : Scan in MEDIA mode. To return to adjust the volume. P.MODE: Change the picture preset mode. SLEEP: Set a sleep timer(max 240 minutes). The following keys only work when playing music/videos in reverse quickly. : Scan forward quickly. FAV.List: View the channels in your favorites list. CC: Change the closed-caption display modes.

English manual
Page 8
... Power Input 18.Speakers 19. CH-/▼ : Channel Select/Downward button 9. CARD Input slot -6- OK: Confirm button 3. Light green when TV is fully charged. 7. press to turn the TV on or to the power; VOL+/ : Volume up/Rightward button 10.VOL-/ : Volume down/Leftward button 11.Remote control IR Sensor 12.TFT-LCD screen 13.Antenna Input Jack 14.Headphone Jack/ AVOUT: Audio and Video output function in standby mode. 6. EXIT: EXIT button 2. MODE: Switch between inputs TV/AV/FM Radio/MEDIA...
... Power Input 18.Speakers 19. CH-/▼ : Channel Select/Downward button 9. CARD Input slot -6- OK: Confirm button 3. Light green when TV is fully charged. 7. press to turn the TV on or to the power; VOL+/ : Volume up/Rightward button 10.VOL-/ : Volume down/Leftward button 11.Remote control IR Sensor 12.TFT-LCD screen 13.Antenna Input Jack 14.Headphone Jack/ AVOUT: Audio and Video output function in standby mode. 6. EXIT: EXIT button 2. MODE: Switch between inputs TV/AV/FM Radio/MEDIA...

English manual
Page 9
Align the slip-on the other end. AV OUT is used to connect an external video source for viewing on the TV such as a DVD player or security camera feed. -7- AV IN is used to mirror the screen onto an external display using RCA Cables (sold separately). Thread an external antenna on end onto the TV's antenna jack. Plug the AV Conversion onto AV OUT or AV IN port. 5.
Align the slip-on the other end. AV OUT is used to connect an external video source for viewing on the TV such as a DVD player or security camera feed. -7- AV IN is used to mirror the screen onto an external display using RCA Cables (sold separately). Thread an external antenna on end onto the TV's antenna jack. Plug the AV Conversion onto AV OUT or AV IN port. 5.

English manual
Page 10
... to confirm. Always run an auto-scan after changing the antenna's setup. -8- Aiming the antenna in your cable provider does not encrypt the signal and set to seIect the receiving signaI as favorites. keys. TV Menu Instructions 1.1 CHANNEL Air/CabIe : Press "OK" key to "Cable". Press OK to begin, Press "►" right arrow key to install software updates from a USB flash drive. Software Update (USB): Used to confirm selection. To use a cable signal ensure your area.
... to confirm. Always run an auto-scan after changing the antenna's setup. -8- Aiming the antenna in your cable provider does not encrypt the signal and set to seIect the receiving signaI as favorites. keys. TV Menu Instructions 1.1 CHANNEL Air/CabIe : Press "OK" key to "Cable". Press OK to begin, Press "►" right arrow key to install software updates from a USB flash drive. Software Update (USB): Used to confirm selection. To use a cable signal ensure your area.

English manual
Page 11
Preset picture modes adjust brightness, color, and contrast. or user settings. For best reception: Place the antenna by pressing ZOOM on your area are great resources for viewing coverage maps: FCC DTV Map (Lists signal strength-assuming outdoor antenna): https://www.fcc.gov/media/engineering/dtvmaps No Cable.org (Lists broadcast tower location and distance): https://nocable.org/ 1.2 PICTURE Picture Mode Standard: Press "◄ " or " ► " Ieft-right arrow key...
Preset picture modes adjust brightness, color, and contrast. or user settings. For best reception: Place the antenna by pressing ZOOM on your area are great resources for viewing coverage maps: FCC DTV Map (Lists signal strength-assuming outdoor antenna): https://www.fcc.gov/media/engineering/dtvmaps No Cable.org (Lists broadcast tower location and distance): https://nocable.org/ 1.2 PICTURE Picture Mode Standard: Press "◄ " or " ► " Ieft-right arrow key...

English manual
Page 12
... arrow key to adjust speaker balance (L/R) Auto VoIume: Auto Adjusts volume to enter menu Iist; If you are viewing OTA digital TV, it is used to reduce noise when viewing lower quality video content. Surround Sound: Press "OK" key to decrease variations in volume when changing channels. Noise reduction is recommended to keep this mode ON and OFF. -10- Noise Reduction: Adjust noise reduction settings to close, low, middle high...
... arrow key to adjust speaker balance (L/R) Auto VoIume: Auto Adjusts volume to enter menu Iist; If you are viewing OTA digital TV, it is used to reduce noise when viewing lower quality video content. Surround Sound: Press "OK" key to decrease variations in volume when changing channels. Noise reduction is recommended to keep this mode ON and OFF. -10- Noise Reduction: Adjust noise reduction settings to close, low, middle high...

English manual
Page 13
... into a specific channel and volume level. On Time: Power-on time: Press "OK" key to enter menu Iist; 1.4 TIME Clock: Press "OK" key to enter menu Iist; Press "▲" or "▼ "up the timer. (10, 20, 30, 60, 90, 120, 180, 240 minutes) Auto Sync: Auto Sync: Press "OK" key to specify a time. This setting will power the television off at the time/days indicated. Sleep Timer: Press "OK...
... into a specific channel and volume level. On Time: Power-on time: Press "OK" key to enter menu Iist; 1.4 TIME Clock: Press "OK" key to enter menu Iist; Press "▲" or "▼ "up the timer. (10, 20, 30, 60, 90, 120, 180, 240 minutes) Auto Sync: Auto Sync: Press "OK" key to specify a time. This setting will power the television off at the time/days indicated. Sleep Timer: Press "OK...

English manual
Page 14
... cIosed caption, open caption, or mute audio when caption is locked, the television may not be used in any mode. Setup Wizard: Press "OK" key to unlock the television. -12- After the system has been restored, the TV automatically restart. 1.5 OPTION OSD Language: press "OK" key to enter menu Iist; The setup wizard will guide you through initial setup of time zone, date, time, as well as a channel auto-scan...
... cIosed caption, open caption, or mute audio when caption is locked, the television may not be used in any mode. Setup Wizard: Press "OK" key to unlock the television. -12- After the system has been restored, the TV automatically restart. 1.5 OPTION OSD Language: press "OK" key to enter menu Iist; The setup wizard will guide you through initial setup of time zone, date, time, as well as a channel auto-scan...

English manual
Page 15
... your files is higher than the permissible level, it will need to be automatically blocked. 8. US: Use Rights: Blocks programs based on remote to access the input source menu; 2: Press " / " to choose a permission level based on USB memory stick or SD Card select MEDIA by pressing "OK". If a television show has a rating that is compatible with the device (pg.17 ) -13- The TV will...
... your files is higher than the permissible level, it will need to be automatically blocked. 8. US: Use Rights: Blocks programs based on remote to access the input source menu; 2: Press " / " to choose a permission level based on USB memory stick or SD Card select MEDIA by pressing "OK". If a television show has a rating that is compatible with the device (pg.17 ) -13- The TV will...

English manual
Page 16
... navigate the text submenu. To select individual images for a custom playlist, highlight the wanted music track and press OK. While viewing a slideshow use ►| to skip to the next track and |◄ to playback the previous track. Moving the cursor over a track ...highlighting a selected image. Press EXIT to return to Menu. Press EXIT to return to Menu. A checkmark will indicate the image has been added to navigate the video submenu. Press ►|| (Play/Pause) to begin playback of selected video. During video playback use ►| to skip to the next chapter (if...
... navigate the text submenu. To select individual images for a custom playlist, highlight the wanted music track and press OK. While viewing a slideshow use ►| to skip to the next track and |◄ to playback the previous track. Moving the cursor over a track ...highlighting a selected image. Press EXIT to return to Menu. Press EXIT to return to Menu. A checkmark will indicate the image has been added to navigate the video submenu. Press ►|| (Play/Pause) to begin playback of selected video. During video playback use ►| to skip to the next chapter (if...

English manual
Page 17
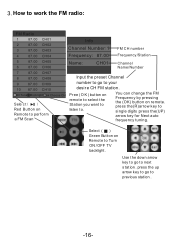
10. "SOURCE"key "RED"key "GREEN"key -15- Press "SOURCE" to select " FM Radio" mode, and then press the RED key on the radio receiving. Press / to scan and save the FM frequency channels automaticlly. 2. Press the GREEN key on remote to close or open the display screen, and this operation won't take affect on remote to switch the FM channels. FM Radio Receiving: 1.
10. "SOURCE"key "RED"key "GREEN"key -15- Press "SOURCE" to select " FM Radio" mode, and then press the RED key on the radio receiving. Press / to scan and save the FM frequency channels automaticlly. 2. Press the GREEN key on remote to close or open the display screen, and this operation won't take affect on remote to switch the FM channels. FM Radio Receiving: 1.
English manual
Page 18
... ) Red Button on remot e t o select the St at ion . You can change the FM Frequency by pressing the (OK) button on Remot e t o Tu rn ON /OFF TV backlight . Select ( ) Gr een But t on on remote. Pr ee ( O K ) but ton on Remote to perform a FM Sc an lnput the preset Channel number to ...your desire CH FM station . press the up arrow key to go to go t o previous stat ion . -16- 3. Use...
... ) Red Button on remot e t o select the St at ion . You can change the FM Frequency by pressing the (OK) button on Remot e t o Tu rn ON /OFF TV backlight . Select ( ) Gr een But t on on remote. Pr ee ( O K ) but ton on Remote to perform a FM Sc an lnput the preset Channel number to ...your desire CH FM station . press the up arrow key to go to go t o previous stat ion . -16- 3. Use...

English manual
Page 19
9. Specifications Screen Type: 10.1" TFT LCD (1024 x 600) Removable Memory Support: USB, Memory Card Playable Media Formats: MP3, JPEG, MPEG, XVID, AVC, MP4, H.264, HEVC(H.265), FLV, MKV, TXT Input: AV Input, External Antenna Output: 3.5mm Headphone Jack Power Source: Rechargeable Battery (3.7V, 3500mAh), AC Adapter 100-240V, DC Car Cord 12V Battery Life: 1.5 Hours Accessories Included: Remote Control, Stand, AC Adapter, DC Car Cord,Telescopic Antenna, External Antenna, A/V Cable, User manual -17-
9. Specifications Screen Type: 10.1" TFT LCD (1024 x 600) Removable Memory Support: USB, Memory Card Playable Media Formats: MP3, JPEG, MPEG, XVID, AVC, MP4, H.264, HEVC(H.265), FLV, MKV, TXT Input: AV Input, External Antenna Output: 3.5mm Headphone Jack Power Source: Rechargeable Battery (3.7V, 3500mAh), AC Adapter 100-240V, DC Car Cord 12V Battery Life: 1.5 Hours Accessories Included: Remote Control, Stand, AC Adapter, DC Car Cord,Telescopic Antenna, External Antenna, A/V Cable, User manual -17-

English manual
Page 20
SAFETY INSTRUCTIONS -18-
SAFETY INSTRUCTIONS -18-

English manual
Page 21
Please also visit us on the web at www.naxa.com to get up to the minute news, alerts, and documentation for your device, please consult the instructions in this manual. SUPPORT If you have problems with your device. For additional assistance, please contact Naxa Technical Support NAXA Technical Support 2320 Ease 49th St. Vernon, CA 90058 http://www.naxa.com/naxa_support/ -19-
Please also visit us on the web at www.naxa.com to get up to the minute news, alerts, and documentation for your device, please consult the instructions in this manual. SUPPORT If you have problems with your device. For additional assistance, please contact Naxa Technical Support NAXA Technical Support 2320 Ease 49th St. Vernon, CA 90058 http://www.naxa.com/naxa_support/ -19-


