
English manual
Page 2
... B digital device, pursuant to Part 15 of the FCC Rules. For additional assistance, please contact Naxa Technical Support. Vernon, CA 90058 Tel: (323)-583-8883 http://www.naxa.com/naxa_support/ Made in a residential installation. However, there is subject to the following measures: • Reorient or relocate the receiving antenna. • Increase the separation between the equipment and receiver. • Connect...
... B digital device, pursuant to Part 15 of the FCC Rules. For additional assistance, please contact Naxa Technical Support. Vernon, CA 90058 Tel: (323)-583-8883 http://www.naxa.com/naxa_support/ Made in a residential installation. However, there is subject to the following measures: • Reorient or relocate the receiving antenna. • Increase the separation between the equipment and receiver. • Connect...
English manual
Page 3
... TV screen may appear blurry or spotty. • It is recommended that a technician install the TV set on a wall, if such placement is a thunderstorm (Please, pull out the power cord and antenna). - When cleaning the TV set is not used as a vase) on top of the TV set. • Do not move the TV set when the power is used for a long time. •...
... TV screen may appear blurry or spotty. • It is recommended that a technician install the TV set on a wall, if such placement is a thunderstorm (Please, pull out the power cord and antenna). - When cleaning the TV set is not used as a vase) on top of the TV set. • Do not move the TV set when the power is used for a long time. •...

English manual
Page 4
... product damage of the panel and cabinet. 4 When you wipe the front cabinet, please make sure the power plug is an abnormal sound or smell or the LED TV has sound but no picture, and contact after sales support. SAFETY Please, immediately pull out the AC power plug if there is pulled out and use a soft, dry, lint-free cloth and handle...
... product damage of the panel and cabinet. 4 When you wipe the front cabinet, please make sure the power plug is an abnormal sound or smell or the LED TV has sound but no picture, and contact after sales support. SAFETY Please, immediately pull out the AC power plug if there is pulled out and use a soft, dry, lint-free cloth and handle...

English manual
Page 5
Keep all people away from the antenna cable during electrical storms so the LED TV is used to water droplets, vapor, or splash. Do not overload the power cord or power socket. The TV set should conduct internal adjustments, maintenance, and checks. When the power plug is not damaged by electrical surges. Do not place flame sources, such as it contains high voltages...
Keep all people away from the antenna cable during electrical storms so the LED TV is used to water droplets, vapor, or splash. Do not overload the power cord or power socket. The TV set should conduct internal adjustments, maintenance, and checks. When the power plug is not damaged by electrical surges. Do not place flame sources, such as it contains high voltages...
English manual
Page 6
... Features Specifications Accessories General Description Overview of Front & Back Panel Overview of Back Panel Overview of Remote Control Installing Batteries in Remote Control Antenna Connection External Connection Connecting VCR Connecting DVD Player/Set-Top Box Connecting Digital Audio System Connecting USB Connecting DVD Player/Set-Top Box via HDMI Connecting PC Connecting a Headphone Supporting Signals Basic Operation Turning the TV On and Off OSD Menu Operation INPUT SOURCE SELECTION BASIC OPERATION FIRST TIME INSTALLATION PICTURE SOUND TIME SETUP LOCK CHANNEL PC SETTINGS USB Operation...
... Features Specifications Accessories General Description Overview of Front & Back Panel Overview of Back Panel Overview of Remote Control Installing Batteries in Remote Control Antenna Connection External Connection Connecting VCR Connecting DVD Player/Set-Top Box Connecting Digital Audio System Connecting USB Connecting DVD Player/Set-Top Box via HDMI Connecting PC Connecting a Headphone Supporting Signals Basic Operation Turning the TV On and Off OSD Menu Operation INPUT SOURCE SELECTION BASIC OPERATION FIRST TIME INSTALLATION PICTURE SOUND TIME SETUP LOCK CHANNEL PC SETTINGS USB Operation...

English manual
Page 7
... Input x 1 PC Audio Input x 1 HDMI Input x 3 USB Input x 1 Output terminals used for external equipment connection: Earphone Output x 1 Coaxial Output x 1 Audio L/R Output x 1 7 • TV adopts TFT LED display screen • HDTV compatible (480i, 480p, 576i, 576p, 720p, 1080i, 1080p) • Support American TV Standard 8VSB/Free 64/256QAM, NTSC System, ATSC System • Connect to computer directly to realize TV/monitor combo • Zero X radiation complies to green environment protection requirement • Advanced Chroma Processing • Closed Captioning/Program Control...
... Input x 1 PC Audio Input x 1 HDMI Input x 3 USB Input x 1 Output terminals used for external equipment connection: Earphone Output x 1 Coaxial Output x 1 Audio L/R Output x 1 7 • TV adopts TFT LED display screen • HDTV compatible (480i, 480p, 576i, 576p, 720p, 1080i, 1080p) • Support American TV Standard 8VSB/Free 64/256QAM, NTSC System, ATSC System • Connect to computer directly to realize TV/monitor combo • Zero X radiation complies to green environment protection requirement • Advanced Chroma Processing • Closed Captioning/Program Control...
English manual
Page 8
Display Screen Type Model Maximum Resolution Image Control Power Supply TV Receiver System Frequency Range Antenna Input Impedance Sound Output Power Supply (Remote Control) Power Consumption Dimensions (LxWxH) Weight (Net Weight) Operation Environment Temperature Color Active Matrix LED Display NT-3205 1366 x 768 Fine Digital Control AC 100-240V ~50/60Hz NTSC System, ATSC System Antenna: 2~69, Cable: 2~125 75Ohms (Unbalance) 2 x 8W DC 3V (Two AAA Batteries) 60W 28.8 x 7.7 x 18.7 in. 3.6 kg 0°C-40°C NOTE: Design and specification modifications may be made...
Display Screen Type Model Maximum Resolution Image Control Power Supply TV Receiver System Frequency Range Antenna Input Impedance Sound Output Power Supply (Remote Control) Power Consumption Dimensions (LxWxH) Weight (Net Weight) Operation Environment Temperature Color Active Matrix LED Display NT-3205 1366 x 768 Fine Digital Control AC 100-240V ~50/60Hz NTSC System, ATSC System Antenna: 2~69, Cable: 2~125 75Ohms (Unbalance) 2 x 8W DC 3V (Two AAA Batteries) 60W 28.8 x 7.7 x 18.7 in. 3.6 kg 0°C-40°C NOTE: Design and specification modifications may be made...

English manual
Page 9
... between all the available input sourc- STANDBY: Press to increase/decrease the volume. MENU: Press to view on -screen menu, use to change channels. If any of the following items are missing, contact your LED TV. Remote control sensor/power indicator. 2 2. CH +/-: Press to move left/right. 3 3. In the on -screen menu of front and back panel 1 6 1. In the on-screen menu, use to move up/down. 5 4 4. SOURCE: Toggle between normal and standby mode. 9 es. 6.
... between all the available input sourc- STANDBY: Press to increase/decrease the volume. MENU: Press to view on -screen menu, use to change channels. If any of the following items are missing, contact your LED TV. Remote control sensor/power indicator. 2 2. CH +/-: Press to move left/right. 3 3. In the on -screen menu of front and back panel 1 6 1. In the on-screen menu, use to move up/down. 5 4 4. SOURCE: Toggle between normal and standby mode. 9 es. 6.
English manual
Page 11
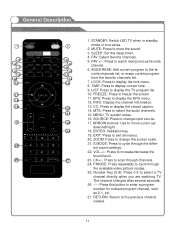
... display current time. 9. EPG: Press to display the closed caption. 14. ent sound settings. 22. ZOOM: Press to move cursor up/ down/left/right. 18. CC: Press to display the EPG menu. 12. MUTE: Press to cycle through the available video picture modes. 25. P.MODE: Press repeatedly to mute the sound. 3. S TA N D B Y 1 MUTE 2 3 4 7 8 11 12 15 SLEE P FAV ADD/ERASE FAV +/- ARROW buttons: Use to change input source. 17. MENU...
... display current time. 9. EPG: Press to display the closed caption. 14. ent sound settings. 22. ZOOM: Press to move cursor up/ down/left/right. 18. CC: Press to display the EPG menu. 12. MUTE: Press to cycle through the available video picture modes. 25. P.MODE: Press repeatedly to mute the sound. 3. S TA N D B Y 1 MUTE 2 3 4 7 8 11 12 15 SLEE P FAV ADD/ERASE FAV +/- ARROW buttons: Use to change input source. 17. MENU...

English manual
Page 13
.../60Hz L R OUT CO AX OUT L R IN CVBS/Y Pb IN Pr HDMI 1 (A RC ) Follow the instructions in Viewing a VCR or Camcorder Tape to view your VCR is stereo, you have a mono (non-stereo) VCR, use of cables with a Ferrite Core. 1. When connecting a VCR, match the color of the TV. 2. Connect a video cable between the ANT OUT terminal on the VCR and the...
.../60Hz L R OUT CO AX OUT L R IN CVBS/Y Pb IN Pr HDMI 1 (A RC ) Follow the instructions in Viewing a VCR or Camcorder Tape to view your VCR is stereo, you have a mono (non-stereo) VCR, use of cables with a Ferrite Core. 1. When connecting a VCR, match the color of the TV. 2. Connect a video cable between the ANT OUT terminal on the VCR and the...

English manual
Page 14
... connecting the video cable to COMPONENT IN, connect the audio cable to match the component video and audio connections. Each DVD player/STB has a different back panel configuration. When connecting a DVD player/STB, match the color of cable with a Ferrite Core. 1. AC 100-240V~ 50/60Hz L R OU T CO AX OUT L R IN CVBS/Y Pb IN Pr HDMI 1 (A RC ) Component video separates the video into Y (Luminance (brightness)), Pb (Blue), and Pr (Red) for enhanced video quality. The rear panel...
... connecting the video cable to COMPONENT IN, connect the audio cable to match the component video and audio connections. Each DVD player/STB has a different back panel configuration. When connecting a DVD player/STB, match the color of cable with a Ferrite Core. 1. AC 100-240V~ 50/60Hz L R OU T CO AX OUT L R IN CVBS/Y Pb IN Pr HDMI 1 (A RC ) Component video separates the video into Y (Luminance (brightness)), Pb (Blue), and Pr (Red) for enhanced video quality. The rear panel...

English manual
Page 15
...~ 50/60Hz L R OUT CO AX L R CVBS/Y Pb Pr O UT IN IN HDMI 1 (A RC ) 5.1 CH audio is possible when the TV is connected to an external device supporting 5.1 CH. Connect a coaxial cable between the SPDIF jacks on the TV and the digital audio input jacks on your TV make it easy to connect a digital audio system to your TV. The rear panel jacks on the digital audio system.
...~ 50/60Hz L R OUT CO AX L R CVBS/Y Pb Pr O UT IN IN HDMI 1 (A RC ) 5.1 CH audio is possible when the TV is connected to an external device supporting 5.1 CH. Connect a coaxial cable between the SPDIF jacks on the TV and the digital audio input jacks on your TV make it easy to connect a digital audio system to your TV. The rear panel jacks on the digital audio system.
English manual
Page 17
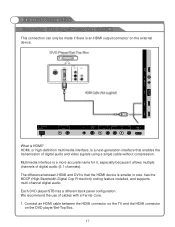
... HDMI output connector on the DVD player/Set-Top Box. 17 Each DVD player/STB has a different back panel configuration. We recommend the use of digital audio and video signals using a single cable without compression. AC 100-240V~ 50/60Hz L R OUT CO AX O UT L R IN CV BS/ Y Pb IN Pr HDMI 1 ( A RC ) What is smaller in size, has the HDCP (High Bandwidth Digital Cop Protection) coding feature installed, and supports multi-channel digital audio. Connect an HDMI cable...
... HDMI output connector on the DVD player/Set-Top Box. 17 Each DVD player/STB has a different back panel configuration. We recommend the use of digital audio and video signals using a single cable without compression. AC 100-240V~ 50/60Hz L R OUT CO AX O UT L R IN CV BS/ Y Pb IN Pr HDMI 1 ( A RC ) What is smaller in size, has the HDCP (High Bandwidth Digital Cop Protection) coding feature installed, and supports multi-channel digital audio. Connect an HDMI cable...
English manual
Page 20
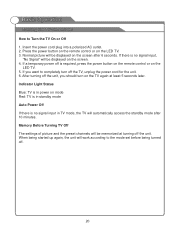
... The settings of picture and the preset channels will be memorized at least 5 seconds later. How to the mode set before being turned off the unit. If there is no signal input, "No Signal" will be displayed on the screen after 10 minutes. Press the power button on the remote control or on the LED TV. 5. When being started up again, the unit will work according to Turn...
... The settings of picture and the preset channels will be memorized at least 5 seconds later. How to the mode set before being turned off the unit. If there is no signal input, "No Signal" will be displayed on the screen after 10 minutes. Press the power button on the remote control or on the LED TV. 5. When being started up again, the unit will work according to Turn...

English manual
Page 21
... input source you want to cable. NOTE: Cable system is adjustable only when your signal type is your first time turning on the screen. • Use the up and down arrow buttons to select the preferred item. • Use the left and right arrow buttons to adjust the selected option to your menu language. Auto Scan Highlight Auto Scan, press ENTER to display the input source list. 2. INPUTS OURCE TV AV YPbPr HDMI 1 HDMI 2 HDMI 3 VGA USB 1. Press the SOURCE button...
... input source you want to cable. NOTE: Cable system is adjustable only when your signal type is your first time turning on the screen. • Use the up and down arrow buttons to select the preferred item. • Use the left and right arrow buttons to adjust the selected option to your menu language. Auto Scan Highlight Auto Scan, press ENTER to display the input source list. 2. INPUTS OURCE TV AV YPbPr HDMI 1 HDMI 2 HDMI 3 VGA USB 1. Press the SOURCE button...

English manual
Page 23
... can be adjusted from 0-100. 4. Accessibility This item is used to make accessibility for digital programs. 9. Surround This item is used to select preferred SPDIF audio output type. AVC (Auto Volume Control) Available options: On, Off. 7. Bass The value of bass or treble has been changed, the sound mode will turn on /off video description. 23 Voice Guide Turn on /off the surround sound function. 6. SPDIF Type This item is used to display the...
... can be adjusted from 0-100. 4. Accessibility This item is used to make accessibility for digital programs. 9. Surround This item is used to select preferred SPDIF audio output type. AVC (Auto Volume Control) Available options: On, Off. 7. Bass The value of bass or treble has been changed, the sound mode will turn on /off video description. 23 Voice Guide Turn on /off the surround sound function. 6. SPDIF Type This item is used to display the...

English manual
Page 24
... 24 Sleep Timer Available options: Off, 5 min, 10 min, 15 min, 30 min, 45 min, 60 min, 90 min, 120 min, 160 min, 240 min. 2. Clock When an available digital program is adjustable only for PC/VGA input signal 6. NOTE: The available zoom mode may be different for digital programs. 4. Closed Caption CC Mode Available options: CC on /off transparent OSD menu. 3. Time Zone Available...
... 24 Sleep Timer Available options: Off, 5 min, 10 min, 15 min, 30 min, 45 min, 60 min, 90 min, 120 min, 160 min, 240 min. 2. Clock When an available digital program is adjustable only for PC/VGA input signal 6. NOTE: The available zoom mode may be different for digital programs. 4. Closed Caption CC Mode Available options: CC on /off transparent OSD menu. 3. Time Zone Available...
English manual
Page 25
BG Color Available options: Default, White, Red, Green, Blue, Yellow, Magenta, Cyan. Auto Standby: If this function is used to reset to factory default settings. 25 NOTE: "ARC" functions in HDMI1 port only. Device List: List connected external devices. 10. DLC This item is enabled, connected external CEC device will power on automatically after turning off OverScan if Users found the image wasn't fully displayed on /off Dynamic Luminance Control. 8. HDMI ARC (Audio Return Channel): If this function is enabled...
BG Color Available options: Default, White, Red, Green, Blue, Yellow, Magenta, Cyan. Auto Standby: If this function is used to reset to factory default settings. 25 NOTE: "ARC" functions in HDMI1 port only. Device List: List connected external devices. 10. DLC This item is enabled, connected external CEC device will power on automatically after turning off OverScan if Users found the image wasn't fully displayed on /off Dynamic Luminance Control. 8. HDMI ARC (Audio Return Channel): If this function is enabled...

English manual
Page 26
.... 5. Boot Setting: Set Picture Mode, Default, Volume, Max Volume, Boot Source. (Boot Channel and Channel Select won't work if no TV signals.) Hotel Lock: Turn on /off Tuner Lock, Keypad Lock, or Menu Lock. Press the right arrow button or ENTER to enter it again to reset RRT rating. 7. US TV - Canada Canada English Available options: E, C, C8+, G, PG, 14+, 18+. Hotel Mode: Turn on /off Hotel Mode. USB to move the cursor. - Press the number buttons to...
.... 5. Boot Setting: Set Picture Mode, Default, Volume, Max Volume, Boot Source. (Boot Channel and Channel Select won't work if no TV signals.) Hotel Lock: Turn on /off Tuner Lock, Keypad Lock, or Menu Lock. Press the right arrow button or ENTER to enter it again to reset RRT rating. 7. US TV - Canada Canada English Available options: E, C, C8+, G, PG, 14+, 18+. Hotel Mode: Turn on /off Hotel Mode. USB to move the cursor. - Press the number buttons to...
English manual
Page 30
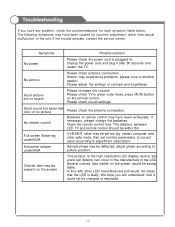
... for each symptom listed below. Unplug the power cord and plug it could not be within Bm. Good sound but no picture No remote control Full screen flickering underVGA Horizontal stripes underVGA Please check the antenna connection. Station may have been exhausted, if necessary, please change the batteries. Please adjust the settings of the LED. The following symptoms may experience problems, please tune to picture position. If...
... for each symptom listed below. Unplug the power cord and plug it could not be within Bm. Good sound but no picture No remote control Full screen flickering underVGA Horizontal stripes underVGA Please check the antenna connection. Station may have been exhausted, if necessary, please change the batteries. Please adjust the settings of the LED. The following symptoms may experience problems, please tune to picture position. If...


