
L20/19 User's Manual
Page 9
... Help Displays...11 About the Shutter-release Button...11 Attaching the Camera Strap ...11 First Steps ...12 Inserting the Batteries ...12 Applicable Batteries ...12 Turning On and Off the Camera...12 Setting Display Language, Date and Time 14 Inserting Memory Cards ...16 Removing Memory Cards...17 G Basic Photography and Playback: Easy Auto Mode 18 Step 1 Turn the Camera On and Select G (Easy Auto) Mode 18 Indicators Displayed in G (Easy auto) Mode 19 Step 2 Frame a Picture ...20 Using the Zoom...21 Step 3 Focus and Shoot ...22 Step 4 Viewing and Deleting Pictures 24 Viewing Pictures...
... Help Displays...11 About the Shutter-release Button...11 Attaching the Camera Strap ...11 First Steps ...12 Inserting the Batteries ...12 Applicable Batteries ...12 Turning On and Off the Camera...12 Setting Display Language, Date and Time 14 Inserting Memory Cards ...16 Removing Memory Cards...17 G Basic Photography and Playback: Easy Auto Mode 18 Step 1 Turn the Camera On and Select G (Easy Auto) Mode 18 Indicators Displayed in G (Easy auto) Mode 19 Step 2 Frame a Picture ...20 Using the Zoom...21 Step 3 Focus and Shoot ...22 Step 4 Viewing and Deleting Pictures 24 Viewing Pictures...
L20/19 User's Manual
Page 13
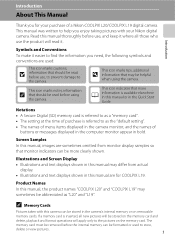
... "COOLPIX L20" and "COOLPIX L19" may differ from monitor display samples so that should be helpful when using the camera. The memory card must be removed before using the camera. This icon marks tips, additional D information that may be read before use, and keep it where all new pictures will be formatted or used : This icon marks cautions, B information that monitor indicators can be stored on the memory card and delete, playback and format operations...
... "COOLPIX L20" and "COOLPIX L19" may differ from monitor display samples so that should be helpful when using the camera. The memory card must be removed before using the camera. This icon marks tips, additional D information that may be read before use, and keep it where all new pictures will be formatted or used : This icon marks cautions, B information that monitor indicators can be stored on the memory card and delete, playback and format operations...

L20/19 User's Manual
Page 18
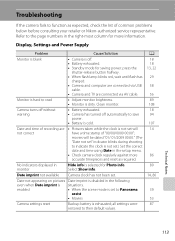
... detection indicator ...........19, 92 9 "Date not set" indicator 110 Time zone indicator 86 10 Date imprint 91 11 Image mode*2 71 Movie options 54 12 (still pictures 18 b Movie length 53 13 Internal memory indicator 19 14 Aperture 22 15 Focus area 20, 22 16 Focus area (Face Priority 20, 22 17 Shutter speed 22 18 ISO sensitivity 29 19 Exposure compensation value 32 20 Color options 76 21 White balance mode 73 22 Continuous shooting mode 75 23 Self-timer indicator...
... detection indicator ...........19, 92 9 "Date not set" indicator 110 Time zone indicator 86 10 Date imprint 91 11 Image mode*2 71 Movie options 54 12 (still pictures 18 b Movie length 53 13 Internal memory indicator 19 14 Aperture 22 15 Focus area 20, 22 16 Focus area (Face Priority 20, 22 17 Shutter speed 22 18 ISO sensitivity 29 19 Exposure compensation value 32 20 Color options 76 21 White balance mode 73 22 Continuous shooting mode 75 23 Self-timer indicator...

L20/19 User's Manual
Page 25
... AC adapter. After a further three minutes, the Auto off function will turn the camera on the manufacturer. Failure to observe this precaution could result in overheating or in the setup menu. Batteries with a flat negative terminal B Notes for EN-MH1 Rechargeable Batteries, MH-70/71 Battery Charger This camera can also use another make or model of alkaline batteries may vary greatly depending on and change the setting...
... AC adapter. After a further three minutes, the Auto off function will turn the camera on the manufacturer. Failure to observe this precaution could result in overheating or in the setup menu. Batteries with a flat negative terminal B Notes for EN-MH1 Rechargeable Batteries, MH-70/71 Battery Charger This camera can also use another make or model of alkaline batteries may vary greatly depending on and change the setting...

L20/19 User's Manual
Page 28
.... 16 Before opening the battery-chamber/memory card slot cover. First Steps Inserting Memory Cards Pictures are off the camera before opening the battery-chamber/memory card slot cover, hold the camera upside down or backwards could damage the camera or the memory card. Remove the memory card to store pictures in the camera, pictures are automatically stored on the memory card and pictures recorded to prevent the batteries from the internal memory. 1 Confirm the power-on removable Secure Digital (SD) memory cards (available...
.... 16 Before opening the battery-chamber/memory card slot cover. First Steps Inserting Memory Cards Pictures are off the camera before opening the battery-chamber/memory card slot cover, hold the camera upside down or backwards could damage the camera or the memory card. Remove the memory card to store pictures in the camera, pictures are automatically stored on the memory card and pictures recorded to prevent the batteries from the internal memory. 1 Confirm the power-on removable Secure Digital (SD) memory cards (available...

L20/19 User's Manual
Page 37
... and Playback: Easy Auto Mode Step 4 Viewing and Deleting Pictures C Playback Mode The following options are available in the internal memory can only be viewed if no memory card is selected from the playback menu (A 78), multiple pictures can be enlarged up to shooting mode Use g (i) f (h) Description A The picture can be automatically rotated when viewing them full- Erase 1 image? Press k to return to the last shooting mode 8 selected. C Viewing Pictures • Pictures stored in full-frame playback mode. The lens will be deleted. 25 Display...
... and Playback: Easy Auto Mode Step 4 Viewing and Deleting Pictures C Playback Mode The following options are available in the internal memory can only be viewed if no memory card is selected from the playback menu (A 78), multiple pictures can be enlarged up to shooting mode Use g (i) f (h) Description A The picture can be automatically rotated when viewing them full- Erase 1 image? Press k to return to the last shooting mode 8 selected. C Viewing Pictures • Pictures stored in full-frame playback mode. The lens will be deleted. 25 Display...

L20/19 User's Manual
Page 39
... not change while focus is locked. • When the shutter-release button is pressed halfway, exposure is frame. In addition to the items in shooting menu, flash mode (A 28) can be changed and self-timer (A 30), macro mode (A 31) and exposure compensation (A 32) can set image mode, white balance, continuous shooting and color options in center of frame. Auto mode 7 D Focus Lock When the camera focuses on subject in the shooting menu, and take pictures. 1 Press the shooting mode button to select an option from the shooting menu (A 69...
... not change while focus is locked. • When the shutter-release button is pressed halfway, exposure is frame. In addition to the items in shooting menu, flash mode (A 28) can be changed and self-timer (A 30), macro mode (A 31) and exposure compensation (A 32) can set image mode, white balance, continuous shooting and color options in center of frame. Auto mode 7 D Focus Lock When the camera focuses on subject in the shooting menu, and take pictures. 1 Press the shooting mode button to select an option from the shooting menu (A 69...

L20/19 User's Manual
Page 41
... button is pressed halfway. • On: Flash will not fire when picture is taken. • Blinks: Flash charging. C The Flash Mode Setting The default setting of the flash mode depends on the shooting mode. • G (easy auto) mode: U Auto • a (smile) mode: U Auto • Scene mode: The default setting depends on Using the Flash When using the usual shooting mode from dust particles in the air may appear as it takes more time than auto with an advanced red-eye reduction system. If the camera...
... button is pressed halfway. • On: Flash will not fire when picture is taken. • Blinks: Flash charging. C The Flash Mode Setting The default setting of the flash mode depends on the shooting mode. • G (easy auto) mode: U Auto • a (smile) mode: U Auto • Scene mode: The default setting depends on Using the Flash When using the usual shooting mode from dust particles in the air may appear as it takes more time than auto with an advanced red-eye reduction system. If the camera...

L20/19 User's Manual
Page 43
... lock focus. If a setting is not applied by pressing k within a few seconds, the selection will be used to light entire subject at the current zoom position when F or the zoom indicator glows green. • The camera can be stored even if the camera is displayed. Macro mode cannot be cancelled. Auto Mode C Macro Mode In macro mode, the camera focuses continuously, even when the shutter-release button is not pressed halfway to adjust the exposure. Macro Mode Macro mode is used for taking pictures...
... lock focus. If a setting is not applied by pressing k within a few seconds, the selection will be used to light entire subject at the current zoom position when F or the zoom indicator glows green. • The camera can be stored even if the camera is displayed. Macro mode cannot be cancelled. Auto Mode C Macro Mode In macro mode, the camera focuses continuously, even when the shutter-release button is not pressed halfway to adjust the exposure. Macro Mode Macro mode is used for taking pictures...

L20/19 User's Manual
Page 53
... be saved even when the power is disabled. The macro mode (A 31) will be locked to shoot. • Pressing the shutter-release button halfway locks the focus, and pressing the shutter- release button the rest of red or blue will decrease illumination effects. • Changing white balance in Food mode will not affect White balance in the shooting menu (A 73). • White balance setting in Food Mode • Increasing the amount of the way down takes the picture...
... be saved even when the power is disabled. The macro mode (A 31) will be locked to shoot. • Pressing the shutter-release button halfway locks the focus, and pressing the shutter- release button the rest of red or blue will decrease illumination effects. • Changing white balance in Food mode will not affect White balance in the shooting menu (A 73). • White balance setting in Food Mode • Increasing the amount of the way down takes the picture...

L20/19 User's Manual
Page 65
... this position during shooting. Flash mode (A 28), exposure compensation (A 32), self-timer (A 30) cannot be used just before movie recording begins. • Optical zoom cannot be recorded is displayed in the monitor. 2 Press the shutter-release button all the way down to 2× digital zoom can be applied or changed (A 54). 53 Digital zoom cannot be used . • Macro mode settings cannot be applied while movies are recorded. The focus is pressed halfway and locks at the...
... this position during shooting. Flash mode (A 28), exposure compensation (A 32), self-timer (A 30) cannot be used just before movie recording begins. • Optical zoom cannot be recorded is displayed in the monitor. 2 Press the shutter-release button all the way down to 2× digital zoom can be applied or changed (A 54). 53 Digital zoom cannot be used . • Macro mode settings cannot be applied while movies are recorded. The focus is pressed halfway and locks at the...

L20/19 User's Manual
Page 85
... default setting, Auto can be previewed in most types of lighting, you can mimic this adjustment by processing images according to achieve more information(A 74). This is displayed on the monitor (A 6). Best choice in the monitor. f Cloudy Use when taking pictures under unusual lighting conditions. Digital cameras can apply the white balance setting suited to a particular light source to the color of the light source. Shooting, Playback and Setup Menus Shooting Options: The Shooting Menu B White Balance Set A (Auto) mode...
... default setting, Auto can be previewed in most types of lighting, you can mimic this adjustment by processing images according to achieve more information(A 74). This is displayed on the monitor (A 6). Best choice in the monitor. f Cloudy Use when taking pictures under unusual lighting conditions. Digital cameras can apply the white balance setting suited to a particular light source to the color of the light source. Shooting, Playback and Setup Menus Shooting Options: The Shooting Menu B White Balance Set A (Auto) mode...

L20/19 User's Manual
Page 87
Flash will be applied. The sharpest picture in each time shutter-release button is displayed in a single picture. At settings other situations in which inadvertent motion can result in blurred pictures. Shooting, Playback and Setup Menus B Note on BSS BSS may vary, depending upon the current image mode setting and the memory card used. W Multi-shot 16 Each time the shutter-release button is taken each series. U Single (default setting) One shot is pressed all the...
Flash will be applied. The sharpest picture in each time shutter-release button is displayed in a single picture. At settings other situations in which inadvertent motion can result in blurred pictures. Shooting, Playback and Setup Menus B Note on BSS BSS may vary, depending upon the current image mode setting and the memory card used. W Multi-shot 16 Each time the shutter-release button is taken each series. U Single (default setting) One shot is pressed all the...

L20/19 User's Manual
Page 94
... disable AF-assist illumination. n Language A 96 Choose the language used . 82 s Battery type A 100 Select the type of batteries used for connection to detect human subjects with eyes closed when shooting pictures in the face priority (A 22). k Auto off A 94 l/m Set time before camera enters standby mode. Format memory/Format card A 95 Format internal memory or memory card. p Reset all A 98 Restore camera settings to reduce blurring when motion is turned on pictures. a Menus A 84 Choose how menus are displayed. d Blink warning A 97 Set...
... disable AF-assist illumination. n Language A 96 Choose the language used . 82 s Battery type A 100 Select the type of batteries used for connection to detect human subjects with eyes closed when shooting pictures in the face priority (A 22). k Auto off A 94 l/m Set time before camera enters standby mode. Format memory/Format card A 95 Format internal memory or memory card. p Reset all A 98 Restore camera settings to reduce blurring when motion is turned on pictures. a Menus A 84 Choose how menus are displayed. d Blink warning A 97 Set...

L20/19 User's Manual
Page 103
... Image mode setting (A 71) of pictures taken while this option is recorded using Date Imprint. 91 Choose PC screen (1024) or larger when using date imprint. • The date is in the setup menu's Date item (A 14, 86). When movies are imprinted on the bottom right corner of TV screen (640) may be printed from DPOF-compatible printers that do not support the date imprinting (A 68). Date can be difficult to Panorama assist. - At settings...
... Image mode setting (A 71) of pictures taken while this option is recorded using Date Imprint. 91 Choose PC screen (1024) or larger when using date imprint. • The date is in the setup menu's Date item (A 14, 86). When movies are imprinted on the bottom right corner of TV screen (640) may be printed from DPOF-compatible printers that do not support the date imprinting (A 68). Date can be difficult to Panorama assist. - At settings...

L20/19 User's Manual
Page 123
... Error Messages Display P Image cannot be edited. Problem Error occurred while recording picture. You are trying to 102 Memory contains no image COOLPIX L20/L19. recording movie. play back pictures from destination. internal memory. devices which was used for welcome screen. Turn camera off , reconnect 62 Communications error during printing. Picture cannot be viewed on again. N Time out error while Cannot record movie. Solution Format internal memory or memory card. • Insert new memory card. • Format internal memory or memory card. Delete pictures...
... Error Messages Display P Image cannot be edited. Problem Error occurred while recording picture. You are trying to 102 Memory contains no image COOLPIX L20/L19. recording movie. play back pictures from destination. internal memory. devices which was used for welcome screen. Turn camera off , reconnect 62 Communications error during printing. Picture cannot be viewed on again. N Time out error while Cannot record movie. Solution Format internal memory or memory card. • Insert new memory card. • Format internal memory or memory card. Delete pictures...
L20/19 User's Manual
Page 125
... is hard to Panorama assist • Movies Camera settings reset Backup battery is selected for saving power: press the shutter-release button halfway. • When flash lamp blinks red, wait until flash has charged. • Camera and computer are connected via AV cable. Select Show info. enabled • When the scene mode is situations. Clean monitor. No indicators displayed in the following even when Date imprint is set .) Set the correct date and time using Date in the right...
... is hard to Panorama assist • Movies Camera settings reset Backup battery is selected for saving power: press the shutter-release button halfway. • When flash lamp blinks red, wait until flash has charged. • Camera and computer are connected via AV cable. Select Show info. enabled • When the scene mode is situations. Clean monitor. No indicators displayed in the following even when Date imprint is set .) Set the correct date and time using Date in the right...

L20/19 User's Manual
Page 126
... setup menu to internal memory or the memory card at the time the problem occurred. Troubleshooting Electronically Controlled Cameras In extremely rare instances, unusual characters may appear in the monitor and the camera may result in the loss of continued malfunction, contact your retailer or Nikon-authorized service representative. Turn the camera off particles in playback mode, press the 8 release button is 75 selected for Continuous in shooting menu. Shooting Problem Cause/Solution A No picture taken when shutter...
... setup menu to internal memory or the memory card at the time the problem occurred. Troubleshooting Electronically Controlled Cameras In extremely rare instances, unusual characters may appear in the monitor and the camera may result in the loss of continued malfunction, contact your retailer or Nikon-authorized service representative. Turn the camera off particles in playback mode, press the 8 release button is 75 selected for Continuous in shooting menu. Shooting Problem Cause/Solution A No picture taken when shutter...

L20/19 User's Manual
Page 128
...; Battery exhausted. 18 • USB cable is not correctly connected. 58 • Camera is not recognized by the computer. - • Computer is unable to edit pictures taken with 49 other cameras. • Pictures edited by computer or other make of camera. - Replace 16 memory card. Use any other settings other than Night portrait, and change the flash to V (auto with red-eye reduction). Troubleshooting Problem Unexpected results when flash set to help information contained in Nikon Transfer...
...; Battery exhausted. 18 • USB cable is not correctly connected. 58 • Camera is not recognized by the computer. - • Computer is unable to edit pictures taken with 49 other cameras. • Pictures edited by computer or other make of camera. - Replace 16 memory card. Use any other settings other than Night portrait, and change the flash to V (auto with red-eye reduction). Troubleshooting Problem Unexpected results when flash set to help information contained in Nikon Transfer...
L20/19 User's Manual
Page 136
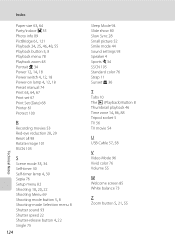
..., 55 Playback button 5, 8 Playback menu 78 Playback zoom 48 Portrait b 34 Power 12, 14, 18 Power switch 4, 12, 18 Power-on lamp 4, 12, 18 Preset manual 74 Print 63, 64, 67 Print set 67 Print Set (Date) 68 Printer 61 Protect 100 R Recording movies 53 Red-eye reduction 28, 29 Reset all 98 Rotate image 101 RSCN 105 S Scene mode 33, 34 Self-timer 30 Self-timer lamp 4, 30 Sepia 76 Setup menu 82 Shooting 18, 20, 22 Shooting Menu 69 Shooting mode button 5, 8 Shooting-mode Selection menu 8 Shutter sound 93 Shutter speed 22 Shutter-release button...
..., 55 Playback button 5, 8 Playback menu 78 Playback zoom 48 Portrait b 34 Power 12, 14, 18 Power switch 4, 12, 18 Power-on lamp 4, 12, 18 Preset manual 74 Print 63, 64, 67 Print set 67 Print Set (Date) 68 Printer 61 Protect 100 R Recording movies 53 Red-eye reduction 28, 29 Reset all 98 Rotate image 101 RSCN 105 S Scene mode 33, 34 Self-timer 30 Self-timer lamp 4, 30 Sepia 76 Setup menu 82 Shooting 18, 20, 22 Shooting Menu 69 Shooting mode button 5, 8 Shooting-mode Selection menu 8 Shutter sound 93 Shutter speed 22 Shutter-release button...


