Reference Manual
Page 19
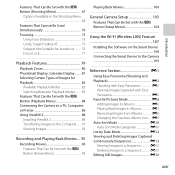
... Movies.... 95 Recording Movies 96 Features That Can Be Set with the d Button (Movie Menu 99 Playing Back Movies 100 General Camera Setup 103 Features That Can Be Set with the d Button (Setup Menu 104 Using the Wi-Fi (Wireless LAN) Feature 107 Installing the Software on the Smart Device 108 Connecting the Smart Device to the Camera 109 Reference Section E1 Using Easy Panorama (Shooting and Playback E2 Shooting with Easy Panorama E2 Viewing Images Captured with Easy Panorama E5 Favorite Pictures Mode...
... Movies.... 95 Recording Movies 96 Features That Can Be Set with the d Button (Movie Menu 99 Playing Back Movies 100 General Camera Setup 103 Features That Can Be Set with the d Button (Setup Menu 104 Using the Wi-Fi (Wireless LAN) Feature 107 Installing the Software on the Smart Device 108 Connecting the Smart Device to the Camera 109 Reference Section E1 Using Easy Panorama (Shooting and Playback E2 Shooting with Easy Panorama E2 Viewing Images Captured with Easy Panorama E5 Favorite Pictures Mode...

Reference Manual
Page 25
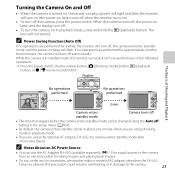
1 Shutter-release button 30 Zoom control 29 f: wide-angle 29 2 g: telephoto 29 h: thumbnail playback 81 i: playback zoom 80 j: help 41 3 Power switch/power-on lamp 24 4 Self-timer lamp 60 AF-assist illuminator 104 5 Flash 57 6 Microphone (stereo 84, 96 7 Lens 8 Lens cover 9 Speaker 84, 100 10 Eyelet for camera strap 5 11 Connector cover 16, 86 12 HDMI micro connector (Type D 86 13 USB/audio/video output connector 16, 86 Parts of the Camera 3
1 Shutter-release button 30 Zoom control 29 f: wide-angle 29 2 g: telephoto 29 h: thumbnail playback 81 i: playback zoom 80 j: help 41 3 Power switch/power-on lamp 24 4 Self-timer lamp 60 AF-assist illuminator 104 5 Flash 57 6 Microphone (stereo 84, 96 7 Lens 8 Lens cover 9 Speaker 84, 100 10 Eyelet for camera strap 5 11 Connector cover 16, 86 12 HDMI micro connector (Type D 86 13 USB/audio/video output connector 16, 86 Parts of the Camera 3

Reference Manual
Page 41
... used in another device into the camera (1) to partially eject the card, and then remove the card (2). Do not pull it with your memory card for shooting or playback, first remove the memory card. 19 The Basics of Shooting and Playback B Formatting Memory Cards • The first time you wish to keep, copy that data to a computer before opening the battery-chamber/ memory card slot cover. If there is data saved on a memory card is permanently deleted when the card...
... used in another device into the camera (1) to partially eject the card, and then remove the card (2). Do not pull it with your memory card for shooting or playback, first remove the memory card. 19 The Basics of Shooting and Playback B Formatting Memory Cards • The first time you wish to keep, copy that data to a computer before opening the battery-chamber/ memory card slot cover. If there is data saved on a memory card is permanently deleted when the card...
Reference Manual
Page 47
C Power Saving Function (Auto Off) If no operations are performed for approximately another make or model of Shooting and Playback No operations performed No operations performed 25m 0s 3 min 850 Camera enters Camera turns off. C Notes About an AC Power Source • You can be changed using the Auto off setting in the setup menu (A104). • By default, the camera enters standby mode in playback mode, press and hold the c (playback) button. standby mode. • The time that elapses before...
C Power Saving Function (Auto Off) If no operations are performed for approximately another make or model of Shooting and Playback No operations performed No operations performed 25m 0s 3 min 850 Camera enters Camera turns off. C Notes About an AC Power Source • You can be changed using the Auto off setting in the setup menu (A104). • By default, the camera enters standby mode in playback mode, press and hold the c (playback) button. standby mode. • The time that elapses before...

Reference Manual
Page 49
... applied to take an image automatically without pressing the shutter-release button (smile timer). Select the desired scene by pressing H, I , J, or K, and then press the k button. The Basics of human faces. Settings can be adjusted in the shooting menu (A68) to suit the shooting conditions and the type of shot you frame an image, making it even easier to images during shooting. Available Shooting Modes A Auto mode A38 Used for more...
... applied to take an image automatically without pressing the shutter-release button (smile timer). Select the desired scene by pressing H, I , J, or K, and then press the k button. The Basics of human faces. Settings can be adjusted in the shooting menu (A68) to suit the shooting conditions and the type of shot you frame an image, making it even easier to images during shooting. Available Shooting Modes A Auto mode A38 Used for more...

Reference Manual
Page 53
... of data, or in camera shake and blurred images. C To Make Sure You Do Not Miss a Shot If you feel a slight resistance. Do not open the battery-chamber/memory card slot cover or remove the battery or memory card while an indicator is pressed halfway. The Shutter-release Button Press halfway Press all the way To set focus and exposure (shutter speed and aperture value), press the shutter-release button lightly until you are being recorded...
... of data, or in camera shake and blurred images. C To Make Sure You Do Not Miss a Shot If you feel a slight resistance. Do not open the battery-chamber/memory card slot cover or remove the battery or memory card while an indicator is pressed halfway. The Shutter-release Button Press halfway Press all the way To set focus and exposure (shutter speed and aperture value), press the shutter-release button lightly until you are being recorded...

Reference Manual
Page 66
... left of the following functions, first press the k button to the shooting screen. - One image is pressed all the way. • Digital zoom cannot be narrower than that seen in the setup menu is displayed. To change settings for any of the monitor lights in green, press the shutter-release button all the way, hold the camera still until a still image is set to produce shots with reduced blurring and...
... left of the following functions, first press the k button to the shooting screen. - One image is pressed all the way. • Digital zoom cannot be narrower than that seen in the setup menu is displayed. To change settings for any of the monitor lights in green, press the shutter-release button all the way, hold the camera still until a still image is set to produce shots with reduced blurring and...

Reference Manual
Page 67
... the camera automatically zooms to stabilize the camera during shooting. 45 Self-timer - O: Use of up to cancel focusarea selection, then change settings for any of the camera focusing. • You can move the focus area, press the k button, and then press the multi selector H, I . Shooting Features 25m 0s 850 l Museum • The camera focuses on the area in the setup menu (A104) when using scene modes indicated with O, because the shutter speed...
... the camera automatically zooms to stabilize the camera during shooting. 45 Self-timer - O: Use of up to cancel focusarea selection, then change settings for any of the camera focusing. • You can move the focus area, press the k button, and then press the multi selector H, I . Shooting Features 25m 0s 850 l Museum • The camera focuses on the area in the setup menu (A104) when using scene modes indicated with O, because the shutter speed...

Reference Manual
Page 92
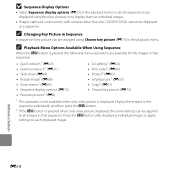
... Be Used Simultaneously Some functions cannot be used. If the self-timer is used when Continuous is selected, the flash cannot be used . Restricted function Option Continuous (A68) Flash mode Blink proof (A69) Smile timer (A69) Self-timer Smile timer (A69) AF area mode (A68) Macro mode AF area mode (A68) Image mode Continuous (A68) White balance Color options (A68) Continuous Self-timer (A60) Description When a setting other than Single is set to Pre-shooting cache, the Continuous setting changes to On, the flash cannot be used with other menu...
... Be Used Simultaneously Some functions cannot be used. If the self-timer is used when Continuous is selected, the flash cannot be used . Restricted function Option Continuous (A68) Flash mode Blink proof (A69) Smile timer (A69) Self-timer Smile timer (A69) AF area mode (A68) Macro mode AF area mode (A68) Image mode Continuous (A68) White balance Color options (A68) Continuous Self-timer (A60) Description When a setting other than Single is set to Pre-shooting cache, the Continuous setting changes to On, the flash cannot be used with other menu...

Reference Manual
Page 121
E80 Autofocus mode When Single AF (default setting) is selected, focus is selected, the camera records a normal speed movie when recording starts. • Press the k button to determine whether or not the camera records HS movies when movie recording starts. • When Off is locked when movie recording begins. Features That Can Be Set with the d Button (Movie Menu) Enter shooting mode M d button M D menu icon M k button The settings of the menu options listed below can be played in slow or fast motion. If you...
E80 Autofocus mode When Single AF (default setting) is selected, focus is selected, the camera records a normal speed movie when recording starts. • Press the k button to determine whether or not the camera records HS movies when movie recording starts. • When Off is locked when movie recording begins. Features That Can Be Set with the d Button (Movie Menu) Enter shooting mode M d button M D menu icon M k button The settings of the menu options listed below can be played in slow or fast motion. If you...

Reference Manual
Page 139
... Favorite pictures Back Add Playing Back Images in full-frame playback mode or thumbnail playback mode, press the d button to select a feature from the favorite pictures menu (A84). Favorite pictures Choose icon Reference Section B Notes About Deletion If an image is deleted while using favorite pictures mode, the image will not only be removed from the album, but the corresponding image file will also be permanently deleted from the internal memory or the memory card. 2 Use the multi...
... Favorite pictures Back Add Playing Back Images in full-frame playback mode or thumbnail playback mode, press the d button to select a feature from the favorite pictures menu (A84). Favorite pictures Choose icon Reference Section B Notes About Deletion If an image is deleted while using favorite pictures mode, the image will not only be removed from the album, but the corresponding image file will also be permanently deleted from the internal memory or the memory card. 2 Use the multi...
Reference Manual
Page 146
...) • Copy2 (E71) • Choose key picture (E73) 1 This operation is not available when only a key picture is displayed. C Changing Key Picture in Sequence A sequence's key picture can be changed using their key pictures or to each displayed image. Press the d button after displaying individual images to apply settings to display them as individual images. • Images captured continuously with cameras other than the COOLPIX S6500 cannot be displayed as a sequence. Reference Section E14
...) • Copy2 (E71) • Choose key picture (E73) 1 This operation is not available when only a key picture is displayed. C Changing Key Picture in Sequence A sequence's key picture can be changed using their key pictures or to each displayed image. Press the d button after displaying individual images to apply settings to display them as individual images. • Images captured continuously with cameras other than the COOLPIX S6500 cannot be displayed as a sequence. Reference Section E14

Reference Manual
Page 192
...; Connecting the camera to a PictBridge-compatible (F23) printer (E29). Print Order (Creating a DPOF Print Order) Press the c button (playback mode) M d button M Print order M k button When printing images saved on the memory card using any of the following methods, the Print order option in the playback menu is used to create digital "print orders" for images saved in the internal memory if the memory card is not displayed. The Playback Menu • See "Editing Still Images" (E16) for information about image editing features. • See "Favorite Pictures Mode...
...; Connecting the camera to a PictBridge-compatible (F23) printer (E29). Print Order (Creating a DPOF Print Order) Press the c button (playback mode) M d button M Print order M k button When printing images saved on the memory card using any of the following methods, the Print order option in the playback menu is used to create digital "print orders" for images saved in the internal memory if the memory card is not displayed. The Playback Menu • See "Editing Still Images" (E16) for information about image editing features. • See "Favorite Pictures Mode...

Reference Manual
Page 205
... M d button M Choose key picture M k button When Sequence display options is set for more information. Option Q Individual pictures C Key picture only (default setting) Description Set all images in full-frame playback mode (A32) and thumbnail playback mode (A81) can be set to be displayed using full-frame playback mode or thumbnail playback mode. • When the key picture selection screen is displayed on the playback screen (A11). F is displayed, select an image. See "The Image Selection Screen" (E66) for each sequence of images shot continuously...
... M d button M Choose key picture M k button When Sequence display options is set for more information. Option Q Individual pictures C Key picture only (default setting) Description Set all images in full-frame playback mode (A32) and thumbnail playback mode (A81) can be set to be displayed using full-frame playback mode or thumbnail playback mode. • When the key picture selection screen is displayed on the playback screen (A11). F is displayed, select an image. See "The Image Selection Screen" (E66) for each sequence of images shot continuously...
Reference Manual
Page 232
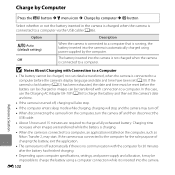
... camera turns off and then disconnect the USB cable. • About 3 hours and 15 minutes are transferred while the battery is charging. • When the camera is connected to a computer, an application installed on the computer, such as Nikon Transfer 2, may be transferred, when the camera is connected to a computer. E100 Reference Section Charging time increases when images are required to charge the battery using a computer connection while it may start. Option Description a Auto (default setting...
... camera turns off and then disconnect the USB cable. • About 3 hours and 15 minutes are transferred while the battery is charging. • When the camera is connected to a computer, an application installed on the computer, such as Nikon Transfer 2, may be transferred, when the camera is connected to a computer. E100 Reference Section Charging time increases when images are required to charge the battery using a computer connection while it may start. Option Description a Auto (default setting...

Reference Manual
Page 233
... charge lamp status when the camera is connected to charging. If the charge lamp changes from slow flashing (green) to off while the power-on , turn the camera off and disconnect the USB cable. Reference Section E101 Set Charge by computer, it may be impossible to print images with direct connection of 5°C to 35°C (41°F to the computer's settings or its specifications. Make sure the USB cable is connected correctly and replace the battery...
... charge lamp status when the camera is connected to charging. If the charge lamp changes from slow flashing (green) to off while the power-on , turn the camera off and disconnect the USB cable. Reference Section E101 Set Charge by computer, it may be impossible to print images with direct connection of 5°C to 35°C (41°F to the computer's settings or its specifications. Make sure the USB cable is connected correctly and replace the battery...
Reference Manual
Page 247
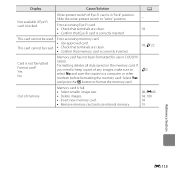
... memory card. • Remove memory card and use in "lock" position. Format card? Formatting deletes all data saved on the memory card. Display Cause/Solution A Not available if Eye-Fi card is in COOLPIX S6500. Select Yes and press the k button to a computer or other medium before formatting the memory card. Write-protect switch of Eye-Fi card is locked. Yes No Memory card has not been formatted for use internal memory. 68, E40 34, 100 18 19 Reference Section E115 If you need to keep copies of memory. Error accessing memory card...
... memory card. • Remove memory card and use in "lock" position. Format card? Formatting deletes all data saved on the memory card. Display Cause/Solution A Not available if Eye-Fi card is in COOLPIX S6500. Select Yes and press the k button to a computer or other medium before formatting the memory card. Write-protect switch of Eye-Fi card is locked. Yes No Memory card has not been formatted for use internal memory. 68, E40 34, 100 18 19 Reference Section E115 If you need to keep copies of memory. Error accessing memory card...
Reference Manual
Page 248
... welcome screen. • Images captured at an Image mode setting of file numbers. Cannot edit selected image. • Select images that support editing function. • Movies cannot be saved. E70 32, E59 E17 - 18, F22 Reference Section E116 Album is full. Cannot record movie. Image cannot be added. Delete images from destination. 200 images have blinked when the image was detected in playback mode. No further pictures can be used for welcome screen. Format internal memory or memory card. Check the image...
... welcome screen. • Images captured at an Image mode setting of file numbers. Cannot edit selected image. • Select images that support editing function. • Movies cannot be saved. E70 32, E59 E17 - 18, F22 Reference Section E116 Album is full. Cannot record movie. Image cannot be added. Delete images from destination. 200 images have blinked when the image was detected in playback mode. No further pictures can be used for welcome screen. Format internal memory or memory card. Check the image...

Reference Manual
Page 257
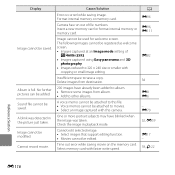
... camera before using a computer. • The first time you insert a memory card that has been used in another make or model of AC adapter other data on the memory card. Format card? To format the memory card, select Yes. • Observe the following precautions while formatting the memory card, saving and deleting images, and copying images to a computer before formatting. • If the message Card is turned on, the memory card must be formatted. Do not open the battery-chamber/memory card slot cover or remove the memory card...
... camera before using a computer. • The first time you insert a memory card that has been used in another make or model of AC adapter other data on the memory card. Format card? To format the memory card, select Yes. • Observe the following precautions while formatting the memory card, saving and deleting images, and copying images to a computer before formatting. • If the message Card is turned on, the memory card must be formatted. Do not open the battery-chamber/memory card slot cover or remove the memory card...
Reference Manual
Page 267
Remove the memory card to play back images from the internal memory. 105, E99 86, 91, E26, E30 19 Album icons are reset to their default icons, images Data saved in the internal memory or on the memory added to the USB/audio/video output connector simultaneously. • Memory card contains no images. Replace the memory card. displayed in total, new images or movies cannot be added. 82, E10 82, E10 - 82, E10 Technical Notes and Index F15 If...
Remove the memory card to play back images from the internal memory. 105, E99 86, 91, E26, E30 19 Album icons are reset to their default icons, images Data saved in the internal memory or on the memory added to the USB/audio/video output connector simultaneously. • Memory card contains no images. Replace the memory card. displayed in total, new images or movies cannot be added. 82, E10 82, E10 - 82, E10 Technical Notes and Index F15 If...


