
Reference Manual
Page 10
...the precautions listed in their mouths. Keep out of reach of flammable gas, as the result of an infant or child. Introduction WARNINGS Turn off in injury. Repairs should be performed only by the following symbol: This icon marks warnings, information that could result in injury....into their entirety before using this equipment. The consequences that should be read before using this Nikon product, to prevent possible injury. For Your Safety To prevent damage to your Nikon product or injury to yourself or to others, read the following safety precautions in this ...
...the precautions listed in their mouths. Keep out of reach of flammable gas, as the result of an infant or child. Introduction WARNINGS Turn off in injury. Repairs should be performed only by the following symbol: This icon marks warnings, information that could result in injury....into their entirety before using this equipment. The consequences that should be read before using this Nikon product, to prevent possible injury. For Your Safety To prevent damage to your Nikon product or injury to yourself or to others, read the following safety precautions in this ...

Reference Manual
Page 11
... a dry cloth. Do not remain in contact with the camera, battery charger, or AC adapter for use in this product: • Before replacing the battery, turn the product off. To charge the battery with plenty of the devices become exposed, take it upside down or backwards. • Do not short or...
... a dry cloth. Do not remain in contact with the camera, battery charger, or AC adapter for use in this product: • Before replacing the battery, turn the product off. To charge the battery with plenty of the devices become exposed, take it upside down or backwards. • Do not short or...

Reference Manual
Page 12
... be no less than 1 m (3 ft 4 in burns or fire. Follow the instructions of the hospital when using inside an airplane or the hospital Turn the power off while inside the airplane during take off when using while in a hospital. Particular care should be observed if photographing infants, when the... should any of the disruption, beforehand if inserted in electric shock. • Do not use only the cables provided or sold by Nikon for extended periods, whether on a television, monitor, or other moving parts with product regulations. Cease use and follow their instructions.
... be no less than 1 m (3 ft 4 in burns or fire. Follow the instructions of the hospital when using inside an airplane or the hospital Turn the power off while inside the airplane during take off when using while in a hospital. Particular care should be observed if photographing infants, when the... should any of the disruption, beforehand if inserted in electric shock. • Do not use only the cables provided or sold by Nikon for extended periods, whether on a television, monitor, or other moving parts with product regulations. Cease use and follow their instructions.

Reference Manual
Page 13
...8226; Connect the equipment into an outlet on a circuit different from that to radio communications. These limits are not expressly approved by Nikon Corporation may cause harmful interference to which can radiate radio frequency energy and, if not installed and used in a vertical or floor ...this equipment does cause harmful interference to radio or television reception, which the receiver is encouraged to try to correct the interference by turning the equipment off and on, the user is connected. • Consult the dealer or an experienced radio/television technician for help....
...8226; Connect the equipment into an outlet on a circuit different from that to radio communications. These limits are not expressly approved by Nikon Corporation may cause harmful interference to which can radiate radio frequency energy and, if not installed and used in a vertical or floor ...this equipment does cause harmful interference to radio or television reception, which the receiver is encouraged to try to correct the interference by turning the equipment off and on, the user is connected. • Consult the dealer or an experienced radio/television technician for help....

Reference Manual
Page 17
...no license), and amateur radio stations (hereinafter referred to as "another station"). 1. If you have further questions, contact a Nikon service center or Nikon authorized service representative. Always keep in the setup menu (A105) to alteration and loss resulting from alteration or loss of content ... leaks that may occur during data transfer. • The operating frequency band of this product or transferring it to interception by turning off the power, etc. 3. Before using this equipment, confirm that another station, promptly change the operating frequency or stop radio...
...no license), and amateur radio stations (hereinafter referred to as "another station"). 1. If you have further questions, contact a Nikon service center or Nikon authorized service representative. Always keep in the setup menu (A105) to alteration and loss resulting from alteration or loss of content ... leaks that may occur during data transfer. • The operating frequency band of this product or transferring it to interception by turning off the power, etc. 3. Before using this equipment, confirm that another station, promptly change the operating frequency or stop radio...

Reference Manual
Page 18
... Battery 16 Preparation 3 Insert a Memory Card.......... 18 Internal Memory and Memory Cards......... 19 Preparation 4 Setting the Display Language, Date, and Time 20 Step 1 Turn the Camera On 24 Turning the Camera On and Off 25 Step 2 Select a Shooting Mode 26 Available Shooting Modes 27 Step 3 Frame a Picture 28 Using the Zoom 29...
... Battery 16 Preparation 3 Insert a Memory Card.......... 18 Internal Memory and Memory Cards......... 19 Preparation 4 Setting the Display Language, Date, and Time 20 Step 1 Turn the Camera On 24 Turning the Camera On and Off 25 Step 2 Select a Shooting Mode 26 Available Shooting Modes 27 Step 3 Frame a Picture 28 Using the Zoom 29...

Reference Manual
Page 30
By default, information is displayed when the camera is first turned on and when you operate the camera, and turns off after a few seconds (when Photo info is displayed in the monitor during shooting and playback changes depending on the camera's settings and state of the Camera The Monitor The information that is set to Auto info in Monitor settings (A104)). Shooting Mode 41 40 39 10 2 38 2 45 37 13 6 36 35 10 34 33 32 31 30 29m 0s +1.0 400 1/250 F3.1 999 24 23 22 20 29 28 27 26 25 999 9999 21 7 8 9 10 11 12 13 14 15 16 17 18 19 8 Parts of use.
By default, information is displayed when the camera is first turned on and when you operate the camera, and turns off after a few seconds (when Photo info is displayed in the monitor during shooting and playback changes depending on the camera's settings and state of the Camera The Monitor The information that is set to Auto info in Monitor settings (A104)). Shooting Mode 41 40 39 10 2 38 2 45 37 13 6 36 35 10 34 33 32 31 30 29m 0s +1.0 400 1/250 F3.1 999 24 23 22 20 29 28 27 26 25 999 9999 21 7 8 9 10 11 12 13 14 15 16 17 18 19 8 Parts of use.

Reference Manual
Page 35
The Basics of Shooting and Playback The Basics of Shooting and Playback Preparation Preparation 1 Insert the Battery 14 Preparation 2 Charge the Battery 16 Preparation 3 Insert a Memory Card 18 Preparation 4 Setting the Display Language, Date, and Time 20 Shooting Step 1 Turn the Camera On 24 Step 2 Select a Shooting Mode 26 Step 3 Frame a Picture ...28 Step 4 Focus and Shoot...30 Playback Step 5 Play Back Images ...32 Step 6 Delete Images...34 13
The Basics of Shooting and Playback The Basics of Shooting and Playback Preparation Preparation 1 Insert the Battery 14 Preparation 2 Charge the Battery 16 Preparation 3 Insert a Memory Card 18 Preparation 4 Setting the Display Language, Date, and Time 20 Shooting Step 1 Turn the Camera On 24 Step 2 Select a Shooting Mode 26 Step 3 Frame a Picture ...28 Step 4 Focus and Shoot...30 Playback Step 5 Play Back Images ...32 Step 6 Delete Images...34 13

Reference Manual
Page 37
Do not pull it at an angle. Removing the Battery Turn the camera off before use. 15 B High Temperature Caution The camera, battery, and memory card may be sure that the power-on page ix and ... of Shooting and Playback B Notes About the Battery Be sure to read and follow the warnings for the battery on lamp and the monitor have turned off and be hot immediately after using the camera.
Do not pull it at an angle. Removing the Battery Turn the camera off before use. 15 B High Temperature Caution The camera, battery, and memory card may be sure that the power-on page ix and ... of Shooting and Playback B Notes About the Battery Be sure to read and follow the warnings for the battery on lamp and the monitor have turned off and be hot immediately after using the camera.

Reference Manual
Page 38
... slowly flashes green to indicate that plugs are required to charge a fully exhausted battery. • When the battery has been completely charged, the charge lamp turns off. • See "The Charge Lamp" (A17) for more information. 16 Do not attempt to 3. • Keep the camera... turned off. • Be sure that the battery is securely held in which the camera was purchased. If a plug adapter* is installed in the camera, and ...
... slowly flashes green to indicate that plugs are required to charge a fully exhausted battery. • When the battery has been completely charged, the charge lamp turns off. • See "The Charge Lamp" (A17) for more information. 16 Do not attempt to 3. • Keep the camera... turned off. • Be sure that the battery is securely held in which the camera was purchased. If a plug adapter* is installed in the camera, and ...
Reference Manual
Page 39
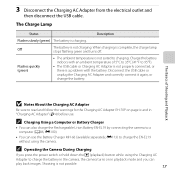
... indoors with the battery. The Charge Lamp Status Description Flashes slowly (green) The battery is complete, the charge lamp stops flashing green and turns off. When charging is charging. C Operating the Camera During Charging If you can use . Disconnect the USB cable or unplug the Charging AC ...8226; You can also charge the Rechargeable Li-ion Battery EN-EL19 by connecting the camera to charge the battery in the camera, the camera turns on page ix and in playback mode and you press the power switch or hold down the c (playback) button while using the camera. ...
... indoors with the battery. The Charge Lamp Status Description Flashes slowly (green) The battery is complete, the charge lamp stops flashing green and turns off. When charging is charging. C Operating the Camera During Charging If you can use . Disconnect the USB cable or unplug the Charging AC ...8226; You can also charge the Rechargeable Li-ion Battery EN-EL19 by connecting the camera to charge the battery in the camera, the camera turns on page ix and in playback mode and you press the power switch or hold down the c (playback) button while using the camera. ...

Reference Manual
Page 40
... sure to check that the power-on lamp and the monitor are off and open the batterychamber/memory card slot cover. • Be sure to turn off the camera before opening the cover. 2 Insert the memory card. BInserting the Memory Card Correctly Inserting the memory card upside down or backwards could...
... sure to check that the power-on lamp and the monitor are off and open the batterychamber/memory card slot cover. • Be sure to turn off the camera before opening the cover. 2 Insert the memory card. BInserting the Memory Card Correctly Inserting the memory card upside down or backwards could...

Reference Manual
Page 41
... the camera, press the d button, and select Format card in either the camera's internal memory (approximately 25 MB) or on lamp and the monitor have turned off and be saved in the setup menu (A104). To use the camera's internal memory for more information. Removing Memory Cards... Turn the camera off before formatting. • To format a memory card, insert the card into the camera (1) to format it at an angle. B High Temperature Caution ...
... the camera, press the d button, and select Format card in either the camera's internal memory (approximately 25 MB) or on lamp and the monitor have turned off and be saved in the setup menu (A104). To use the camera's internal memory for more information. Removing Memory Cards... Turn the camera off before formatting. • To format a memory card, insert the card into the camera (1) to format it at an angle. B High Temperature Caution ...

Reference Manual
Page 42
... Language, Date, and Time When the camera is turned on for the first time, the language-selection screen and the date and time setting screen for the camera clock are displayed. 1 Press the power switch to turn on the camera. • When the camera is turned on, the power-on lamp (green) will... light and then the monitor will turn on (the power-on lamp turns off when the monitor turns on). 2 Press the multi selector H or I to select the desired...
... Language, Date, and Time When the camera is turned on for the first time, the language-selection screen and the date and time setting screen for the camera clock are displayed. 1 Press the power switch to turn on the camera. • When the camera is turned on, the power-on lamp (green) will... light and then the monitor will turn on (the power-on lamp turns off when the monitor turns on). 2 Press the multi selector H or I to select the desired...

Reference Manual
Page 43
... the k button or K. 7 Press H or I to shooting mode. Yes No 21 When the daylight saving time function is enabled, W is displayed above the map. To turn off the daylight saving time function, press I. 5 Press H or I to select Yes and press the k button. • When settings are finished, the lens extends and...
... the k button or K. 7 Press H or I to shooting mode. Yes No 21 When the daylight saving time function is enabled, W is displayed above the map. To turn off the daylight saving time function, press I. 5 Press H or I to select Yes and press the k button. • When settings are finished, the lens extends and...

Reference Manual
Page 44
... about ten hours of charging. • If the camera's backup battery becomes exhausted, the date and time setting screen is displayed when the camera is turned on images as they are saved at the time of Shooting and Playback C Changing the Language Setting and the Date and Time Setting • You...
... about ten hours of charging. • If the camera's backup battery becomes exhausted, the date and time setting screen is displayed when the camera is turned on images as they are saved at the time of Shooting and Playback C Changing the Language Setting and the Date and Time Setting • You...

Reference Manual
Page 46
Battery level indicator Battery level indicator Display b Description The battery level is low. Prepare to turn on the camera. • The lens extends and the monitor turns on the image quality and image size (determined by the image mode setting; E41). 24 The camera cannot take images. B N Battery exhausted. ...internal memory or memory card, and also varies depending on . 2 Check the battery level indicator and the number of Shooting and Playback Step 1 Turn the Camera On 1 Press the power switch to charge or replace the battery. The Basics of exposures remaining.
Battery level indicator Battery level indicator Display b Description The battery level is low. Prepare to turn on the camera. • The lens extends and the monitor turns on the image quality and image size (determined by the image mode setting; E41). 24 The camera cannot take images. B N Battery exhausted. ...internal memory or memory card, and also varies depending on . 2 Check the battery level indicator and the number of Shooting and Playback Step 1 Turn the Camera On 1 Press the power switch to charge or replace the battery. The Basics of exposures remaining.
Reference Manual
Page 47
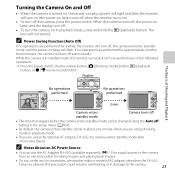
... (A104). • By default, the camera enters standby mode in damage to the camera from an electrical outlet for a while, the monitor will turn the camera on if you are performed for taking images and playing back images. • Do not, under any of the following operations: ➝... standby mode can use another three minutes, the camera will turn on (the power-on lamp turns off when the monitor turns on). • To turn off , the camera will enter standby mode, and the power-on lamp and the display turn off automatically. If no operations are using shooting mode or...
... (A104). • By default, the camera enters standby mode in damage to the camera from an electrical outlet for a while, the monitor will turn the camera on if you are performed for taking images and playing back images. • Do not, under any of the following operations: ➝... standby mode can use another three minutes, the camera will turn on (the power-on lamp turns off when the monitor turns on). • To turn off , the camera will enter standby mode, and the power-on lamp and the display turn off automatically. If no operations are using shooting mode or...

Reference Manual
Page 48
Auto mode The Basics of Shooting and Playback 26 Step 2 Select a Shooting Mode 1 Press the A button. • The shooting mode selection menu, which allows you to select the desired shooting mode, is displayed. 2 Press the multi selector H or I to select a shooting mode and press the k button. • A (auto) mode is used in this example. • The shooting mode setting is saved even after the camera is turned off.
Auto mode The Basics of Shooting and Playback 26 Step 2 Select a Shooting Mode 1 Press the A button. • The shooting mode selection menu, which allows you to select the desired shooting mode, is displayed. 2 Press the multi selector H or I to select a shooting mode and press the k button. • A (auto) mode is used in this example. • The shooting mode setting is saved even after the camera is turned off.

Reference Manual
Page 50
Step 3 Frame a Picture 1 Hold the camera steady. • Keep fingers, hair, the camera strap, and other objects away from the lens, flash, AF assist-illuminator, microphone, and speaker. • When taking images in portrait ("tall") orientation, turn the camera so that the flash is displayed (default setting). 25m 0s 850 Focus area 28 The Basics of Shooting and Playback 2 Frame the picture. • Aim the camera at the desired subject. • When the camera detects the main subject, the focus area is above the lens.
Step 3 Frame a Picture 1 Hold the camera steady. • Keep fingers, hair, the camera strap, and other objects away from the lens, flash, AF assist-illuminator, microphone, and speaker. • When taking images in portrait ("tall") orientation, turn the camera so that the flash is displayed (default setting). 25m 0s 850 Focus area 28 The Basics of Shooting and Playback 2 Frame the picture. • Aim the camera at the desired subject. • When the camera detects the main subject, the focus area is above the lens.


