

W460 User Manual
Page 2
... Warnings...6 INTRODUCTION 7 Package overview...7 Product overview...8 Installation 11 Connecting the Projector...11 Powering On/Off the Projector 13 Adjusting the Projected Image 14 User Controls 22 Remote control...22 On-screen Display Menus...23 Menu Tree...24 Display / Image Settings...28 Display / 3D...30 Display / Geometric Correction 31 Display / Image Settings / Color Setting 32 Display / Image Settings / Signal 33 Display / Image Settings / Color Setting / Color Matching 34 Setup / Lamp Settings...36 Setup / Power Settings...37 Setup / Security...38 Setup / HDMI Link Settings...
... Warnings...6 INTRODUCTION 7 Package overview...7 Product overview...8 Installation 11 Connecting the Projector...11 Powering On/Off the Projector 13 Adjusting the Projected Image 14 User Controls 22 Remote control...22 On-screen Display Menus...23 Menu Tree...24 Display / Image Settings...28 Display / 3D...30 Display / Geometric Correction 31 Display / Image Settings / Color Setting 32 Display / Image Settings / Signal 33 Display / Image Settings / Color Setting / Color Matching 34 Setup / Lamp Settings...36 Setup / Power Settings...37 Setup / Security...38 Setup / HDMI Link Settings...

W460 User Manual
Page 4
... the presence of important operating and maintenance (servicing) instructions in a location that restricts air flow. ‡‡ Do not use the unit if it is recommended to dangerous voltages or other hazards. SAFETY The lightning flash with dry cloth. ‡‡ Only use attachments/accessories specified by appropriate service personnel. 4 English Class B emissions limits This Class B digital apparatus meets all...
... the presence of important operating and maintenance (servicing) instructions in a location that restricts air flow. ‡‡ Do not use the unit if it is recommended to dangerous voltages or other hazards. SAFETY The lightning flash with dry cloth. ‡‡ Only use attachments/accessories specified by appropriate service personnel. 4 English Class B emissions limits This Class B digital apparatus meets all...

W460 User Manual
Page 5
... open or disassemble the projector as this user's guide. Do not: ‡‡ Block the slots and openings on the unit provided for ventilation. ‡‡ Use abrasive cleaners, waxes or solvents to page 36). As with mild detergent to clean the display housing. ‡‡ Disconnect the power plug from the on-screen display "System / Lamp Setting" menu after replacing the lamp module (refer to clean...
... open or disassemble the projector as this user's guide. Do not: ‡‡ Block the slots and openings on the unit provided for ventilation. ‡‡ Use abrasive cleaners, waxes or solvents to page 36). As with mild detergent to clean the display housing. ‡‡ Disconnect the power plug from the on-screen display "System / Lamp Setting" menu after replacing the lamp module (refer to clean...
W460 User Manual
Page 7
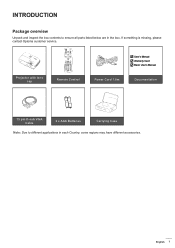
INTRODUCTION Package overview Unpack and inspect the box contents to different applications in the box. English 7 Projector with lens cap Remote Control User's Manual Warranty Card Basic User's Manual Power Cord 1.8m Documentation 15 pin D-sub VGA Cable 2 x AAA Batteries Carrying Case Note: Due to ensure all parts listed below are in each Country, some regions may have different accessories. If something is missing, please contact Optoma customer service.
INTRODUCTION Package overview Unpack and inspect the box contents to different applications in the box. English 7 Projector with lens cap Remote Control User's Manual Warranty Card Basic User's Manual Power Cord 1.8m Documentation 15 pin D-sub VGA Cable 2 x AAA Batteries Carrying Case Note: Due to ensure all parts listed below are in each Country, some regions may have different accessories. If something is missing, please contact Optoma customer service.

W460 User Manual
Page 13
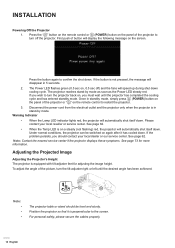
... the projector. (Check the user manual of the laptop to determine the appropriate Fn key combination to change display output.) See "Setup / Security" on the projector first and then select the signal sources. 4. If more than one input device is steady red and then press the power button to switch between For direct source selection, see page 23. Ensure the Power LED is connected, press devices. (Source) button sequentially to turn On the projector. INSTALLATION Powering...
... the projector. (Check the user manual of the laptop to determine the appropriate Fn key combination to change display output.) See "Setup / Security" on the projector first and then select the signal sources. 4. If more than one input device is steady red and then press the power button to switch between For direct source selection, see page 23. Ensure the Power LED is connected, press devices. (Source) button sequentially to turn On the projector. INSTALLATION Powering...
W460 User Manual
Page 14
... the remote control or (POWER) button on the screen. The projector reaches stand-by mode. Position the projector so that it has cooled down . Adjusting the Projected Image Adjusting the Projector's Height The projector is in 5 seconds. 2. For personal safety, please secure the cables properly. 14 English The Power LED flashes green (0.5 sec on, 0.5 sec off the projector. Once in standby mode, simply press (POWER) button on , you should be switched on a steady (not flashing) red, the projector...
... the remote control or (POWER) button on the screen. The projector reaches stand-by mode. Position the projector so that it has cooled down . Adjusting the Projected Image Adjusting the Projector's Height The projector is in 5 seconds. 2. For personal safety, please secure the cables properly. 14 English The Power LED flashes green (0.5 sec on, 0.5 sec off the projector. Once in standby mode, simply press (POWER) button on , you should be switched on a steady (not flashing) red, the projector...
W460 User Manual
Page 23
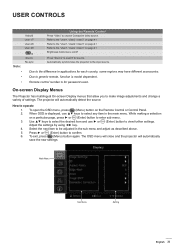
...-screen Display menus that allow you to confirm. 6. To open the OSD menu, press (Menu) button on a particular page, press ► or (Enter) button to select any item in the sub menu and adjust as described above. 5. Press ► or (Enter) button to make image adjustments and change a variety of settings. The projector will automatically save the new settings. While making a selection on the Remote Control or Control Panel. 2. USER CONTROLS Video/6 User 1/7 User 2/8 User 3/9 Note: /0 Source Re-sync Using...
...-screen Display menus that allow you to confirm. 6. To open the OSD menu, press (Menu) button on a particular page, press ► or (Enter) button to select any item in the sub menu and adjust as described above. 5. Press ► or (Enter) button to make image adjustments and change a variety of settings. The projector will automatically save the new settings. While making a selection on the Remote Control or Control Panel. 2. USER CONTROLS Video/6 User 1/7 User 2/8 User 3/9 Note: /0 Source Re-sync Using...

W460 User Manual
Page 29
... the picture. ‡‡ Press ◄ to decrease the contrast. ‡‡ Press ► to increase the contrast. See page 32 for more information. Signal Enter the Signal menu. Set projector signal properties. The lamp life will be extended. ‡‡ Eco+: When Eco+ mode is activated, the brightness level of the content is support VGA. USER CONTROLS Brightness Adjust the brightness of the image. ‡...
... the picture. ‡‡ Press ◄ to decrease the contrast. ‡‡ Press ► to increase the contrast. See page 32 for more information. Signal Enter the Signal menu. Set projector signal properties. The lamp life will be extended. ‡‡ Eco+: When Eco+ mode is activated, the brightness level of the content is support VGA. USER CONTROLS Brightness Adjust the brightness of the image. ‡...
W460 User Manual
Page 36
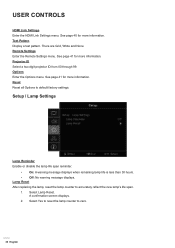
... English Remote Settings Enter the Remote Settings menu. Setup / Lamp Settings Lamp Reminder Enable or disable the lamp life span reminder. ‡‡ On: A warning message displays when remaining lamp life is less than 30 hours. ‡‡ Off: No warning message displays. Select Yes to reset the lamp counter to default factory settings. Lamp Reset After replacing the lamp, reset the lamp counter to accurately reflect the new lamp's life span. 1. See page 41 for more information. A confirmation screen displays. 2. USER CONTROLS HDMI Link Settings Enter the HDMI Link Settings menu...
... English Remote Settings Enter the Remote Settings menu. Setup / Lamp Settings Lamp Reminder Enable or disable the lamp life span reminder. ‡‡ On: A warning message displays when remaining lamp life is less than 30 hours. ‡‡ Off: No warning message displays. Select Yes to reset the lamp counter to default factory settings. Lamp Reset After replacing the lamp, reset the lamp counter to accurately reflect the new lamp's life span. 1. See page 41 for more information. A confirmation screen displays. 2. USER CONTROLS HDMI Link Settings Enter the HDMI Link Settings menu...

W460 User Manual
Page 37
USER CONTROLS Setup / Power Settings Direct Power On Enable or disable Direct Power On. ‡‡ On: The projector powers on automatically when AC power is supplied. ‡‡ Off: The projector must be 100% turn off unless end-user wait 100 sec. If projector is turned off with keeping input the signal source (the last image source showing on screen), it will not re-start unless: ±± Terminate the last image source and input any signal source again...
USER CONTROLS Setup / Power Settings Direct Power On Enable or disable Direct Power On. ‡‡ On: The projector powers on automatically when AC power is supplied. ‡‡ Off: The projector must be 100% turn off unless end-user wait 100 sec. If projector is turned off with keeping input the signal source (the last image source showing on screen), it will not re-start unless: ±± Terminate the last image source and input any signal source again...

W460 User Manual
Page 38
... current password is set to power on region. When Power Mode (Standby) is required to Eco., the VGA & Audio pass-through and RJ45 would be used without entering the password. Optional feature depends on the projector and access the Security menu. ‡‡ Off: No password is enabled, the following screen displays at startup and before access to normal standby mode . Security Timer Enter the Security Timer sub menu. When...
... current password is set to power on region. When Power Mode (Standby) is required to Eco., the VGA & Audio pass-through and RJ45 would be used without entering the password. Optional feature depends on the projector and access the Security menu. ‡‡ Off: No password is enabled, the following screen displays at startup and before access to normal standby mode . Security Timer Enter the Security Timer sub menu. When...

W460 User Manual
Page 41
... a hotkey for easier identification. Input Name Use to scan for at startup. Select the sources to rename the input function for LAN, Brightness, Contrast, Sleep Timer, Color Matching, Color Temp, Gamma, Projection, Lamp Settings, Zoom, Test Pattern, Freeze, Network Display, USB Display, Multimedia, HDMI2 function. The available options include HDMI1, HDMI2/MHL, VGA, Networkdisplay, USB Display, and Multimedia. Setup / Options Language Enter the Language menu. USER CONTROLS Setup / Remote Settings IR Function Enable or Disable projector's IR function. Select the...
... a hotkey for easier identification. Input Name Use to scan for at startup. Select the sources to rename the input function for LAN, Brightness, Contrast, Sleep Timer, Color Matching, Color Temp, Gamma, Projection, Lamp Settings, Zoom, Test Pattern, Freeze, Network Display, USB Display, Multimedia, HDMI2 function. The available options include HDMI1, HDMI2/MHL, VGA, Networkdisplay, USB Display, and Multimedia. Setup / Options Language Enter the Language menu. USER CONTROLS Setup / Remote Settings IR Function Enable or Disable projector's IR function. Select the...

W460 User Manual
Page 42
... from the Advanced menu. A confirmation screen displays. 3. When finished, Screen capture Succeeded will display. Note: Only one startup screen can be saved at once. Background Color Select the desired background color for Setup menu settings. 42 English Keypad Lock Lock the buttons on the projector top panel. ‡‡ On: A warning message displays to confirm keypad lock. ‡‡ Off: Projector keypad functions as User in progress will display. USER CONTROLS High Altitude Adjust the fan speed to...
... from the Advanced menu. A confirmation screen displays. 3. When finished, Screen capture Succeeded will display. Note: Only one startup screen can be saved at once. Background Color Select the desired background color for Setup menu settings. 42 English Keypad Lock Lock the buttons on the projector top panel. ‡‡ On: A warning message displays to confirm keypad lock. ‡‡ Off: Projector keypad functions as User in progress will display. USER CONTROLS High Altitude Adjust the fan speed to...

W460 User Manual
Page 53
...; Projector connects to LAN, please use Ethernet Normal Cable. ‡‡ Peer-to-peer (PC connects to support Extron device(s) for trademark and logo registration in 2017. http://pjlink.jbmia.or.jp/english/ English 53 Select HDMirror (Android) from the menu to start mirroring the screen of Extron Electronics, Inc. Also, projector status information, such as remotely manage: Power On/Off, Brightness and Contrast settings...
...; Projector connects to LAN, please use Ethernet Normal Cable. ‡‡ Peer-to-peer (PC connects to support Extron device(s) for trademark and logo registration in 2017. http://pjlink.jbmia.or.jp/english/ English 53 Select HDMirror (Android) from the menu to start mirroring the screen of Extron Electronics, Inc. Also, projector status information, such as remotely manage: Power On/Off, Brightness and Contrast settings...
W460 User Manual
Page 61
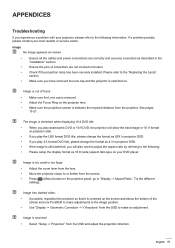
...; Press (Menu) button on the screen and below the bottom of focus ‡‡ Make sure the Lens cap is reversed ‡‡ Select "Setup -> Projection" from the projector. Appendices Troubleshooting If you experience a problem with your local reseller or service center. Image No image appears on-screen ‡‡ Ensure all the cables and power connections are not crooked or broken. ‡‡ Check if the projection lamp has...
...; Press (Menu) button on the screen and below the bottom of focus ‡‡ Make sure the Lens cap is reversed ‡‡ Select "Setup -> Projection" from the projector. Appendices Troubleshooting If you experience a problem with your local reseller or service center. Image No image appears on-screen ‡‡ Ensure all the cables and power connections are not crooked or broken. ‡‡ Check if the projection lamp has...

W460 User Manual
Page 62
Projector LED status indicator Power LED Power LED Temp LED Lamp LED Message Standby State Power on (Warming) Power on & Lamp lighting (Red) Power off (Cooling) Quick Resume (100 secs) Error (Lamp fail) Error (Fan fail) Error (Over Temp) Flashing Flashing Flashing (Green) (Red) Flashing 0.25 sec off 0.25 sec light Flashing 0.5 sec off 0.5 sec ligh Back to all controls ‡‡ If possible, turn on page 64. To replace the lamp, follow the procedures in the "Replacing the lamp" on until the lamp module has been replaced. Lamp burns out or makes a popping...
Projector LED status indicator Power LED Power LED Temp LED Lamp LED Message Standby State Power on (Warming) Power on & Lamp lighting (Red) Power off (Cooling) Quick Resume (100 secs) Error (Lamp fail) Error (Fan fail) Error (Over Temp) Flashing Flashing Flashing (Green) (Red) Flashing 0.25 sec off 0.25 sec light Flashing 0.5 sec off 0.5 sec ligh Back to all controls ‡‡ If possible, turn on page 64. To replace the lamp, follow the procedures in the "Replacing the lamp" on until the lamp module has been replaced. Lamp burns out or makes a popping...

W460 User Manual
Page 63
...;‡ Make sure there are exhausted. Replacement suggested. APPENDICES LED states On Screen Messages ‡‡ Fan failed: The projector will switch off automatically. ‡‡ Over temperature: The projector will switch off automatically. ‡‡ Replacing the lamp: Lamp is within 7 m (23 ft) of its rated life. Remote control If the remote control does not work ‡‡ Check the operating angle of the remote control is approaching the end of the...
...;‡ Make sure there are exhausted. Replacement suggested. APPENDICES LED states On Screen Messages ‡‡ Fan failed: The projector will switch off automatically. ‡‡ Over temperature: The projector will switch off automatically. ‡‡ Replacing the lamp: Lamp is within 7 m (23 ft) of its rated life. Remote control If the remote control does not work ‡‡ Check the operating angle of the remote control is approaching the end of the...

W460 User Manual
Page 66
... firmly on the lamp compartment cover. 5. APPENDICES Lamp replacing procedure: 1. Lamp Reset: (i)Press "Menu" -> (ii)Select "Setup" -> (iii)Select "Lamp Settings" -> (iv)Select "Lamp Reset" -> (v)Select "Yes". Disconnect the power cord. 4. Remove two screws on the module handle to the projector. Warning: Lamp Connector must be installed flush with the connector and ensure it is replaced. While installing, align the lamp module with the connector base as shown in the image below. A gap...
... firmly on the lamp compartment cover. 5. APPENDICES Lamp replacing procedure: 1. Lamp Reset: (i)Press "Menu" -> (ii)Select "Setup" -> (iii)Select "Lamp Settings" -> (iv)Select "Lamp Reset" -> (v)Select "Yes". Disconnect the power cord. 4. Remove two screws on the module handle to the projector. Warning: Lamp Connector must be installed flush with the connector and ensure it is replaced. While installing, align the lamp module with the connector base as shown in the image below. A gap...
W460 User Manual
Page 70
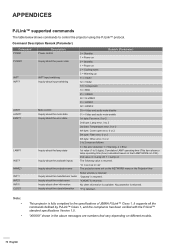
... = VIDEO 22 = S-VIDEO 31 = HDMI 1 32 = HDMI 2 30 = Video and audio mute disable 31 = Video and audio mute enable 1st byte: Fan error, 0 or 2 2nd byte: Lamp error, 0 to 2 3rd byte: Temperature error, 0 or 2 4th byte: Cover open error, 0 or 2 5th byte: Filter error, 0 or 2 6th byte: Other error, 0 or 2 0 to 2 mean as follows: 0 = No error detected, 1 = Warning, 2 = Error 1st value (1 to control the projector using the PJLink™ protocol. INPT INPT? It supports all the commands defined...
... = VIDEO 22 = S-VIDEO 31 = HDMI 1 32 = HDMI 2 30 = Video and audio mute disable 31 = Video and audio mute enable 1st byte: Fan error, 0 or 2 2nd byte: Lamp error, 0 to 2 3rd byte: Temperature error, 0 or 2 4th byte: Cover open error, 0 or 2 5th byte: Filter error, 0 or 2 6th byte: Other error, 0 or 2 0 to 2 mean as follows: 0 = No error detected, 1 = Warning, 2 = Error 1st value (1 to control the projector using the PJLink™ protocol. INPT INPT? It supports all the commands defined...

W460_Datasheet
Page 2
... WXGA PROJECTION- HDMI2-In (MHL) 3. must manually switch to high altitude mode @ 5000 feet & above (using OSD) MULTIMEDIA AND PRESENTATION FEATURES Wireless Screen Mirroring Windows, Mac and Android devices (requires HD Cast Pro app) LAN Display (Ethernet) Screen mirroring with Windows and Mac systems, up to change at any time. 11202019 DLP® and the DLP logo are the property of Texas Instruments™. Mouse service 13. Copyright © 2018 Optoma Technology, Inc. VGA...
... WXGA PROJECTION- HDMI2-In (MHL) 3. must manually switch to high altitude mode @ 5000 feet & above (using OSD) MULTIMEDIA AND PRESENTATION FEATURES Wireless Screen Mirroring Windows, Mac and Android devices (requires HD Cast Pro app) LAN Display (Ethernet) Screen mirroring with Windows and Mac systems, up to change at any time. 11202019 DLP® and the DLP logo are the property of Texas Instruments™. Mouse service 13. Copyright © 2018 Optoma Technology, Inc. VGA...


