

User Manual
Page 3
... names are separate collection systems for EU countries only. Your MITSUBISHI ELECTRIC product is for used electrical and electronic product. Contents Important safeguards ...4 Preparing your projector...6 Using the remote control...9 Setting up your projector...10 Viewing computer images ...13 Viewing video images...17 Menu operation ...22 Adjusting projected images...28 Advanced features ...32 Indicators...37 Replacing the lamp ...38 Maintenance ...40 Troubleshooting ...41 Specifications ...44 Note: This symbol mark is...
... names are separate collection systems for EU countries only. Your MITSUBISHI ELECTRIC product is for used electrical and electronic product. Contents Important safeguards ...4 Preparing your projector...6 Using the remote control...9 Setting up your projector...10 Viewing computer images ...13 Viewing video images...17 Menu operation ...22 Adjusting projected images...28 Advanced features ...32 Indicators...37 Replacing the lamp ...38 Maintenance ...40 Troubleshooting ...41 Specifications ...44 Note: This symbol mark is...

User Manual
Page 4
... operating instructions. Power-cord protection Power-supply cords should be routed so that could result in fire, electric shock or other personal injury. 7. EN-4 Important safeguards Please read before cleaning it from overheating. Instructions All operating instructions must be adhered to protect it . Any mounting of the projector and to . 4. Power sources This projector should be read all these openings or allow them for future reference. Replacement parts When replacement parts...
... operating instructions. Power-cord protection Power-supply cords should be routed so that could result in fire, electric shock or other personal injury. 7. EN-4 Important safeguards Please read before cleaning it from overheating. Instructions All operating instructions must be adhered to protect it . Any mounting of the projector and to . 4. Power sources This projector should be read all these openings or allow them for future reference. Replacement parts When replacement parts...
User Manual
Page 5
... not keep using the damaged projector. Do not face the projector lens to turn off before turning the main power off and on, the user is encouraged to try to correct the interference by yourself. If you keep using the damaged projector. Never let children look into the air outlet grille when projector is operating. It is best to wait for a Class B digital device, pursuant to Part...
... not keep using the damaged projector. Do not face the projector lens to turn off before turning the main power off and on, the user is encouraged to try to correct the interference by yourself. If you keep using the damaged projector. Never let children look into the air outlet grille when projector is operating. It is best to wait for a Class B digital device, pursuant to Part...

User Manual
Page 6
...: • Use two size-AA batteries (R6P). • Replace the 2 batteries with this projector. If the battery is difficult because the coil spring end hits on the remote control. • Keep batteries out of reach of children and pets. • Remove the batteries, if the remote control is not used exclusively for a long time. • Do not combine a new battery with...
...: • Use two size-AA batteries (R6P). • Replace the 2 batteries with this projector. If the battery is difficult because the coil spring end hits on the remote control. • Keep batteries out of reach of children and pets. • Remove the batteries, if the remote control is not used exclusively for a long time. • Do not combine a new battery with...

User Manual
Page 7
.../W button 1 2 AUTO POSITION/S button 3 VIDEO/X button 2 4 KEYSTONE/ENTER button 5 VOLUME/T button 3 6 MENU button 7 POWER button 8 POWER indicator 4 9 STATUS indicator Important: • While the menu or the screen for the keystone adjustment or password entry is being displayed or image capturing is being executed, the COMPUTER, VIDEO, AUTO POSITION and VOLUME buttons function as the W, X, S and T buttons respectively. • While the menu is used for other devices than the specified wireless LAN unit. (Wireless LAN unit isn't packaged together with the projector.) 10...
.../W button 1 2 AUTO POSITION/S button 3 VIDEO/X button 2 4 KEYSTONE/ENTER button 5 VOLUME/T button 3 6 MENU button 7 POWER button 8 POWER indicator 4 9 STATUS indicator Important: • While the menu or the screen for the keystone adjustment or password entry is being displayed or image capturing is being executed, the COMPUTER, VIDEO, AUTO POSITION and VOLUME buttons function as the W, X, S and T buttons respectively. • While the menu is used for other devices than the specified wireless LAN unit. (Wireless LAN unit isn't packaged together with the projector.) 10...

User Manual
Page 15
... some time before the lamp was cooled down sufficiently last time, the fan may start rotating and the POWER button may not work after the power cord is not a malfunction. • Images may not be replaced soon. The selected signal format is displayed on the POWER indicator. 2. Press the W or X button on the remote control to turn -on the 4:3 image screen. (See page 42.) EN-15 Adjust the focus by default whenever the projector is...
... some time before the lamp was cooled down sufficiently last time, the fan may start rotating and the POWER button may not work after the power cord is not a malfunction. • Images may not be replaced soon. The selected signal format is displayed on the POWER indicator. 2. Press the W or X button on the remote control to turn -on the 4:3 image screen. (See page 42.) EN-15 Adjust the focus by default whenever the projector is...

User Manual
Page 16
... setting procedure for the input signal. • If the projected image is still displaced even after pressing the AUTO POSITION button several seconds before muting is completely canceled. • If MUTE MODE in the INSTALLATION menu is not a malfunction. 11.Unplug the power cord from the computer after use .) EN-16 Viewing computer images (continued) POWER button POWER button To stop projecting: 8. Press the POWER button. • The lamp goes out and the projector...
... setting procedure for the input signal. • If the projected image is still displaced even after pressing the AUTO POSITION button several seconds before muting is completely canceled. • If MUTE MODE in the INSTALLATION menu is not a malfunction. 11.Unplug the power cord from the computer after use .) EN-16 Viewing computer images (continued) POWER button POWER button To stop projecting: 8. Press the POWER button. • The lamp goes out and the projector...

User Manual
Page 19
... the screen depending on the type of the input signal, such symptom is not a malfunction. • Some images become easier to view when the setting of the projector to turn -on rare occasions. EN-19 When LAMP MODE has been set to LOW, the lamp mode changes from a DVD player that is plugged. (The STATUS indicator blinks green.) After the fan stops rotating, press the POWER button to keep an appropriate projection distance with the lens...
... the screen depending on the type of the input signal, such symptom is not a malfunction. • Some images become easier to view when the setting of the projector to turn -on rare occasions. EN-19 When LAMP MODE has been set to LOW, the lamp mode changes from a DVD player that is plugged. (The STATUS indicator blinks green.) After the fan stops rotating, press the POWER button to keep an appropriate projection distance with the lens...

User Manual
Page 20
... cool down for safety purpose. Press the POWER button. • The lamp goes out and the projector goes into a standby mode. If it should be lit again for a while or press the MENU button. 9. Viewing video images (continued) POWER button POWER button To stop projecting: 8. Press the POWER button. • A confirmation message is blinking. If you want to turn on , allow the projector to light up immediately, repeat pressing the POWER button 2 or 3 times.
... cool down for safety purpose. Press the POWER button. • The lamp goes out and the projector goes into a standby mode. If it should be lit again for a while or press the MENU button. 9. Viewing video images (continued) POWER button POWER button To stop projecting: 8. Press the POWER button. • A confirmation message is blinking. If you want to turn on , allow the projector to light up immediately, repeat pressing the POWER button 2 or 3 times.
User Manual
Page 22
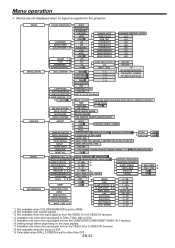
... (for digital signal input) BACK COLOR GLAY, RED, GREEN, BLUE, BLACK, WHITE, RED 50%, GREEN 50%, BLUE 50% SIZE x1, x2, FULL CAPTURE GO ON , OFF BLUE, BLACK, IMAGE BLACK, IMAGE OFF, MIRROR, INVERT, MIRROR INVERT FEATURE ASPECT AUTO 16:9 CENTER, UPPER, LOWER REAL FULL PASSWORD FUNCTION DISPLAY INPUT , MENU ACCESS , SPLASH ID SCREEN LOCK OK MENU POSITION 1 (Upper left), 2(Lower right) UNLOCK OK CINEMA MODE *4 AUTO, OFF VIDEO SIGNAL *7 AUTO, NTSC, PAL, SECAM, 4.43NTSC, PAL-M, PAL-N, PAL-60 SETUP *2 AUTO, OFF...
... (for digital signal input) BACK COLOR GLAY, RED, GREEN, BLUE, BLACK, WHITE, RED 50%, GREEN 50%, BLUE 50% SIZE x1, x2, FULL CAPTURE GO ON , OFF BLUE, BLACK, IMAGE BLACK, IMAGE OFF, MIRROR, INVERT, MIRROR INVERT FEATURE ASPECT AUTO 16:9 CENTER, UPPER, LOWER REAL FULL PASSWORD FUNCTION DISPLAY INPUT , MENU ACCESS , SPLASH ID SCREEN LOCK OK MENU POSITION 1 (Upper left), 2(Lower right) UNLOCK OK CINEMA MODE *4 AUTO, OFF VIDEO SIGNAL *7 AUTO, NTSC, PAL, SECAM, 4.43NTSC, PAL-M, PAL-N, PAL-60 SETUP *2 AUTO, OFF...

User Manual
Page 24
... button is selected, the splash screen will be displayed. Select when viewing images from the behind of color tone (1 to view images in the INSTALLATION menu, the STANDARD lamp mode is activated by default whenever the projector is turned on the ceiling. When ON is chosen, the lamp is automatically lit when the power cord is switched, the projected image may damage the lamp. Select when viewing images projected from the front with the projector installed on the lamp. Menu operation...
... button is selected, the splash screen will be displayed. Select when viewing images from the behind of color tone (1 to view images in the INSTALLATION menu, the STANDARD lamp mode is activated by default whenever the projector is turned on the ceiling. When ON is chosen, the lamp is automatically lit when the power cord is switched, the projected image may damage the lamp. Select when viewing images projected from the front with the projector installed on the lamp. Menu operation...
User Manual
Page 25
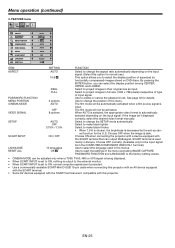
... 3.75% / 7.5% ON / OFF LANGUAGE RESET ALL 10 languages OK FUNCTION Select to project images in their original size as input. Select to change the SETUP mode automatically. See page 33 for the U.S. The film mode will not be automatically activated when a film source signal is dark. VIDEO SIGNAL SETUP SCART INPUT A Ë LANGUAGE RESET ALL AUTO DISPLAY INPUT 1. FEATURE menu opt. Menu operation (continued) 3. Select to enable or cancel the password lock.
... 3.75% / 7.5% ON / OFF LANGUAGE RESET ALL 10 languages OK FUNCTION Select to project images in their original size as input. Select to change the SETUP mode automatically. See page 33 for the U.S. The film mode will not be automatically activated when a film source signal is dark. VIDEO SIGNAL SETUP SCART INPUT A Ë LANGUAGE RESET ALL AUTO DISPLAY INPUT 1. FEATURE menu opt. Menu operation (continued) 3. Select to enable or cancel the password lock.

User Manual
Page 34
... EXPAND mode, you can change the magnification of the sub image by using the VIDEO or S-VIDEO button on the remote control or the VIDEO button on the screen, the image from the VIDEO IN or S-VIDEO IN terminal is displayed as the sub image. • When the image from different sources at the same time. For further information, see page 45. • The EXPAND mode doesn't work with some input signals.
... EXPAND mode, you can change the magnification of the sub image by using the VIDEO or S-VIDEO button on the remote control or the VIDEO button on the screen, the image from the VIDEO IN or S-VIDEO IN terminal is displayed as the sub image. • When the image from different sources at the same time. For further information, see page 45. • The EXPAND mode doesn't work with some input signals.

User Manual
Page 36
... be supported.) External HUB • Use a straight-through category-5 cable for projector control and you can supervise and control the projector's operation using the same application among projectors of different models and different manufacturers. Opening the User Manuals 1. Open CD-ROM "XL2550_1550." 3. For the installation procedure and usage of the software, see "User Manual for LAN Control Utility" contained in the attached CD-ROM. *) Functions • Setting of the projector's IP address • Setting of password, display...
... be supported.) External HUB • Use a straight-through category-5 cable for projector control and you can supervise and control the projector's operation using the same application among projectors of different models and different manufacturers. Opening the User Manuals 1. Open CD-ROM "XL2550_1550." 3. For the installation procedure and usage of the software, see "User Manual for LAN Control Utility" contained in the attached CD-ROM. *) Functions • Setting of the projector's IP address • Setting of password, display...

User Manual
Page 37
... green Steady green The power is off by pressing the POWER button. Change with dust or dirt. • The room temperature is not effective, replace the lamp. The lamp operation time exceeds the time elapsed until the STATUS indicator goes out, then press the POWER button. • If the above solution is high. Indicators This projector has 2 indicators, each of which shows the operation condition of the projector. POWER indicator STATUS indicator Normal condition POWER STATUS Steady Off red CONDITION...
... green Steady green The power is off by pressing the POWER button. Change with dust or dirt. • The room temperature is not effective, replace the lamp. The lamp operation time exceeds the time elapsed until the STATUS indicator goes out, then press the POWER button. • If the above solution is high. Indicators This projector has 2 indicators, each of which shows the operation condition of the projector. POWER indicator STATUS indicator Normal condition POWER STATUS Steady Off red CONDITION...
User Manual
Page 38
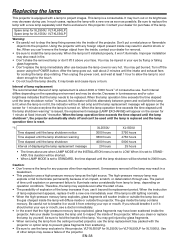
... Time elapsed until the lamp shutdown warning Time elapsed until the lamp shutdown*1, the projector automatically shuts off the power using the POWER button. It may be sure to this projector. When the lamp operation time exceeds the time elapsed until the lamp shutdown Interval of the lamp may have been scattered inside the lamp contains mercury. Unnecessary removal of displaying the lamp replacement message XL2550U 3000 hours 3800 hours 4000 hours 20 hours XL1550U 3750 hours 4750 hours 5000 hours 25 hours...
... Time elapsed until the lamp shutdown warning Time elapsed until the lamp shutdown*1, the projector automatically shuts off the power using the POWER button. It may be sure to this projector. When the lamp operation time exceeds the time elapsed until the lamp shutdown Interval of the lamp may have been scattered inside the lamp contains mercury. Unnecessary removal of displaying the lamp replacement message XL2550U 3000 hours 3800 hours 4000 hours 20 hours XL1550U 3750 hours 4750 hours 5000 hours 25 hours...
User Manual
Page 39
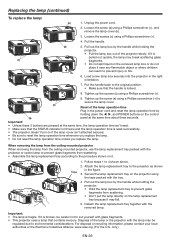
... the lamp replacement tray together with the lamp may fall. 5. Tighten up the screws (c) using a Phillips screwdriver (+), and remove the lamp cover (b). 3. For disposal or recycling information, please contact your local authorities or the Electronic Industries Alliance: www.eiae.org. (For the U.S. Unplug the power cord. 2. Reset of the lamp operation time Plug in the power cord and reset the lamp operation time by holding down the W, X, and POWER buttons on the removed lamp...
... the lamp replacement tray together with the lamp may fall. 5. Tighten up the screws (c) using a Phillips screwdriver (+), and remove the lamp cover (b). 3. For disposal or recycling information, please contact your local authorities or the Electronic Industries Alliance: www.eiae.org. (For the U.S. Unplug the power cord. 2. Reset of the lamp operation time Plug in the power cord and reset the lamp operation time by holding down the W, X, and POWER buttons on the removed lamp...

User Manual
Page 41
... air emitted from the wall outlet and contact your dealer. O f f 2. Press the POWER button. Steady or Blinking No image appears on the POWER indicator. • Set SCART INPUT in this case. • Check that AUTO POWER OFF has been set to OFF. • If the lamp has deteriorated, it with dirt and dust. EN-41 Troubleshooting Before asking for repair of its life.) Steady red • Attach the lamp cover...
... air emitted from the wall outlet and contact your dealer. O f f 2. Press the POWER button. Steady or Blinking No image appears on the POWER indicator. • Set SCART INPUT in this case. • Check that AUTO POWER OFF has been set to OFF. • If the lamp has deteriorated, it with dirt and dust. EN-41 Troubleshooting Before asking for repair of its life.) Steady red • Attach the lamp cover...
User Manual
Page 42
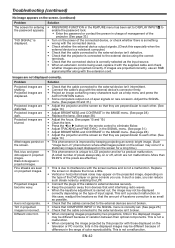
... isn't intermittent. • Connect the cable's plug with the external device's connector firmly. • Project an image containing many characters such as a help menu and press the AUTO POSITION button. • Some computers output out-of-spec signals on the power of the projector. (See page 33.) "NO SIGNAL" is correctly set to DISPLAY INPUT to the password appears. Replace the screen or displace the focus a little. • Vertical...
... isn't intermittent. • Connect the cable's plug with the external device's connector firmly. • Project an image containing many characters such as a help menu and press the AUTO POSITION button. • Some computers output out-of-spec signals on the power of the projector. (See page 33.) "NO SIGNAL" is correctly set to DISPLAY INPUT to the password appears. Replace the screen or displace the focus a little. • Vertical...

User Manual
Page 43
... images supplied from the computer aren't displayed. • This is replaced, check the following problem occurs after cooling the inside the projector may be used . For the method to enable the password lock. In such cases, use with the Kensington System for the POWER button) don't function. The menu can't be wrongly operating because of the SIGNAL menu. (See page 26.) Others Problem The exhaust vents emit warm air...
... images supplied from the computer aren't displayed. • This is replaced, check the following problem occurs after cooling the inside the projector may be used . For the method to enable the password lock. In such cases, use with the Kensington System for the POWER button) don't function. The menu can't be wrongly operating because of the SIGNAL menu. (See page 26.) Others Problem The exhaust vents emit warm air...

