

User Manual
Page 1
Please read it before using your projector. LCD PROJECTOR MODEL XL2550U XL1550U User Manual XL2550 XL1550 This User Manual is important to you.
Please read it before using your projector. LCD PROJECTOR MODEL XL2550U XL1550U User Manual XL2550 XL1550 This User Manual is important to you.

User Manual
Page 5
... blow out of your projector. Please maintain an operating temperature, humidity, and altitude as specifically explained in the User Manual do not attempt to service this product by Mitsubishi could void the user's authority to operate this equipment does cause harmful interference to radio or television reception, which become hot...
... blow out of your projector. Please maintain an operating temperature, humidity, and altitude as specifically explained in the User Manual do not attempt to service this product by Mitsubishi could void the user's authority to operate this equipment does cause harmful interference to radio or television reception, which become hot...

User Manual
Page 6
... control 1. Remote control parts Others • Lens cap (Attached to the projector) • Lamp replacement tray ( 857C106-10) • CD-ROM (919C154-60) • Safety Manual/ Quick Start up (871D489-60) Power cord (two) (246C483-10, 246C383-20) Remote control R6P (size-AA) (290P136-10) battery (two) Important: • The attached...
... control 1. Remote control parts Others • Lens cap (Attached to the projector) • Lamp replacement tray ( 857C106-10) • CD-ROM (919C154-60) • Safety Manual/ Quick Start up (871D489-60) Power cord (two) (246C483-10, 246C383-20) Remote control R6P (size-AA) (290P136-10) battery (two) Important: • The attached...

User Manual
Page 13
... monitor to the COMPUTER/COMPONENT VIDEO IN-1/IN-2 terminal of the projector. 2. EN-13 Connect one end of a commercially available DVI cable to a desktop computer, disconnect the RGB cable that of the computer are required depending on the type of the connected computer. • Also read the instruction... manual of the connected computer and prepare a proper cable for its audio input. Connect the other end of the DVI cable to the DVI ...
... monitor to the COMPUTER/COMPONENT VIDEO IN-1/IN-2 terminal of the projector. 2. EN-13 Connect one end of a commercially available DVI cable to a desktop computer, disconnect the RGB cable that of the computer are required depending on the type of the connected computer. • Also read the instruction... manual of the connected computer and prepare a proper cable for its audio input. Connect the other end of the DVI cable to the DVI ...

User Manual
Page 16
... in the standby mode, the intake fan and exhaust fan rotate to light up immediately, repeat pressing the POWER button 2 or 3 times. See the instruction manual of the setting procedure for safety purpose. Press the POWER button. • A confirmation message is displayed. • To cancel the procedure, leave the...
... in the standby mode, the intake fan and exhaust fan rotate to light up immediately, repeat pressing the POWER button 2 or 3 times. See the instruction manual of the setting procedure for safety purpose. Press the POWER button. • A confirmation message is displayed. • To cancel the procedure, leave the...
User Manual
Page 17
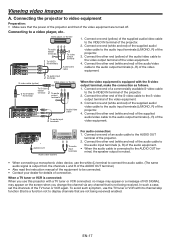
... (L, R) of the audio equipment. • When the audio cable is output from the channels L and R of the AUDIO OUT terminal.) • Also read the instruction manual of the projector. 4. S-video cable (option) 2 To audio input terminals Video player, or the like To audio output terminals 4 1 To VIDEO IN terminals 3 To video...
... (L, R) of the audio equipment. • When the audio cable is output from the channels L and R of the AUDIO OUT terminal.) • Also read the instruction manual of the projector. 4. S-video cable (option) 2 To audio input terminals Video player, or the like To audio output terminals 4 1 To VIDEO IN terminals 3 To video...
User Manual
Page 25
... reset the settings of squeezed (or horizontally compressed) images stored on the input signal. If the image isn't displayed correctly, select the desired video format manually. Use to ON, normal computer signals aren't projected. • Use a commercially available SCART-Mini D-SUB 15-pin cable when connecting this option for details. Select...
... reset the settings of squeezed (or horizontally compressed) images stored on the input signal. If the image isn't displayed correctly, select the desired video format manually. Use to ON, normal computer signals aren't projected. • Use a commercially available SCART-Mini D-SUB 15-pin cable when connecting this option for details. Select...

User Manual
Page 30
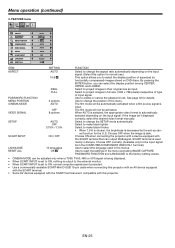
..., VERT. PIXELS and VERT. EN-30 However, video signals from the computer may not be projected correctly depending on the desktop, select Properties, and click the Settings tab to display the screen resolution setting.) The screen resolution setting of the projector....button. Image is 1280x800, set HORIZ. Project a bright computer image containing as many texts and characters as possible. NO Perform manual adjustment. Set HORIZ. Adjusting projected images (continued) This projector automatically selects a proper signal format according to be projected. When...
..., VERT. PIXELS and VERT. EN-30 However, video signals from the computer may not be projected correctly depending on the desktop, select Properties, and click the Settings tab to display the screen resolution setting.) The screen resolution setting of the projector....button. Image is 1280x800, set HORIZ. Project a bright computer image containing as many texts and characters as possible. NO Perform manual adjustment. Set HORIZ. Adjusting projected images (continued) This projector automatically selects a proper signal format according to be projected. When...

User Manual
Page 36
...operation using the same application among projectors of the LAN connector and LAN cable because static electricity may be displayed. 4. Opening the User Manuals 1. Advanced features (continued) Supervising and controlling by PJLink™ Class 1, and the compliance has been verified with the PJLink... *" contained in the attached CD-ROM. EN-36 For the installation procedure and usage of the software, see "User Manual for the User Manual will be discharged from your body, causing damage to the specifications of PJLink™, access to the desired language...
...operation using the same application among projectors of the LAN connector and LAN cable because static electricity may be displayed. 4. Opening the User Manuals 1. Advanced features (continued) Supervising and controlling by PJLink™ Class 1, and the compliance has been verified with the PJLink... *" contained in the attached CD-ROM. EN-36 For the installation procedure and usage of the software, see "User Manual for the User Manual will be discharged from your body, causing damage to the specifications of PJLink™, access to the desired language...