

User Manual
Page 3
... for registration or registered trademark in ! Declaration of Conformity Model number: Trade name: Responsible party: Telephone number: XL2550U/XL1550U MITSUBISHI ELECTRIC Mitsubishi Digital Electronics America, Inc. 9351 Jeronimo Road, Irvine, CA 92618 U.S.A +1-(949) 465-6000 This device complies with ...images ...13 Viewing video images...17 Menu operation ...22 Adjusting projected images...28 Advanced features ...32 Indicators...37 Replacing the lamp ...38 Maintenance ...40 Troubleshooting ...41 Specifications ...44 Note: This symbol mark is trademark applied for EU countries...
... for registration or registered trademark in ! Declaration of Conformity Model number: Trade name: Responsible party: Telephone number: XL2550U/XL1550U MITSUBISHI ELECTRIC Mitsubishi Digital Electronics America, Inc. 9351 Jeronimo Road, Irvine, CA 92618 U.S.A +1-(949) 465-6000 This device complies with ...images ...13 Viewing video images...17 Menu operation ...22 Adjusting projected images...28 Advanced features ...32 Indicators...37 Replacing the lamp ...38 Maintenance ...40 Troubleshooting ...41 Specifications ...44 Note: This symbol mark is trademark applied for EU countries...
User Manual
Page 5
...can lead to high temperature and high humidity. Never let children look into an outlet on unstable surfaces. It is easily affected by Mitsubishi could void the user's authority to wait for inspection. Flammable substances may result in a residential installation. If this equipment does cause ...generates, uses and can lead to comply with Canadian ICES-003. COMPLIANCE NOTICE OF FCC This equipment has been tested and found to lamp breakage, fire, electric shock or other equipment in accordance with your projector. If you want to which become hot. Do ...
...can lead to high temperature and high humidity. Never let children look into an outlet on unstable surfaces. It is easily affected by Mitsubishi could void the user's authority to wait for inspection. Flammable substances may result in a residential installation. If this equipment does cause ...generates, uses and can lead to comply with Canadian ICES-003. COMPLIANCE NOTICE OF FCC This equipment has been tested and found to lamp breakage, fire, electric shock or other equipment in accordance with your projector. If you want to which become hot. Do ...

User Manual
Page 6
..., rinse with new ones when the remote control is forced to operate. EN-6 Remote control parts Others • Lens cap (Attached to the projector) • Lamp replacement tray ( 857C106-10) • CD-ROM (919C154-60) • Safety Manual/ Quick Start up (871D489-60) Power cord (two) (246C483-10, 246C383-20) Remote...
..., rinse with new ones when the remote control is forced to operate. EN-6 Remote control parts Others • Lens cap (Attached to the projector) • Lamp replacement tray ( 857C106-10) • CD-ROM (919C154-60) • Safety Manual/ Quick Start up (871D489-60) Power cord (two) (246C483-10, 246C383-20) Remote...

User Manual
Page 7
...-7 to this lock bar to anchor the projector. 13 Terminal board 7 8 Caution: Do not replace the lamp immediately after using the projector 9 because the lamp would be extremely hot and it may cause burns. Preparating your projector (continued) Overview 6 13 12 11 ... Air inlet grille/Filter cover 1 3 Control area 2 4 ZOOM ring 3 5 FOCUS ring 4 6 Remote control sensor (Front) 5 7 Air outlet grille 8 Lamp cover 9 Air outlet grille 10 Remote control sensor (Rear) 11 Kensington Security Lock Standard connector 12 Lock bar (SECURITY ANCHOR) • Attach a chain, etc. ...
...-7 to this lock bar to anchor the projector. 13 Terminal board 7 8 Caution: Do not replace the lamp immediately after using the projector 9 because the lamp would be extremely hot and it may cause burns. Preparating your projector (continued) Overview 6 13 12 11 ... Air inlet grille/Filter cover 1 3 Control area 2 4 ZOOM ring 3 5 FOCUS ring 4 6 Remote control sensor (Front) 5 7 Air outlet grille 8 Lamp cover 9 Air outlet grille 10 Remote control sensor (Rear) 11 Kensington Security Lock Standard connector 12 Lock bar (SECURITY ANCHOR) • Attach a chain, etc. ...

User Manual
Page 9
... (ceiling mount) 20° 20° EN-9 The operable range of the remote control, however, depends on the characteristics of direct sunlight or fluorescent lamp light. • Keep the remote control photo-sensor at least 2 m (6 feet) away from the remote control to the remote control sensor, the remote control ...30° 30° 30° Operate the remote control within about 5 m (15 feet). When operating the remote control, keep the distance from fluorescent lamps. Otherwise, the remote control may malfunction. • If there is an inverter-operated fluorescent...
... (ceiling mount) 20° 20° EN-9 The operable range of the remote control, however, depends on the characteristics of direct sunlight or fluorescent lamp light. • Keep the remote control photo-sensor at least 2 m (6 feet) away from the remote control to the remote control sensor, the remote control ...30° 30° 30° Operate the remote control within about 5 m (15 feet). When operating the remote control, keep the distance from fluorescent lamps. Otherwise, the remote control may malfunction. • If there is an inverter-operated fluorescent...

User Manual
Page 11
... not cover any damage caused by use of any non-recommended ceiling mount kit or installation of 1500 meters or higher. INSTALLATION WALL SCREEN BEIGE LAMP MODE STANDARD 2. For details, consult your dealer. • The warranty on the ceiling, set IMAGE REVERSE in the INSTALLATION menu to provide a breaker. For details...
... not cover any damage caused by use of any non-recommended ceiling mount kit or installation of 1500 meters or higher. INSTALLATION WALL SCREEN BEIGE LAMP MODE STANDARD 2. For details, consult your dealer. • The warranty on the ceiling, set IMAGE REVERSE in the INSTALLATION menu to provide a breaker. For details...

User Manual
Page 15
... projector is pressed. Repeat steps 4 to turn -on. • The projector starts warming up on . Do not strip off before the lamp becomes stable. Viewing computer images (continued) C. Adjust the position of the COMPUTER button on the type of the black bars may flicker... the screen depending on the type of the input signal, such symptom is not a product malfunction. • Regardless of the setting of LAMP MODE in the correct position, depending on the projector. • The projector automatically selects the appropriate signal format. This is not a malfunction...
... projector is pressed. Repeat steps 4 to turn -on. • The projector starts warming up on . Do not strip off before the lamp becomes stable. Viewing computer images (continued) C. Adjust the position of the COMPUTER button on the type of the black bars may flicker... the screen depending on the type of the input signal, such symptom is not a product malfunction. • Regardless of the setting of LAMP MODE in the correct position, depending on the projector. • The projector automatically selects the appropriate signal format. This is not a malfunction...

User Manual
Page 16
...the fans make loud sounds during cooling, such symptom is pressed. • You can output signals externally. Press the POWER button. • The lamp goes out and the projector goes into a standby mode. Project a bright image containing as many texts and characters as the temperature around the projector...minutes. • During this procedure with a dark image, the image may be lit again for 1 minute after turned off . To light the lamp again, press the POWER button. The setting procedure varies depending on the type of the computer. Example of the setting procedure for a while or ...
...the fans make loud sounds during cooling, such symptom is pressed. • You can output signals externally. Press the POWER button. • The lamp goes out and the projector goes into a standby mode. Project a bright image containing as many texts and characters as the temperature around the projector...minutes. • During this procedure with a dark image, the image may be lit again for 1 minute after turned off . To light the lamp again, press the POWER button. The setting procedure varies depending on the type of the computer. Example of the setting procedure for a while or ...

User Manual
Page 19
...-D (HDCP) button on the power of the projected image by turning the FOCUS ring. Adjust the size of the connected video equipment. Replace the lamp when the STATUS indicator blinks red. (See page 37.) 3. Repeat steps 4 to LOW about 1 minute for a few minutes and then try ...other. (See page 10.) • When the projector cannot be replaced soon. Press the POWER button. • It may flicker before the lamp becomes stable. Projecting images Preparation: • Remove the lens cap. • Turn on the remote control. • When projecting images from STANDARD to...
...-D (HDCP) button on the power of the projected image by turning the FOCUS ring. Adjust the size of the connected video equipment. Replace the lamp when the STATUS indicator blinks red. (See page 37.) 3. Repeat steps 4 to LOW about 1 minute for a few minutes and then try ...other. (See page 10.) • When the projector cannot be replaced soon. Press the POWER button. • It may flicker before the lamp becomes stable. Projecting images Preparation: • Remove the lens cap. • Turn on the remote control. • When projecting images from STANDARD to...

User Manual
Page 20
.... • If the power cord should still fail to change the volume from the speaker Press the VOLUME + or - Press the POWER button. • The lamp goes out and the projector goes into a standby mode. If you want to the AUDIO OUT terminal, the speaker output is muted. • The volume... the lens cap to protect it should be unplugged accidentally while either the air inlet fan or the air outlet fans are operating or the lamp is also changed by pressing the VOLUME buttons. • The volume of the audio from dust. It will go out. Viewing video images (continued) POWER...
.... • If the power cord should still fail to change the volume from the speaker Press the VOLUME + or - Press the POWER button. • The lamp goes out and the projector goes into a standby mode. If you want to the AUDIO OUT terminal, the speaker output is muted. • The volume... the lens cap to protect it should be unplugged accidentally while either the air inlet fan or the air outlet fans are operating or the lamp is also changed by pressing the VOLUME buttons. • The volume of the audio from dust. It will go out. Viewing video images (continued) POWER...
User Manual
Page 22
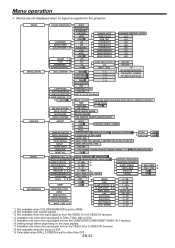
... to other than OFF. IMAGE INSTALLATION COLOR ENHANCER CONTRAST BRIGHTNESS COLOR TEMP. *1 *9 COLOR *1 *2 TINT *1 *2 SHARPNESS *2 ADVANCED MENU WALL SCREEN *1 LAMP MODE AUTO POWER ON AUTO POWER OFF IMAGE CAPTURE *2 *3 SETUP SPLASH SCREEN BACK COLOR MUTE MODE IMAGE REVERSE AUTO PRESENTATION STANDARD THEATER sRGB USER ±...ALL OK SIGNAL INFORMATION MEMORY CALL *2 *3 RESOLUTION (MEMORIZE HORIZ.POSITION *8 VERT.POSITION *8 FINE SYNC. *3 *8 TRACKING *2 *3 *8 COMPUTER INPUT *3 OVER SCAN *2 HOLD *2 *3 *8 USER LAMP TIME (LOW) INPUT RESOLUTION VERTICAL FREQUENCY HORIZONTAL FREQUENCY SYNC.
... to other than OFF. IMAGE INSTALLATION COLOR ENHANCER CONTRAST BRIGHTNESS COLOR TEMP. *1 *9 COLOR *1 *2 TINT *1 *2 SHARPNESS *2 ADVANCED MENU WALL SCREEN *1 LAMP MODE AUTO POWER ON AUTO POWER OFF IMAGE CAPTURE *2 *3 SETUP SPLASH SCREEN BACK COLOR MUTE MODE IMAGE REVERSE AUTO PRESENTATION STANDARD THEATER sRGB USER ±...ALL OK SIGNAL INFORMATION MEMORY CALL *2 *3 RESOLUTION (MEMORIZE HORIZ.POSITION *8 VERT.POSITION *8 FINE SYNC. *3 *8 TRACKING *2 *3 *8 COMPUTER INPUT *3 OVER SCAN *2 HOLD *2 *3 *8 USER LAMP TIME (LOW) INPUT RESOLUTION VERTICAL FREQUENCY HORIZONTAL FREQUENCY SYNC.

User Manual
Page 24
... viewing images from the source. When selecting any option depending on . • The splash screen can be displayed. When ON is chosen, the lamp is automatically lit when the power cord is no signal input from the behind of the screen with the projector installed on which will be... displayed when the MUTE button is chosen, the splash screen will be displayed when there is plugged in the INSTALLATION menu, the STANDARD lamp mode is activated by default whenever the projector is no signal input from the front with the projector installed on the ceiling. • Regardless...
... viewing images from the source. When selecting any option depending on . • The splash screen can be displayed. When ON is chosen, the lamp is automatically lit when the power cord is no signal input from the behind of the screen with the projector installed on which will be... displayed when the MUTE button is chosen, the splash screen will be displayed when there is plugged in the INSTALLATION menu, the STANDARD lamp mode is activated by default whenever the projector is no signal input from the front with the projector installed on the ceiling. • Regardless...

User Manual
Page 27
...time. (See page 38 for the currently projected video signal. The lamp operating time exceeding 10 hours is indicated by the actual hours. • When the lamp operation time exceeds the time elapsed until the lamp shutdown warning is issued, the bar turns to red. (See page .... Indicates the vertical frequency of the currently projected video signal. TYPE DESCRIPTION This item shows a lamp operating time (hour) calculated based on that LAMP MODE is LOW. • When the LAMP MODE is being input. Indicates the resolution of the currently projected video signal. INFORMATION menu opt....
...time. (See page 38 for the currently projected video signal. The lamp operating time exceeding 10 hours is indicated by the actual hours. • When the lamp operation time exceeds the time elapsed until the lamp shutdown warning is issued, the bar turns to red. (See page .... Indicates the vertical frequency of the currently projected video signal. TYPE DESCRIPTION This item shows a lamp operating time (hour) calculated based on that LAMP MODE is LOW. • When the LAMP MODE is being input. Indicates the resolution of the currently projected video signal. INFORMATION menu opt....

User Manual
Page 35
... to personal computer through the USB port, you are recommended to use the mouse remote control function with a computer supporting USB only. • When the lamp is connected using a long USB cable, it may not work correctly. Projector + computer with USB connector USB USB cable To USB port USB 4-pin (type...
... to personal computer through the USB port, you are recommended to use the mouse remote control function with a computer supporting USB only. • When the lamp is connected using a long USB cable, it may not work correctly. Projector + computer with USB connector USB USB cable To USB port USB 4-pin (type...

User Manual
Page 37
...red Blinking red Steady red Steady red Blinking green/red Blinking green/red O f f Steady or Blinking The protection circuit is working or the lamp is in an abnormal condition. • Wait until the STATUS indicator goes out, then press the POWER button. • If the above ...condition of the projector. POWER indicator STATUS indicator Normal condition POWER STATUS Steady Off red CONDITION Stand-by Lamp stand-by for power-off (about 1 minute) Steady green Blinking green Lamp stand-by pressing the POWER button. Change with dust or dirt. • The room temperature is not...
...red Blinking red Steady red Steady red Blinking green/red Blinking green/red O f f Steady or Blinking The protection circuit is working or the lamp is in an abnormal condition. • Wait until the STATUS indicator goes out, then press the POWER button. • If the above ...condition of the projector. POWER indicator STATUS indicator Normal condition POWER STATUS Steady Off red CONDITION Stand-by Lamp stand-by for power-off (about 1 minute) Steady green Blinking green Lamp stand-by pressing the POWER button. Change with dust or dirt. • The room temperature is not...
User Manual
Page 38
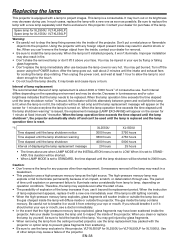
...replacement message (LAMP EXCHANGE) will be replaced. When it from lamp to lamp, depending on the screen for 1 minute everytime the lamp is reset. *1: Time elapsed until the lamp shutdown notice Time elapsed until the lamp shutdown warning Time elapsed until the intake and exhaust fans for XL1550U: VLT-...careful not to hold the handle of displaying the lamp replacement message XL2550U 3000 hours 3800 hours 4000 hours 20 hours XL1550U 3750 hours 4750 hours 5000 hours 25 hours • The times above your dealer for XL1550U). Use of an impact, scratch, or deterioration...
...replacement message (LAMP EXCHANGE) will be replaced. When it from lamp to lamp, depending on the screen for 1 minute everytime the lamp is reset. *1: Time elapsed until the lamp shutdown notice Time elapsed until the lamp shutdown warning Time elapsed until the intake and exhaust fans for XL1550U: VLT-...careful not to hold the handle of displaying the lamp replacement message XL2550U 3000 hours 3800 hours 4000 hours 20 hours XL1550U 3750 hours 4750 hours 5000 hours 25 hours • The times above your dealer for XL1550U). Use of an impact, scratch, or deterioration...
User Manual
Page 39
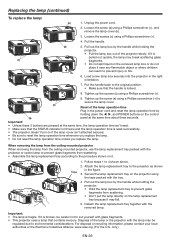
... on it is broken, be regulated due to the projector as shown in the right orientation. 7. Reset of the lamp operation time Plug in the power cord and reset the lamp operation time by holding down the W, X, and POWER buttons on the control panel at the same time, the... the handle while holding the projector. • Pull the lamp box out of the lamp or the projector with the removed lamp. only.) EN-39 Detach the lamp replacement tray together with the lamp may fall. 5. Secure the lamp replacement tray on the lamp replacement tray because it near any flammable object or ...
... on it is broken, be regulated due to the projector as shown in the right orientation. 7. Reset of the lamp operation time Plug in the power cord and reset the lamp operation time by holding down the W, X, and POWER buttons on the control panel at the same time, the... the handle while holding the projector. • Pull the lamp box out of the lamp or the projector with the removed lamp. only.) EN-39 Detach the lamp replacement tray together with the lamp may fall. 5. Secure the lamp replacement tray on the lamp replacement tray because it near any flammable object or ...

User Manual
Page 40
... Use a standard lens-cleaning brush or a piece of the arrow. 2. Flammable substances may ignite causing fire or breakdown while the lamp is illuminating. Caution: Be sure to clean the filter. Contact your fingers. If the filter or ventilation grilles become....) and flammable aerosols when cleaning the projector body and lens. Flammable substances may ignite causing fire or backdown when the lamp is damaged or becomes extremely dirty, change it with dirt or dust, the temperature inside the projector may get inside the projector. ...
... Use a standard lens-cleaning brush or a piece of the arrow. 2. Flammable substances may ignite causing fire or breakdown while the lamp is illuminating. Caution: Be sure to clean the filter. Contact your fingers. If the filter or ventilation grilles become....) and flammable aerosols when cleaning the projector body and lens. Flammable substances may ignite causing fire or backdown when the lamp is damaged or becomes extremely dirty, change it with dirt or dust, the temperature inside the projector may get inside the projector. ...

User Manual
Page 41
... image appears on the screen. Problem Solution Power can 't turn on about 1 minute when you unplug the power cord while the fan is rotating, the lamp may take about 10 minutes. 4. O f f 2. O f f Blinking red/green • Unplug the power cord from a heating appliance. • Check wheather the filter ...Unplug the power cord from the wall outlet. 3. EN-41 Plug the power cord into the wall outlet. 4. Power turns off before the lamp was cooled down sufficiently last time, the fan may start rotating and the POWER button may not work after the power cord is...
... image appears on the screen. Problem Solution Power can 't turn on about 1 minute when you unplug the power cord while the fan is rotating, the lamp may take about 10 minutes. 4. O f f 2. O f f Blinking red/green • Unplug the power cord from a heating appliance. • Check wheather the filter ...Unplug the power cord from the wall outlet. 3. EN-41 Plug the power cord into the wall outlet. 4. Power turns off before the lamp was cooled down sufficiently last time, the fan may start rotating and the POWER button may not work after the power cord is...
User Manual
Page 42
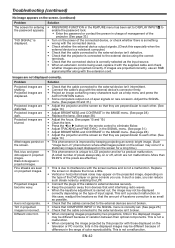
... they are not broken. • Check that COMPUTER INPUT in the SIGNAL menu is not a malfunction. This isn't a product malfunction. This is unique to LCD projector and isn't a product malfunction. (A small number of pixels always stay on or off, which are perpendicular to each other . (See page 10.) &#...8226; Adjust BRIGHTNESS and CONTRAST in the IMAGE menu. (See page 28.) • Replace the lamp. (See page 38.) • Adjust the focus. (See pages 15 and 19.) • Clean the lens. • Press the W or X button on the...
... they are not broken. • Check that COMPUTER INPUT in the SIGNAL menu is not a malfunction. This isn't a product malfunction. This is unique to LCD projector and isn't a product malfunction. (A small number of pixels always stay on or off, which are perpendicular to each other . (See page 10.) &#...8226; Adjust BRIGHTNESS and CONTRAST in the IMAGE menu. (See page 28.) • Replace the lamp. (See page 38.) • Adjust the focus. (See pages 15 and 19.) • Clean the lens. • Press the W or X button on the...
