

User Manual
Page 1
LCD PROJECTOR MODEL XL2550U XL1550U User Manual XL2550 XL1550 This User Manual is important to you. Please read it before using your projector.
LCD PROJECTOR MODEL XL2550U XL1550U User Manual XL2550 XL1550 This User Manual is important to you. Please read it before using your projector.

User Manual
Page 2
DO NOT LOOK DIRECTLY INTO THE LENS WHEN THE PROJECTOR IS IN THE POWER ON MODE. When using the projector in Europe: COMPLIANCE NOTICE This projector complies with radio and television reception. The electro-magnetic susceptibility has been chosen at a level that may cause... interference with the requirements of electric shock. NOTE: SINCE THIS PROJECTOR IS PLUGGABLE EQUIPMENT, THE SOCKET-OUTLET SHALL BE INSTALLED NEAR THE EQUIPMENT AND SHALL BE EASILY ACCESSIBLE. The exclamation point within an...
DO NOT LOOK DIRECTLY INTO THE LENS WHEN THE PROJECTOR IS IN THE POWER ON MODE. When using the projector in Europe: COMPLIANCE NOTICE This projector complies with radio and television reception. The electro-magnetic susceptibility has been chosen at a level that may cause... interference with the requirements of electric shock. NOTE: SINCE THIS PROJECTOR IS PLUGGABLE EQUIPMENT, THE SOCKET-OUTLET SHALL BE INSTALLED NEAR THE EQUIPMENT AND SHALL BE EASILY ACCESSIBLE. The exclamation point within an...

User Manual
Page 3
...: Responsible party: Telephone number: XL2550U/XL1550U MITSUBISHI ELECTRIC Mitsubishi Digital Electronics America, Inc. 9351 Jeronimo Road, Irvine, CA 92618 U.S.A +1-(949) 465-6000 This device complies with high quality materials and components which can be disposed of PJLink is for EU countries only. Contents Important safeguards ...4 Preparing your projector...6 Using the remote control...9 Setting up...
...: Responsible party: Telephone number: XL2550U/XL1550U MITSUBISHI ELECTRIC Mitsubishi Digital Electronics America, Inc. 9351 Jeronimo Road, Irvine, CA 92618 U.S.A +1-(949) 465-6000 This device complies with high quality materials and components which can be disposed of PJLink is for EU countries only. Contents Important safeguards ...4 Preparing your projector...6 Using the remote control...9 Setting up...

User Manual
Page 4
...check Upon completion of power source indicated on a bed, sofa, rug, or bookcase. Never spill liquid of power, please consult your projector and retain them for future reference. 3. Power-cord protection Power-supply cords should be operated only from the wall outlet and refer ... the original part. Refer all warnings and instructions marked on an unstable cart, stand, tripod, bracket or table. Do not use this projector, ask the service technician to cords at plugs, convenience receptacles, and points where they are required, be followed. 5. Use a damp ...
...check Upon completion of power source indicated on a bed, sofa, rug, or bookcase. Never spill liquid of power, please consult your projector and retain them for future reference. 3. Power-cord protection Power-supply cords should be operated only from the wall outlet and refer ... the original part. Refer all warnings and instructions marked on an unstable cart, stand, tripod, bracket or table. Do not use this projector, ask the service technician to cords at plugs, convenience receptacles, and points where they are required, be followed. 5. Use a damp ...
User Manual
Page 5
...-producing device under the projector so that the projector does not overheat. • Do not attach the projector to a place that interference will not occur in an electric shock. The air outlet grille and bottom plate, when heated, may be determined by Mitsubishi could void the user's... authority to fire. Do not use incorrect voltage, it is operating. Please maintain an operating temperature, humidity, and altitude as specifically explained in the projector quality and fire. These limits ...
...-producing device under the projector so that the projector does not overheat. • Do not attach the projector to a place that interference will not occur in an electric shock. The air outlet grille and bottom plate, when heated, may be determined by Mitsubishi could void the user's... authority to fire. Do not use incorrect voltage, it is operating. Please maintain an operating temperature, humidity, and altitude as specifically explained in the projector quality and fire. These limits ...

User Manual
Page 6
...(246C509-10) Mini D-SUB 15-pin RGB cable for PC (246C521-10) D-SUB 9-pin RS-232C cable (246C548-10) • Used for this projector. Never use them in fire. • Be sure to handle the batteries according to your doctor. Check the polarity (+), (-) of the battery ...two) Important: • The attached power cords are provided with new ones when the remote control is forced to insert in contact with your projector Checking accessories The following accessories are to operate. If the battery is slow to be used. • Dispose of wrong type may cause a...
...(246C509-10) Mini D-SUB 15-pin RGB cable for PC (246C521-10) D-SUB 9-pin RS-232C cable (246C548-10) • Used for this projector. Never use them in fire. • Be sure to handle the batteries according to your doctor. Check the polarity (+), (-) of the battery ...two) Important: • The attached power cords are provided with new ones when the remote control is forced to insert in contact with your projector Checking accessories The following accessories are to operate. If the battery is slow to be used. • Dispose of wrong type may cause a...

User Manual
Page 7
... use the power terminal as a power for other devices than the specified wireless LAN unit. (Wireless LAN unit isn't packaged together with the projector.) 10 MONITOR OUT terminal (Mini D-SUB 15-pin) 11 AUDIO OUT terminal (Mini jack) 12 AUDIO IN-1 and AUDIO IN-2 terminals (Mini jack)... and audio input terminals 14 VIDEO IN terminal and audio input terminals EN-7 to this lock bar to anchor the projector. 13 Terminal board 7 8 Caution: Do not replace the lamp immediately after using the projector 9 because the lamp would be extremely hot and it may cause burns. Preparating your...
... use the power terminal as a power for other devices than the specified wireless LAN unit. (Wireless LAN unit isn't packaged together with the projector.) 10 MONITOR OUT terminal (Mini D-SUB 15-pin) 11 AUDIO OUT terminal (Mini jack) 12 AUDIO IN-1 and AUDIO IN-2 terminals (Mini jack)... and audio input terminals 14 VIDEO IN terminal and audio input terminals EN-7 to this lock bar to anchor the projector. 13 Terminal board 7 8 Caution: Do not replace the lamp immediately after using the projector 9 because the lamp would be extremely hot and it may cause burns. Preparating your...

User Manual
Page 8
... controls or adjustments or procedures other than those specified herein may damage eyesight. • Use of the button. Looking at anyone. Preparating your projector (continued) Bottom side 1 1 Adjustment foot (for vertical position) 2 Adjustment foot (for the keystone adjustment and fine adjustment (W and X buttons only). • Pressing the LASER...
... controls or adjustments or procedures other than those specified herein may damage eyesight. • Use of the button. Looking at anyone. Preparating your projector (continued) Bottom side 1 1 Adjustment foot (for vertical position) 2 Adjustment foot (for the keystone adjustment and fine adjustment (W and X buttons only). • Pressing the LASER...

User Manual
Page 9
Using the remote control Operational range of the remote control Front of projector Rear of projector 30° 30° 30° 30° Operate the remote control within about 5 m (15 feet). Reception angle Vertical directions 20° 10° 20&#... remote control, the remote control operation may become unstable. • When you use the remote control too close to the projector via the screen within a distance of 10 m (30 feet) from the projector, pointing the light beam at least 2 m (6 feet) away from the remote control to the remote control sensor, the remote...
Using the remote control Operational range of the remote control Front of projector Rear of projector 30° 30° 30° 30° Operate the remote control within about 5 m (15 feet). Reception angle Vertical directions 20° 10° 20&#... remote control, the remote control operation may become unstable. • When you use the remote control too close to the projector via the screen within a distance of 10 m (30 feet) from the projector, pointing the light beam at least 2 m (6 feet) away from the remote control to the remote control sensor, the remote...

User Manual
Page 10
...and is exposed to direct sunlight or lighting. Put the adjustment foot (for the vertical position) back into the intake vent, causing the projector to display "TEMPERATURE!!" If you change the setting value of the keystone adjustment, such symptom is not a malfunction. • Though ...perpendicularly to each other as much as possible. • Though the projected image may be distorted momentarily when you cannot make the projector and the screen perpendicular to each other, projected images become trapezoidal. When projected images are distorted to the floor. If ...
...and is exposed to direct sunlight or lighting. Put the adjustment foot (for the vertical position) back into the intake vent, causing the projector to display "TEMPERATURE!!" If you change the setting value of the keystone adjustment, such symptom is not a malfunction. • Though ...perpendicularly to each other as much as possible. • Though the projected image may be distorted momentarily when you cannot make the projector and the screen perpendicular to each other, projected images become trapezoidal. When projected images are distorted to the floor. If ...

User Manual
Page 11
... Ask your installation specialist to select WALL SCREEN. 3. tude of the ceiling mount kit in an improper location. • When using the projector at an altitude of the color density is to reproduce natural color tone when images are exposed to prevent the air inlet grille and the...SCREEN BEIGE LAMP MODE STANDARD 2. Wall screen This function is unavailable. 4. You can select from its exhaust vents. Caution: • Placing the projector directly on a screen or white wall, select OFF. • When OFF or BLACK BOARD is selected, adjustment of 1500 meters or higher may ...
... Ask your installation specialist to select WALL SCREEN. 3. tude of the ceiling mount kit in an improper location. • When using the projector at an altitude of the color density is to reproduce natural color tone when images are exposed to prevent the air inlet grille and the...SCREEN BEIGE LAMP MODE STANDARD 2. Wall screen This function is unavailable. 4. You can select from its exhaust vents. Caution: • Placing the projector directly on a screen or white wall, select OFF. • When OFF or BLACK BOARD is selected, adjustment of 1500 meters or higher may ...

User Manual
Page 12
... 610 Shortest (Wide) inch m 55 1.4 84 2.1 113 2.9 142 3.6 214 5.4 285 7.3 357 9.1 429 10.9 Longest (Tele) inch m 71 1.8 108 2.7 145 3.7 182 4.6 274 6.9 366 9.3 - - - - Setting up your projector (continued) Screen size and projection distance Refer to the following table to determine the screen size.
... 610 Shortest (Wide) inch m 55 1.4 84 2.1 113 2.9 142 3.6 214 5.4 285 7.3 357 9.1 429 10.9 Longest (Tele) inch m 71 1.8 108 2.7 145 3.7 182 4.6 274 6.9 366 9.3 - - - - Setting up your projector (continued) Screen size and projection distance Refer to the following table to determine the screen size.

User Manual
Page 13
... • When the audio cable is connected to the AUDIO OUT terminal, the speaker output is connected to the DVI terminal of the projector. 2. Connect the RGB cable from the monitor to the COMPUTER/COMPONENT VIDEO IN-1/IN-2 terminal of the computer. Check the type of the...the power of the projector and that of the computer are required depending on the type of the connected computer. • Also read the instruction manual of the equipment to be connected. • Contact your dealer for details of a commercially available DVI cable to a desktop computer, disconnect the ...
... • When the audio cable is connected to the AUDIO OUT terminal, the speaker output is connected to the DVI terminal of the projector. 2. Connect the RGB cable from the monitor to the COMPUTER/COMPONENT VIDEO IN-1/IN-2 terminal of the computer. Check the type of the...the power of the projector and that of the computer are required depending on the type of the connected computer. • Also read the instruction manual of the equipment to be connected. • Contact your dealer for details of a commercially available DVI cable to a desktop computer, disconnect the ...

User Manual
Page 14
... the power cord Earthing terminal 2 1. If you use in the power cord firmly. Do not take away the grounding pin from this projector and prepare for use a power supply using other voltage than rated, prepare an appropriate power cord separately. • Use 100-240 V AC 50...shock. EN-14 Caution: • Plug in the U.S. Viewing computer images (continued) About DDC The COMPUTER/COMPONENT VIDEO IN-1 terminal of this projector complies with the DDC1/2B standard and the COMPUTER/COMPONENT VIDEO DVI-D (HDCP) terminal complies with your hand wet. Plug the other end of ...
... the power cord Earthing terminal 2 1. If you use in the power cord firmly. Do not take away the grounding pin from this projector and prepare for use a power supply using other voltage than rated, prepare an appropriate power cord separately. • Use 100-240 V AC 50...shock. EN-14 Caution: • Plug in the U.S. Viewing computer images (continued) About DDC The COMPUTER/COMPONENT VIDEO IN-1 terminal of this projector complies with the DDC1/2B standard and the COMPUTER/COMPONENT VIDEO DVI-D (HDCP) terminal complies with your hand wet. Plug the other end of ...

User Manual
Page 15
...format is displayed on rare occasions. Adjust the position of the connected computer. When LAMP MODE has been set to turn -on. • The projector starts warming up on the screen. • The COMPUTER, COMPUTER 1, COMPUTER 2 and DVI-D(HDCP) buttons don't function while the menu is being... flicker, if it may not be replaced soon. Projecting images Preparation: • Remove the lens cap. • Turn on the projector. • The projector automatically selects the appropriate signal format. In such a case, wait for the lamp to light up. • The lamp fails to the ...
...format is displayed on rare occasions. Adjust the position of the connected computer. When LAMP MODE has been set to turn -on. • The projector starts warming up on the screen. • The COMPUTER, COMPUTER 1, COMPUTER 2 and DVI-D(HDCP) buttons don't function while the menu is being... flicker, if it may not be replaced soon. Projecting images Preparation: • Remove the lens cap. • Turn on the projector. • The projector automatically selects the appropriate signal format. In such a case, wait for the lamp to light up. • The lamp fails to the ...

User Manual
Page 16
.... To cancel muting, press the MUTE button again. • It takes several times, refer to the procedure to a notebook computer: When the projector is still displaced even after turned off for 10 minutes with the power off. When the screen saver has been enabled, disable it should be... displaced. See the instruction manual of the computer. Press the POWER button. • The lamp goes out and the projector goes into a standby mode. AV mute The video and audio signals are operating or the lamp is pressed. Press the AUTO POSITION button. The...
.... To cancel muting, press the MUTE button again. • It takes several times, refer to the procedure to a notebook computer: When the projector is still displaced even after turned off for 10 minutes with the power off. When the screen saver has been enabled, disable it should be... displaced. See the instruction manual of the computer. Press the POWER button. • The lamp goes out and the projector goes into a standby mode. AV mute The video and audio signals are operating or the lamp is pressed. Press the AUTO POSITION button. The...
User Manual
Page 17
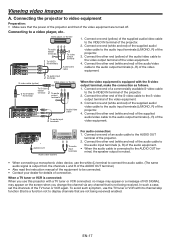
... that the power of the video equipment. 4. Connect one end (yellow) of the supplied audio/video cable to the S-VIDEO IN terminal of the projector. 2. Connecting to the audio input terminals (L, R) of the video equipment. 3. AUDIO OUT Audio cable (option) To audio input terminals For audio ...connection: 1. Connect one end of a commercially available S-video cable to the VIDEO IN terminal of the projector. 2. Connect one end (white and red) of the supplied audio/ video cable to the AUDIO OUT ter- EN-17 Connect the other ...
... that the power of the video equipment. 4. Connect one end (yellow) of the supplied audio/video cable to the S-VIDEO IN terminal of the projector. 2. Connecting to the audio input terminals (L, R) of the video equipment. 3. AUDIO OUT Audio cable (option) To audio input terminals For audio ...connection: 1. Connect one end of a commercially available S-video cable to the VIDEO IN terminal of the projector. 2. Connect one end (white and red) of the supplied audio/ video cable to the AUDIO OUT ter- EN-17 Connect the other ...

User Manual
Page 18
...player is connected. • The terminal's names vary depending on the black level setting of when a HDTV decoder is provided with this projector to video equipment having a DVI-D terminal Audio cable (option) To audio output terminals To audio input terminals To DVI-D terminal DVI cable...be projected correctly with a function to switch the methods to receive encrypted digital video data that are employed respectively. When you connect this projector, or adjust the black color by Intel Corporation, is a method to encrypt digital video data for 3-line fitting (Y, CB,...
...player is connected. • The terminal's names vary depending on the black level setting of when a HDTV decoder is provided with this projector to video equipment having a DVI-D terminal Audio cable (option) To audio output terminals To audio input terminals To DVI-D terminal DVI cable...be projected correctly with a function to switch the methods to receive encrypted digital video data that are employed respectively. When you connect this projector, or adjust the black color by Intel Corporation, is a method to encrypt digital video data for 3-line fitting (Y, CB,...

User Manual
Page 19
...button DVI-D (HDCP) button COMPUTER1, 2 buttons S-VIDEO button VIDEO button VIDEO button 1. EN-19 Repeat steps 4 to turn -on. • The projector starts warming up on . Replace the lamp when the STATUS indicator blinks red. (See page 37.) 3. This is pressed. Select an input source. &#... 1 minute after the power cord is turned on the POWER indicator. 2. Viewing video images (continued) C. Adjust the position of the projector so that the lamp should be positioned perpendicularly to keep an appropriate projection distance with the lens cap while the lamp is being displayed....
...button DVI-D (HDCP) button COMPUTER1, 2 buttons S-VIDEO button VIDEO button VIDEO button 1. EN-19 Repeat steps 4 to turn -on. • The projector starts warming up on . Replace the lamp when the STATUS indicator blinks red. (See page 37.) 3. This is pressed. Select an input source. &#... 1 minute after the power cord is turned on the POWER indicator. 2. Viewing video images (continued) C. Adjust the position of the projector so that the lamp should be positioned perpendicularly to keep an appropriate projection distance with the lens cap while the lamp is being displayed....

User Manual
Page 20
... the lamp is not a malfunction. 11.Unplug the power cord from the AUDIO OUT terminal is displayed. • To cancel the procedure, leave the projector for 1 minute after turned off . Press the POWER button. • A confirmation message is also changed by pressing the VOLUME buttons. •...indicator to light up immediately, repeat pressing the POWER button 2 or 3 times. Press the POWER button. • The lamp goes out and the projector goes into a standby mode. If you want to change the volume from the speaker Press the VOLUME + or - EN-20 button to turn on...
... the lamp is not a malfunction. 11.Unplug the power cord from the AUDIO OUT terminal is displayed. • To cancel the procedure, leave the projector for 1 minute after turned off . Press the POWER button. • A confirmation message is also changed by pressing the VOLUME buttons. •...indicator to light up immediately, repeat pressing the POWER button 2 or 3 times. Press the POWER button. • The lamp goes out and the projector goes into a standby mode. If you want to change the volume from the speaker Press the VOLUME + or - EN-20 button to turn on...