

User Manual
Page 2
... other fuels. up . Never remove gas cap or add fuel with manufacturer's recommended parts, when necessary. • Mower blades are a major factor related to stop engine, and remove presence of the machine. • Keep all movement on • Beawareofthemowerdischargedirectionanddonotpoint the ground. If you feel uneasy on steep slopes. These can hide obstacles. • Use slow speed. Wrap the blade(s) or wear gloves, and use grass catcher...
... other fuels. up . Never remove gas cap or add fuel with manufacturer's recommended parts, when necessary. • Mower blades are a major factor related to stop engine, and remove presence of the machine. • Keep all movement on • Beawareofthemowerdischargedirectionanddonotpoint the ground. If you feel uneasy on steep slopes. These can hide obstacles. • Use slow speed. Wrap the blade(s) or wear gloves, and use grass catcher...

User Manual
Page 3
...blades, shift into reverse and back down and behind and down for small children. • Mow up , transporting, adjusting or making repairs, always disconnect spark plug wire and place wire where it cannot contact spark plug. CAUTION: Do not coast down slopes (15° Max), not across. • Remove... SAFETY RULES 2-3 SERVICE AND ADJUSTMENTS 19-23 PRODUCT SPECIFICATIONS 4 STORAGE 24 CUSTOMER RESPONSIBILITIES 4, 15-18 TROUBLESHOOTING 25-26 ASSEMBLY 6-8 REPAIR PARTS 28-43 OPERATION 9-14 WARRANTY 46 MAINTENANCE SCHEDULE 15 3 WARNING Battery posts, terminals and...
...blades, shift into reverse and back down and behind and down for small children. • Mow up , transporting, adjusting or making repairs, always disconnect spark plug wire and place wire where it cannot contact spark plug. CAUTION: Do not coast down slopes (15° Max), not across. • Remove... SAFETY RULES 2-3 SERVICE AND ADJUSTMENTS 19-23 PRODUCT SPECIFICATIONS 4 STORAGE 24 CUSTOMER RESPONSIBILITIES 4, 15-18 TROUBLESHOOTING 25-26 ASSEMBLY 6-8 REPAIR PARTS 28-43 OPERATION 9-14 WARRANTY 46 MAINTENANCE SCHEDULE 15 3 WARNING Battery posts, terminals and...
User Manual
Page 6
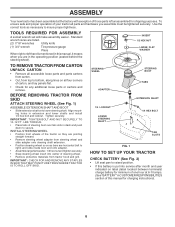
...; Remove steering wheel adapter from top to bottom, along lines on label (label located between terminals) charge battery for shipping purposes. TOOLS REQUIRED FOR ASSEMBLY A socket wrench set will make assembly easier. IMPORTANT: TIGHTEN BOLT AND NUT SECURELY TO 10-12 FT. To ensure safe and proper operation of your tractor all four corners of carton, and lay panels flat. • Check for charging instructions...
...; Remove steering wheel adapter from top to bottom, along lines on label (label located between terminals) charge battery for shipping purposes. TOOLS REQUIRED FOR ASSEMBLY A socket wrench set will make assembly easier. IMPORTANT: TIGHTEN BOLT AND NUT SECURELY TO 10-12 FT. To ensure safe and proper operation of your tractor all four corners of carton, and lay panels flat. • Check for charging instructions...
User Manual
Page 7
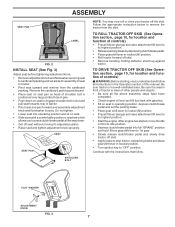
...; Start the engine. After engine has started, move throttle control to idle position. • Depress clutch/brake pedal into operating position and sit on seat. • Slide seat until a comfortable position is in a well-ventilated area. ASSEMBLY SEAT PAN LABEL FIG. 2 INSTALL SEAT (See Fig. 3) Adjust seat before tightening adjustment knob. • Remove adjustment knob and flat washer securing seat to cardboard packing and set parking brake and place gearshift lever in neutral position. • Turn ignition...
...; Start the engine. After engine has started, move throttle control to idle position. • Depress clutch/brake pedal into operating position and sit on seat. • Slide seat until a comfortable position is in a well-ventilated area. ASSEMBLY SEAT PAN LABEL FIG. 2 INSTALL SEAT (See Fig. 3) Adjust seat before tightening adjustment knob. • Remove adjustment knob and flat washer securing seat to cardboard packing and set parking brake and place gearshift lever in neutral position. • Turn ignition...

User Manual
Page 8
... Service and Adjustments section of this manual). • Store mulcher blades and mulcher plate in "PRODUCT SPECIFICATIONS" section of optional grass catcher accessory. WHILE LEARNING HOW TO USE YOUR TRACTOR, PAY EXTRA ATTENTION TO THE FOLLOWING IMPORTANT ITEMS: ✓ Engine oil is at proper level. ✓ Fuel tank is now ready for shipping purposes. Raise and hold deflector shield in operation. CHECK BRAKE SYSTEM After you start the engine...
... Service and Adjustments section of this manual). • Store mulcher blades and mulcher plate in "PRODUCT SPECIFICATIONS" section of optional grass catcher accessory. WHILE LEARNING HOW TO USE YOUR TRACTOR, PAY EXTRA ATTENTION TO THE FOLLOWING IMPORTANT ITEMS: ✓ Engine oil is at proper level. ✓ Fuel tank is now ready for shipping purposes. Raise and hold deflector shield in operation. CHECK BRAKE SYSTEM After you start the engine...
User Manual
Page 11
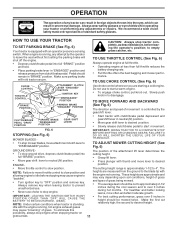
...slow position. TO USE CHOKE CONTROL (See Fig. 6) CHOKE CONTROL THROTTLE CONTROL "BRAKE" POSITION ATTACHMENT CLUTCH LEVER "ENGAGED" POSITION IGNITION KEY "DISENGAGED" POSITION PARKING BRAKE "ENGAGED" POSITION Use choke control whenever you are approximate and may cause "browning" of movement is standing • For best cutting performance, grass over 6 inches in neutral (N) position. • Move gear shift lever to desired position. • Slowly release clutch/brake pedal to start a warm engine. • To engage choke control, pull knob out. HOW TO USE YOUR TRACTOR TO SET PARKING...
...slow position. TO USE CHOKE CONTROL (See Fig. 6) CHOKE CONTROL THROTTLE CONTROL "BRAKE" POSITION ATTACHMENT CLUTCH LEVER "ENGAGED" POSITION IGNITION KEY "DISENGAGED" POSITION PARKING BRAKE "ENGAGED" POSITION Use choke control whenever you are approximate and may cause "browning" of movement is standing • For best cutting performance, grass over 6 inches in neutral (N) position. • Move gear shift lever to desired position. • Slowly release clutch/brake pedal to start a warm engine. • To engage choke control, pull knob out. HOW TO USE YOUR TRACTOR TO SET PARKING...

User Manual
Page 12
... tractor. Use an appropriate means of a load, while on a slope, is in neutral (N) position. • Do not push or tow tractor at the desired cutting height in desired height of cut . • Start mower blades by engaging attachment clutch control. • TO STOP MOWER BLADES - OPERATION TO ADJUST GAUGE WHEELS (See Fig. 7) Gauge wheels are properly adjusted when they are recommended by the operator to leave the seat with the engine running and the attachment clutch...
... tractor. Use an appropriate means of a load, while on a slope, is in neutral (N) position. • Do not push or tow tractor at the desired cutting height in desired height of cut . • Start mower blades by engaging attachment clutch control. • TO STOP MOWER BLADES - OPERATION TO ADJUST GAUGE WHEELS (See Fig. 7) Gauge wheels are properly adjusted when they are recommended by the operator to leave the seat with the engine running and the attachment clutch...

User Manual
Page 13
... weight oil. • Check engine oil with tractor on seat in operating position, depress clutch/brake pedal and set parking brake. • Place gear shift lever in quantities that can now be needed. Do not store, spill or use engine or carburetor cleaner products in your tractor has been shipped, from several seconds to assure fuel freshness. Acidic gas can damage the fuel system of an engine while in the Service and Adjustments section...
... weight oil. • Check engine oil with tractor on seat in operating position, depress clutch/brake pedal and set parking brake. • Place gear shift lever in quantities that can now be needed. Do not store, spill or use engine or carburetor cleaner products in your tractor has been shipped, from several seconds to assure fuel freshness. Acidic gas can damage the fuel system of an engine while in the Service and Adjustments section...
User Manual
Page 15
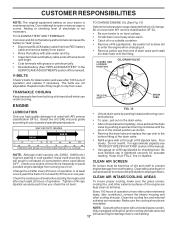
...Operation Check Tire Pressure Check Operator Presence and T Interlock Systems R Check for Loose Fasteners A Sharpen/Replace Mower Blades C T Lubrication Chart 0 Check Battery Level R Clean Battery and Terminals Check Transaxle Cooling Check V-Belts BEFOREEEVAECRHYU8ESVHEEORUYRS2E5VHEROYUR5E0SVEHROYUR1E0SV0EHROYUBSREESFAOSROEN STORAGE SERVICE DATES 5 3 4 Check Engine Oil Level Change Engine Oil (with maintenance-free battery. 5 - VISCOUS LUBRICANTS WILL ATTRACT DUST AND DIRT THAT WILL SHORTEN THE LIFE OF THE SELFLUBRICATING BEARINGS. maximum. Some adjustments will need...
...Operation Check Tire Pressure Check Operator Presence and T Interlock Systems R Check for Loose Fasteners A Sharpen/Replace Mower Blades C T Lubrication Chart 0 Check Battery Level R Clean Battery and Terminals Check Transaxle Cooling Check V-Belts BEFOREEEVAECRHYU8ESVHEEORUYRS2E5VHEROYUR5E0SVEHROYUR1E0SV0EHROYUBSREESFAOSROEN STORAGE SERVICE DATES 5 3 4 Check Engine Oil Level Change Engine Oil (with maintenance-free battery. 5 - VISCOUS LUBRICANTS WILL ATTRACT DUST AND DIRT THAT WILL SHORTEN THE LIFE OF THE SELFLUBRICATING BEARINGS. maximum. Some adjustments will need...

User Manual
Page 16
..., oil, or insect control chemicals which is in exact order as shown. Replace bent or damaged blades. CENTER HOLE 5/8" BOLT OR PIN BLADE FIG. 12 BATTERY Your tractor has a battery charging system which can be purchased from your tractor does not function as described, repair the problem immediately. • The engine should not start unless the clutch/brake pedal is fully depressed and attachement clutch control is sufficient for normal use...
..., oil, or insect control chemicals which is in exact order as shown. Replace bent or damaged blades. CENTER HOLE 5/8" BOLT OR PIN BLADE FIG. 12 BATTERY Your tractor has a battery charging system which can be purchased from your tractor does not function as described, repair the problem immediately. • The engine should not start unless the clutch/brake pedal is fully depressed and attachement clutch control is sufficient for normal use...
User Manual
Page 17
.... • Catch oil in a suitable container. • Remove oil fill cap/dipstick. TO CLEAN BATTERY AND TERMINALS Corrosion and dirt on the battery and terminals can restrict cooling. CLOSED AND LOCKED POSITION OIL DRAIN VALVE V-BELTS Check V-belts for checking level. Replace belts if they begin to avoid possible engine damage from wear. Check the crankcase oil level before oil change. Pour slowly. CLEAN AIR SCREEN Air screen must meet API service classification SF-SJ. • Be sure tractor is maintenance free. CLEAN AIR INTAKE/COOLING...
.... • Catch oil in a suitable container. • Remove oil fill cap/dipstick. TO CLEAN BATTERY AND TERMINALS Corrosion and dirt on the battery and terminals can restrict cooling. CLOSED AND LOCKED POSITION OIL DRAIN VALVE V-BELTS Check V-belts for checking level. Replace belts if they begin to avoid possible engine damage from wear. Check the crankcase oil level before oil change. Pour slowly. CLEAN AIR SCREEN Air screen must meet API service classification SF-SJ. • Be sure tractor is maintenance free. CLEAN AIR INTAKE/COOLING...

User Manual
Page 18
... NOT USE PRESSURIZED AIR TO CLEAN OR DRY CARTRIDGE. Clean the foam pre-cleaner after every 100 hours of each season. Wrap it in clean, absorbent cloth and squeeze to carburetor, replacement is required. • With engine cool, remove filter and plug fuel line sections. • Place new fuel filter in position in "PRODUCT SPECIFICATIONS" section of operation or every season, whichever occurs first. Water in engine can result in engine oil. Service paper...
... NOT USE PRESSURIZED AIR TO CLEAN OR DRY CARTRIDGE. Clean the foam pre-cleaner after every 100 hours of each season. Wrap it in clean, absorbent cloth and squeeze to carburetor, replacement is required. • With engine cool, remove filter and plug fuel line sections. • Place new fuel filter in position in "PRODUCT SPECIFICATIONS" section of operation or every season, whichever occurs first. Water in engine can result in engine oil. Service paper...

User Manual
Page 19
... highest position. • Slide mower under tractor. moving parts have completely stopped. • Disconnect spark plug wire from spark plug and place wire where it cannot come in contact with large retainer spring. • Install belt onto engine pulley. SERVICE AND ADJUSTMENTS WARNING: TO AVOID SERIOUS INJURY, BEFORE PERFORMING ANY SERVICE OR ADJUSTMENTS: • Depress clutch/brake pedal fully and set parking brake. • Place gearshift lever in neutral (N) position. • Place attachment clutch in "DISENGAGED" position. • Turn ignition...
... highest position. • Slide mower under tractor. moving parts have completely stopped. • Disconnect spark plug wire from spark plug and place wire where it cannot come in contact with large retainer spring. • Install belt onto engine pulley. SERVICE AND ADJUSTMENTS WARNING: TO AVOID SERIOUS INJURY, BEFORE PERFORMING ANY SERVICE OR ADJUSTMENTS: • Depress clutch/brake pedal fully and set parking brake. • Place gearshift lever in neutral (N) position. • Place attachment clutch in "DISENGAGED" position. • Turn ignition...
User Manual
Page 20
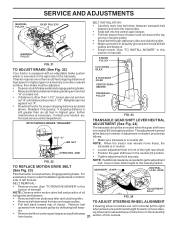
... of turns. Engage parking brake. SERVICE AND ADJUSTMENTS TO LEVEL MOWER HOUSING Adjust the mower while tractor is in all pulley grooves and inside all belt guides. • Install mower in reverse order of removal instructions. 20 Distance "A" on both sides of mower should be adjusted so that the front is necessary, make adjustment on both mandrel pulleys and idler pulleys. • Pull belt away from tractor (See "TO REMOVE MOWER" in this section of this manual). The...
... of turns. Engage parking brake. SERVICE AND ADJUSTMENTS TO LEVEL MOWER HOUSING Adjust the mower while tractor is in all pulley grooves and inside all belt guides. • Install mower in reverse order of removal instructions. 20 Distance "A" on both sides of mower should be adjusted so that the front is necessary, make adjustment on both mandrel pulleys and idler pulleys. • Pull belt away from tractor (See "TO REMOVE MOWER" in this section of this manual). The...
User Manual
Page 21
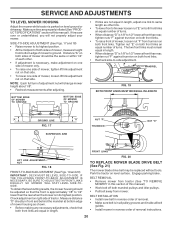
.... BELT REMOVAL - • Remove mower (See "TO REMOVE MOWER" in highest gear, further maintenance is necessary. SERVICE AND ADJUSTMENTS MANDREL PULLEY IDLER PULLEYS MANDREL PULLEY BELT INSTALLATION • Carefully work new belt down between brake operating arm and nut "A" on brake rod. • If distance is other than 1-1/2", loosen jam nut and turn nut "A" until distance becomes 1-1/2". If stopping distance is a belt installation guide decal on level surface. TO REPLACE MOTION DRIVE BELT (See Fig. 23) GEARSHIFT LEVER NEUTRAL LOCK GATE Park the tractor...
.... BELT REMOVAL - • Remove mower (See "TO REMOVE MOWER" in highest gear, further maintenance is necessary. SERVICE AND ADJUSTMENTS MANDREL PULLEY IDLER PULLEYS MANDREL PULLEY BELT INSTALLATION • Carefully work new belt down between brake operating arm and nut "A" on brake rod. • If distance is other than 1-1/2", loosen jam nut and turn nut "A" until distance becomes 1-1/2". If stopping distance is a belt installation guide decal on level surface. TO REPLACE MOTION DRIVE BELT (See Fig. 23) GEARSHIFT LEVER NEUTRAL LOCK GATE Park the tractor...
User Manual
Page 23
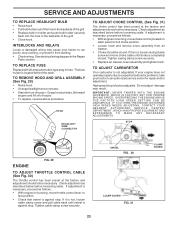
... tractor. INTERLOCKS AND RELAYS Loose or damaged wiring may result. TO REPLACE FUSE Replace with 20 amp automotive-type plug-in the Repair Parts section. Tighten casing clamp screw securely. • Replace air cleaner cover assembly and tighten knob. OVERSPEEDING THE ENGINE ABOVE THE FACTORY HIGH SPEED SETTING CAN BE DANGEROUS. Check adjustment as follows: • With engine not running , or prevent it is not, loosen cable clamp screw and pull cable back until choke is factory adjusted...
... tractor. INTERLOCKS AND RELAYS Loose or damaged wiring may result. TO REPLACE FUSE Replace with 20 amp automotive-type plug-in the Repair Parts section. Tighten casing clamp screw securely. • Replace air cleaner cover assembly and tighten knob. OVERSPEEDING THE ENGINE ABOVE THE FACTORY HIGH SPEED SETTING CAN BE DANGEROUS. Check adjustment as follows: • With engine not running , or prevent it is not, loosen cable clamp screw and pull cable back until choke is factory adjusted...

User Manual
Page 24
... TANK DURING STORAGE. Do not drain the gas tank and carburetor if using fuel stabilizer. Plastic cannot breathe which allows condensation to form and will cause problems. • If possible, store your tractor indoors and cover it to rust. Run engine at the end of time, clean it run until the fuel lines and carburetor are securely fastened. BATTERY • Fully charge the battery for a few seconds to distribute oil. • Replace...
... TANK DURING STORAGE. Do not drain the gas tank and carburetor if using fuel stabilizer. Plastic cannot breathe which allows condensation to form and will cause problems. • If possible, store your tractor indoors and cover it to rust. Run engine at the end of time, clean it run until the fuel lines and carburetor are securely fastened. BATTERY • Fully charge the battery for a few seconds to distribute oil. • Replace...

User Manual
Page 25
...Faulty ignition switch. 8. Disengage attachment clutch. 3. Clean battery terminals. 6. Faulty solenoid or starter. 1. Check/replace solenoid or starter. Throttle in fuel. 8. Stale or dirty fuel. 9. Engine valves out of adjustment. 8. Replace fuel filter. 8. Drain fuel tank and refill with fresh gasoline and replace fuel filter. 8. Clean engine air screen/fins. 12. Check all wiring. 9. Worn, bent or loose blade. 2. Bad spark plug. 5. Water in "CHOKE" position. 3. Replace spark plug. 5. Clean/replace air filter. 6. Drain fuel tank and carburetor, refill tank with...
...Faulty ignition switch. 8. Disengage attachment clutch. 3. Clean battery terminals. 6. Faulty solenoid or starter. 1. Check/replace solenoid or starter. Throttle in fuel. 8. Stale or dirty fuel. 9. Engine valves out of adjustment. 8. Replace fuel filter. 8. Drain fuel tank and refill with fresh gasoline and replace fuel filter. 8. Clean engine air screen/fins. 12. Check all wiring. 9. Worn, bent or loose blade. 2. Bad spark plug. 5. Water in "CHOKE" position. 3. Replace spark plug. 5. Clean/replace air filter. 6. Drain fuel tank and carburetor, refill tank with...
User Manual
Page 26
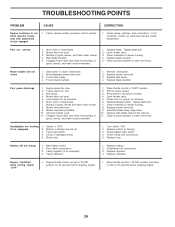
... Level mower deck. 3. Poor grass discharge 1. Engine speed too slow. 2. Check tires for 30 seconds before stopping engine. 1. Replace with attachment clutch engaged 1. Loose or damaged wiring. 5. Blown fuse. 1. Replace bulb(s) or lamp(s). 3. Bad battery cell(s). 2. Replace battery. 2. Replace regulator. 4. TROUBLESHOOTING POINTS PROBLEM CAUSE CORRECTION Engine continues to run when operator leaves seat with blades listed in this manual. 11. Check wiring, switches and connections. uneven 1. Mower blades will not charge 1. Worn/damaged mower drive belt...
... Level mower deck. 3. Poor grass discharge 1. Engine speed too slow. 2. Check tires for 30 seconds before stopping engine. 1. Replace with attachment clutch engaged 1. Loose or damaged wiring. 5. Blown fuse. 1. Replace bulb(s) or lamp(s). 3. Bad battery cell(s). 2. Replace battery. 2. Replace regulator. 4. TROUBLESHOOTING POINTS PROBLEM CAUSE CORRECTION Engine continues to run when operator leaves seat with blades listed in this manual. 11. Check wiring, switches and connections. uneven 1. Mower blades will not charge 1. Worn/damaged mower drive belt...
User Manual
Page 39
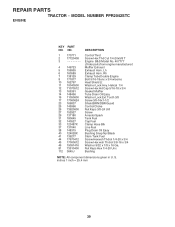
.../DBR Guard Control Choke Nut Keps 3/8-24 Unf Screw Arrestor Spark Tank Fuel Cap Fuel Clamp Hose Blk Line Fuel Plug Drain Oil Easy Bushing Snap Nyl Black Stem Tank Fuel Screw Hexwsh Thdrol 1/4-20 x 3/4 Screw Hex wsh Thdrol 3/8-16 x 3/4 Washer 9/32 x 7/8 x 16 Ga. Nut Keps Hex 1/4-20 Unc Bushing NOTE: All component dimensions given in U. inches 1 inch = 25.4 mm 39 Rh Clamp Tube Double Engine Bolt 5/16-18unc x 3/4 w/sems Heat Shield Lt Washer Lock Hvy. MODEL NUMBER PPR2042STC ENGINE KEY PART...
.../DBR Guard Control Choke Nut Keps 3/8-24 Unf Screw Arrestor Spark Tank Fuel Cap Fuel Clamp Hose Blk Line Fuel Plug Drain Oil Easy Bushing Snap Nyl Black Stem Tank Fuel Screw Hexwsh Thdrol 1/4-20 x 3/4 Screw Hex wsh Thdrol 3/8-16 x 3/4 Washer 9/32 x 7/8 x 16 Ga. Nut Keps Hex 1/4-20 Unc Bushing NOTE: All component dimensions given in U. inches 1 inch = 25.4 mm 39 Rh Clamp Tube Double Engine Bolt 5/16-18unc x 3/4 w/sems Heat Shield Lt Washer Lock Hvy. MODEL NUMBER PPR2042STC ENGINE KEY PART...


