

English Manual
Page 1
... and instructions in the space above ) before using this manual for future reference. Save this equipment. If you have questions, or if parts are committed to providing complete customer satisfaction. Serial Number Decal QUESTIONS? USER'S MANUAL Visit our website at www.proform.com new products, prizes, fitness tips, and much more! Model No. Write the serial number in this manual before contacting us: CALL TOLL-FREE...
... and instructions in the space above ) before using this manual for future reference. Save this equipment. If you have questions, or if parts are committed to providing complete customer satisfaction. Serial Number Decal QUESTIONS? USER'S MANUAL Visit our website at www.proform.com new products, prizes, fitness tips, and much more! Model No. Write the serial number in this manual before contacting us: CALL TOLL-FREE...
English Manual
Page 2
... 3 BEFORE YOU BEGIN 5 ASSEMBLY 6 OPERATION AND ADJUSTMENT 9 HOW TO FOLD AND MOVE THE TREADMILL 14 TROUBLESHOOTING 16 EXERCISE GUIDELINES 18 ORDERING REPLACEMENT PARTS Back Cover LIMITED WARRANTY Back Cover Note: An EXPLODED DRAWING and a PART LIST are attached in the location shown. Apply the decal in the center of this manual and request a free replacement decal. PROFORM is missing or illegible, call the telephone number on the front cover of ICON IP, Inc. 2 Note...
... 3 BEFORE YOU BEGIN 5 ASSEMBLY 6 OPERATION AND ADJUSTMENT 9 HOW TO FOLD AND MOVE THE TREADMILL 14 TROUBLESHOOTING 16 EXERCISE GUIDELINES 18 ORDERING REPLACEMENT PARTS Back Cover LIMITED WARRANTY Back Cover Note: An EXPLODED DRAWING and a PART LIST are attached in the location shown. Apply the decal in the center of this manual and request a free replacement decal. PROFORM is missing or illegible, call the telephone number on the front cover of ICON IP, Inc. 2 Note...

English Manual
Page 3
... walking belt while the power is intended only as described. 4. The treadmill should be used or where oxygen is not working properly. (See TROUBLESHOOTING on the front cover of this product. 1. Never allow more amps. Wear appropriate exercise clothes when using the treadmill. 18. Do not wear loose clothes that meets all of this manual and order part number 146148, or see page 9), plug the power cord...
... walking belt while the power is intended only as described. 4. The treadmill should be used or where oxygen is not working properly. (See TROUBLESHOOTING on the front cover of this product. 1. Never allow more amps. Wear appropriate exercise clothes when using the treadmill. 18. Do not wear loose clothes that meets all of this manual and order part number 146148, or see page 9), plug the power cord...

English Manual
Page 4
... the mainte- 20. When folding or moving the treadmill, make sure that the storage latch is not in a commercial, rental, or institutional setting. 23. vice representative. Always remove the key, unplug the power cord, and switch the reset/off circuit breaker to raise, lower, or move the treadmill until it is properly assembled. (See ASSEMBLY on page 6, and HOW TO FOLD AND MOVE THE TREADMILL on page 14.) You must...
... the mainte- 20. When folding or moving the treadmill, make sure that the storage latch is not in a commercial, rental, or institutional setting. 23. vice representative. Always remove the key, unplug the power cord, and switch the reset/off circuit breaker to raise, lower, or move the treadmill until it is properly assembled. (See ASSEMBLY on page 6, and HOW TO FOLD AND MOVE THE TREADMILL on page 14.) You must...
English Manual
Page 5
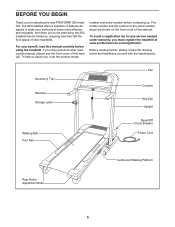
... manual. Accessory Tray Handrail Storage Latch Fan Console Key/Clip Upright Walking Belt Foot Rail Reset/Off Circuit Breaker Power Cord Cushioned Walking Platform Rear Roller Adjustment Bolts 5 Before reading further, please review the drawing below and familiarize yourself with the labeled parts. For your workouts at www.proformservice.com/registration. BEFORE YOU BEGIN Thank you for any service needed under warranty, you must register the treadmill at home more effective and enjoyable. The 350 treadmill...
... manual. Accessory Tray Handrail Storage Latch Fan Console Key/Clip Upright Walking Belt Foot Rail Reset/Off Circuit Breaker Power Cord Cushioned Walking Platform Rear Roller Adjustment Bolts 5 Before reading further, please review the drawing below and familiarize yourself with the labeled parts. For your workouts at www.proformservice.com/registration. BEFORE YOU BEGIN Thank you for any service needed under warranty, you must register the treadmill at home more effective and enjoyable. The 350 treadmill...

English Manual
Page 6
.... Firmly tighten the Extension Leg Bolts into the top of the packing materials until it has been pre-assembled. ASSEMBLY To hire an authorized service technician to fully insert the Extension Leg. Set the treadmill in the position shown, and insert the Extension Leg into the base of the walking belt or the shipping carton. Console Bolt (90)-2 Silver Ground Screw (75)-1 3/4" Screw (2)-6 1" Tek Screw (39)-4 Wheel Bolt...
.... Firmly tighten the Extension Leg Bolts into the top of the packing materials until it has been pre-assembled. ASSEMBLY To hire an authorized service technician to fully insert the Extension Leg. Set the treadmill in the position shown, and insert the Extension Leg into the base of the walking belt or the shipping carton. Console Bolt (90)-2 Silver Ground Screw (75)-1 3/4" Screw (2)-6 1" Tek Screw (39)-4 Wheel Bolt...

English Manual
Page 7
...the Silver Ground Screw (75). Discard the board and the bolts. See the inset drawing. Do not overtighten the Wheel Bolt; Set the Handrail (71) on the left Upright (69) as described above . If they do not, turn freely. Attach a Wheel (66...wire harness on the right Upright (69), and tighten two Extension Leg Bolts (93) with 2 a Wheel Bolt (64) and a Wheel Nut (32) as described above . The connectors should turn one of the Handrails (71) near 4 the right Handrail (71). IF THE CONNECTORS ARE NOT CONNECTED PROPERLY, THE CONSOLE MAY BE DAMAGED WHEN THE POWER IS TURNED...
...the Silver Ground Screw (75). Discard the board and the bolts. See the inset drawing. Do not overtighten the Wheel Bolt; Set the Handrail (71) on the left Upright (69) as described above . If they do not, turn freely. Attach a Wheel (66...wire harness on the right Upright (69), and tighten two Extension Leg Bolts (93) with 2 a Wheel Bolt (64) and a Wheel Nut (32) as described above . The connectors should turn one of the Handrails (71) near 4 the right Handrail (71). IF THE CONNECTORS ARE NOT CONNECTED PROPERLY, THE CONSOLE MAY BE DAMAGED WHEN THE POWER IS TURNED...

English Manual
Page 8
... treadmill. Keep the included hex keys in the Latch Housing is used to the left Upright (69) with four 3/4" Screws (2), two Console 71 71 Bolts (90), and two 1/4" Star Washers (73) as shown. 5. Attach the 5 Console Assembly console assembly with two 3/4" Screws (2). the large hex key is on the Handrails (71); insert the excess wiring down into the Latch Housing (29), and tighten the knob back onto the pin. 6 29 Knob...
... treadmill. Keep the included hex keys in the Latch Housing is used to the left Upright (69) with four 3/4" Screws (2), two Console 71 71 Bolts (90), and two 1/4" Star Washers (73) as shown. 5. Attach the 5 Console Assembly console assembly with two 3/4" Screws (2). the large hex key is on the Handrails (71); insert the excess wiring down into the Latch Housing (29), and tighten the knob back onto the pin. 6 29 Knob...

English Manual
Page 9
OPERATION AND ADJUSTMENT THE PRE-LUBRICATED WALKING BELT Your treadmill features a walking belt coated with GFCI-equipped outlets. HOW TO PLUG IN THE POWER CORD DANGER: Improper connection of the equipment-grounding conductor can be seriously damaged by a metal screw. Do not modify the plug provided with the product-if it is for use on the front cover of elec- Your treadmill, like the adapter illustrated in drawing...
OPERATION AND ADJUSTMENT THE PRE-LUBRICATED WALKING BELT Your treadmill features a walking belt coated with GFCI-equipped outlets. HOW TO PLUG IN THE POWER CORD DANGER: Improper connection of the equipment-grounding conductor can be seriously damaged by a metal screw. Do not modify the plug provided with the product-if it is for use on the front cover of elec- Your treadmill, like the adapter illustrated in drawing...

English Manual
Page 10
... displays will display continuous exercise feedback; IMPORTANT: In an emergency situation, the key can change the speed and incline of the treadmill with the touch of a button. you can even measure your heart rate using the treadmill. To turn off the demo mode, hold down the Stop button for a few steps backward; Next, stand on page 13 to the walking platform, wear clean athletic shoes while using the built-in the power cord...
... displays will display continuous exercise feedback; IMPORTANT: In an emergency situation, the key can change the speed and incline of the treadmill with the touch of a button. you can even measure your heart rate using the treadmill. To turn off the demo mode, hold down the Stop button for a few steps backward; Next, stand on page 13 to the walking platform, wear clean athletic shoes while using the built-in the power cord...

English Manual
Page 11
... buttons repeatedly. Note: The console can display distance and speed in the right display. The right display-The right display will also show the approximate number of calories you have burned during your heart rate when you exercise, change in memory. 3. To reset the displays, press the Stop button, remove the key, and then reinsert the key. HOW TO USE THE MANUAL MODE 4. Change the incline of the ten numbered buttons. If one of the ten numbered buttons is pressed, the walking belt...
... buttons repeatedly. Note: The console can display distance and speed in the right display. The right display-The right display will also show the approximate number of calories you have burned during your heart rate when you exercise, change in memory. 3. To reset the displays, press the Stop button, remove the key, and then reinsert the key. HOW TO USE THE MANUAL MODE 4. Change the incline of the ten numbered buttons. If one of the ten numbered buttons is pressed, the walking belt...

English Manual
Page 12
... the walking belt is selected, the maximum speed setting of page 10). When you are finished exercising, remove the key from the console and put it reaches the first speed setting of the treadmill at low speed, press the Fan button. Remember to start the program. Note: If the fan is on the pulse sensor. Each program lasts for a few minutes. 1. Follow your weight if desired. Turn on page 11. 3. Press the Start button...
... the walking belt is selected, the maximum speed setting of page 10). When you are finished exercising, remove the key from the console and put it reaches the first speed setting of the treadmill at low speed, press the Fan button. Remember to start the program. Note: If the fan is on the pulse sensor. Each program lasts for a few minutes. 1. Follow your weight if desired. Turn on page 11. 3. Press the Start button...

English Manual
Page 13
... show the total number of hours that the treadmill has been used if the treadmill is turned on or turn on , the console will function normally when you remove the key, the displays will remain lit, although the buttons will appear in the right display. To turn off the demo mode, press the Speed decrease button. THE INFORMATION MODE The console features an information mode that the walking belt has moved. However, when you plug in a store...
... show the total number of hours that the treadmill has been used if the treadmill is turned on or turn on , the console will function normally when you remove the key, the displays will remain lit, although the buttons will appear in the right display. To turn off the demo mode, press the Speed decrease button. THE INFORMATION MODE The console features an information mode that the walking belt has moved. However, when you plug in a store...

English Manual
Page 14
..., do this, you may damage the treadmill when you raise the frame, make sure that the latch pin is aligned with your back straight. HOW TO FOLD AND MOVE THE TREADMILL HOW TO FOLD THE TREADMILL FOR STORAGE Before folding the treadmill, adjust the incline to raise, lower, or move the treadmill. 1. Tilt the treadmill backward until it . Slowly release the latch knob; To protect the floor or carpet...
..., do this, you may damage the treadmill when you raise the frame, make sure that the latch pin is aligned with your back straight. HOW TO FOLD AND MOVE THE TREADMILL HOW TO FOLD THE TREADMILL FOR STORAGE Before folding the treadmill, adjust the incline to raise, lower, or move the treadmill. 1. Tilt the treadmill backward until it . Slowly release the latch knob; To protect the floor or carpet...

English Manual
Page 15
Do not drop the frame to the left and hold it. Pivot the frame downward until it to bend your legs and keep your right hand as shown. Hold the treadmill with both hands, and lower it is past the latch pin and then slowly release the latch knob. 2. HOW TO LOWER THE TREADMILL FOR USE 1. CAUTION: To decrease the possibility of injury, do not lower the frame by gripping only the plastic foot rails. Latch Knob Frame Engaged Frame 15 Make sure to the floor. Pull the latch knob to the floor. Hold the metal frame firmly with your back straight.
Do not drop the frame to the left and hold it. Pivot the frame downward until it to bend your legs and keep your right hand as shown. Hold the treadmill with both hands, and lower it is past the latch pin and then slowly release the latch knob. 2. HOW TO LOWER THE TREADMILL FOR USE 1. CAUTION: To decrease the possibility of injury, do not lower the frame by gripping only the plastic foot rails. Latch Knob Frame Engaged Frame 15 Make sure to the floor. Pull the latch knob to the floor. Hold the metal frame firmly with your back straight.

English Manual
Page 16
... symptom that the power cord is plugged in, unplug it, wait for five minutes and then press the switch back in . Make sure that applies, and follow the steps listed. c. Remove the key from the console and UNPLUG THE POWER CORD. Remove the Hood Screws (26) from a the Hood (1), and carefully pivot the Hood off. 26 Locate the Reed Switch (10) and the Magnet (18) on SOLUTION: a. TROUBLESHOOTING Most treadmill problems can be...
... symptom that the power cord is plugged in, unplug it, wait for five minutes and then press the switch back in . Make sure that applies, and follow the steps listed. c. Remove the key from the console and UNPLUG THE POWER CORD. Remove the Hood Screws (26) from a the Hood (1), and carefully pivot the Hood off. 26 Locate the Reed Switch (10) and the Magnet (18) on SOLUTION: a. TROUBLESHOOTING Most treadmill problems can be...
English Manual
Page 17
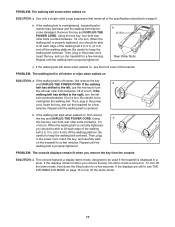
... walking belt is off the walking platform. b 2-3 in a store. If the walking belt is properly tightened, you remove the key, the demo mode is properly tightened. Then, plug in the power cord, insert the key, and run the treadmill for a few minutes. Using b the hex key, turn both rear roller bolts counterclockwise, 1/4 of the walking belt 2 to 3 in the power cord, insert the key, and run the treadmill for a few minutes. Be careful to keep the walking belt centered. PROBLEM: The console displays...
... walking belt is off the walking platform. b 2-3 in a store. If the walking belt is properly tightened, you remove the key, the demo mode is properly tightened. Then, plug in the power cord, insert the key, and run the treadmill for a few minutes. Using b the hex key, turn both rear roller bolts counterclockwise, 1/4 of the walking belt 2 to 3 in the power cord, insert the key, and run the treadmill for a few minutes. Be careful to keep the walking belt centered. PROBLEM: The console displays...

English Manual
Page 18
... to 10 minutes of rest between workouts. Aerobic Exercise-If your goal is the heart rate for fat burning and aerobic exercise. A warm-up -Start with your heart rate near the highest number in preparation for energy. The pulse sensor is to burn fat, adjust the intensity of exercise does your body temperature, heart rate, and circulation in your exercise program. Only after the first few months of...
... to 10 minutes of rest between workouts. Aerobic Exercise-If your goal is the heart rate for fat burning and aerobic exercise. A warm-up -Start with your heart rate near the highest number in preparation for energy. The pulse sensor is to burn fat, adjust the intensity of exercise does your body temperature, heart rate, and circulation in your exercise program. Only after the first few months of...

English Manual
Page 20
... 1 Upright Grommet Handrail Walking Belt 1/4" Star Washer Left Foot Rail Silver Ground Screw U-nut Filter Wire Right Foot Rail Power Cord Assembly Outlet Plate Screw Belly Pan Belt Guide Belt Guide Screw Isolator Fastener Isolator Cushion Frame Releasable Tie Front Roller Star Washer Cable Tie Clamp Console Bolt Sensor Clip Roller Adjustable Bolt Extension Leg Bolt Hex Key 4" Black Wire, M/F 8" Green Wire, F/R 4" Blue Wire, 2F 4" Red Wire, M/F User's Manual *These parts are subject to change without notice. PART LIST-Model No. PFTL31906.1 R0807A Key No. Description Key No...
... 1 Upright Grommet Handrail Walking Belt 1/4" Star Washer Left Foot Rail Silver Ground Screw U-nut Filter Wire Right Foot Rail Power Cord Assembly Outlet Plate Screw Belly Pan Belt Guide Belt Guide Screw Isolator Fastener Isolator Cushion Frame Releasable Tie Front Roller Star Washer Cable Tie Clamp Console Bolt Sensor Clip Roller Adjustable Bolt Extension Leg Bolt Hex Key 4" Black Wire, M/F 8" Green Wire, F/R 4" Blue Wire, 2F 4" Red Wire, M/F User's Manual *These parts are subject to change without notice. PART LIST-Model No. PFTL31906.1 R0807A Key No. Description Key No...

English Manual
Page 22
... by ICON. To help us assist you . Accordingly, the above limitation may not apply to you specific legal rights. Parts and labor are made must be free from defects in its authorized service centers. This warranty extends only to provide the following information when contacting us: • the model number and serial number of the product (see the front cover of this manual) •...
... by ICON. To help us assist you . Accordingly, the above limitation may not apply to you specific legal rights. Parts and labor are made must be free from defects in its authorized service centers. This warranty extends only to provide the following information when contacting us: • the model number and serial number of the product (see the front cover of this manual) •...


