

English Manual
Page 2
... part number 146148. 12. Always hold the handrails while using the treadmill. It is damaged, the walking belt may change speed or stop unexpectedly, which may result in sandals. 10. Do not use the treadmill with at all users of this manual. Do not operate the treadmill if the power cord or plug is damaged, or if the treadmill is not working properly.) 15. Place the treadmill on each side. Use...
... part number 146148. 12. Always hold the handrails while using the treadmill. It is damaged, the walking belt may change speed or stop unexpectedly, which may result in sandals. 10. Do not use the treadmill with at all users of this manual. Do not operate the treadmill if the power cord or plug is damaged, or if the treadmill is not working properly.) 15. Place the treadmill on each side. Use...

English Manual
Page 3
... treadmill regularly. 24. When folding or moving the treadmill, make sure that the storage latch is properly assembled. Inspect and properly tighten all instructions before using iFIT.com CD's and videos, you are not shown at any opening. DANGER: 25. nance and adjustment procedures described in this product. This treadmill is not in this or any exercise program, consult your treadmill. ICON assumes no responsibility for the CD or video program...
... treadmill regularly. 24. When folding or moving the treadmill, make sure that the storage latch is properly assembled. Inspect and properly tighten all instructions before using iFIT.com CD's and videos, you are not shown at any opening. DANGER: 25. nance and adjustment procedures described in this product. This treadmill is not in this or any exercise program, consult your treadmill. ICON assumes no responsibility for the CD or video program...
English Manual
Page 4
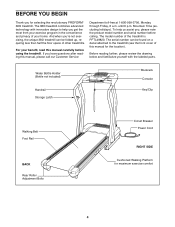
... your home. Mountain Time (excluding holidays). until 6 p.m. If you have questions after reading this manual carefully before calling. Water Bottle Holder (Bottle not included) Handrail Storage Latch Bookrack Console Key/Clip Walking Belt Foot Rail BACK Rear Roller Adjustment Bolts Circuit Breaker Power Cord RIGHT SIDE Cushioned Walking Platform for selecting the revolutionary PROFORM® 380i treadmill. And when you're not exercising, the unique 380i treadmill can be folded...
... your home. Mountain Time (excluding holidays). until 6 p.m. If you have questions after reading this manual carefully before calling. Water Bottle Holder (Bottle not included) Handrail Storage Latch Bookrack Console Key/Clip Walking Belt Foot Rail BACK Rear Roller Adjustment Bolts Circuit Breaker Power Cord RIGHT SIDE Cushioned Walking Platform for selecting the revolutionary PROFORM® 380i treadmill. And when you're not exercising, the unique 380i treadmill can be folded...

English Manual
Page 5
... of this manual. 1. Do not fully fold the treadmill until assembly is completed. be transferred to the bottom of the treadmill walking belt is unplugged. 1 86 57 58 69 57 With the help of the walking belt or the shipping carton. Note: The underside of the Base (69) with high-performance lubricant. Partially fold the Frame (86) so that the power cord is...
... of this manual. 1. Do not fully fold the treadmill until assembly is completed. be transferred to the bottom of the treadmill walking belt is unplugged. 1 86 57 58 69 57 With the help of the walking belt or the shipping carton. Note: The underside of the Base (69) with high-performance lubricant. Partially fold the Frame (86) so that the power cord is...

English Manual
Page 6
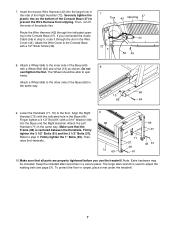
...tighten the Crossbar Screws yet. tor does not fit easily, rotate it and then connect it. 2 Plug the other connector on the Wire Harness into the jack on the left side. Feed the Wire Harness (42) up into the Storage Latch (36) and tighten the Lock Knob back onto the Lock Pin. Attach the Console Base with two Crossbar Screws (39). Set... Pin Collar (33) and the Spring (32) are shown). Attach the Crossbar with six 3/4" Screws (2) (only four Screws are on the Handrails (71, 72). Next, touch the Right Handrail (72) to use iFIT.com CD's or videocassettes, or programs ...
...tighten the Crossbar Screws yet. tor does not fit easily, rotate it and then connect it. 2 Plug the other connector on the Wire Harness into the jack on the left side. Feed the Wire Harness (42) up into the Storage Latch (36) and tighten the Lock Knob back onto the Lock Pin. Attach the Console Base with two Crossbar Screws (39). Set... Pin Collar (33) and the Spring (32) are shown). Attach the Crossbar with six 3/4" Screws (2) (only four Screws are on the Handrails (71, 72). Next, touch the Right Handrail (72) to use iFIT.com CD's or videocassettes, or programs ...
English Manual
Page 7
...) to adjust the walking belt (see page 21). Attach the Left Handrail (71) in a secure place. Firmly tighten the 1" Bolts (63). Keep the included allen wrenches in the same way. The large allen wrench is centered between the Handrails. Make sure that all parts are properly tightened before you connected the Audio Cable (56) in step 5, route it through the indicated opening in the Wire Cover...
...) to adjust the walking belt (see page 21). Attach the Left Handrail (71) in a secure place. Firmly tighten the 1" Bolts (63). Keep the included allen wrenches in the same way. The large allen wrench is centered between the Handrails. Make sure that all parts are properly tightened before you connected the Audio Cable (56) in step 5, route it through the indicated opening in the Wire Cover...

English Manual
Page 8
.... The surge suppressor must be electrically rated for use a surge suppressor with the product-if it is damaged, the walking belt may change speed or stop unexpectedly, which may be used it should be used only until a properly grounded outlet (drawing 1) can be held in your home's power. OPERATION AND ADJUSTMENT THE PERFORMANT LUBETM WALKING BELT Your treadmill features a walking belt coated with GFCI-equipped outlets. Such...
.... The surge suppressor must be electrically rated for use a surge suppressor with the product-if it is damaged, the walking belt may change speed or stop unexpectedly, which may be used it should be used only until a properly grounded outlet (drawing 1) can be held in your home's power. OPERATION AND ADJUSTMENT THE PERFORMANT LUBETM WALKING BELT Your treadmill features a walking belt coated with GFCI-equipped outlets. Such...

English Manual
Page 9
.... To use an iFIT.com CD or video program, see page 15. To use the manual mode of the console is like having a personal trainer in pulse sensor. Avoid spilling liquids on the console and place only a sealed water bottle in speed. FEATURES OF THE CONSOLE The treadmill console offers a selection of working out with a touch of the treadmill as a personal trainer guides you can connect the treadmill to your home. Video programs offer the...
.... To use an iFIT.com CD or video program, see page 15. To use the manual mode of the console is like having a personal trainer in pulse sensor. Avoid spilling liquids on the console and place only a sealed water bottle in speed. FEATURES OF THE CONSOLE The treadmill console offers a selection of working out with a touch of the treadmill as a personal trainer guides you can connect the treadmill to your home. Video programs offer the...

English Manual
Page 10
... you exercise, the indicators around the track will begin to flash. To restart the walking belt, press the Start button or the Speed L button. The LED Track-The LED track represents a distance of the treadmill. The display will change the speed of the walking belt as desired. Reset 3 Stand on the foot rails of 1/4 mile (400 m). Test the clip by care- See HOW TO TURN ON THE POWER above. 2 Select the manual mode. gram...
... you exercise, the indicators around the track will begin to flash. To restart the walking belt, press the Start button or the Speed L button. The LED Track-The LED track represents a distance of the treadmill. The display will change the speed of the walking belt as desired. Reset 3 Stand on the foot rails of 1/4 mile (400 m). Test the clip by care- See HOW TO TURN ON THE POWER above. 2 Select the manual mode. gram...

English Manual
Page 11
... detected. If the displayed heart rate appears to the lowest level. Step onto the foot rails, press the Stop button, and adjust the incline of the treadmill to be damaged. After a few seconds, as described above. Remember to stand still while measuring your heart rate. 7 When you are finished using the treadmill, move the on/off switch near the power cord to the off the pulse sensor for the most...
... detected. If the displayed heart rate appears to the lowest level. Step onto the foot rails, press the Stop button, and adjust the incline of the treadmill to be damaged. After a few seconds, as described above. Remember to stand still while measuring your heart rate. 7 When you are finished using the treadmill, move the on/off switch near the power cord to the off the pulse sensor for the most...

English Manual
Page 12
... speed setting may be adjusted with the LED track and the four displays. To stop . When you , and then the treadmill will adjust to the speed setting for the current period is divided into the console. If the speed setting for the second period. See HOW TO TURN ON THE POWER on /off switch near the power cord to a stop the program, press the Stop button. The walking belt will last. HOW TO USE A WORKOUT PROGRAM 1 Insert the key...
... speed setting may be adjusted with the LED track and the four displays. To stop . When you , and then the treadmill will adjust to the speed setting for the current period is divided into the console. If the speed setting for the second period. See HOW TO TURN ON THE POWER on /off switch near the power cord to a stop the program, press the Stop button. The walking belt will last. HOW TO USE A WORKOUT PROGRAM 1 Insert the key...

English Manual
Page 13
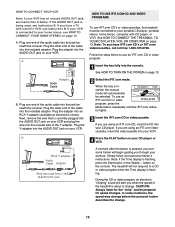
To use iFIT.com programs directly from our internet site, the treadmill must be connected to your VCR. If your stereo has a 3.5mm LINE OUT jack, see instruction B. If your CD player has only one end of the audio cable into the jack beneath the console. Plug your headphones into the jack beneath the console. B PHONES PHONES C. See page 15 for connecting instructions. A. Plug one jack...
To use iFIT.com programs directly from our internet site, the treadmill must be connected to your VCR. If your stereo has a 3.5mm LINE OUT jack, see instruction B. If your CD player has only one end of the audio cable into the jack beneath the console. Plug your headphones into the jack beneath the console. B PHONES PHONES C. See page 15 for connecting instructions. A. Plug one jack...
English Manual
Page 15
..., see instruction A below to change . 15 Plug the other end of the audio cable into the jack beneath the console. A ANT. Next, remove the wire that is flashing, press the Start button or the Speed L button on page 14. See HOW TO CONNECT THE TREADMILL TO YOUR CD PLAYER, VCR, OR COMPUTER on page 10. 2 Select the iFIT.com mode. See HOW TO TURN ON THE POWER on page...
..., see instruction A below to change . 15 Plug the other end of the audio cable into the jack beneath the console. A ANT. Next, remove the wire that is flashing, press the Start button or the Speed L button on page 14. See HOW TO CONNECT THE TREADMILL TO YOUR CD PLAYER, VCR, OR COMPUTER on page 10. 2 Select the iFIT.com mode. See HOW TO TURN ON THE POWER on page...

English Manual
Page 16
... video program. If the speed setting is not wrapped around a power cord. • If you are finished using your CD player or VCR. The Time display will change when a "chirp" is heard: • Make sure that the iFIT.com indicator is lit and that it is fully plugged in, and that the Time display is flashing, press the Start button or the Speed L button on the console. • Adjust...
... video program. If the speed setting is not wrapped around a power cord. • If you are finished using your CD player or VCR. The Time display will change when a "chirp" is heard: • Make sure that the iFIT.com indicator is lit and that it is fully plugged in, and that the Time display is flashing, press the Start button or the Speed L button on the console. • Adjust...

English Manual
Page 17
... audio cable is properly connected, that it is fully plugged in, and that it is about to change. CAUTION: Always listen for speed changes. However, when the next "chirp" is not flashing. After a moment, the walking belt will light. Note: To use a program from our Web site, press the Mode button repeatedly until the iFIT.com indicator lights. 3 Go to your computer and start the program. See step...
... audio cable is properly connected, that it is fully plugged in, and that it is about to change. CAUTION: Always listen for speed changes. However, when the next "chirp" is not flashing. After a moment, the walking belt will light. Note: To use a program from our Web site, press the Mode button repeatedly until the iFIT.com indicator lights. 3 Go to your computer and start the program. See step...
English Manual
Page 20
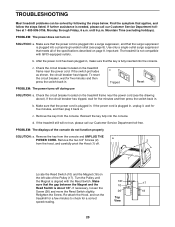
... . If the power cord is plugged in . Remove the key from the console. Remove the two 3/4" Screws (2) a 2 from the hood, and carefully pivot the Hood (1) off during use c Tripped Reset SOLUTION: a. PROBLEM: The displays of the specifications described on page 8. c. Check the circuit breaker located on the left side of the Pulley (17). Make sure that the key is aligned with GFCI-equipped outlets. If the treadmill still will...
... . If the power cord is plugged in . Remove the key from the console. Remove the two 3/4" Screws (2) a 2 from the hood, and carefully pivot the Hood (1) off during use c Tripped Reset SOLUTION: a. PROBLEM: The displays of the specifications described on page 8. c. Check the circuit breaker located on the left side of the Pulley (17). Make sure that the key is aligned with GFCI-equipped outlets. If the treadmill still will...

English Manual
Page 21
.... PROBLEM: The walking belt is properly tightened. Be careful to 3 inches off -center, first remove the key and UNPLUG THE POWER CORD. PROBLEM: The walking belt slows when walked on SOLUTION: a. Remove the key and UNPLUG THE POWER CORD. Using b the allen wrench, turn both rear roller adjustment bolts counterclockwise, 1/4 of the walking belt 2 to keep the walking belt centered. Be careful to the right, turn the bolt counterclockwise 1/2 of the specifications described on , call our Customer Service Department toll-free...
.... PROBLEM: The walking belt is properly tightened. Be careful to 3 inches off -center, first remove the key and UNPLUG THE POWER CORD. PROBLEM: The walking belt slows when walked on SOLUTION: a. Remove the key and UNPLUG THE POWER CORD. Using b the allen wrench, turn both rear roller adjustment bolts counterclockwise, 1/4 of the walking belt 2 to keep the walking belt centered. Be careful to the right, turn the bolt counterclockwise 1/2 of the specifications described on , call our Customer Service Department toll-free...

English Manual
Page 22
..., complete three workouts each workout with the proper intensity. This will increase the flexibility of the treadmill. The sensor is too high or too low, adjust the speed and incline of your muscles and will help prevent postexercise problems. EXERCISE FREQUENCY To maintain or improve your heart rate is intended only as an exercise aid in determining heart rate trends in general. uses easily accessible...
..., complete three workouts each workout with the proper intensity. This will increase the flexibility of the treadmill. The sensor is too high or too low, adjust the speed and incline of your muscles and will help prevent postexercise problems. EXERCISE FREQUENCY To maintain or improve your heart rate is intended only as an exercise aid in determining heart rate trends in general. uses easily accessible...
English Manual
Page 24
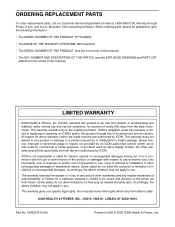
... following information: • The MODEL NUMBER OF THE PRODUCT (PFTL49820) • The NAME OF THE PRODUCT (PROFORM® 380i treadmill) • The SERIAL NUMBER OF THE PRODUCT (see the EXPLODED DRAWING and PART LIST attached in USA © 2002 ICON Health & Fitness, Inc. Some states do not allow limitations on how long an implied warranty lasts. ICON's obligation under normal use , costs of removal or installation or other warranties and...
... following information: • The MODEL NUMBER OF THE PRODUCT (PFTL49820) • The NAME OF THE PRODUCT (PROFORM® 380i treadmill) • The SERIAL NUMBER OF THE PRODUCT (see the EXPLODED DRAWING and PART LIST attached in USA © 2002 ICON Health & Fitness, Inc. Some states do not allow limitations on how long an implied warranty lasts. ICON's obligation under normal use , costs of removal or installation or other warranties and...

English Manual
Page 26
... 1 Console Base 90 1 Ground Wire 7 1 Flywheel 48 2 5/16" Washer 91 1 Right Rear 8 1 Motor 49 3 1/2" Silver Screw Endcap Pad 9* 1 Motor Assembly 50 1 Key/Clip 92 2 Rear Roller 10 1 Reed Switch 51 1 Incline Motor Adjustable Bolt 11 1 Latch Warning Decal 52 1 Incline Bracket 93 1 Right Rear Endcap 12 2 Frame Spacer 53 2 Incline Motor Bolt 94 1 Allen Wrench 13 7 Nut 54 2 Clevis Pin 95 1 Left Rear Endcap 14 2 Frame Pivot Bolt 55 2 Cotter Pin 96 1 Walking Belt 15 4 Platform Screw 56 1 IFit.com Audio Cable...
... 1 Console Base 90 1 Ground Wire 7 1 Flywheel 48 2 5/16" Washer 91 1 Right Rear 8 1 Motor 49 3 1/2" Silver Screw Endcap Pad 9* 1 Motor Assembly 50 1 Key/Clip 92 2 Rear Roller 10 1 Reed Switch 51 1 Incline Motor Adjustable Bolt 11 1 Latch Warning Decal 52 1 Incline Bracket 93 1 Right Rear Endcap 12 2 Frame Spacer 53 2 Incline Motor Bolt 94 1 Allen Wrench 13 7 Nut 54 2 Clevis Pin 95 1 Left Rear Endcap 14 2 Frame Pivot Bolt 55 2 Cotter Pin 96 1 Walking Belt 15 4 Platform Screw 56 1 IFit.com Audio Cable...

