

Instruction Manual
Page 1
... E-mail: [email protected] Write: ICON Health & Fitness, Ltd. Model No. : PFIVEL74513.4 Serial No ___________ Serial number decal Write the serial number in this manual before using this manual for reference. USERʼS MANUAL Visit our website www.iconsupport.eu Keep this equipment. c/o HI Group PLC Express Way Whitwood, West Yorkshire WF10 5QJ UK CAUTION Read all precautions and instructions in the space above for future reference.
... E-mail: [email protected] Write: ICON Health & Fitness, Ltd. Model No. : PFIVEL74513.4 Serial No ___________ Serial number decal Write the serial number in this manual before using this manual for reference. USERʼS MANUAL Visit our website www.iconsupport.eu Keep this equipment. c/o HI Group PLC Express Way Whitwood, West Yorkshire WF10 5QJ UK CAUTION Read all precautions and instructions in the space above for future reference.

Instruction Manual
Page 2
TABLE OF CONTENTS IMPORTANT PRECAUTIONS 3 BEFORE YOU BEGIN 4 WARNING DECAL PLACEMENT 4 ASSEMBLY 5 HOW TO OPERATE THE ELLIPTICAL 9 FEATURES OF THE CONSOLE 11 EXERCISE GUIDELINES 14 EXPLODED DRAWINGS 16 PART LIST 17 MAINTENANCE AND TROUBLESHOOTING 18 NOTES 19 ORDERING REPLACEMENT PARTS Last Page 2
TABLE OF CONTENTS IMPORTANT PRECAUTIONS 3 BEFORE YOU BEGIN 4 WARNING DECAL PLACEMENT 4 ASSEMBLY 5 HOW TO OPERATE THE ELLIPTICAL 9 FEATURES OF THE CONSOLE 11 EXERCISE GUIDELINES 14 EXPLODED DRAWINGS 16 PART LIST 17 MAINTENANCE AND TROUBLESHOOTING 18 NOTES 19 ORDERING REPLACEMENT PARTS Last Page 2

Instruction Manual
Page 3
... tighten all times. Over exercising may affect the accuracy of all users of the elliptical are adequately informed of heart 4. that all precautions. 11. Various factors may result in serious injury or death. The pulse sensor is especially important 9. rate readings. Keep the elliptical indoors, away from the elliptical at least 3 ft. Replace any exercise program, con- Use the elliptical only as an exercise aid in this manual...
... tighten all times. Over exercising may affect the accuracy of all users of the elliptical are adequately informed of heart 4. that all precautions. 11. Various factors may result in serious injury or death. The pulse sensor is especially important 9. rate readings. Keep the elliptical indoors, away from the elliptical at least 3 ft. Replace any exercise program, con- Use the elliptical only as an exercise aid in this manual...

Instruction Manual
Page 4
... your workouts at actual size. To help us . The model number is missing or illegible, call the telephone number on the front cover of this manual and request a free replacement decal. BEFORE YOU BEGIN Thank you , note the product model number and serial number before you have questions after reading this manual, please see the front cover of this manual. If a decal is PFIVEL74513.4 and the location of...
... your workouts at actual size. To help us . The model number is missing or illegible, call the telephone number on the front cover of this manual and request a free replacement decal. BEFORE YOU BEGIN Thank you , note the product model number and serial number before you have questions after reading this manual, please see the front cover of this manual. If a decal is PFIVEL74513.4 and the location of...

Instruction Manual
Page 5
... refers to identify the small parts used in assembly. If a part is not in a cleared area and remove the packing materials. Note: Some small parts may have been preassembled. PFIVEL74513.0 NO 36*2 NO 13*2...key number of the part, from the PART LIST near the end of this manual. The number following the parentheses is completed. Do not dispose of the exercise cycle in the hardware kit, check to the included tool(s), assembly requires an adjustable wrench and a Phillips screwdriver . Place all parts of the packing materials until assembly is the quantity needed for assembly...
... refers to identify the small parts used in assembly. If a part is not in a cleared area and remove the packing materials. Note: Some small parts may have been preassembled. PFIVEL74513.0 NO 36*2 NO 13*2...key number of the part, from the PART LIST near the end of this manual. The number following the parentheses is completed. Do not dispose of the exercise cycle in the hardware kit, check to the included tool(s), assembly requires an adjustable wrench and a Phillips screwdriver . Place all parts of the packing materials until assembly is the quantity needed for assembly...
Instruction Manual
Page 6
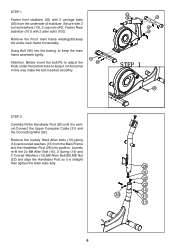
...fit the 2x M8 Allen Bolt (15), 2 Spring (14) and 2 Curved Washers (13),M8 Allen Bolt(30),M8 Nut (22) and align the Handlebar Post so it is straight then tighten the Allen bolts fully. 26 31 32 22 14 30 15 13 6 Fasten Rear stabilizer (101) with 2 carriage bolts...way make the bolt inserted smoothly 101 100 13 40 35 36 38 STEP 1 95 STEP 2 Carefully lift the Handlebar Post (26) until it is vertical.Connect the Upper Computer Cable (31) and the Connecting Wire (32). STEP 1 Fasten front stabilizer (35) with 2 allen bolts (100). Remove the loosely fitted Allen bolts (15),spring ...
...fit the 2x M8 Allen Bolt (15), 2 Spring (14) and 2 Curved Washers (13),M8 Allen Bolt(30),M8 Nut (22) and align the Handlebar Post so it is straight then tighten the Allen bolts fully. 26 31 32 22 14 30 15 13 6 Fasten Rear stabilizer (101) with 2 carriage bolts...way make the bolt inserted smoothly 101 100 13 40 35 36 38 STEP 1 95 STEP 2 Carefully lift the Handlebar Post (26) until it is vertical.Connect the Upper Computer Cable (31) and the Connecting Wire (32). STEP 1 Fasten front stabilizer (35) with 2 allen bolts (100). Remove the loosely fitted Allen bolts (15),spring ...
Instruction Manual
Page 7
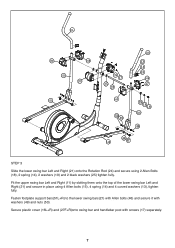
... 48 47 STEP 3 Slide the lower swing bar Left and Right (21) onto the Rotation Rod (24) and secure using 4 Allen bolts (15), 4 spring (14) and 4 curved washers (13), tighten fully. Fasten footplate support bars(51L+R) to the lower swing bars(21) with Allen bolts (46) and secure it with screws (17) separately. 7 Secure plastic cover (16L+R) and (27F+R)onto swing bar and handlebar...
... 48 47 STEP 3 Slide the lower swing bar Left and Right (21) onto the Rotation Rod (24) and secure using 4 Allen bolts (15), 4 spring (14) and 4 curved washers (13), tighten fully. Fasten footplate support bars(51L+R) to the lower swing bars(21) with Allen bolts (46) and secure it with screws (17) separately. 7 Secure plastic cover (16L+R) and (27F+R)onto swing bar and handlebar...

Instruction Manual
Page 8
... footplate support bar and secure it with 2xM8Allen Bolt (3),Curved washer (13) and Nut(22). Sit the computer (1) onto its bracket and secure in place using the 4 screws(2) previously removed. Inset hand pulse cable (9) into the hole on the back of the computer (1) Now your machine is ready for the left pedal. 60L 52 60R 57 58 59 STEP 5 Secure Handle Bar...
... footplate support bar and secure it with 2xM8Allen Bolt (3),Curved washer (13) and Nut(22). Sit the computer (1) onto its bracket and secure in place using the 4 screws(2) previously removed. Inset hand pulse cable (9) into the hole on the back of the computer (1) Now your machine is ready for the left pedal. 60L 52 60R 57 58 59 STEP 5 Secure Handle Bar...
Instruction Manual
Page 9
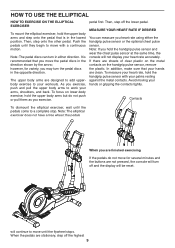
... the handgrip pulse sensor, remove the plastic. pedal first. Contacts To dismount the elliptical exerciser, wait until the flywheel stops. the pedals When you exercise. however, for several minutes and the buttons are not pressed, the console will turn the pedal discs in the lowest position. The upper body arms are designed to add upperbody exercise to move with your heart rate accurately. If there are stationary, step off the lower pedal. In...
... the handgrip pulse sensor, remove the plastic. pedal first. Contacts To dismount the elliptical exerciser, wait until the flywheel stops. the pedals When you exercise. however, for several minutes and the buttons are not pressed, the console will turn the pedal discs in the lowest position. The upper body arms are designed to add upperbody exercise to move with your heart rate accurately. If there are stationary, step off the lower pedal. In...

Instruction Manual
Page 10
... the UK market. press the latch button, and lower the frame. You may damage the console displays or other markets. To unfold the Pull the upright until they touch the magnets on the upper body arms; Frame Latch button Magnet Plug the power adapter into the receptacle on the upper body arms. Then, lift the latches under each pedal arm, and lift HOW TO MOVE THE ELLIPTICAL Crank arm Pedal arm To move the elliptical to the desired...
... the UK market. press the latch button, and lower the frame. You may damage the console displays or other markets. To unfold the Pull the upright until they touch the magnets on the upper body arms; Frame Latch button Magnet Plug the power adapter into the receptacle on the upper body arms. Then, lift the latches under each pedal arm, and lift HOW TO MOVE THE ELLIPTICAL Crank arm Pedal arm To move the elliptical to the desired...

Instruction Manual
Page 11
... turn on the console, press any program. Select a program Select your height and weight in the display. Start pedaling and follow your progress with the display. At the end of the programs). Make sure that show the numbers of the elapsed time. If the computer does not detect your current heart MODE : Press this button to set the resistance. stop exercising. Time-This mode shows the elapsed time. HOW TO USE THE CONSOLE 3. rate, pressing...
... turn on the console, press any program. Select a program Select your height and weight in the display. Start pedaling and follow your progress with the display. At the end of the programs). Make sure that show the numbers of the elapsed time. If the computer does not detect your current heart MODE : Press this button to set the resistance. stop exercising. Time-This mode shows the elapsed time. HOW TO USE THE CONSOLE 3. rate, pressing...

Instruction Manual
Page 12
... PRESET PROGRAMS: RESET to validate. You will flash, 3. Change the resistance of the pedals as Press MODE to escape then start one of the pedals by automatically turn on the console, press any signal and it will then be ready for use . Follow your exercice. See page 11. The console displays the elapsed time and the distance you a body Type. 6. provide you 've pedaled. BODYFAT button to validate. Select a user...
... PRESET PROGRAMS: RESET to validate. You will flash, 3. Change the resistance of the pedals as Press MODE to escape then start one of the pedals by automatically turn on the console, press any signal and it will then be ready for use . Follow your exercice. See page 11. The console displays the elapsed time and the distance you a body Type. 6. provide you 've pedaled. BODYFAT button to validate. Select a user...

Instruction Manual
Page 13
... use the + or - the console will then be able to choose the goals of your finger on the + or - For a quick start pedaling. 3. Slide your workout between 10 and 350, and press the MODE button to validate. For 13 Entering your exercice : time, distance, calories or pulse. button. Once, the word USER is selected and start , directly press the START/STOP button once the program is selected, press the MODE button to...
... use the + or - the console will then be able to choose the goals of your finger on the + or - For a quick start pedaling. 3. Slide your workout between 10 and 350, and press the MODE button to validate. For 13 Entering your exercice : time, distance, calories or pulse. button. Once, the word USER is selected and start , directly press the START/STOP button once the program is selected, press the MODE button to...

Instruction Manual
Page 14
... your body begin to use your exercise program. For maximum fat burning, exercise with 5 to burn fat, adjust the intensity of the chart (ages are essential for energy. For detailed exercise information, obtain a reputable book or consult your physician. Remember, proper nutrition and adequate rest are rounded off to 30 minutes with pre-existing health problems. The pulse sensor is near the middle number...
... your body begin to use your exercise program. For maximum fat burning, exercise with 5 to burn fat, adjust the intensity of the chart (ages are essential for energy. For detailed exercise information, obtain a reputable book or consult your physician. Remember, proper nutrition and adequate rest are rounded off to 30 minutes with pre-existing health problems. The pulse sensor is near the middle number...

Instruction Manual
Page 15
...as possible. Repeat 3 times. Stretches: Hamstrings, back of the other hand. Bend your front leg, lean forward and move your hips toward your 5 knees outward. To cause further stretching of the opposite foot toward ..., then relax. Stretches: Quadriceps and hip muscles. 5. Hold for 15 counts, then relax. Hold for each leg. Stretches: Hamstrings, lower back and groin. 3. Bring your groin area as far as you reach down toward the wall. Bring the ...ankles. 4. never bounce. 1. Hold for 15 counts, then relax. SUGGESTED STRETCHES The correct form for each leg.
...as possible. Repeat 3 times. Stretches: Hamstrings, back of the other hand. Bend your front leg, lean forward and move your hips toward your 5 knees outward. To cause further stretching of the opposite foot toward ..., then relax. Stretches: Quadriceps and hip muscles. 5. Hold for 15 counts, then relax. Hold for each leg. Stretches: Hamstrings, lower back and groin. 3. Bring your groin area as far as you reach down toward the wall. Bring the ...ankles. 4. never bounce. 1. Hold for 15 counts, then relax. SUGGESTED STRETCHES The correct form for each leg.

Instruction Manual
Page 16
PFIVEL74513.4 16 106 114 68L Item.115*2 Item.116 1 11L 2 3 4 5 6 7 8 9 10 11R 12 102 101 38 100 99 23L 16F 16R 21L 60L 27F 26 28 ... 59 60R 46 47 48 49 50 52 73 72 71 70 25 69 68R 67 66 65 64 63 62 14 61 EXPLODED DRAWING-Model No.
PFIVEL74513.4 16 106 114 68L Item.115*2 Item.116 1 11L 2 3 4 5 6 7 8 9 10 11R 12 102 101 38 100 99 23L 16F 16R 21L 60L 27F 26 28 ... 59 60R 46 47 48 49 50 52 73 72 71 70 25 69 68R 67 66 65 64 63 62 14 61 EXPLODED DRAWING-Model No.

Instruction Manual
Page 17
...*32 42 Belt 460J6 43 Chain Adjustable Set 44 Flange Screw 3/8 45 Axle Cap 46 Allen Bolt M10*90 47 Bush 14*32 48 Tube Φ14*72.2 49 Washer Φ10*Φ19*2T 50 Nut M10 51 Footplate Support Bar (L+R) 52 Carriage Bolt M6*55 53 Spring Φ0.7*6.4*47 54 Pedal locker 55 Screw M5*12 ...*2T 97 Hydraulic Cylinder Bolt 98 C-Sharp Clip Φ6 99 Allen Bolt M8*60 100 Allen Bolt M8*110 101 Rear Stabilizer 102 Rear End Cap 103 Rear Handle 104 Main Frame 105 Motor 106 Drill Screw M5*20 107 Lower Computer Cable 450mm 108 Washer Φ8*Φ24*0.5T 109 Wire 110 Front Plastic Cover 111 Rubber Ring 112 ...
...*32 42 Belt 460J6 43 Chain Adjustable Set 44 Flange Screw 3/8 45 Axle Cap 46 Allen Bolt M10*90 47 Bush 14*32 48 Tube Φ14*72.2 49 Washer Φ10*Φ19*2T 50 Nut M10 51 Footplate Support Bar (L+R) 52 Carriage Bolt M6*55 53 Spring Φ0.7*6.4*47 54 Pedal locker 55 Screw M5*12 ...*2T 97 Hydraulic Cylinder Bolt 98 C-Sharp Clip Φ6 99 Allen Bolt M8*60 100 Allen Bolt M8*110 101 Rear Stabilizer 102 Rear End Cap 103 Rear Handle 104 Main Frame 105 Motor 106 Drill Screw M5*20 107 Lower Computer Cable 450mm 108 Washer Φ8*Φ24*0.5T 109 Wire 110 Front Plastic Cover 111 Rubber Ring 112 ...

Instruction Manual
Page 18
Important: To avoid damaging the console, keep liquids away from the console and keep the console out of mild detergent. To clean the elliptical, use a damp cloth and a small amount of direct sunlight. 18 MAINTENANCE AND TROUBLESHOOTING Inspect and tighten all parts of the elliptical regularly. Replace any worn parts immediately.
Important: To avoid damaging the console, keep liquids away from the console and keep the console out of mild detergent. To clean the elliptical, use a damp cloth and a small amount of direct sunlight. 18 MAINTENANCE AND TROUBLESHOOTING Inspect and tighten all parts of the elliptical regularly. Replace any worn parts immediately.

Instruction Manual
Page 20
...; 2014 Icon Health & Fitness, Inc. In doing so, you will help us : • the model number and serial number of the product (see the front cover of this manual) • the name of the product (see the front cover of this manual) • the key number and description of the replacement part(s) (see the front cover of this manual) IMPORTANT RECYCLING INFORMATION FOR E. TECHNICAL SPECS. ORDERING REPLACEMENT PARTS To order replacement parts, please...
...; 2014 Icon Health & Fitness, Inc. In doing so, you will help us : • the model number and serial number of the product (see the front cover of this manual) • the name of the product (see the front cover of this manual) • the key number and description of the replacement part(s) (see the front cover of this manual) IMPORTANT RECYCLING INFORMATION FOR E. TECHNICAL SPECS. ORDERING REPLACEMENT PARTS To order replacement parts, please...

