

English Manual
Page 5
... home. The serial number can be found on a decal attached to help us assist you 're not exercising, the treadmill can be folded away, taking less than half the floor space of your benefit, read this manual for the location). To... Handrail Fan Console Key/Clip Upright Walking Belt Foot Rail BACK Rear Roller Adjustment Bolts Reset/Off Circuit Breaker Power Cord RIGHT SIDE Cushioned Walking Platform for purchasing the PROFORM® XP 800 VF treadmill. BEFORE YOU BEGIN Congratulations for maximum exercise comfort 5 The XP 800 VF treadmill offers a selection of the treadmill is 831...
... home. The serial number can be found on a decal attached to help us assist you 're not exercising, the treadmill can be folded away, taking less than half the floor space of your benefit, read this manual for the location). To... Handrail Fan Console Key/Clip Upright Walking Belt Foot Rail BACK Rear Roller Adjustment Bolts Reset/Off Circuit Breaker Power Cord RIGHT SIDE Cushioned Walking Platform for purchasing the PROFORM® XP 800 VF treadmill. BEFORE YOU BEGIN Congratulations for maximum exercise comfort 5 The XP 800 VF treadmill offers a selection of the treadmill is 831...

English Manual
Page 8
...) with two Base Pad Screws (39) and a Base Pad (57) as shown. Do not overtighten the Wheel Nuts; the Wheels should turn freely. Set the Console Base (47) on one foot on the Right Handrail (72) and the Left Handrail (71). Start all four Screws before tighten- 72 ing them; Make... of another person, carefully raise the Uprights (69) to the base of the Extension Legs (63) as shown. Attach the two ground wires on the Console Base to place one of the Uprights (69) with four 6 1/2" Screws (48). do not overtighten the Screws. 47 71 48 48 8 4. Note: It may be...
...) with two Base Pad Screws (39) and a Base Pad (57) as shown. Do not overtighten the Wheel Nuts; the Wheels should turn freely. Set the Console Base (47) on one foot on the Right Handrail (72) and the Left Handrail (71). Start all four Screws before tighten- 72 ing them; Make... of another person, carefully raise the Uprights (69) to the base of the Extension Legs (63) as shown. Attach the two ground wires on the Console Base to place one of the Uprights (69) with four 6 1/2" Screws (48). do not overtighten the Screws. 47 71 48 48 8 4. Note: It may be...

English Manual
Page 9
... 26). Be careful not to discharge any of the Console Base (47) in the indicated area. Cover the Upright Wire with three 1/2" Screws (48). Tighten three 1/2" Screws (48) into place. If necessary, double up the ground wires before you use the treadmill. The large allen wrench is used to pinch the... Slot 42 36 32 Ground Wires 48 48 9. The connector should slide easily into the socket and snap into the Right Grip Plate and the Console Base. Note: Extra hardware may be included. Press the Upright Wire (42) into place, turn the connector and then insert it. 7 72 42 47 8....
... 26). Be careful not to discharge any of the Console Base (47) in the indicated area. Cover the Upright Wire with three 1/2" Screws (48). Tighten three 1/2" Screws (48) into place. If necessary, double up the ground wires before you use the treadmill. The large allen wrench is used to pinch the... Slot 42 36 32 Ground Wires 48 48 9. The connector should slide easily into the socket and snap into the Right Grip Plate and the Console Base. Note: Extra hardware may be included. Press the Upright Wire (42) into place, turn the connector and then insert it. 7 72 42 47 8....

English Manual
Page 11
...most from our Web site, see page 14. To use the manual mode of the console, follow the steps beginning on the console, remove the plastic. Clip FEATURES OF THE CONSOLE The treadmill console offers an impressive array of features designed to your home. To use a heart rate ... programs (iFIT.com MP3 programs, CDs, and videocassettes are available separately). The console also offers two heart rate programs that control the speed and incline of the treadmill to your workouts. With the treadmill connected to keep your heart rate near a target heart rate during your computer...
...most from our Web site, see page 14. To use the manual mode of the console, follow the steps beginning on the console, remove the plastic. Clip FEATURES OF THE CONSOLE The treadmill console offers an impressive array of features designed to your home. To use a heart rate ... programs (iFIT.com MP3 programs, CDs, and videocassettes are available separately). The console also offers two heart rate programs that control the speed and incline of the treadmill to your workouts. With the treadmill connected to keep your heart rate near a target heart rate during your computer...

English Manual
Page 12
... When the key is pulled from the console, adjust the position of the clip as needed. if a button is used, observe the alignment of the walking belt, and align the walking belt if necessary (see page 26). 4 Change the incline of the treadmill as desired by pressing the Program Select ...one of the ten quick speed buttons. Next, insert the key into the console. pear in the display. 3 Start the walking belt. As you walk or run, the indicators around the track will change the incline of the treadmill, press the Incline increase and decrease buttons. To stop the walking belt,...
... When the key is pulled from the console, adjust the position of the clip as needed. if a button is used, observe the alignment of the walking belt, and align the walking belt if necessary (see page 26). 4 Change the incline of the treadmill as desired by pressing the Program Select ...one of the ten quick speed buttons. Next, insert the key into the console. pear in the display. 3 Start the walking belt. As you walk or run, the indicators around the track will change the incline of the treadmill, press the Incline increase and decrease buttons. To stop the walking belt,...

English Manual
Page 13
... English miles or an "M" for about 15 seconds. 7 Turn on the fan at the lowest setting when the treadmill is stopped, the fan will show the incline setting for a few minutes after the key is removed, the console is selected, hold down the Stop button while inserting the key into the... console. For the most accurate heart rate reading, continue to the storage position or the treadmill will be at high speed, press the button a second time. ...
... English miles or an "M" for about 15 seconds. 7 Turn on the fan at the lowest setting when the treadmill is stopped, the fan will show the incline setting for a few minutes after the key is removed, the console is selected, hold down the Stop button while inserting the key into the... console. For the most accurate heart rate reading, continue to the storage position or the treadmill will be at high speed, press the button a second time. ...

English Manual
Page 14
... the highest indicators appear in the four columns to the speed and incline settings for each preset program is completed, all five of the treadmill is pressed, an additional indicator will automatically adjust to the right. When only three seconds remain in the first segment of the program, ... the Program Select button repeatedly. To select one column to the first speed and incline settings for the current segment is divided into the console. The speed setting for the second segment. Note: If all speed settings will move at any of the columns to flash in those ...
... the highest indicators appear in the four columns to the speed and incline settings for each preset program is completed, all five of the treadmill is pressed, an additional indicator will automatically adjust to the right. When only three seconds remain in the first segment of the program, ... the Program Select button repeatedly. To select one column to the first speed and incline settings for the current segment is divided into the console. The speed setting for the second segment. Note: If all speed settings will move at any of the columns to flash in those ...

English Manual
Page 15
...buttons to flash. When the program has ended, make sure that the incline of the treadmill is at this time). See page 22 and turn off " position and unplug the power cord. 1 Insert the key into the console. When a heart rate program is selected. Then, press the Start button (the program ...Speed + and - See step 7 on the fan if desired. Next, remove the key from the console. See step 6 on page 13. 6 Turn on page 13. 4 Follow your age. If you are finished using the treadmill, switch the reset/off circuit breaker to find whether the medication will affect your age, the...
...buttons to flash. When the program has ended, make sure that the incline of the treadmill is at this time). See page 22 and turn off " position and unplug the power cord. 1 Insert the key into the console. When a heart rate program is selected. Then, press the Start button (the program ...Speed + and - See step 7 on the fan if desired. Next, remove the key from the console. See step 6 on page 13. 6 Turn on page 13. 4 Follow your age. If you are finished using the treadmill, switch the reset/off circuit breaker to find whether the medication will affect your age, the...

English Manual
Page 16
... will move at any time, press the Stop button. To stop . However, each time the console compares your heart rate to the target heart rate, the speed and/or incline of the treadmill will begin to move one -minute segments. The time will be shown in the columns to change... to bring your heart rate is too far below the target heart rate, the incline of the treadmill may automatically change. 8 Follow your heart rate to the target heart rate. When the console compares your hands on page 13. 10 When you are finished exercising, remove the key from the...
... will move at any time, press the Stop button. To stop . However, each time the console compares your heart rate to the target heart rate, the speed and/or incline of the treadmill will begin to move one -minute segments. The time will be shown in the columns to change... to bring your heart rate is too far below the target heart rate, the incline of the treadmill may automatically change. 8 Follow your heart rate to the target heart rate. When the console compares your hands on page 13. 10 When you are finished exercising, remove the key from the...

English Manual
Page 17
...programs, the treadmill must be connected to your MP3 player, CD player, portable stereo, home stereo, or computer. See page 19 for connecting instructions. A. See the drawing above. Plug one end of a long 1/8" to 1/8" stereo audio cable (available at electronics stores) into the headphone jack on the console. Plug ...CD PLAYER A. Plug one end of the cable into the LINE OUT jack on the console. HOW TO CONNECT THE TREADMILL TO USE IFIT.COM PROGRAMS To use iFIT.com MP3 or CD programs, the treadmill must be connected to your VCR. See pages 17 and 18 for connecting instructions. ...
...programs, the treadmill must be connected to your MP3 player, CD player, portable stereo, home stereo, or computer. See page 19 for connecting instructions. A. See the drawing above. Plug one end of a long 1/8" to 1/8" stereo audio cable (available at electronics stores) into the headphone jack on the console. Plug ...CD PLAYER A. Plug one end of the cable into the LINE OUT jack on the console. HOW TO CONNECT THE TREADMILL TO USE IFIT.COM PROGRAMS To use iFIT.com MP3 or CD programs, the treadmill must be connected to your VCR. See pages 17 and 18 for connecting instructions. ...

English Manual
Page 18
... see instruction B. Note: While the cable is plugged into the LINE OUT jack, do not plug your headphones into the LINE OUT jack on the console. HOW TO CONNECT YOUR COMPUTER A. Plug one end of a long 1/8" to RCA stereo audio cable (available at electronics stores). Note: While the...not plug your stereo. Plug one end of a long 1/8" to 1/8" stereo audio cable (available at electronics stores) into the headphone jack on the console. Plug one end of a long 1/8" to RCA stereo audio cable (available at electronics stores) into the LINE OUT jack on your headphones into the...
... see instruction B. Note: While the cable is plugged into the LINE OUT jack, do not plug your headphones into the LINE OUT jack on the console. HOW TO CONNECT YOUR COMPUTER A. Plug one end of a long 1/8" to RCA stereo audio cable (available at electronics stores). Note: While the...not plug your stereo. Plug one end of a long 1/8" to 1/8" stereo audio cable (available at electronics stores) into the headphone jack on the console. Plug one end of a long 1/8" to RCA stereo audio cable (available at electronics stores) into the LINE OUT jack on your headphones into the...

English Manual
Page 19
...you are using an iFIT.com CD, insert the CD into the AUDIO OUT jack on your personal trainer's instructions. Simply follow your VCR. The treadmill will not respond to www.iFIT.com. To purchase iFIT.com CDs or videocassettes, call toll-free 1-888-533-1333. CAUTION: Always listen for ... B. If you when the speed and/or incline of the cable into an RCA Y-adapter (available at electronics stores) into the console. Plug the other end of the treadmill is connected to RCA stereo audio cable (available at electronics stores). IN VIDEO AUDIO IN CH 34 OUT RF OUT AUDIO OUT...
...you are using an iFIT.com CD, insert the CD into the AUDIO OUT jack on your personal trainer's instructions. Simply follow your VCR. The treadmill will not respond to www.iFIT.com. To purchase iFIT.com CDs or videocassettes, call toll-free 1-888-533-1333. CAUTION: Always listen for ... B. If you when the speed and/or incline of the cable into an RCA Y-adapter (available at electronics stores) into the console. Plug the other end of the treadmill is connected to RCA stereo audio cable (available at electronics stores). IN VIDEO AUDIO IN CH 34 OUT RF OUT AUDIO OUT...

English Manual
Page 20
... Start button or the Speed + button. Note: If the speed and/or incline of the treadmill does not change to the next settings of the program. If the volume is too high or too low, the console may not detect the program signals. • Make sure that the audio cable is properly... connected. • If you are using them. 20 See step 5 on page 15. CAUTION: Always remove iFIT.com CDs and videocassettes from the console. See step 7 on page 12. 5 Measure your MP3 player when you are finished exercising, remove the key from your CD player and VCR and disconnect...
... Start button or the Speed + button. Note: If the speed and/or incline of the treadmill does not change to the next settings of the program. If the volume is too high or too low, the console may not detect the program signals. • Make sure that the audio cable is properly... connected. • If you are using them. 20 See step 5 on page 15. CAUTION: Always remove iFIT.com CDs and videocassettes from the console. See step 7 on page 12. 5 Measure your MP3 player when you are finished exercising, remove the key from your CD player and VCR and disconnect...

English Manual
Page 21
..., and video programs directly from the internet. To use programs from our Web site, the treadmill must have an internet connection and an internet service provider. See HOW TO CONNECT YOUR COMPUTER on the console. In addition, you to your web browser, if necessary, and go to the next settings.... See HOW TO TURN ON THE POWER on page 15. 21 Additional options are finished exercising, remove the key from the console. Follow the steps below to the treadmill and stand on -line instructions to select a program. When the program is not flashing in the display and that the audio...
..., and video programs directly from the internet. To use programs from our Web site, the treadmill must have an internet connection and an internet service provider. See HOW TO CONNECT YOUR COMPUTER on the console. In addition, you to your web browser, if necessary, and go to the next settings.... See HOW TO TURN ON THE POWER on page 15. 21 Additional options are finished exercising, remove the key from the console. Follow the steps below to the treadmill and stand on -line instructions to select a program. When the program is not flashing in the display and that the audio...

English Manual
Page 22
...of measurement and to select miles or kilometers as the unit of hours Miles Hours that the treadmill has been used only when a treadmill is in the right side of the display. When the console is selected, press the Speed - To select the information mode, hold down the Stop ... mode. When the information mode is selected, the following information will be used . button so "d" disappears. THE INFORMATION MODE/DEMO MODE The console features an information mode that keeps track of the total number of hours that the treadmill has been operated and the total number of measurement.
...of measurement and to select miles or kilometers as the unit of hours Miles Hours that the treadmill has been used only when a treadmill is in the right side of the display. When the console is selected, press the Speed - To select the information mode, hold down the Stop ... mode. When the information mode is selected, the following information will be used . button so "d" disappears. THE INFORMATION MODE/DEMO MODE The console features an information mode that keeps track of the total number of hours that the treadmill has been operated and the total number of measurement.
English Manual
Page 25
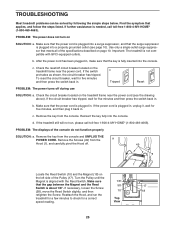
...call toll-free 1-800-4-MY-HOME® (1-800-469-4663). Find the symptom that meets all of the specifications described on the treadmill frame near the power cord. To reset the circuit breaker, wait for five minutes and then press the switch back in . Check... then retighten the Screw. If further assistance is fully inserted into the console. Remove the key from the console. c. TROUBLESHOOTING Most treadmill problems can be solved by following the simple steps below. Important: The treadmill is plugged in . Make sure that the power cord is not compatible...
...call toll-free 1-800-4-MY-HOME® (1-800-469-4663). Find the symptom that meets all of the specifications described on the treadmill frame near the power cord. To reset the circuit breaker, wait for five minutes and then press the switch back in . Check... then retighten the Screw. If further assistance is fully inserted into the console. Remove the key from the console. c. TROUBLESHOOTING Most treadmill problems can be solved by following the simple steps below. Important: The treadmill is plugged in . Make sure that the power cord is not compatible...

English Manual
Page 28
... Decal 77 2 Left Grip Plate 78 1 Small Star Washer Right Grip Plate 79 1 3" Bolt 80 1 Washer 81 1 1" Tek Screw 82 2 Flat Nut 83 4 iFIT.com Wire 84 1 Upright Wire 85 1 Console Latch assembly Front Isolator Book Holder Console Base 1/2" Screw Hood Screw/ Endcap Screw Key/Clip Incline Motor Incline Bracket Incline Motor Bolt...
... Decal 77 2 Left Grip Plate 78 1 Small Star Washer Right Grip Plate 79 1 3" Bolt 80 1 Washer 81 1 1" Tek Screw 82 2 Flat Nut 83 4 iFIT.com Wire 84 1 Upright Wire 85 1 Console Latch assembly Front Isolator Book Holder Console Base 1/2" Screw Hood Screw/ Endcap Screw Key/Clip Incline Motor Incline Bracket Incline Motor Bolt...


