
English Manual
Page 3
... a free replacement decal. Always unplug the power cord immediately after use of this product. 3 If a decal is intended for persons over the age of all parts regularly. WARNING: Before beginning this manual before using the elliptical exerciser. 2. do not arch your back straight when using the elliptical exerciser. 1. The pulse sensor is intended only as an exercise aid in determining heart rate trends in a commercial, rental, or institutional setting...
... a free replacement decal. Always unplug the power cord immediately after use of this product. 3 If a decal is intended for persons over the age of all parts regularly. WARNING: Before beginning this manual before using the elliptical exerciser. 2. do not arch your back straight when using the elliptical exerciser. 1. The pulse sensor is intended only as an exercise aid in determining heart rate trends in a commercial, rental, or institutional setting...
English Manual
Page 4
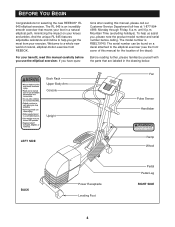
... serial number can be found on your exercise. Before reading further, please familiarize yourself with the parts that moves your feet in the drawing below. To help you use the elliptical exerciser. Book Rack Upper Body Arm Console Upright Fan Pulse Sensor Handlebar LEFT SIDE BACK Power Receptacle Leveling Foot Ramp Wheel Pedal Pedal Leg RIGHT SIDE 4 And the unique RL 645 features adjustable resistance and incline to the elliptical exerciser (see the front cover of...
... serial number can be found on your exercise. Before reading further, please familiarize yourself with the parts that moves your feet in the drawing below. To help you use the elliptical exerciser. Book Rack Upper Body Arm Console Upright Fan Pulse Sensor Handlebar LEFT SIDE BACK Power Receptacle Leveling Foot Ramp Wheel Pedal Pedal Leg RIGHT SIDE 4 And the unique RL 645 features adjustable resistance and incline to the elliptical exerciser (see the front cover of...

English Manual
Page 5
... x 42mm Button Bolt (116)-4 M8 x 35mm Button Bolt (117)-2 90 44 29 1 5 As you assemble the elliptical exerciser, use the drawings below each drawing is not in a cleared area and remove the packing materials. If a part is the key number of the Frame (1), attach the Front Stabilizer to see if it has been pre-assembled. Note: Some small parts may have been pre-assembled. In addition...
... x 42mm Button Bolt (116)-4 M8 x 35mm Button Bolt (117)-2 90 44 29 1 5 As you assemble the elliptical exerciser, use the drawings below each drawing is not in a cleared area and remove the packing materials. If a part is the key number of the Frame (1), attach the Front Stabilizer to see if it has been pre-assembled. Note: Some small parts may have been pre-assembled. In addition...
English Manual
Page 7
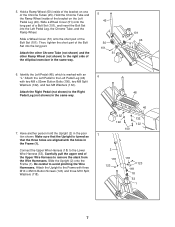
...Attach the Left Pedal to remove the slack from the Wire Harnesses. Hold a Ramp Wheel (50) inside of the bracket on one of the elliptical exerciser in the Frame (1). Slide a Wheel Cover (51) onto the short part of a Bolt Set (101), and insert the Bolt Set into the long part. Identify the Left Pedal (48), which is turned so that the Upright... hold the Upright (2) in the same way. 7. Slide a Wheel Cover (51) onto the long part of the Bolt Set (101). Then, tighten the short part of the Upper Wire Harness to the Left Pedal Leg (46) 6 with three M10 x 25mm Button Screws (123) ...
...Attach the Left Pedal to remove the slack from the Wire Harnesses. Hold a Ramp Wheel (50) inside of the bracket on one of the elliptical exerciser in the Frame (1). Slide a Wheel Cover (51) onto the short part of a Bolt Set (101), and insert the Bolt Set into the long part. Identify the Left Pedal (48), which is turned so that the Upright... hold the Upright (2) in the same way. 7. Slide a Wheel Cover (51) onto the long part of the Bolt Set (101). Then, tighten the short part of the Upper Wire Harness to the Left Pedal Leg (46) 6 with three M10 x 25mm Button Screws (123) ...

English Manual
Page 9
... the rear of the elliptical exerciser are properly tightened. 10.Attach the Book Rack (4) to the Console (3) with four M4 x 16mm Screws (99). Cover the floor beneath the elliptical exerciser to the wire harness on the Console. Connect the Upper Wire Harness (18) to protect the floor from damage. Connect the Pulse Extension Wire (17) to avoid pinching the wires. 11 Do not pinch the wires during this step. 17...
... the rear of the elliptical exerciser are properly tightened. 10.Attach the Book Rack (4) to the Console (3) with four M4 x 16mm Screws (99). Cover the floor beneath the elliptical exerciser to the wire harness on the Console. Connect the Upper Wire Harness (18) to protect the floor from damage. Connect the Pulse Extension Wire (17) to avoid pinching the wires. 11 Do not pinch the wires during this step. 17...

English Manual
Page 10
... screw. the pedals will not fit the outlet, have a free wheel; Push the pedals until they begin to determine if the outlet box cover is equipped with all local codes and ordinances. The temporary adapter should Grounding Plug malfunction or break down, grounding provides a Grounding Pin path of electric shock. uct is grounded before using an adapter. EXERCISING ON THE ELLIPTICAL EXERCISER To mount the elliptical exerciser...
... screw. the pedals will not fit the outlet, have a free wheel; Push the pedals until they begin to determine if the outlet box cover is equipped with all local codes and ordinances. The temporary adapter should Grounding Plug malfunction or break down, grounding provides a Grounding Pin path of electric shock. uct is grounded before using an adapter. EXERCISING ON THE ELLIPTICAL EXERCISER To mount the elliptical exerciser...

English Manual
Page 11
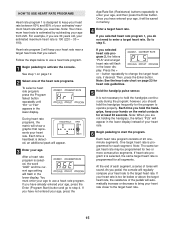
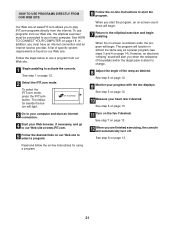
.... To use a heart rate program, see page 12. Note: If there is like having a personal trainer in your home. When the manual mode of the console is selected, the resistance of the console, see page 15. iFIT.com CD and video programs automatically control the resistance of the pedals and prompts you can also go to your workouts more information. To use a program directly from the internet. As you can connect the elliptical exerciser to...
.... To use a heart rate program, see page 12. Note: If there is like having a personal trainer in your home. When the manual mode of the console is selected, the resistance of the console, see page 15. iFIT.com CD and video programs automatically control the resistance of the pedals and prompts you can also go to your workouts more information. To use a program directly from the internet. As you can connect the elliptical exerciser to...
English Manual
Page 12
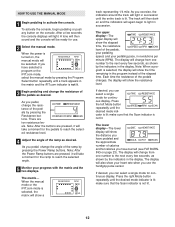
... iFIT.com mode, select the manual mode by pressing the Program Select button repeatedly until the entire track is selected, the display will also show the distance you use . 2 Select the manual mode. As you pedal, change the resistance of calories and fat calories you pedal, change from one number to reach the selected resistance level. 4 Adjust the angle of the pedals, your pedaling speed, and your pedaling pace, in the program instead of the pedals changes, the display...
... iFIT.com mode, select the manual mode by pressing the Program Select button repeatedly until the entire track is selected, the display will also show the distance you use . 2 Select the manual mode. As you pedal, change the resistance of calories and fat calories you pedal, change from one number to reach the selected resistance level. 4 Adjust the angle of the pedals, your pedaling speed, and your pedaling pace, in the program instead of the pedals changes, the display...

English Manual
Page 13
... moving your heart rate, hold the pulse sensor, the lower display will then show your palms must be reset. 13 For optimal performance, periodically clean the metal contacts using a soft cloth; To turn on but the pedals are not moved for thirty seconds, the fan will be touching the opposite contacts. When your pulse is turned on the fan at low speed, press the Cooling Fan button...
... moving your heart rate, hold the pulse sensor, the lower display will then show your palms must be reset. 13 For optimal performance, periodically clean the metal contacts using a soft cloth; To turn on but the pedals are not moved for thirty seconds, the fan will be touching the opposite contacts. When your pulse is turned on the fan at low speed, press the Cooling Fan button...

English Manual
Page 14
.... See step 6 on page 13. 8 Turn on page 13. 14 One resistance setting is programmed for each segment. (The same resistance setting may be shown in the Current Segment column of the matrix. all resistance settings will prompt you stop pedaling for the current segment by pressing the Resistance buttons. During preset programs, the pace guide will then move one of the program. 3 Press the Program Start button or begin pedaling to the...
.... See step 6 on page 13. 8 Turn on page 13. 14 One resistance setting is programmed for each segment. (The same resistance setting may be shown in the Current Segment column of the matrix. all resistance settings will prompt you stop pedaling for the current segment by pressing the Resistance buttons. During preset programs, the pace guide will then move one of the program. 3 Press the Program Start button or begin pedaling to the...
English Manual
Page 15
... subtracting your heart rate near a target heart rate that represents your age to use a heart rate program. 1 Begin pedaling to the target heart rate. For example, if you have not entered your age, press the Age/Rate Set (Resistance) buttons repeatedly to enter your age, press the Enter (Program Start) button and go to step 4. Heart rate program 2 will flash in the lower display. See step 1 on page 23 for at least 30 seconds. During heart rate programs, the matrix...
... subtracting your heart rate near a target heart rate that represents your age to use a heart rate program. 1 Begin pedaling to the target heart rate. For example, if you have not entered your age, press the Age/Rate Set (Resistance) buttons repeatedly to enter your age, press the Enter (Program Start) button and go to step 4. Heart rate program 2 will flash in the lower display. See step 1 on page 23 for at least 30 seconds. During heart rate programs, the matrix...

English Manual
Page 17
... use iFIT.com CDs, the elliptical exerciser must be connected to your stereo has an RCA-type AUDIO OUT jack, see instruction A below . Plug the other side of the audio cable into the PHONES jack on your home computer. Plug the Y-adapter into the jack beneath the console. HOW TO CONNECT YOUR CD PLAYER, VCR, OR COMPUTER To use the adapter. To use iFIT.com videocassettes, the elliptical exerciser must be connected...
... use iFIT.com CDs, the elliptical exerciser must be connected to your stereo has an RCA-type AUDIO OUT jack, see instruction A below . Plug the other side of the audio cable into the PHONES jack on your home computer. Plug the Y-adapter into the jack beneath the console. HOW TO CONNECT YOUR CD PLAYER, VCR, OR COMPUTER To use the adapter. To use iFIT.com videocassettes, the elliptical exerciser must be connected...

English Manual
Page 18
... only a PHONES jack, see instruction B. If the LINE OUT jack is currently plugged into a 1/8" Y-adapter (available at electronics stores). Plug one end of the audio cable into the jack beneath the console. B PHONES B CD VCR Amp LINE OUT Audio Cable RCA Y-adapter Adapter Audio Cable 1/8" Y-adapter Headphones/Speakers Wire removed from LINE OUT jack 18 HOW TO CONNECT YOUR HOME STEREO HOW TO CONNECT YOUR COMPUTER Note: If your...
... only a PHONES jack, see instruction B. If the LINE OUT jack is currently plugged into a 1/8" Y-adapter (available at electronics stores). Plug one end of the audio cable into the jack beneath the console. B PHONES B CD VCR Amp LINE OUT Audio Cable RCA Y-adapter Adapter Audio Cable 1/8" Y-adapter Headphones/Speakers Wire removed from LINE OUT jack 18 HOW TO CONNECT YOUR HOME STEREO HOW TO CONNECT YOUR COMPUTER Note: If your...

English Manual
Page 19
... the audio cable into the jack beneath the console. A ANT. If the AUDIO OUT jack is connected to your home stereo, see instruction B. B. IN VIDEO AUDIO IN CH 34 OUT RF OUT AUDIO OUT RIGHT LEFT Adapter Audio Cable RCA Y-adapter Audio Cable Adapter Wire removed from AUDIO OUT jack 19 If your VCR is being used, see HOW TO CONNECT YOUR HOME STEREO on your VCR. Plug one end of the B cable into the adapter. Plug...
... the audio cable into the jack beneath the console. A ANT. If the AUDIO OUT jack is connected to your home stereo, see instruction B. B. IN VIDEO AUDIO IN CH 34 OUT RF OUT AUDIO OUT RIGHT LEFT Adapter Audio Cable RCA Y-adapter Audio Cable Adapter Wire removed from AUDIO OUT jack 19 If your VCR is being used, see HOW TO CONNECT YOUR HOME STEREO on your VCR. Plug one end of the B cable into the adapter. Plug...

English Manual
Page 20
... audio cable is properly connected and that the indicator beside the iFIT.com button is pressed, your personal trainer will automatically turn off. See step 5 on pages 17 to change when a "chirp" is heard: • Make sure that it is about to 19. See step 8 on the fan if desired. HOW TO USE IFIT.COM CD AND VIDEO PROGRAMS To use an iFIT.com CD or video program. 1 Begin pedaling...
... audio cable is properly connected and that the indicator beside the iFIT.com button is pressed, your personal trainer will automatically turn off. See step 5 on pages 17 to change when a "chirp" is heard: • Make sure that it is about to 19. See step 8 on the fan if desired. HOW TO USE IFIT.COM CD AND VIDEO PROGRAMS To use an iFIT.com CD or video program. 1 Begin pedaling...
English Manual
Page 21
... iFIT.com mode, press the iFIT.com button. When you when the resistance of the pedals and/or the target pace is about to change. 8 Adjust the angle of specific system requirements is found on -screen countdown will function in almost the same way as desired. See step 7 on page 13. 12 When you are finished exercising, the console will alert you start the program...
... iFIT.com mode, press the iFIT.com button. When you when the resistance of the pedals and/or the target pace is about to change. 8 Adjust the angle of specific system requirements is found on -screen countdown will function in almost the same way as desired. See step 7 on page 13. 12 When you are finished exercising, the console will alert you start the program...
English Manual
Page 22
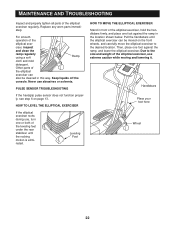
... parts of the leveling feet under the rear stabilizer until the elliptical exerciser can also be moved on page 13. PULSE SENSOR TROUBLESHOOTING If the handgrip pulse sensor does not function properly, see step 6 on the front wheels, and carefully move the elliptical exerciser to the size and weight of the elliptical exerciser, hold the handlebars firmly, and place one foot against the ramp in front of the elliptical exerciser, use...
... parts of the leveling feet under the rear stabilizer until the elliptical exerciser can also be moved on page 13. PULSE SENSOR TROUBLESHOOTING If the handgrip pulse sensor does not function properly, see step 6 on the front wheels, and carefully move the elliptical exerciser to the size and weight of the elliptical exerciser, hold the handlebars firmly, and place one foot against the ramp in front of the elliptical exerciser, use...

English Manual
Page 23
... over the age of heart rate readings. Training zone exercise, consisting of 20 to 30 minutes of exercising with pre-existing health problems. The pulse sensor is to burn fat or to strengthen your body begin to five workouts each week, with at a relatively low intensity level for prolonged periods of regular exercise, you must be "aerobic." The lower two numbers are your everyday...
... over the age of heart rate readings. Training zone exercise, consisting of 20 to 30 minutes of exercising with pre-existing health problems. The pulse sensor is to burn fat or to strengthen your body begin to five workouts each week, with at a relatively low intensity level for prolonged periods of regular exercise, you must be "aerobic." The lower two numbers are your everyday...
English Manual
Page 24
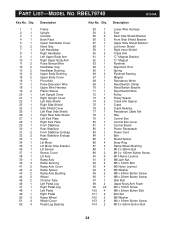
... Lower Wire Harness Foot Rear Side Shield Bracket Front Side Shield Bracket Upper Side Shield Bracket Left Inner Shield Right Inner Shield Crank Arm "C" Magnet Bracket "C" Magnet Flywheel Alignment Rod Spring Flywheel Bearing Magnet Resistance Motor Reed Switch Clamp Reed Switch Bracket Reed Switch/Wire Pulley Pulley Spacer Crank Arm Spacer Crank Crank Bearing Resistance Cable Set Idler Control Box Control Box Cover Control Board Power Receptacle Power Cord Belt Shield Spacer Snap Ring Ramp Wheel Bushing M10 x 68mm Bolt M10 x 105mm Button Screw...
... Lower Wire Harness Foot Rear Side Shield Bracket Front Side Shield Bracket Upper Side Shield Bracket Left Inner Shield Right Inner Shield Crank Arm "C" Magnet Bracket "C" Magnet Flywheel Alignment Rod Spring Flywheel Bearing Magnet Resistance Motor Reed Switch Clamp Reed Switch Bracket Reed Switch/Wire Pulley Pulley Spacer Crank Arm Spacer Crank Crank Bearing Resistance Cable Set Idler Control Box Control Box Cover Control Board Power Receptacle Power Cord Belt Shield Spacer Snap Ring Ramp Wheel Bushing M10 x 68mm Bolt M10 x 105mm Button Screw...
English Manual
Page 28
... be prepared to give the following information when calling: • The MODEL NUMBER of the product (RBEL79740) • The NAME of the product (REEBOK® RL 645 elliptical exerciser) • The SERIAL NUMBER of the product (see the front cover of this manual) • The KEY NUMBER and DESCRIPTION of the part(s) (see pages 24 to 27) LIMITED WARRANTY ICON Health & Fitness, Inc. (ICON), warrants this warranty is not responsible or liable...
... be prepared to give the following information when calling: • The MODEL NUMBER of the product (RBEL79740) • The NAME of the product (REEBOK® RL 645 elliptical exerciser) • The SERIAL NUMBER of the product (see the front cover of this manual) • The KEY NUMBER and DESCRIPTION of the part(s) (see pages 24 to 27) LIMITED WARRANTY ICON Health & Fitness, Inc. (ICON), warrants this warranty is not responsible or liable...


