
Users Guide
Page 3
... Pointer...11 Red Marker...12 Remote Operation...12 Send URL...13 Command Function...13 Pause...14 Exiting the Client Tool...15 Permission to Read This Manual...5 Symbols...5 Disclaimer...5 Notes...5 Terminology...6 Trademarks...7 2. TABLE OF CONTENTS 1.
... Pointer...11 Red Marker...12 Remote Operation...12 Send URL...13 Command Function...13 Pause...14 Exiting the Client Tool...15 Permission to Read This Manual...5 Symbols...5 Disclaimer...5 Notes...5 Terminology...6 Trademarks...7 2. TABLE OF CONTENTS 1.
Users Guide
Page 6
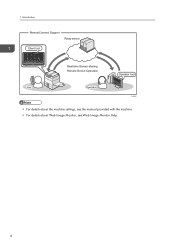
Introduction RemoteConnect Support Relay server Client tool Real-time Screen-sharing Remote Device Operation Operator tool User Operator DUN040 • For details about the machine settings, see the manual provided with the machine. • For details about Web Image Monitor, see Web Image Monitor Help. 4 1.
Introduction RemoteConnect Support Relay server Client tool Real-time Screen-sharing Remote Device Operation Operator tool User Operator DUN040 • For details about the machine settings, see the manual provided with the machine. • For details about Web Image Monitor, see Web Image Monitor Help. 4 1.

Users Guide
Page 7
Be sure to your operational errors or malfunctions of this product or any documents created by you using this product and operation manuals provided with it. Notes Some illustrations in property damage or malfunction if instructions are not followed. Indicates supplementary relevant information. ...Also, you are subject to change without prior notice. 5 How to Read This Manual How to Read This Manual Symbols This manual uses the following symbols: Indicates a situation that may result in this manual might be responsible for any results from the machine. Make sure that appear on...
Be sure to your operational errors or malfunctions of this product or any documents created by you using this product and operation manuals provided with it. Notes Some illustrations in property damage or malfunction if instructions are not followed. Indicates supplementary relevant information. ...Also, you are subject to change without prior notice. 5 How to Read This Manual How to Read This Manual Symbols This manual uses the following symbols: Indicates a situation that may result in this manual might be responsible for any results from the machine. Make sure that appear on...
Users Guide
Page 8
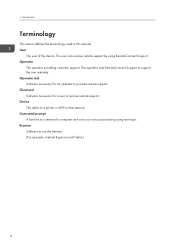
... using text input. The operator uses RemoteConnect Support to a printer or MFP on the network. Introduction Terminology This section defines the terminology used in this manual. Operator The operator providing customer support. Device This refers to support the user remotely. Browser Software to command a computer and carry out various processing using...
... using text input. The operator uses RemoteConnect Support to a printer or MFP on the network. Introduction Terminology This section defines the terminology used in this manual. Operator The operator providing customer support. Device This refers to support the user remotely. Browser Software to command a computer and carry out various processing using...
Users Guide
Page 24
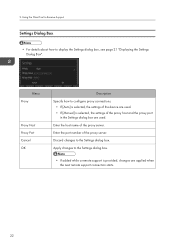
... "Displaying the Settings Dialog Box". Apply changes to configure proxy connections. • If [Auto] is selected, the settings of the device are used. • If [Manual] is provided, changes are used. Using the Client Tool to Receive Support Settings Dialog Box • For details about how to the Settings dialog box...
... "Displaying the Settings Dialog Box". Apply changes to configure proxy connections. • If [Auto] is selected, the settings of the device are used. • If [Manual] is provided, changes are used. Using the Client Tool to Receive Support Settings Dialog Box • For details about how to the Settings dialog box...

User Guide
Page 1
For safe and correct use, be sure to read Safety Information before using the machine. User Guide Selected Version Getting Started Copy Fax Print Scan Document Server Web Image Monitor Adding Paper and Toner Troubleshooting Specifications for the Machine Legal and Contact Information For information not found in this manual, see the online manuals available on our web site (https://www.ricoh.com/) or via the control panel.
For safe and correct use, be sure to read Safety Information before using the machine. User Guide Selected Version Getting Started Copy Fax Print Scan Document Server Web Image Monitor Adding Paper and Toner Troubleshooting Specifications for the Machine Legal and Contact Information For information not found in this manual, see the online manuals available on our web site (https://www.ricoh.com/) or via the control panel.

User Guide
Page 3
How to Read the Manuals Symbols Used in the loss of keys or buttons on resolving user errors. [ ] Indicates the names of data if the instructions are not obeyed. This symbol indicates points that may result in the product or service becoming unusable or result in the Manuals This manual uses the following symbols: Indicates points to pay attention to read these explanations. Indicates supplementary explanations of the machine's functions, and instructions on the product or display. 1 Be sure to when using functions.
How to Read the Manuals Symbols Used in the loss of keys or buttons on resolving user errors. [ ] Indicates the names of data if the instructions are not obeyed. This symbol indicates points that may result in the product or service becoming unusable or result in the Manuals This manual uses the following symbols: Indicates points to pay attention to read these explanations. Indicates supplementary explanations of the machine's functions, and instructions on the product or display. 1 Be sure to when using functions.

User Guide
Page 4
... Display of the Keys of the Copy Function 47 How to Use the Fax Screen...49 Customizing the [Settings] Screen...49 How to Read the Manuals...1 Symbols Used in the Manuals...1 1. TABLE OF CONTENTS How to Use the Scanner Screen...52 Customizing the [Send Settings] Screen...52 2
... Display of the Keys of the Copy Function 47 How to Use the Fax Screen...49 Customizing the [Settings] Screen...49 How to Read the Manuals...1 Symbols Used in the Manuals...1 1. TABLE OF CONTENTS How to Use the Scanner Screen...52 Customizing the [Send Settings] Screen...52 2

User Guide
Page 27
If it cannot be installed correctly even after trying the installation a second time, contact your sales or service representative. • To use the paper feed unit, configure the machine options in "Accessories" in the printer driver. • See "Specifying the Option Configuration or Paper Settings Manually", User Guide (Full Version). 25 Attaching the Paper Feed Unit • If the optional paper feed unit was not installed properly, repeat the procedure from the beginning.
If it cannot be installed correctly even after trying the installation a second time, contact your sales or service representative. • To use the paper feed unit, configure the machine options in "Accessories" in the printer driver. • See "Specifying the Option Configuration or Paper Settings Manually", User Guide (Full Version). 25 Attaching the Paper Feed Unit • If the optional paper feed unit was not installed properly, repeat the procedure from the beginning.

User Guide
Page 51
...currently specified and the remaining amount of the keys. How to Use the Fax Screen There are using various other methods such as by entering manually or selecting from the history. You can also register a new destination in the memory or on the Fax screen. 1 2 How to ...Fax Screen 5 3 4 DZX895 1. Destination specification You can specify the additional features to use when sending a fax, configure the scan settings appropriately for manual entry change also when you are five kinds of functions and settings on the hard disk drive of the machine. When user authentication is set...
...currently specified and the remaining amount of the keys. How to Use the Fax Screen There are using various other methods such as by entering manually or selecting from the history. You can also register a new destination in the memory or on the Fax screen. 1 2 How to ...Fax Screen 5 3 4 DZX895 1. Destination specification You can specify the additional features to use when sending a fax, configure the scan settings appropriately for manual entry change also when you are five kinds of functions and settings on the hard disk drive of the machine. When user authentication is set...

User Guide
Page 54
... key on the screen below to switch to scan and the purpose of the keys. The transmission file status may not be customized for manual entry also change the key layout mode Long-press any key and press [OK] on the [Send Settings] screen to Folder]. When user... on the Scanner screen. 1 2 5 3 4 EAT358 1. Press to Use the Scanner Screen There are using various other methods such as by entering manually or selecting from the history. The items displayed in the address book through one-touch operation. Destination specification You can also register a new destination in...
... key on the screen below to switch to scan and the purpose of the keys. The transmission file status may not be customized for manual entry also change the key layout mode Long-press any key and press [OK] on the [Send Settings] screen to Folder]. When user... on the Scanner screen. 1 2 5 3 4 EAT358 1. Press to Use the Scanner Screen There are using various other methods such as by entering manually or selecting from the history. The items displayed in the address book through one-touch operation. Destination specification You can also register a new destination in...

User Guide
Page 95
... Suitable for the destination in the ADF or on the Scanner", User Guide (Full Version). 4. Specify the destination. DZC301 • To enter the fax number manually, select the destination from the destination history, or search for the Original", User Guide (Full Version). 5. You can also transmit a fax while confirming the status...
... Suitable for the destination in the ADF or on the Scanner", User Guide (Full Version). 4. Specify the destination. DZC301 • To enter the fax number manually, select the destination from the destination history, or search for the Original", User Guide (Full Version). 5. You can also transmit a fax while confirming the status...

User Guide
Page 97
... any document • Number of destinations that can be held in the destination history • Number of characters/digits in a destination that can be entered manually 95
... any document • Number of destinations that can be held in the destination history • Number of characters/digits in a destination that can be entered manually 95

User Guide
Page 101
... the destination on the exposure glass. See "Setting an Original to specify the orientation of the following: • Immediate Transmission • On-hook dialing • Manual dialing To display the preview in the correct orientation, specify the [Original Orientation] in the Auto Document Feeder (ADF) or on the fax screen, and...
... the destination on the exposure glass. See "Setting an Original to specify the orientation of the following: • Immediate Transmission • On-hook dialing • Manual dialing To display the preview in the correct orientation, specify the [Original Orientation] in the Auto Document Feeder (ADF) or on the fax screen, and...

User Guide
Page 148
... opening confirmation. 6. Scan • Specify the sender to specify the destination again or select [To], [Cc] or [Bcc]. 5. DZC505 • To enter the e-mail address manually, select the destination from the destination. 7. page 161 "Scanning an Original with Suitable Quality and Density" page 164 "Specifying the File Type or File Name...
... opening confirmation. 6. Scan • Specify the sender to specify the destination again or select [To], [Cc] or [Bcc]. 5. DZC505 • To enter the e-mail address manually, select the destination from the destination. 7. page 161 "Scanning an Original with Suitable Quality and Density" page 164 "Specifying the File Type or File Name...

User Guide
Page 149
Press [Scanner] on the scanner. Specify the destination. • When entering manually 1. Press and then select [Enter Using Keyboard]. 147 Select [Scan to the purpose of the scanned data. Press [Send Settings] on the scanner screen and ... Quality and Density" page 164 "Specifying the File Type or File Name When Scanning a Document" 5. Scanning Documents and Sending the Scanned Data by entering it manually or selecting it from the scanner records, you can register the e-mail address in the address book before sending an e-mail. 1. Place the original on...
Press [Scanner] on the scanner. Specify the destination. • When entering manually 1. Press and then select [Enter Using Keyboard]. 147 Select [Scan to the purpose of the scanned data. Press [Send Settings] on the scanner screen and ... Quality and Density" page 164 "Specifying the File Type or File Name When Scanning a Document" 5. Scanning Documents and Sending the Scanned Data by entering it manually or selecting it from the scanner records, you can register the e-mail address in the address book before sending an e-mail. 1. Place the original on...

User Guide
Page 150
Enter the e-mail address, and press . Book]. DZC513 2. Select the e-mail address that was entered manually and press [Reg. Enter the name and other additional information. • When selecting from History]. Scan DZC510 2. DZC511 3. Press [Register] of the destination to Add. Press and then select [Select from the transmission history 1. DZC512 4. 5. to register. 148
Enter the e-mail address, and press . Book]. DZC513 2. Select the e-mail address that was entered manually and press [Reg. Enter the name and other additional information. • When selecting from History]. Scan DZC510 2. DZC511 3. Press [Register] of the destination to Add. Press and then select [Select from the transmission history 1. DZC512 4. 5. to register. 148

User Guide
Page 160
... host name of the login user who will access the shared folder. 158 DZC134 6. Select [SMB (Send to classify the destination. 4. Entering the path name manually If the computer name is "YamadaPC" ([1] on PC)] in [Protocol].
... host name of the login user who will access the shared folder. 158 DZC134 6. Select [SMB (Send to classify the destination. 4. Entering the path name manually If the computer name is "YamadaPC" ([1] on PC)] in [Protocol].

User Guide
Page 162
... SMB as the protocol and enter the required information. • To specify the destination again, press . DZC536 6. DZC533 • To enter the information manually, press , and select [Manual Entry]. 5. If you send files by Reg. Press [Send Settings] and configure the scan settings according to Folder]. • After scan files are sent...
... SMB as the protocol and enter the required information. • To specify the destination again, press . DZC536 6. DZC533 • To enter the information manually, press , and select [Manual Entry]. 5. If you send files by Reg. Press [Send Settings] and configure the scan settings according to Folder]. • After scan files are sent...

User Guide
Page 236
9. Wait a while, and press [Manual Reception: Email]. 234 Load paper." appears on the screen, prompting you can receive documents as usual, even if the message appears on or off with "... can specify the setting so this function on the screen. If there is receiving an On-demand Email Notification (a query email from the administrator), and manual reception cannot be sure to add paper. If you do not need to connect to a network, you to set "Display" by configuring the appropriate user...
9. Wait a while, and press [Manual Reception: Email]. 234 Load paper." appears on the screen, prompting you can receive documents as usual, even if the message appears on or off with "... can specify the setting so this function on the screen. If there is receiving an On-demand Email Notification (a query email from the administrator), and manual reception cannot be sure to add paper. If you do not need to connect to a network, you to set "Display" by configuring the appropriate user...


