Users Guide
Page 5
...[Screen Features Settings] • [Control Panel: Proxy Settings] in [Network/Interface] in [System Settings] • [RC Gate Proxy Server] in [Configuration] in [Device Management] of a client tool that runs on the user's device, an operator tool that runs on the operator's computer, and a ...environment where a proxy server is a remote control system that connects the client tool and operator tool. RemoteConnect Support is used, configure the proxy settings. The setting items displayed on the screen vary on the telephone while following the operator's onscreen instructions, so ...
...[Screen Features Settings] • [Control Panel: Proxy Settings] in [Network/Interface] in [System Settings] • [RC Gate Proxy Server] in [Configuration] in [Device Management] of a client tool that runs on the user's device, an operator tool that runs on the operator's computer, and a ...environment where a proxy server is a remote control system that connects the client tool and operator tool. RemoteConnect Support is used, configure the proxy settings. The setting items displayed on the screen vary on the telephone while following the operator's onscreen instructions, so ...
Users Guide
Page 24
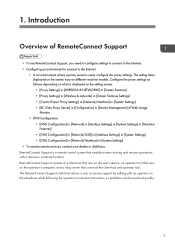
Apply changes to configure proxy connections. • If [Auto] is selected, the settings of the proxy host and the proxy port in the Settings dialog box are applied when ...
Apply changes to configure proxy connections. • If [Auto] is selected, the settings of the proxy host and the proxy port in the Settings dialog box are applied when ...
Users Guide
Page 25
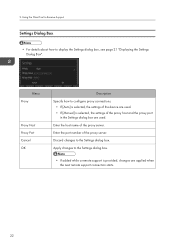
DUN034 The Information screen is configured. 1. Tap to return to display the Settings dialog box, see page 21 "Displaying the Settings Dialog Box". 2. Connecting via a Proxy Server Connecting via a Proxy Server The client tool connects to an operator via a proxy server after the proxy server is displayed. 3. Open the Settings dialog box. • For details about how to the software license agreement. DUN003 After a while, a reception number is displayed. 23 If you accept the software license agreement, tap [Accept]. Configure the proxy server, and then tap [OK].
DUN034 The Information screen is configured. 1. Tap to return to display the Settings dialog box, see page 21 "Displaying the Settings Dialog Box". 2. Connecting via a Proxy Server Connecting via a Proxy Server The client tool connects to an operator via a proxy server after the proxy server is displayed. 3. Open the Settings dialog box. • For details about how to the software license agreement. DUN003 After a while, a reception number is displayed. 23 If you accept the software license agreement, tap [Accept]. Configure the proxy server, and then tap [OK].

Users Guide
Page 26
... details about how to the software license agreement. Tap to return to display the Settings dialog box, see page 21 "Displaying the Settings Dialog Box". 2. Configure the proxy server, and then tap [OK]. 2. Using the Client Tool to Receive Support User Authentication for the proxy server, and then tap [OK].
... details about how to the software license agreement. Tap to return to display the Settings dialog box, see page 21 "Displaying the Settings Dialog Box". 2. Configure the proxy server, and then tap [OK]. 2. Using the Client Tool to Receive Support User Authentication for the proxy server, and then tap [OK].
AirPrint Guide
Page 8
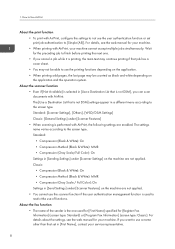
...select [Active] for "Certificate1": 6 Click [Bonjour] in "Device Management". 3. If [Active] is set to [Active]. Log in Web Image Monitor, see page 6 "Confirming Settings". Click [Configuration] in "Network". 10. To log in to [Active]. 11. If [Active] is set to [Active]. Confirm that "IPP" is not set, set to Use AirPrint...]. Click [AirPrint] in "Device Management". 3. If [Active] is already installed by using a web browser on a computer on the printer or multi-function printer. 1. Click [Configuration] in "Network". 4. Confirming AirPrint settings 1.
...select [Active] for "Certificate1": 6 Click [Bonjour] in "Device Management". 3. If [Active] is set to [Active]. Log in Web Image Monitor, see page 6 "Confirming Settings". Click [Configuration] in "Network". 10. To log in to [Active]. 11. If [Active] is set to [Active]. Confirm that "IPP" is not set, set to Use AirPrint...]. Click [AirPrint] in "Device Management". 3. If [Active] is already installed by using a web browser on a computer on the printer or multi-function printer. 1. Click [Configuration] in "Network". 4. Confirming AirPrint settings 1.

AirPrint Guide
Page 9
... use AirPrint when AirPrint is set to use encrypted communications because access using for "SSL/TLS". • Set [Active] for your service representative. 7 Click [OK]. Configure the following utilities after the device certificate for SSL/TLS is [Ciphertext/Cleartext].
... use AirPrint when AirPrint is set to use encrypted communications because access using for "SSL/TLS". • Set [Active] for your service representative. 7 Click [OK]. Configure the following utilities after the device certificate for SSL/TLS is [Ciphertext/Cleartext].
AirPrint Guide
Page 10
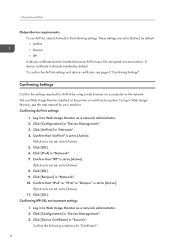
..., see the web manual for your machine cannot accept multiple jobs simultaneously. How to Use AirPrint About the print function • To print with AirPrint, configure the settings to not use the user authentication function or set in [Sending Settings] under [Scanner Features] • When scanning is not DSM], you want...
..., see the web manual for your machine cannot accept multiple jobs simultaneously. How to Use AirPrint About the print function • To print with AirPrint, configure the settings to not use the user authentication function or set in [Sending Settings] under [Scanner Features] • When scanning is not DSM], you want...

AirPrint Guide
Page 11
.... • The line type for fax transmission is set to Korea and a sender's name is not registered on the machine • When the fax is configured. • You cannot use the fax function in the following conditions: • When the use an extension line for fax transmissions, contact your service representative...
.... • The line type for fax transmission is set to Korea and a sender's name is not registered on the machine • When the fax is configured. • You cannot use the fax function in the following conditions: • When the use an extension line for fax transmissions, contact your service representative...

AirPrint Guide
Page 13
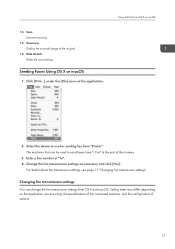
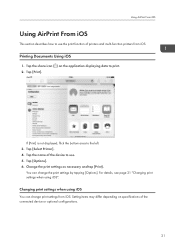
Using AirPrint From OS X or macOS 2. For details, see page 11 "Changing print settings when using , the specifications of the connected machine, and the configuration of the application. Click [Print...] in the [File] menu of options. 1 2 3 9 4 10 5 6 11 7 8 1. You can change the print settings by clicking [Show Details]. Changing print ...
Using AirPrint From OS X or macOS 2. For details, see page 11 "Changing print settings when using , the specifications of the connected machine, and the configuration of the application. Click [Print...] in the [File] menu of options. 1 2 3 9 4 10 5 6 11 7 8 1. You can change the print settings by clicking [Show Details]. Changing print ...
AirPrint Guide
Page 14
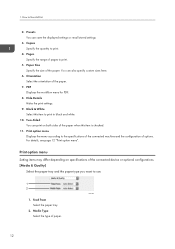
... on both sides of the paper when this item to the specifications of the connected machine and the configuration of the paper. Media Type Select the type of the connected device or optional configurations. [Media & Quality] Select the paper tray and the paper type you want to print. 5. Print option menu Displays...
... on both sides of the paper when this item to the specifications of the connected machine and the configuration of the paper. Media Type Select the type of the connected device or optional configurations. [Media & Quality] Select the paper tray and the paper type you want to print. 5. Print option menu Displays...
AirPrint Guide
Page 15
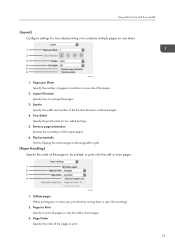
... orientation Reverse the orientation of the borders between combined pages. 4. Page Order Specify the order of the paper. 2. Using AirPrint From OS X or macOS [Layout] Configure settings for two sided printing. 5.
... orientation Reverse the orientation of the borders between combined pages. 4. Page Order Specify the order of the paper. 2. Using AirPrint From OS X or macOS [Layout] Configure settings for two sided printing. 5.
AirPrint Guide
Page 16
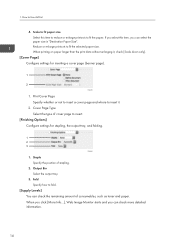
... [More Info...], Web Image Monitor starts and you select this item to reduce or enlarge printouts to insert it , check [Scale down only]. [Cover Page] Configure settings for stapling, the output tray, and folding. 1 2 3 DVL906 1. Fold Specify how to insert. [Finishing Options...
... [More Info...], Web Image Monitor starts and you select this item to reduce or enlarge printouts to insert it , check [Scale down only]. [Cover Page] Configure settings for stapling, the output tray, and folding. 1 2 3 DVL906 1. Fold Specify how to insert. [Finishing Options...

AirPrint Guide
Page 18
... the correction method for scanned data. 9. Setting items may differ depending on the application you are using, the specifications of the connected machine, and the configuration of scanned data. 7. Scan Mode Select whether to save scanned data. 8. Kind Select the type of images and to scan. 6. Use Custom Size You can...
... the correction method for scanned data. 9. Setting items may differ depending on the application you are using, the specifications of the connected machine, and the configuration of scanned data. 7. Scan Mode Select whether to save scanned data. 8. Kind Select the type of images and to scan. 6. Use Custom Size You can...
AirPrint Guide
Page 19
... settings as necessary and click [Fax]. Setting items may differ depending on the application you are using, the specifications of the connected machine, and the configuration of the application. Click [Print...] under the [File] menu of options. 17 Using AirPrint From OS X or macOS 2. For details about fax transmission settings, see...
... settings as necessary and click [Fax]. Setting items may differ depending on the application you are using, the specifications of the connected machine, and the configuration of the application. Click [Print...] under the [File] menu of options. 17 Using AirPrint From OS X or macOS 2. For details about fax transmission settings, see...
AirPrint Guide
Page 20
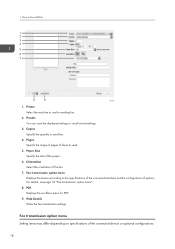
... menu for sending fax. 2. Presets You can save the displayed settings or recall stored settings. 3. Orientation Select the orientation of the connected device or optional configurations. 18 Hide Details Hides the fax transmission settings. How to send fax. 4. Copies Specify the quantity to Use AirPrint 1 2 3 4 5 6 7 8 9 DVL909 1. Pages ... range of pages of options. Fax transmission option menu Displays the menus according to the specifications of the connected machine and the configuration of faxes to use for PDF. 9. Paper Size Specify the size of the paper. 6.
... menu for sending fax. 2. Presets You can save the displayed settings or recall stored settings. 3. Orientation Select the orientation of the connected device or optional configurations. 18 Hide Details Hides the fax transmission settings. How to send fax. 4. Copies Specify the quantity to Use AirPrint 1 2 3 4 5 6 7 8 9 DVL909 1. Pages ... range of pages of options. Fax transmission option menu Displays the menus according to the specifications of the connected machine and the configuration of faxes to use for PDF. 9. Paper Size Specify the size of the paper. 6.
AirPrint Guide
Page 21
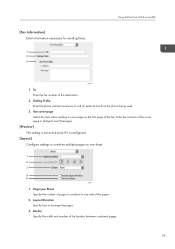
... the destination. 2. To Enter the fax number of the cover page in [Subject] and [Message]. [Preview] This setting is not active even if it is configured. [Layout] Configure settings to combine in one sheet. 1 2 3 4 5 DVL911 1. Pages per Sheet Specify the number of pages to combine multiple pages on one side of the...
... the destination. 2. To Enter the fax number of the cover page in [Subject] and [Message]. [Preview] This setting is not active even if it is configured. [Layout] Configure settings to combine in one sheet. 1 2 3 4 5 DVL911 1. Pages per Sheet Specify the number of pages to combine multiple pages on one side of the...
AirPrint Guide
Page 22
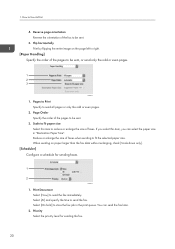
... the print queue. Flip horizontally Print by flipping the entire image on paper larger than the fax data without enlarging, check [Scale down only]. [Scheduler] Configure a schedule for sending the fax. 20 When sending on the page left to right. [Paper Handling] Specify the order of the pages to send the...
... the print queue. Flip horizontally Print by flipping the entire image on paper larger than the fax data without enlarging, check [Scale down only]. [Scheduler] Configure a schedule for sending the fax. 20 When sending on the page left to right. [Paper Handling] Specify the order of the pages to send the...
AirPrint Guide
Page 23
... of printers and multi-function printers from iOS. Tap the name of the device to use the print function of the connected device or optional configurations. 21
... of printers and multi-function printers from iOS. Tap the name of the device to use the print function of the connected device or optional configurations. 21
AirPrint Guide
Page 24
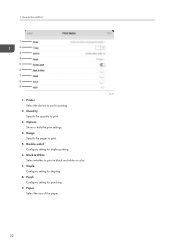
Options Show or hide the print settings. 4. Double-sided Configure setting for stapling. 8. Quantity Specify the quantity to Use AirPrint 1 2 3 4 5 6 7 8 9 DVL907 1. Paper Select the size of the paper. 22 How to print. 3. Black & White Select whether to print. 5. Staple Configure setting for duplex printing. 6. Range Specify the pages to print in black and white or color. 7. Printer Select the device to use for punching. 9. 1. Punch Configure setting for printing. 2.
Options Show or hide the print settings. 4. Double-sided Configure setting for stapling. 8. Quantity Specify the quantity to Use AirPrint 1 2 3 4 5 6 7 8 9 DVL907 1. Paper Select the size of the paper. 22 How to print. 3. Black & White Select whether to print. 5. Staple Configure setting for duplex printing. 6. Range Specify the pages to print in black and white or color. 7. Printer Select the device to use for punching. 9. 1. Punch Configure setting for printing. 2.
Mopria Guide
Page 6
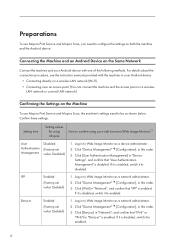
... disabled, switch it to enabled. 4 If it is disabled. Click [User Authentication Management] in this order. 3. Click "Device Management" [Configuration], in this order. 3. Connecting the Machine and an Android Device on the Same Network Connect the machine and your Android device. • ...on the Machine To use Mopria Print Service and Mopria Scan, you need to be as a network administrator. 2. Click "Device Management" [Configuration], in this order. 3. Log in "Network", and confirm that "User Authentication Management" is enabled, switch it to Web Image Monitor ...
... disabled, switch it to enabled. 4 If it is disabled. Click [User Authentication Management] in this order. 3. Click "Device Management" [Configuration], in this order. 3. Connecting the Machine and an Android Device on the Same Network Connect the machine and your Android device. • ...on the Machine To use Mopria Print Service and Mopria Scan, you need to be as a network administrator. 2. Click "Device Management" [Configuration], in this order. 3. Log in "Network", and confirm that "User Authentication Management" is enabled, switch it to Web Image Monitor ...