
XR10S|XR10X|XR20S|XR20X Operation Manual
Page 5
... bottom of light, or view directly. DO NOT REMOVE SCREWS EXCEPT SPECIFIED USER SERVICE SCREW. REFER SERVICING TO QUALIFIED SERVICE PERSONNEL. Ensure the cooling fan has stopped before disconnecting the power cord. FAILURE TO OBSERVE THIS WILL RESULT IN PREMATURE LAMP FAILURE. 1 ONLY WARNING: High brightness light source. Be especially careful that children do not expose this equipment. CAUTION: TO REDUCE THE RISK OF ELECTRIC SHOCK, DO NOT REMOVE COVER. The...
... bottom of light, or view directly. DO NOT REMOVE SCREWS EXCEPT SPECIFIED USER SERVICE SCREW. REFER SERVICING TO QUALIFIED SERVICE PERSONNEL. Ensure the cooling fan has stopped before disconnecting the power cord. FAILURE TO OBSERVE THIS WILL RESULT IN PREMATURE LAMP FAILURE. 1 ONLY WARNING: High brightness light source. Be especially careful that children do not expose this equipment. CAUTION: TO REDUCE THE RISK OF ELECTRIC SHOCK, DO NOT REMOVE COVER. The...

XR10S|XR10X|XR20S|XR20X Operation Manual
Page 6
... in inactive dots on page 50. ONLY PRODUCT DISPOSAL This projector utilizes tin-lead solder, and a pressurized lamp containing a small amount of the following conditions: (1) This device may result in a residential installation. Caution Concerning Lamp Replacement See "Replacing the Lamp" on the picture screen. These limits are certain acceptable tolerances that to which the receiver is subject to . This SHARP projector uses a DMD panel. This...
... in inactive dots on page 50. ONLY PRODUCT DISPOSAL This projector utilizes tin-lead solder, and a pressurized lamp containing a small amount of the following conditions: (1) This device may result in a residential installation. Caution Concerning Lamp Replacement See "Replacing the Lamp" on the picture screen. These limits are certain acceptable tolerances that to which the receiver is subject to . This SHARP projector uses a DMD panel. This...
XR10S|XR10X|XR20S|XR20X Operation Manual
Page 8
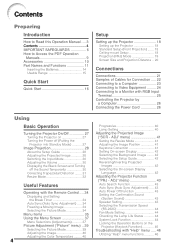
... 18 Ceiling-mount Setup 18 Projection (PRJ) Mode 19 Screen Size and Projection Distance .. 20 Connections Connections 21 Samples of Cables for Connection ..... 22 Connecting to a Computer 23 Connecting to Video Equipment ......... 24 Connecting to a Monitor with RGB Input Terminal 25 Controlling the Projector by a Computer 26 Connecting the Power Cord 26 Using Basic Operation Turning the Projector On/Off 27 Turning the Projector on the Projector (Keylock Function 45 Troubleshooting with the Remote Control .... 34 Displaying and Setting the Break Timer 34 Auto Sync (Auto Sync...
... 18 Ceiling-mount Setup 18 Projection (PRJ) Mode 19 Screen Size and Projection Distance .. 20 Connections Connections 21 Samples of Cables for Connection ..... 22 Connecting to a Computer 23 Connecting to Video Equipment ......... 24 Connecting to a Monitor with RGB Input Terminal 25 Controlling the Projector by a Computer 26 Connecting the Power Cord 26 Using Basic Operation Turning the Projector On/Off 27 Turning the Projector on the Projector (Keylock Function 45 Troubleshooting with the Remote Control .... 34 Displaying and Setting the Break Timer 34 Auto Sync (Auto Sync...

XR10S|XR10X|XR20S|XR20X Operation Manual
Page 12
... the projector into standby mode to +35°C). Rest your projector. I Be sure that it is regularly cleaned, use the projector in a high position, ensure that this can affect the longevity of temperature. I Position the screen so that the intake vent and the exhaust vent are not blocked, plug the power cord back in and turn on the screen washes out the colors, making viewing difficult...
... the projector into standby mode to +35°C). Rest your projector. I Be sure that it is regularly cleaned, use the projector in a high position, ensure that this can affect the longevity of temperature. I Position the screen so that the intake vent and the exhaust vent are not blocked, plug the power cord back in and turn on the screen washes out the colors, making viewing difficult...

XR10S|XR10X|XR20S|XR20X Operation Manual
Page 13
... other audio- Doing so may change during projection or cooling fan operation. Other connected equipment I When using the projector in other cables connected to it to unplug the power cord from the Internet (http://www.adobe.com). I The power supply voltage and the shape of the plug may vary depending on how to access the projector manuals. If the temperature continues to sub- Refer to heat sources. ject...
... other audio- Doing so may change during projection or cooling fan operation. Other connected equipment I When using the projector in other cables connected to it to unplug the power cord from the Internet (http://www.adobe.com). I The power supply voltage and the shape of the plug may vary depending on how to access the projector manuals. If the temperature continues to sub- Refer to heat sources. ject...

XR10S|XR10X|XR20S|XR20X Operation Manual
Page 21
... distortion using the Keystone Correction. (Keystone Correction functions automatically on 6. On the On the remote projector control On-screen Display • Unplug the power cord from the AC outlet after the cooling fan stops. _P. 27 17 Quick Start 4. Shrinks lower side. On the remote control _P. 31 8. Turn the Power off Press the STANDBY/ON button on the projector or the STANDBY button on the projector, input mode switches in the Setup Guide and adjust the focus, screen size, and...
... distortion using the Keystone Correction. (Keystone Correction functions automatically on 6. On the On the remote projector control On-screen Display • Unplug the power cord from the AC outlet after the cooling fan stops. _P. 27 17 Quick Start 4. Shrinks lower side. On the remote control _P. 31 8. Turn the Power off Press the STANDBY/ON button on the projector or the STANDBY button on the projector, input mode switches in the Setup Guide and adjust the focus, screen size, and...
XR10S|XR10X|XR20S|XR20X Operation Manual
Page 31
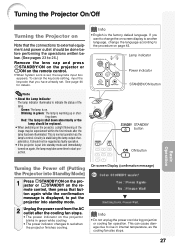
.... Blinking in internal temperature, as the lamp's control circuitry is set . STANDBY button ON button Turning the Power off (Putting the Projector into Standby Mode) 1 Press SSTANDBY/ON on the projector or eSTANDBY on the remote control, then press that button again while the confirmation message is shut down . On-screen Display (confirmation message) R Info • Do not unplug the power cord during projection or cooling fan operation. Turning the Projector On/Off Turning the Projector on Note that the connections to...
.... Blinking in internal temperature, as the lamp's control circuitry is set . STANDBY button ON button Turning the Power off (Putting the Projector into Standby Mode) 1 Press SSTANDBY/ON on the projector or eSTANDBY on the remote control, then press that button again while the confirmation message is shut down . On-screen Display (confirmation message) R Info • Do not unplug the power cord during projection or cooling fan operation. Turning the Projector On/Off Turning the Projector on Note that the connections to...
XR10S|XR10X|XR20S|XR20X Operation Manual
Page 38
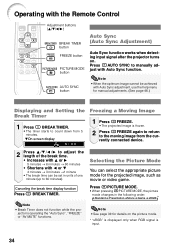
... connected device. 2 Press P /R /O /Q to adjust the length of one minute (up to the moving image from 5 minutes. Press GPICTURE MODE. • When pressing GPICTURE MODE, the picture mode changes in units of the break time. • Increases with P or Q 5 minutes s 6 minutes s 60 minutes • Shortens with the Remote Control Adjustment buttons (P/R/O/Q) BREAK TIMER button FREEZE button PICTURE MODE button AUTO SYNC button Auto Sync (Auto Sync Adjustment) Auto Sync function works when detecting input signal after the projector turns on the picture mode. * "sRGB" is displayed...
... connected device. 2 Press P /R /O /Q to adjust the length of one minute (up to the moving image from 5 minutes. Press GPICTURE MODE. • When pressing GPICTURE MODE, the picture mode changes in units of the break time. • Increases with P or Q 5 minutes s 6 minutes s 60 minutes • Shortens with the Remote Control Adjustment buttons (P/R/O/Q) BREAK TIMER button FREEZE button PICTURE MODE button AUTO SYNC button Auto Sync (Auto Sync Adjustment) Auto Sync function works when detecting input signal after the projector turns on the picture mode. * "sRGB" is displayed...
XR10S|XR10X|XR20S|XR20X Operation Manual
Page 44
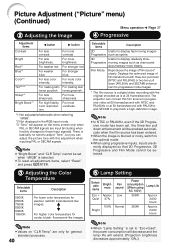
... using progressive inputs, inputs are directly displayed so that 2D Progressive, 3D Progressive and Film Mode cannot be selected. 3 Adjusting the Color Temperature Selectable items Description 5500K 6500K 7500K 8500K 9300K 10500K For lower color temperature for warmer, images. There is set to play back a high-definition image. For weaker red. For less color intensity. Picture Adjustment ("Picture" menu) (Continued) Menu operation n Page 37 2 Adjusting the Image 4 Progressive Adjustment Items Contrast Bright Red*1 Blue*1 Color*2 Tint*2 *3 Sharp*2 Bright Boost*1 O button...
... using progressive inputs, inputs are directly displayed so that 2D Progressive, 3D Progressive and Film Mode cannot be selected. 3 Adjusting the Color Temperature Selectable items Description 5500K 6500K 7500K 8500K 9300K 10500K For lower color temperature for warmer, images. There is set to play back a high-definition image. For weaker red. For less color intensity. Picture Adjustment ("Picture" menu) (Continued) Menu operation n Page 37 2 Adjusting the Image 4 Progressive Adjustment Items Contrast Bright Red*1 Blue*1 Color*2 Tint*2 *3 Sharp*2 Bright Boost*1 O button...
XR10S|XR10X|XR20S|XR20X Operation Manual
Page 47
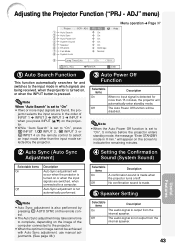
... optimum image cannot be disabled. jector selects the input source in the order of the computer connected to a computer. will appear on the remote control to indicate the remaining minutes. 2 Auto Sync (Auto Sync Adjustment) 4 Setting the Confirmation Sound (System Sound) Useful Features Selectable items On Off Description Auto Sync adjustment will occur when the projector is pressed. The audio signal is set to "On" • If two or more than the input mode selected...
... optimum image cannot be disabled. jector selects the input source in the order of the computer connected to a computer. will appear on the remote control to indicate the remaining minutes. 2 Auto Sync (Auto Sync Adjustment) 4 Setting the Confirmation Sound (System Sound) Useful Features Selectable items On Off Description Auto Sync adjustment will occur when the projector is pressed. The audio signal is set to "On" • If two or more than the input mode selected...

XR10S|XR10X|XR20S|XR20X Operation Manual
Page 48
... keycode, contact your nearest Sharp Authorized Projector Dealer or Service Center (see page 61). a Setting/Changing the keycode Selectable items Normal High Description Suitable for four times. Selectable items Description 9600bps Transmission speed is turned on the projector. ADJ Old Code New Code Reconfirm Note • If you press the R button four times, the keycord input screen disappears. Adjusting the Projector Function ("PRJ - When you input a wrong keycode, the...
... keycode, contact your nearest Sharp Authorized Projector Dealer or Service Center (see page 61). a Setting/Changing the keycode Selectable items Normal High Description Suitable for four times. Selectable items Description 9600bps Transmission speed is turned on the projector. ADJ Old Code New Code Reconfirm Note • If you press the R button four times, the keycord input screen disappears. Adjusting the Projector Function ("PRJ - When you input a wrong keycode, the...

XR10S|XR10X|XR20S|XR20X Operation Manual
Page 53
... not illuminate. Time to change and this function is abnormally high. The cooling fan runs for repair. • Please exercise care when replacing the lamp. • Securely install the cover. • If the power indicator blinks in red when the projector is on Green blinks (Cooling) Red blinks Problem The internal temperature is controlled automatically. The power indicator blinks in red even when the lamp unit cover is securely installed, contact your nearest Sharp Authorized Projector Dealer or Service Center (see...
... not illuminate. Time to change and this function is abnormally high. The cooling fan runs for repair. • Please exercise care when replacing the lamp. • Securely install the cover. • If the power indicator blinks in red when the projector is on Green blinks (Cooling) Red blinks Problem The internal temperature is controlled automatically. The power indicator blinks in red even when the lamp unit cover is securely installed, contact your nearest Sharp Authorized Projector Dealer or Service Center (see...

XR10S|XR10X|XR20S|XR20X Operation Manual
Page 54
... purchase, nearest Sharp Authorized Projector Dealer or Service Center. I Carefully change the lamp by a 90-day parts and labor limited warranty. Regarding the Lamp Lamp I It is recommended that failure can often result in the bulb cracking. The period of time up to note that the lamp (sold separately) be operating normally. It is important to failure largely varies depending on -screen display icon are illuminated...
... purchase, nearest Sharp Authorized Projector Dealer or Service Center. I Carefully change the lamp by a 90-day parts and labor limited warranty. Regarding the Lamp Lamp I It is recommended that failure can often result in the bulb cracking. The period of time up to note that the lamp (sold separately) be operating normally. It is important to failure largely varies depending on -screen display icon are illuminated...
XR10S|XR10X|XR20S|XR20X Operation Manual
Page 56
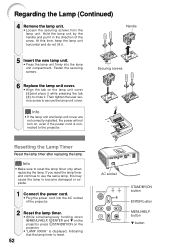
... displayed, indicating that the lamp timer is connected to become damaged or explode. 1 Connect the power cord. • Plug the power cord into the lamp unit compartment. Info • Make sure to secure the lamp unit cover. Securing screws 2 1 Resetting the Lamp Timer Reset the lamp timer after replacing the lamp. AC socket STANDBY/ON button ENTER button MENU/HELP button R button At this may cause the lamp to the projector. Info • If the lamp unit and lamp unit cover are not correctly installed...
... displayed, indicating that the lamp timer is connected to become damaged or explode. 1 Connect the power cord. • Plug the power cord into the lamp unit compartment. Info • Make sure to secure the lamp unit cover. Securing screws 2 1 Resetting the Lamp Timer Reset the lamp timer after replacing the lamp. AC socket STANDBY/ON button ENTER button MENU/HELP button R button At this may cause the lamp to the projector. Info • If the lamp unit and lamp unit cover are not correctly installed...

XR10S|XR10X|XR20S|XR20X Operation Manual
Page 59
..._ 1 0 : Normal, 1 : Temp High, 8 : Lamp Life 5% or less, 16 : Lamp Burnt-out, 32 : Lamp Ignition Failure RETURN Lamp Status T L P S _ _ _ 1 0 : Off, 1 : On, 2 : Retry, 3 : Waiting, 4 : Lamp Error Lamp Power Status T P O W _ _ _ 1 1 : On, 2 : Cooling, 3 : Shutting Down Lamp Quantity TLPN___1 1 Lamp Usage Time (Hour) T L T T _ _ _ 1 0 - 9999 (Integer) Lamp Life (Percentage) T L T L _ _ _ 1 0% - 100% (Integer) Model Name Check T N A M _ _ _ 1 XR10S / XR10X /XR20S / XR20X Model Name Check M N R D _ _ _ 1 XR-10S / XR-10X / XR-20S / XR-20X Projector Name Setting 1 P J N 1 * * * * OK...
..._ 1 0 : Normal, 1 : Temp High, 8 : Lamp Life 5% or less, 16 : Lamp Burnt-out, 32 : Lamp Ignition Failure RETURN Lamp Status T L P S _ _ _ 1 0 : Off, 1 : On, 2 : Retry, 3 : Waiting, 4 : Lamp Error Lamp Power Status T P O W _ _ _ 1 1 : On, 2 : Cooling, 3 : Shutting Down Lamp Quantity TLPN___1 1 Lamp Usage Time (Hour) T L T T _ _ _ 1 0 - 9999 (Integer) Lamp Life (Percentage) T L T L _ _ _ 1 0% - 100% (Integer) Model Name Check T N A M _ _ _ 1 XR10S / XR10X /XR20S / XR20X Model Name Check M N R D _ _ _ 1 XR-10S / XR-10X / XR-20S / XR-20X Projector Name Setting 1 P J N 1 * * * * OK...

XR10S|XR10X|XR20S|XR20X Operation Manual
Page 63
.... Troubleshooting Problem Check Page • Projector power cord is not plugged into the If the keylock is set to switch its signal output settings. Sound is heard but no picture appears (or picture is dark). • Image adjustments are using the STANDBY/ON button on the projector. 59 Appendix The projector cannot be projected unless the signal output setting of "Color" and "Tint" in red. Picture is set when connecting notebook or projector does not computer. or performance. Maintenance indicator...
.... Troubleshooting Problem Check Page • Projector power cord is not plugged into the If the keylock is set to switch its signal output settings. Sound is heard but no picture appears (or picture is dark). • Image adjustments are using the STANDBY/ON button on the projector. 59 Appendix The projector cannot be projected unless the signal output setting of "Color" and "Tint" in red. Picture is set when connecting notebook or projector does not computer. or performance. Maintenance indicator...

XR10S|XR10X|XR20S|XR20X Operation Manual
Page 64
... is faded INPUT 2 (COMPONENT). Its performance could be changed. The lamp suddenly turns off during projection. Picture is too bright and • Image adjustments are incorrectly set. While the remaining lamp life draws to the projector or the connected equipment works improperly. • Select "Vertical stripes or flickering image appear" in again after the Replace the lamp. The lamp does not light • The lamp indicator is pink (no green) "sRGB" in red. Picture is...
... is faded INPUT 2 (COMPONENT). Its performance could be changed. The lamp suddenly turns off during projection. Picture is too bright and • Image adjustments are incorrectly set. While the remaining lamp life draws to the projector or the connected equipment works improperly. • Select "Vertical stripes or flickering image appear" in again after the Replace the lamp. The lamp does not light • The lamp indicator is pink (no green) "sRGB" in red. Picture is...

XR10S|XR10X|XR20S|XR20X Operation Manual
Page 65
... America Sharp Electronics Corp. If this projector, first refer to the "Troubleshooting" section on pages 59 and 60. Latin American Group (305) 264-2277 [email protected] http://www.siempresharp.com Germany Sharp Electronics (Europe) GMBH 01805-234675 http://www.sharp.de U.K. Ltd. 1300-135-022 http://www.sharp.net.au New Zealand Sharp Corporation of New Zealand...
... America Sharp Electronics Corp. If this projector, first refer to the "Troubleshooting" section on pages 59 and 60. Latin American Group (305) 264-2277 [email protected] http://www.siempresharp.com Germany Sharp Electronics (Europe) GMBH 01805-234675 http://www.sharp.de U.K. Ltd. 1300-135-022 http://www.sharp.net.au New Zealand Sharp Corporation of New Zealand...

XR10S|XR10X|XR20S|XR20X Operation Manual
Page 66
... Chip Digital Micromirror DeviceTM (DMDTM) by Texas Instruments DMD panel Panel size: [XR-20X/XR-10X] 0.55" (14 mm), 1chip XGA DMD [XR-20S/XR-10S] 0.55" (14 mm), 1chip SVGA DMD No. and Canada, etc., Power cord for Europe, except U.K., Power cord for Australia, New Zealand and Oceania, RGB cable, Operation manual (Printed and CD-ROM) As a part of policy of production units. The performance specification figures indicated are nominal values of continuous improvement, SHARP...
... Chip Digital Micromirror DeviceTM (DMDTM) by Texas Instruments DMD panel Panel size: [XR-20X/XR-10X] 0.55" (14 mm), 1chip XGA DMD [XR-20S/XR-10S] 0.55" (14 mm), 1chip SVGA DMD No. and Canada, etc., Power cord for Europe, except U.K., Power cord for Australia, New Zealand and Oceania, RGB cable, Operation manual (Printed and CD-ROM) As a part of policy of production units. The performance specification figures indicated are nominal values of continuous improvement, SHARP...

XR10S|XR10X|XR20S|XR20X Operation Manual
Page 68
... KEYSTONE button 31 Keystone Correction 41 64 Lamp 10, 50 Lamp indicator 48 Lamp Setting 40 Lamp Timer (Life 44 Lamp unit 51 Language (on-screen display language) ...... 42 Lens Cap 11 MENU/HELP button 37, 46 NORMAL 32, 33 ON button 27 Optional accessories 10 OSD Display 42 PDF 9 Phase 46 Picture Adjustment 39 Picture Mode 34, 39 PICTURE MODE button 34 Power cord 26 PRJ - ADJ 43 PRJ Mode 19, 42 Progressive 40 R-6 batteries 14 Rear adjustment foot 29 Red 40 Remote control...
... KEYSTONE button 31 Keystone Correction 41 64 Lamp 10, 50 Lamp indicator 48 Lamp Setting 40 Lamp Timer (Life 44 Lamp unit 51 Language (on-screen display language) ...... 42 Lens Cap 11 MENU/HELP button 37, 46 NORMAL 32, 33 ON button 27 Optional accessories 10 OSD Display 42 PDF 9 Phase 46 Picture Adjustment 39 Picture Mode 34, 39 PICTURE MODE button 34 Power cord 26 PRJ - ADJ 43 PRJ Mode 19, 42 Progressive 40 R-6 batteries 14 Rear adjustment foot 29 Red 40 Remote control...


