
XR10S|XR10X|XR20S|XR20X Operation Manual
Page 5
...registration of your purchase. 2. CONSUMER PRODUCT SAFETY ACT To ensure that SHARP may be required to your new SHARP Projector, using the projector, please read this equipment. During normal operation, when putting the projector into the beam of light. ONLY WARNING: The cooling fan in ...: High brightness light source. DURING NORMAL OPERATION, NEVER TURN THE PROJECTOR OFF BY DISCONNECTING THE POWER CORD. Introduction ENGLISH There are two important reasons for about 90 seconds after the projector enters standby mode. WARRANTY This is intended to alert the user to...
...registration of your purchase. 2. CONSUMER PRODUCT SAFETY ACT To ensure that SHARP may be required to your new SHARP Projector, using the projector, please read this equipment. During normal operation, when putting the projector into the beam of light. ONLY WARNING: The cooling fan in ...: High brightness light source. DURING NORMAL OPERATION, NEVER TURN THE PROJECTOR OFF BY DISCONNECTING THE POWER CORD. Introduction ENGLISH There are two important reasons for about 90 seconds after the projector enters standby mode. WARRANTY This is intended to alert the user to...
XR10S|XR10X|XR20S|XR20X Operation Manual
Page 8
... ......... 24 Connecting to a Monitor with RGB Input Terminal 25 Controlling the Projector by a Computer 26 Connecting the Power Cord 26 Using Basic Operation Turning the Projector On/Off 27 Turning the Projector on the Projector (Keylock Function 45 Troubleshooting with the Remote Control .... 34 Displaying and Setting...Setting 44 Checking the Lamp Life Status 44 System Lock Function 44 Locking the Operation Buttons on 27 Turning the Power off (Putting the Projector into Standby Mode 27 Image Projection 28 About the Setup Guide 28 Adjusting the Projected Image 28 Switching the ...
... ......... 24 Connecting to a Monitor with RGB Input Terminal 25 Controlling the Projector by a Computer 26 Connecting the Power Cord 26 Using Basic Operation Turning the Projector On/Off 27 Turning the Projector on the Projector (Keylock Function 45 Troubleshooting with the Remote Control .... 34 Displaying and Setting...Setting 44 Checking the Lamp Life Status 44 System Lock Function 44 Locking the Operation Buttons on 27 Turning the Power off (Putting the Projector into Standby Mode 27 Image Projection 28 About the Setup Guide 28 Adjusting the Projected Image 28 Switching the ...

XR10S|XR10X|XR20S|XR20X Operation Manual
Page 10
... damage to the product due to your home, consult your product dealer or local power company. Power-Cord Protection Power-supply cords should be read all of power supply to lightning and power-line surges. 6 This product has been engineered and manufactured to defeat the safeguards incorporated... uneven surfaces may fall, causing serious injury to a child or adult, and serious damage to fit into a grounding type power outlet. 13. Power Sources This product should never be operated only from the wall outlet and disconnect the cable system. Read Instructions All the safety...
... damage to the product due to your home, consult your product dealer or local power company. Power-Cord Protection Power-supply cords should be read all of power supply to lightning and power-line surges. 6 This product has been engineered and manufactured to defeat the safeguards incorporated... uneven surfaces may fall, causing serious injury to a child or adult, and serious damage to fit into a grounding type power outlet. 13. Power Sources This product should never be operated only from the wall outlet and disconnect the cable system. Read Instructions All the safety...

XR10S|XR10X|XR20S|XR20X Operation Manual
Page 11
... the operating instructions. Damage Requiring Service Unplug this product include confidential and/or trade secret property belonging to determine that produce heat. • DLP\ (Digital Light Processing) and DMD\ (Digital Micromirror Device) are trademarks of any way. e. Object and Liquid Entry Never push objects of...Some IC chips in a risk of any service or repairs to this indicates a need for service. 19. Introduction 15. When the power-supply cord or plug is in performance, this product, ask the service technician to perform safety checks to Texas Instruments.
... the operating instructions. Damage Requiring Service Unplug this product include confidential and/or trade secret property belonging to determine that produce heat. • DLP\ (Digital Light Processing) and DMD\ (Digital Micromirror Device) are trademarks of any way. e. Object and Liquid Entry Never push objects of...Some IC chips in a risk of any service or repairs to this indicates a need for service. 19. Introduction 15. When the power-supply cord or plug is in performance, this product, ask the service technician to perform safety checks to Texas Instruments.

XR10S|XR10X|XR20S|XR20X Operation Manual
Page 12
... adjustment foot. 8 Avoid locations with thin air, set "Fan Mode" to avoid personal injury caused by a Sharp Authorized Projector Dealer or Service Center. Caution regarding placing of the projector I Continuously watching the screen for replacement. I When you use in direct sunlight or room light. I If the... maintain high image quality, SHARP recommends that it is from -4°F to 140°F (-20°C to +60°C). Do not block the exhaust and intake vents. This does not indicate a malfunction. (See pages 48 and 49.) Remove the projector power cord from humidity, dust ...
... adjustment foot. 8 Avoid locations with thin air, set "Fan Mode" to avoid personal injury caused by a Sharp Authorized Projector Dealer or Service Center. Caution regarding placing of the projector I Continuously watching the screen for replacement. I When you use in direct sunlight or room light. I If the... maintain high image quality, SHARP recommends that it is from -4°F to 140°F (-20°C to +60°C). Do not block the exhaust and intake vents. This does not indicate a malfunction. (See pages 48 and 49.) Remove the projector power cord from humidity, dust ...

XR10S|XR10X|XR20S|XR20X Operation Manual
Page 13
... from the wall outlet, and disconnect any other audio- Introduction I When turning off the projector, the cooling fan runs to decrease the internal temperature for instructions on how to make the connections AFTER unplugging the power cord of the air vents, " " and " " will vary, depending on the ...to view. 5 Double click the "10_20_" pdf file to rise, the lamp will enter standby mode. Unplug the power cord after a 90-second cooling-off period the projector will turn off, the temperature warn- dicators" on the region or country you do not have this can work with ...
... from the wall outlet, and disconnect any other audio- Introduction I When turning off the projector, the cooling fan runs to decrease the internal temperature for instructions on how to make the connections AFTER unplugging the power cord of the air vents, " " and " " will vary, depending on the ...to view. 5 Double click the "10_20_" pdf file to rise, the lamp will enter standby mode. Unplug the power cord after a 90-second cooling-off period the projector will turn off, the temperature warn- dicators" on the region or country you do not have this can work with ...

XR10S|XR10X|XR20S|XR20X Operation Manual
Page 14
...this manual (TINS-B851WJZZ) and CD-ROM (UDSKAA062WJZZ)) Power cord* (1) (2) (3) (4) For U.S. and Canada, etc. (6' (1.8 m)) QACCDA007WJPZ For Europe, except U.K. (6' (1.8 m)) QACCVA011WJPZ For U.K. Optional accessories I 3 RCA to the wall outlet in your nearest Sharp Authorized Projector Dealer or Service Center. 10 Please check with your ...Use the power cord that corresponds to 15-pin D-sub cable (9n10o (3.0 m)) I DIN-D-sub RS-232C adaptor (5 57/64o (15 cm)) I Remote receiver I Lamp unit AN-C3CP2 AN-A1RS AN-MR2 AN-XR20LP (for XR-20X/XR-20S) AN-XR10LP (for XR-10X/XR-10S)...
...this manual (TINS-B851WJZZ) and CD-ROM (UDSKAA062WJZZ)) Power cord* (1) (2) (3) (4) For U.S. and Canada, etc. (6' (1.8 m)) QACCDA007WJPZ For Europe, except U.K. (6' (1.8 m)) QACCVA011WJPZ For U.K. Optional accessories I 3 RCA to the wall outlet in your nearest Sharp Authorized Projector Dealer or Service Center. 10 Please check with your ...Use the power cord that corresponds to 15-pin D-sub cable (9n10o (3.0 m)) I DIN-D-sub RS-232C adaptor (5 57/64o (15 cm)) I Remote receiver I Lamp unit AN-C3CP2 AN-A1RS AN-MR2 AN-XR20LP (for XR-20X/XR-20S) AN-XR10LP (for XR-10X/XR-10S)...
XR10S|XR10X|XR20S|XR20X Operation Manual
Page 15
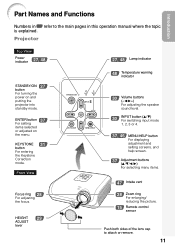
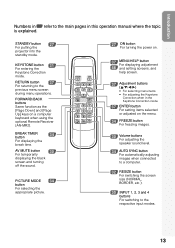
.... ENTER button 37 For setting items selected or adjusted on and putting the projector into standby mode. KEYSTONE 31 button For entering the Keystone Correction mode. Projector Top View Power indicator 27, 48 STANDBY/ON 27 button For turning the power on the menu. HEIGHT 29 ADJUST lever 27, 48 Lamp indicator 48 Temperature...
.... ENTER button 37 For setting items selected or adjusted on and putting the projector into standby mode. KEYSTONE 31 button For entering the Keystone Correction mode. Projector Top View Power indicator 27, 48 STANDBY/ON 27 button For turning the power on the menu. HEIGHT 29 ADJUST lever 27, 48 Lamp indicator 48 Temperature...
XR10S|XR10X|XR20S|XR20X Operation Manual
Page 16
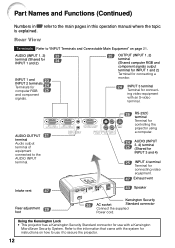
Intake vent 47 26 RS-232C terminal Terminal for controlling the projector using a computer. 24 AUDIO (INPUT 25 3, 4) terminal (Shared for INPUT ...Rear View Terminals Refer to "INPUT Terminals and Connectable Main Equipment" on how to secure the projector. 12 AUDIO OUTPUT 21 terminal Audio output terminal of equipment connected to the main pages in ... video equipment with the system for instructions on page 21. Using the Kensington Lock • This projector has a Kensington Security Standard connector for connecting video equipment. 47 Exhaust vent 43 Speaker Rear adjustment foot...
Intake vent 47 26 RS-232C terminal Terminal for controlling the projector using a computer. 24 AUDIO (INPUT 25 3, 4) terminal (Shared for INPUT ...Rear View Terminals Refer to "INPUT Terminals and Connectable Main Equipment" on how to secure the projector. 12 AUDIO OUTPUT 21 terminal Audio output terminal of equipment connected to the main pages in ... video equipment with the system for instructions on page 21. Using the Kensington Lock • This projector has a Kensington Security Standard connector for connecting video equipment. 47 Exhaust vent 43 Speaker Rear adjustment foot...
XR10S|XR10X|XR20S|XR20X Operation Manual
Page 17
...KEYSTONE button 31 For entering the Keystone Correction mode. PICTURE MODE 34 button For selecting the appropriate picture. 27 ON button For turning the power on. 37 MENU/HELP button For displaying adjustment 46 and setting screens, and help screen. 37 Adjustment buttons (P/R/O/Q) • For selecting menu...items. • For adjusting the Keystone Correction when in this operation manual where the topic is explained. STANDBY button 27 For putting the projector into the standby mode. FORWARD/BACK buttons Same function as the [Page Down] and [Page Up] keys on the menu. 34 ...
...KEYSTONE button 31 For entering the Keystone Correction mode. PICTURE MODE 34 button For selecting the appropriate picture. 27 ON button For turning the power on. 37 MENU/HELP button For displaying adjustment 46 and setting screens, and help screen. 37 Adjustment buttons (P/R/O/Q) • For selecting menu...items. • For adjusting the Keystone Correction when in this operation manual where the topic is explained. STANDBY button 27 For putting the projector into the standby mode. FORWARD/BACK buttons Same function as the [Page Down] and [Page Up] keys on the menu. 34 ...
XR10S|XR10X|XR20S|XR20X Operation Manual
Page 20
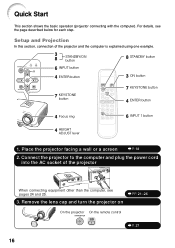
... _P. 27 16 For details, see pages 24 and 25. _PP. 21-26 3. Place the projector facing a wall or a screen _P. 18 2. Connect the projector to the computer and plug the power cord into the AC socket of the projector and the computer is explained using one example. 3 8 STANDBY/ON button 8 STANDBY button 6 INPUT...
... _P. 27 16 For details, see pages 24 and 25. _PP. 21-26 3. Place the projector facing a wall or a screen _P. 18 2. Connect the projector to the computer and plug the power cord into the AC socket of the projector and the computer is explained using one example. 3 8 STANDBY/ON button 8 STANDBY button 6 INPUT...

XR10S|XR10X|XR20S|XR20X Operation Manual
Page 21
... control _P. 31 8. Adjust the projected image with the Setup Guide 1 After the projector turns on XR-20X.) On the projector Shrinks upper side. On the On the remote On-screen display (RGB) projector control • When pressing the INPUT button on the remote control, and then press the... button again while the confirmation message is set to switch the INPUT mode. _P. 30 7. Turn the Power...
... control _P. 31 8. Adjust the projected image with the Setup Guide 1 After the projector turns on XR-20X.) On the projector Shrinks upper side. On the On the remote On-screen display (RGB) projector control • When pressing the INPUT button on the remote control, and then press the... button again while the confirmation message is set to switch the INPUT mode. _P. 30 7. Turn the Power...

XR10S|XR10X|XR20S|XR20X Operation Manual
Page 27
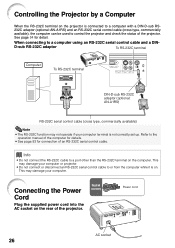
...INPUT1, 2) terminal * ø3.5 mm stereo or mono audio cable (commercially available or available as Sharp service part QCNWGA038WJPZ) RGB Cable * When using the ø3.5 mm stereo audio cable. After ...port. Use with computer signals other devices. Connecting to a Computer Before connecting, ensure that the power cord of the functions to not work. • A Macintosh adaptor may be required for ... mono audio cable, the volume level will be half of computer signals compatible with the projector. Connections 23 Press "Fn" and "F5" keys simultaneously when using , an image may...
...INPUT1, 2) terminal * ø3.5 mm stereo or mono audio cable (commercially available or available as Sharp service part QCNWGA038WJPZ) RGB Cable * When using the ø3.5 mm stereo audio cable. After ...port. Use with computer signals other devices. Connecting to a Computer Before connecting, ensure that the power cord of the functions to not work. • A Macintosh adaptor may be required for ... mono audio cable, the volume level will be half of computer signals compatible with the projector. Connections 23 Press "Fn" and "F5" keys simultaneously when using , an image may...
XR10S|XR10X|XR20S|XR20X Operation Manual
Page 30
... control cable (cross type, commercially available), the computer can be used to control the projector and check the status of the projector. Connecting the Power Cord Plug the supplied power cord into the AC socket on the rear of the projector. Info • Do not connect the RS-232C cable to a computer using an RS...
... control cable (cross type, commercially available), the computer can be used to control the projector and check the status of the projector. Connecting the Power Cord Plug the supplied power cord into the AC socket on the rear of the projector. Info • Do not connect the RS-232C cable to a computer using an RS...
XR10S|XR10X|XR20S|XR20X Operation Manual
Page 31
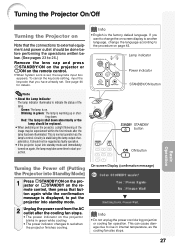
... as the lamp's control circuitry is the factory default language. STANDBY button ON button Turning the Power off (Putting the Projector into Standby Mode) 1 Press SSTANDBY/ON on the projector or eSTANDBY on the remote control, then press that button again while the confirmation message is put... again, the lamp may be experienced within the first minute after the cooling fan stops. • The power indicator on the projector blinks in green while cooling. • The power indicator changes to the procedure on page 42. Info • English is stabilising the lamp output characteristics....
... as the lamp's control circuitry is the factory default language. STANDBY button ON button Turning the Power off (Putting the Projector into Standby Mode) 1 Press SSTANDBY/ON on the projector or eSTANDBY on the remote control, then press that button again while the confirmation message is put... again, the lamp may be experienced within the first minute after the cooling fan stops. • The power indicator on the projector blinks in green while cooling. • The power indicator changes to the procedure on page 42. Info • English is stabilising the lamp output characteristics....

XR10S|XR10X|XR20S|XR20X Operation Manual
Page 40
... on the input signal and the selected input mode. 36 ENTER END Auto Search [On/Off] Page 43 Auto Sync [On/Off] Page 43 Auto Power Off [On/Off] Page 43 System Sound [On/Off] Page 43 Speaker [On/Off] Page 43 RS-232C Page 44 Fan Mode Page 44 System...) Page 44 Sub menu 9600 bps 115200 bps Normal High Old Code New Code Reconfirm "Help" menu Picture SCR - ADJ Auto Search Auto Sync Auto Power Off System Sound Speaker RS-232C Fan Mode System Lock PRJ - ADJ PRJ - Menu Items (Continued) "Projection adjustment (PRJ-ADJ)" menu Picture SCR - ADJ Page...
... on the input signal and the selected input mode. 36 ENTER END Auto Search [On/Off] Page 43 Auto Sync [On/Off] Page 43 Auto Power Off [On/Off] Page 43 System Sound [On/Off] Page 43 Speaker [On/Off] Page 43 RS-232C Page 44 Fan Mode Page 44 System...) Page 44 Sub menu 9600 bps 115200 bps Normal High Old Code New Code Reconfirm "Help" menu Picture SCR - ADJ Auto Search Auto Sync Auto Power Off System Sound Speaker RS-232C Fan Mode System Lock PRJ - ADJ PRJ - Menu Items (Continued) "Projection adjustment (PRJ-ADJ)" menu Picture SCR - ADJ Page...
XR10S|XR10X|XR20S|XR20X Operation Manual
Page 44
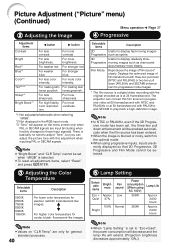
..."Tone", but you can convert this adjustment when inputting PAL or SECAM signals . The projector can adjust the picture tone with PAL50Hz and SECAM to those input signals). For more clearly. For less sharpness. Selectable items Description 2D Useful to display fast-moving images such as is at 50 .... Note • In NTSC or PAL60Hz, even if the 3D Progressive mode has been set when "sRGB" is set to "Eco+Quiet", the power consumption will decrease and the lamp life will appear on "CLR Temp" are input (including when forcibly changed to play back a high-definition image....
..."Tone", but you can convert this adjustment when inputting PAL or SECAM signals . The projector can adjust the picture tone with PAL50Hz and SECAM to those input signals). For more clearly. For less sharpness. Selectable items Description 2D Useful to display fast-moving images such as is at 50 .... Note • In NTSC or PAL60Hz, even if the 3D Progressive mode has been set when "sRGB" is set to "Eco+Quiet", the power consumption will decrease and the lamp life will appear on "CLR Temp" are input (including when forcibly changed to play back a high-definition image....
XR10S|XR10X|XR20S|XR20X Operation Manual
Page 47
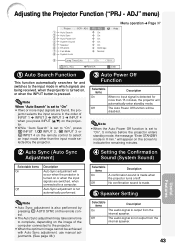
...Function This function automatically searches for more input signals are being received, when the projector is output from the internal speaker. 43 Adjusting the Projector Function ("PRJ - Note • When the Auto Power Off function is set to indicate the remaining minutes. 2 Auto Sync (Auto ...or EINPUT 4 on , or when the INPUT button is set to the projector. • When the optimum image cannot be disabled. Note • Auto Sync adjustment is also performed by the projector. 3 Auto Power Off Function Selectable items On Off Description When no input signal is detected ...
...Function This function automatically searches for more input signals are being received, when the projector is output from the internal speaker. 43 Adjusting the Projector Function ("PRJ - Note • When the Auto Power Off function is set to indicate the remaining minutes. 2 Auto Sync (Auto ...or EINPUT 4 on , or when the INPUT button is set to the projector. • When the optimum image cannot be disabled. Note • Auto Sync adjustment is also performed by the projector. 3 Auto Power Off Function Selectable items On Off Description When no input signal is detected ...

XR10S|XR10X|XR20S|XR20X Operation Manual
Page 49
... keylock function does not affect the operation with the remote control. Input screen for about 5 seconds. a Taking the Keylock off Hold down T ENTER on the projector for keycode: • f ON • e STANDBY • h ENTER • l RETURN • B MENU/HELP • System lock function recognizes...warming up . a Locking the Operation Buttons Hold down T ENTER on the projector for keycode System Lock ---- Note To cancel the keycode that you have already set , the keycode input screen appears after the power is in "New Code". When it appears, enter the right keycode to ...
... keylock function does not affect the operation with the remote control. Input screen for about 5 seconds. a Taking the Keylock off Hold down T ENTER on the projector for keycode: • f ON • e STANDBY • h ENTER • l RETURN • B MENU/HELP • System lock function recognizes...warming up . a Locking the Operation Buttons Hold down T ENTER on the projector for keycode System Lock ---- Note To cancel the keycode that you have already set , the keycode input screen appears after the power is in "New Code". When it appears, enter the right keycode to ...

XR10S|XR10X|XR20S|XR20X Operation Manual
Page 51
...plastic. Mild detergent diluted with a soft flannel cloth. Make sure to test on a small, inconspicuous area on the projector. Do not attach rubber or plastic items to the projector for cleaning the lens. Cleaning the lens I Use a commercially available blower or lens cleaning paper (for glasses and ... agents in the plastic may wear off dirt gently with water Appendix Mild detergent Wax Thinner Info • If you have unplugged the power cord before use volatile agents such as the operation panel is hard to remove, soak a cloth in a mild detergent diluted with water...
...plastic. Mild detergent diluted with a soft flannel cloth. Make sure to test on a small, inconspicuous area on the projector. Do not attach rubber or plastic items to the projector for cleaning the lens. Cleaning the lens I Use a commercially available blower or lens cleaning paper (for glasses and ... agents in the plastic may wear off dirt gently with water Appendix Mild detergent Wax Thinner Info • If you have unplugged the power cord before use volatile agents such as the operation panel is hard to remove, soak a cloth in a mild detergent diluted with water...


