
XR10S|XR10X|XR20S|XR20X Operation Manual
Page 5
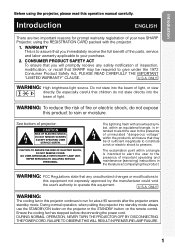
...Do not stare into standby mode always use the STANDBY/ON button on the projector or the STANDBY button on the remote control. CAUTION: TO REDUCE THE RISK OF ELECTRIC SHOCK, DO NOT REMOVE COVER. U.S.A. Be especially careful that SHARP may be required to run for about 90 seconds after the... projector enters standby mode. See bottom of light, or view directly. REFER SERVICING TO ...
...Do not stare into standby mode always use the STANDBY/ON button on the projector or the STANDBY button on the remote control. CAUTION: TO REDUCE THE RISK OF ELECTRIC SHOCK, DO NOT REMOVE COVER. U.S.A. Be especially careful that SHARP may be required to run for about 90 seconds after the... projector enters standby mode. See bottom of light, or view directly. REFER SERVICING TO ...
XR10S|XR10X|XR20S|XR20X Operation Manual
Page 8
...Part Names and Functions 11 Inserting the Batteries 14 Usable Range 15 Quick Start Quick Start 16 Setup Setting up the Projector 18 Setting up the Projector 18 Standard Setup (Front Projection) ....... 18 Ceiling-mount Setup 18 Projection (PRJ) Mode 19 Screen Size and ...a Monitor with RGB Input Terminal 25 Controlling the Projector by a Computer 26 Connecting the Power Cord 26 Using Basic Operation Turning the Projector On/Off 27 Turning the Projector on the Projector (Keylock Function 45 Troubleshooting with the Remote Control .... 34 Displaying and Setting the Break Timer ...
...Part Names and Functions 11 Inserting the Batteries 14 Usable Range 15 Quick Start Quick Start 16 Setup Setting up the Projector 18 Setting up the Projector 18 Standard Setup (Front Projection) ....... 18 Ceiling-mount Setup 18 Projection (PRJ) Mode 19 Screen Size and ...a Monitor with RGB Input Terminal 25 Controlling the Projector by a Computer 26 Connecting the Power Cord 26 Using Basic Operation Turning the Projector On/Off 27 Turning the Projector on the Projector (Keylock Function 45 Troubleshooting with the Remote Control .... 34 Displaying and Setting the Break Timer ...

XR10S|XR10X|XR20S|XR20X Operation Manual
Page 14
...-D-sub RS-232C adaptor (5 57/64o (15 cm)) I Remote receiver I Lamp unit AN-C3CP2 AN-A1RS AN-MR2 AN-XR20LP (for XR-20X/XR-20S) AN-XR10LP (for XR-10X/XR-10S) Note • Some of the optional accessories may not...Remote control Two R-6 batteries RGB cable RRMCGA398WJSA ("AA" size, UM/SUM-3, (9'10" (3.0 m)) HP-7 or similar) QCNWGA045WJPZ Lens cap (attached) CCAPHA024WJSA • Operation manual (this manual (TINS-B851WJZZ) and CD-ROM (UDSKAA062WJZZ)) Power cord* (1) (2) (3) (4) For U.S. Optional accessories I 3 RCA to the wall outlet in your nearest Sharp Authorized Projector...
...-D-sub RS-232C adaptor (5 57/64o (15 cm)) I Remote receiver I Lamp unit AN-C3CP2 AN-A1RS AN-MR2 AN-XR20LP (for XR-20X/XR-20S) AN-XR10LP (for XR-10X/XR-10S) Note • Some of the optional accessories may not...Remote control Two R-6 batteries RGB cable RRMCGA398WJSA ("AA" size, UM/SUM-3, (9'10" (3.0 m)) HP-7 or similar) QCNWGA045WJPZ Lens cap (attached) CCAPHA024WJSA • Operation manual (this manual (TINS-B851WJZZ) and CD-ROM (UDSKAA062WJZZ)) Power cord* (1) (2) (3) (4) For U.S. Optional accessories I 3 RCA to the wall outlet in your nearest Sharp Authorized Projector...
XR10S|XR10X|XR20S|XR20X Operation Manual
Page 15
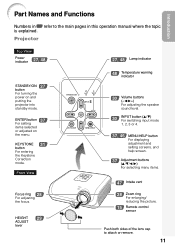
Front View Focus ring 28 For adjusting the focus. ENTER button 37 For setting items selected or adjusted on and putting the projector into standby mode. HEIGHT 29 ADJUST lever 27, 48 Lamp indicator 48 Temperature warning indicator 30 Volume buttons (-O/Q+) For adjusting the speaker sound...screens, and help screen. 37 Adjustment buttons (P/R/O/Q) For selecting menu items. 47 Intake vent 28 Zoom ring For enlarging/ reducing the picture. 15 Remote control sensor Push both sides of the lens cap to the main pages in Z refer to attach or remove. 11 Introduction Part Names and ...
Front View Focus ring 28 For adjusting the focus. ENTER button 37 For setting items selected or adjusted on and putting the projector into standby mode. HEIGHT 29 ADJUST lever 27, 48 Lamp indicator 48 Temperature warning indicator 30 Volume buttons (-O/Q+) For adjusting the speaker sound...screens, and help screen. 37 Adjustment buttons (P/R/O/Q) For selecting menu items. 47 Intake vent 28 Zoom ring For enlarging/ reducing the picture. 15 Remote control sensor Push both sides of the lens cap to the main pages in Z refer to attach or remove. 11 Introduction Part Names and ...
XR10S|XR10X|XR20S|XR20X Operation Manual
Page 17
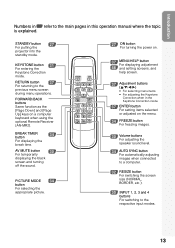
... switching the screen size (NORMAL, BORDER, etc.). 30 INPUT 1, 2, 3 and 4 buttons For switching to the respective input modes. 13 STANDBY button 27 For putting the projector into the standby mode. AV MUTE button 30 For temporarily displaying the black screen and turning off the sound. PICTURE MODE 34 button For selecting... the appropriate picture. 27 ON button For turning the power on a computer keyboard when using the optional Remote Receiver (AN-MR2). BREAK TIMER 34 button For displaying the break time.
... switching the screen size (NORMAL, BORDER, etc.). 30 INPUT 1, 2, 3 and 4 buttons For switching to the respective input modes. 13 STANDBY button 27 For putting the projector into the standby mode. AV MUTE button 30 For temporarily displaying the black screen and turning off the sound. PICTURE MODE 34 button For selecting... the appropriate picture. 27 ON button For turning the power on a computer keyboard when using the optional Remote Receiver (AN-MR2). BREAK TIMER 34 button For displaying the break time.
XR10S|XR10X|XR20S|XR20X Operation Manual
Page 18
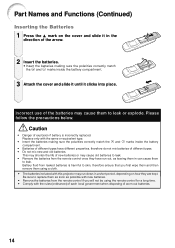
...in a short period, depending on the cover and slide it clicks into place. Be sure to replace them as soon as leaving them using the remote control for a long time. • Comply with the same or equivalent type. • Insert the batteries making sure the polarities correctly match ... it in can cause them to skin, therefore ensure that you will not be using a cloth. • The batteries included with this projector may cause old batteries to leak. • Remove the batteries from leaked batteries is incorrectly replaced. Please follow the precautions below. Battery fluid...
...in a short period, depending on the cover and slide it clicks into place. Be sure to replace them as soon as leaving them using the remote control for a long time. • Comply with the same or equivalent type. • Insert the batteries making sure the polarities correctly match ... it in can cause them to skin, therefore ensure that you will not be using a cloth. • The batteries included with this projector may cause old batteries to leak. • Remove the batteries from leaked batteries is incorrectly replaced. Please follow the precautions below. Battery fluid...

XR10S|XR10X|XR20S|XR20X Operation Manual
Page 19
... to mois- Note • The signal from the fluorescent lamp. 30° Remote control signal transmitters 30° Remote control sensor 23n (7 m) Remote control 15 When using the remote control • Ensure that you do not drop, expose to control the projector within the ranges shown in the illustration. ture or high temperature. • The...
... to mois- Note • The signal from the fluorescent lamp. 30° Remote control signal transmitters 30° Remote control sensor 23n (7 m) Remote control 15 When using the remote control • Ensure that you do not drop, expose to control the projector within the ranges shown in the illustration. ture or high temperature. • The...
XR10S|XR10X|XR20S|XR20X Operation Manual
Page 20
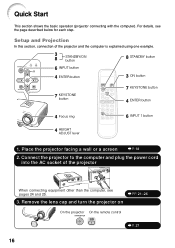
...1 button 1. Quick Start This section shows the basic operation (projector connecting with the computer). For details, see pages 24 and 25. _PP. 21-26 3. Remove the lens cap and turn the projector on On the projector On the remote control _P. 27 16 Setup and Projection In this section, ...connection of the projector When connecting equipment other than the computer, see the page described below for each step...
...1 button 1. Quick Start This section shows the basic operation (projector connecting with the computer). For details, see pages 24 and 25. _PP. 21-26 3. Remove the lens cap and turn the projector on On the projector On the remote control _P. 27 16 Setup and Projection In this section, ...connection of the projector When connecting equipment other than the computer, see the page described below for each step...

XR10S|XR10X|XR20S|XR20X Operation Manual
Page 21
... button on the projector or C INPUT 1 on XR-20X.) On the projector Shrinks upper side. Correct trapezoidal distortion Correcting trapezoidal distortion using the remote control, press the CINPUT 1/CINPUT 2/DINPUT 3/EINPUT 4 button to put the projector into standby mode. Turn the computer on the projector, input mode switches...height (angle). 3 After adjusting the focus, height (angle) and screen size, press TENTER to "On". On the On the remote projector control On-screen Display • Unplug the power cord from the AC outlet after the cooling fan stops. _P. 27 17 Adjust...
... button on the projector or C INPUT 1 on XR-20X.) On the projector Shrinks upper side. Correct trapezoidal distortion Correcting trapezoidal distortion using the remote control, press the CINPUT 1/CINPUT 2/DINPUT 3/EINPUT 4 button to put the projector into standby mode. Turn the computer on the projector, input mode switches...height (angle). 3 After adjusting the focus, height (angle) and screen size, press TENTER to "On". On the On the remote projector control On-screen Display • Unplug the power cord from the AC outlet after the cooling fan stops. _P. 27 17 Adjust...
XR10S|XR10X|XR20S|XR20X Operation Manual
Page 31
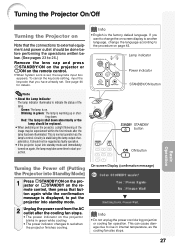
...as the cooling fan also stops. 27 Basic Operation STANDBY button ON button Turning the Power off (Putting the Projector into Standby Mode) 1 Press SSTANDBY/ON on the projector or eSTANDBY on the remote control, then press that button again while the confirmation message is set . If you have already set , ... done before performing the operations written below. (See pages 23 to 26.) Remove the lens cap and press S STANDBY/ON on the projector or fON on the remote control. • When System Lock is displayed, to put into standby mode and immediately turned on again, the lamp may take some...
...as the cooling fan also stops. 27 Basic Operation STANDBY button ON button Turning the Power off (Putting the Projector into Standby Mode) 1 Press SSTANDBY/ON on the projector or eSTANDBY on the remote control, then press that button again while the confirmation message is set . If you have already set , ... done before performing the operations written below. (See pages 23 to 26.) Remove the lens cap and press S STANDBY/ON on the projector or fON on the remote control. • When System Lock is displayed, to put into standby mode and immediately turned on again, the lamp may take some...

XR10S|XR10X|XR20S|XR20X Operation Manual
Page 34
...; When you do not want to output the sound from the projector's speaker while the projector is set to "On", INPUT (P/ R) on the projector functions as the Auto Search buttons. (See page 43.) Adjusting the Volume Press K/L on the remote control or -O/Q+ on / off the sound. On-screen Display... Note • Pressing MAV MUTE again will raise the volume. • When the projector is connected to the lowest level when turning the projector on the projector to adjust the volume. Image Projection...
...; When you do not want to output the sound from the projector's speaker while the projector is set to "On", INPUT (P/ R) on the projector functions as the Auto Search buttons. (See page 43.) Adjusting the Volume Press K/L on the remote control or -O/Q+ on / off the sound. On-screen Display... Note • Pressing MAV MUTE again will raise the volume. • When the projector is connected to the lowest level when turning the projector on the projector to adjust the volume. Image Projection...
XR10S|XR10X|XR20S|XR20X Operation Manual
Page 38
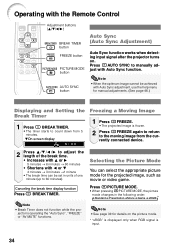
... k BREAK TIMER. • The timer starts to manually adjust with Auto Sync function. Canceling the break time display function Press k BREAK TIMER. Operating with the Remote Control Adjustment buttons (P/R/O/Q) BREAK TIMER button FREEZE button PICTURE MODE button AUTO SYNC button Auto Sync (Auto Sync Adjustment) Auto Sync function works when detecting...
... k BREAK TIMER. • The timer starts to manually adjust with Auto Sync function. Canceling the break time display function Press k BREAK TIMER. Operating with the Remote Control Adjustment buttons (P/R/O/Q) BREAK TIMER button FREEZE button PICTURE MODE button AUTO SYNC button Auto Sync (Auto Sync Adjustment) Auto Sync function works when detecting...
XR10S|XR10X|XR20S|XR20X Operation Manual
Page 39
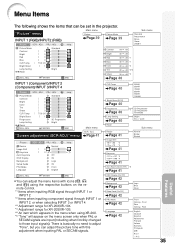
...XR-20X. *6 "Tone" will appear on the remote control. *1 Items when inputting RGB signal through INPUT 1 or INPUT 2. *2 Items when inputting component signal through INPUT 1 or INPUT 2, or when selecting INPUT 3 or INPUT 4. *3 Adjustment range for XR-20X/XR-10X. *4 Adjustment range for XR-20S/XR-10S. *5 An item which appears in the projector...adjust the menu items with this adjustment when inputting PAL or SECAM signals. ADJ Help Picture Mode Contrast Bright Color Tint Sharp CLR Temp Bright Boost Progressive Lamp Setting Reset SEL./ADJ. 0 0 0 0 0 7500K 1 Standard 3D Progressive Bright...
...XR-20X. *6 "Tone" will appear on the remote control. *1 Items when inputting RGB signal through INPUT 1 or INPUT 2. *2 Items when inputting component signal through INPUT 1 or INPUT 2, or when selecting INPUT 3 or INPUT 4. *3 Adjustment range for XR-20X/XR-10X. *4 Adjustment range for XR-20S/XR-10S. *5 An item which appears in the projector...adjust the menu items with this adjustment when inputting PAL or SECAM signals. ADJ Help Picture Mode Contrast Bright Color Tint Sharp CLR Temp Bright Boost Progressive Lamp Setting Reset SEL./ADJ. 0 0 0 0 0 7500K 1 Standard 3D Progressive Bright...
XR10S|XR10X|XR20S|XR20X Operation Manual
Page 47
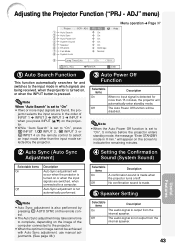
... Sound) Useful Features Selectable items On Off Description Auto Sync adjustment will occur when the projector is set to "On" • If two or more than the input mode selected by pressing F AUTO SYNC on the remote control. • The Auto Sync adjustment may take some time to complete, depending on...Search Auto Sync Auto Power Off System Sound Speaker RS-232C Fan Mode System Lock PRJ - Note When "Auto Search" is turned on the remote control to the projector. • When the optimum image cannot be disabled. ADJ On On On On On 9600 bps Normal Menu operation n Page 37 Help Lamp...
... Sound) Useful Features Selectable items On Off Description Auto Sync adjustment will occur when the projector is set to "On" • If two or more than the input mode selected by pressing F AUTO SYNC on the remote control. • The Auto Sync adjustment may take some time to complete, depending on...Search Auto Sync Auto Power Off System Sound Speaker RS-232C Fan Mode System Lock PRJ - Note When "Auto Search" is turned on the remote control to the projector. • When the optimum image cannot be disabled. ADJ On On On On On 9600 bps Normal Menu operation n Page 37 Help Lamp...

XR10S|XR10X|XR20S|XR20X Operation Manual
Page 48
When you lose or forget your keycode, contact your nearest Sharp Authorized Projector Dealer or Service Center (see page 61). When "Fan Mode" is set to enter the preset keycode in a safe place where only authorized users have ... 1 Press the 4 buttons on the remote control or on . Lamp usage condition "Life" Operated exclusively with Lamp Setting set to "Eco +Quiet" Operated exclusively with Lamp Setting set for the same baud rate. Setting the System Lock PRJ - Note • It is turned on the projector to "High", the fan rotation speeds...
When you lose or forget your keycode, contact your nearest Sharp Authorized Projector Dealer or Service Center (see page 61). When "Fan Mode" is set to enter the preset keycode in a safe place where only authorized users have ... 1 Press the 4 buttons on the remote control or on . Lamp usage condition "Life" Operated exclusively with Lamp Setting set to "Eco +Quiet" Operated exclusively with Lamp Setting set for the same baud rate. Setting the System Lock PRJ - Note • It is turned on the projector to "High", the fan rotation speeds...

XR10S|XR10X|XR20S|XR20X Operation Manual
Page 49
...• h ENTER • l RETURN • B MENU/HELP • System lock function recognizes each button on the remote control or on . Info • Keylock does not function while the projector is: displaying the "Setup Guide" or "Menu" screens, in standby mode, warming up . Useful Features 45 If you can... and 3 above. ROn-screen Display • The keylock function does not affect the operation with the remote control. ROn-screen Display • When the projector is turned on the projector as an individual button, even if they share the same button name. 2 Press the 4 buttons on...
...• h ENTER • l RETURN • B MENU/HELP • System lock function recognizes each button on the remote control or on . Info • Keylock does not function while the projector is: displaying the "Setup Guide" or "Menu" screens, in standby mode, warming up . Useful Features 45 If you can... and 3 above. ROn-screen Display • The keylock function does not affect the operation with the remote control. ROn-screen Display • When the projector is turned on the projector as an individual button, even if they share the same button name. 2 Press the 4 buttons on...

XR10S|XR10X|XR20S|XR20X Operation Manual
Page 51
... If you have unplugged the power cord before use any liquid type cleaning agents, as insecticides on the projector before cleaning the projector. Make sure to test on a small, inconspicuous area on the projector. I Use a vacuum cleaner to remove, soak a cloth in the plastic may discolor, warp or ...damage the coating on the cabinet. Cleaning the exhaust and intake vents I Wipe off the coating film on the remote control and put the projector into standby mode. Mild detergent diluted with a soft flannel cloth. I The cabinet as well as these can easily get damaged,...
... If you have unplugged the power cord before use any liquid type cleaning agents, as insecticides on the projector before cleaning the projector. Make sure to test on a small, inconspicuous area on the projector. I Use a vacuum cleaner to remove, soak a cloth in the plastic may discolor, warp or ...damage the coating on the cabinet. Cleaning the exhaust and intake vents I Wipe off the coating film on the remote control and put the projector into standby mode. Mild detergent diluted with a soft flannel cloth. I The cabinet as well as these can easily get damaged,...
XR10S|XR10X|XR20S|XR20X Operation Manual
Page 55
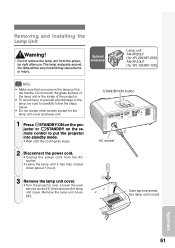
Optional accessory Lamp unit AN-XR20LP (for XR-20X/XR-20S) AN-XR10LP (for lamp unit cover) Appendix 51 STANDBY/ON button AC socket 1 2 User service screw (for XR-10X/XR-10S) Info • Make sure that secures the lamp unit cover. Loosen the user service screw (1) that you remove the lamp unit...steps below. • Do not loosen other screws except for the lamp unit cover and lamp unit. 1 Press SSTANDBY/ON on the projector or eSTANDBY on the remote control to the lamp, be very hot and may cause burns or injury. Removing and Installing the Lamp Unit Warning! • Do...
Optional accessory Lamp unit AN-XR20LP (for XR-20X/XR-20S) AN-XR10LP (for lamp unit cover) Appendix 51 STANDBY/ON button AC socket 1 2 User service screw (for XR-10X/XR-10S) Info • Make sure that secures the lamp unit cover. Loosen the user service screw (1) that you remove the lamp unit...steps below. • Do not loosen other screws except for the lamp unit cover and lamp unit. 1 Press SSTANDBY/ON on the projector or eSTANDBY on the remote control to the lamp, be very hot and may cause burns or injury. Removing and Installing the Lamp Unit Warning! • Do...

XR10S|XR10X|XR20S|XR20X Operation Manual
Page 63
...set to switch its signal output settings. An unusual sound is • If the picture is normal, the sound is switched to the projector. • Remote control battery has run out. start. • The lamp unit cover is not installed correctly. • Cables incorrectly connected to the... projector. • "Bright" is set to "Off". 43 sound is wrong. • Cables incorrectly connected to the external output. Refer to the computer's ...
...set to switch its signal output settings. An unusual sound is • If the picture is normal, the sound is switched to the projector. • Remote control battery has run out. start. • The lamp unit cover is not installed correctly. • Cables incorrectly connected to the... projector. • "Bright" is set to "Off". 43 sound is wrong. • Cables incorrectly connected to the external output. Refer to the computer's ...

XR10S|XR10X|XR20S|XR20X Operation Manual
Page 66
...a part of policy of continuous improvement, SHARP reserves the right to +60°C)... projecting parts) Weight (approx.) 8.6 lbs. (3.9 kg) Replacement parts Remote control, Power cord for U.S. SIGNAL: Same as above S-video input ... Projector Model XR-20X/XR-20S/XR-10X/XR-...10S Video system NTSC3.58/NTSC4.43/PAL/PAL-M/PAL-N/PAL-60/SECAM/DTV480I/DTV480P/ DTV540P/DTV576I/DTV576P/DTV720P/DTV1035I/DTV1080I/DTV1080I-50 Display method Single Chip Digital Micromirror DeviceTM (DMDTM) by Texas Instruments DMD panel Panel size: [XR-20X/XR-10X] 0.55" (14 mm), 1chip XGA DMD [XR-20S/XR...
...a part of policy of continuous improvement, SHARP reserves the right to +60°C)... projecting parts) Weight (approx.) 8.6 lbs. (3.9 kg) Replacement parts Remote control, Power cord for U.S. SIGNAL: Same as above S-video input ... Projector Model XR-20X/XR-20S/XR-10X/XR-...10S Video system NTSC3.58/NTSC4.43/PAL/PAL-M/PAL-N/PAL-60/SECAM/DTV480I/DTV480P/ DTV540P/DTV576I/DTV576P/DTV720P/DTV1035I/DTV1080I/DTV1080I-50 Display method Single Chip Digital Micromirror DeviceTM (DMDTM) by Texas Instruments DMD panel Panel size: [XR-20X/XR-10X] 0.55" (14 mm), 1chip XGA DMD [XR-20S/XR...


