
XR10S|XR10X|XR20S|XR20X Operation Manual
Page 8
... Inserting the Batteries 14 Usable Range 15 Quick Start Quick Start 16 Setup Setting up the Projector 18 Setting up the Projector 18 Standard Setup (Front Projection) ....... 18 Ceiling-mount Setup 18 Projection (PRJ) Mode 19 Screen Size and Projection Distance .. 20 Connections Connections 21 Samples of Cables for Connection ..... 22 Connecting to a Computer...
... Inserting the Batteries 14 Usable Range 15 Quick Start Quick Start 16 Setup Setting up the Projector 18 Setting up the Projector 18 Standard Setup (Front Projection) ....... 18 Ceiling-mount Setup 18 Projection (PRJ) Mode 19 Screen Size and Projection Distance .. 20 Connections Connections 21 Samples of Cables for Connection ..... 22 Connecting to a Computer...
XR10S|XR10X|XR20S|XR20X Operation Manual
Page 17
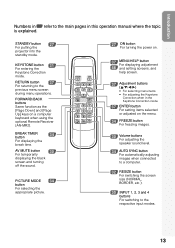
...the appropriate picture. 27 ON button For turning the power on. 37 MENU/HELP button For displaying adjustment 46 and setting screens, and help screen. 37 Adjustment buttons (P/R/O/Q) • For selecting menu items. • For adjusting the Keystone Correction when in this ...connected to a computer. 32 RESIZE button For switching the screen size (NORMAL, BORDER, etc.). 30 INPUT 1, 2, 3 and 4 buttons For switching to the previous menu screen during menu operations. STANDBY button 27 For putting the projector into the standby mode. AV MUTE button 30 For temporarily...
...the appropriate picture. 27 ON button For turning the power on. 37 MENU/HELP button For displaying adjustment 46 and setting screens, and help screen. 37 Adjustment buttons (P/R/O/Q) • For selecting menu items. • For adjusting the Keystone Correction when in this ...connected to a computer. 32 RESIZE button For switching the screen size (NORMAL, BORDER, etc.). 30 INPUT 1, 2, 3 and 4 buttons For switching to the previous menu screen during menu operations. STANDBY button 27 For putting the projector into the standby mode. AV MUTE button 30 For temporarily...

XR10S|XR10X|XR20S|XR20X Operation Manual
Page 21
... (When "Setup Guide" is displayed, to "On". Turn the computer on XR-20X.) On the projector Shrinks upper side. Shrinks lower side. Adjust the projected image with the Setup Guide 1 After the projector turns on the remote control, and then press the button again while the confirmation... INPUT4 • When using the INPUT button on the projector or C INPUT 1 on the projector, input mode switches in the Setup Guide and adjust the focus, screen size, and height (angle). 3 After adjusting the focus, height (angle) and screen size, press TENTER to switch the INPUT mode. _P. 30...
... (When "Setup Guide" is displayed, to "On". Turn the computer on XR-20X.) On the projector Shrinks upper side. Shrinks lower side. Adjust the projected image with the Setup Guide 1 After the projector turns on the remote control, and then press the button again while the confirmation... INPUT4 • When using the INPUT button on the projector or C INPUT 1 on the projector, input mode switches in the Setup Guide and adjust the focus, screen size, and height (angle). 3 After adjusting the focus, height (angle) and screen size, press TENTER to switch the INPUT mode. _P. 30...
XR10S|XR10X|XR20S|XR20X Operation Manual
Page 22
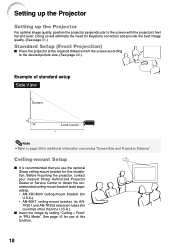
...its ANTK201 and AN-TK202 extension tubes (for additional information concerning "Screen Size and Projection Distance". I Place the projector at the required distance from the screen according to the desired picture size. (See page 20.) Example of this installation. See page ...Before mounting the projector, contact your nearest Sharp Authorized Projector Dealer or Service Center to page 20 for countries other than the U.S.A.). Setting up the Projector Setting up the Projector For optimal image quality, position the projector perpendicular to the screen with the projector's feet flat ...
...its ANTK201 and AN-TK202 extension tubes (for additional information concerning "Screen Size and Projection Distance". I Place the projector at the required distance from the screen according to the desired picture size. (See page 20.) Example of this installation. See page ...Before mounting the projector, contact your nearest Sharp Authorized Projector Dealer or Service Center to page 20 for countries other than the U.S.A.). Setting up the Projector Setting up the Projector For optimal image quality, position the projector perpendicular to the screen with the projector's feet flat ...

XR10S|XR10X|XR20S|XR20X Operation Manual
Page 23
...projector can use . (You can set the PRJ mode in "SCR-ADJ" menu. Select the mode most appropriate for the projection setting in the diagram below. See page 42.) I Table mounted, front projection I Ceiling mounted, front projection Setup Menu item © "Front" I Table mounted, rear projection (with a translucent screen... projection (with a translucent screen) Menu item © "Rear" Menu item © "Ceiling + Rear" Indication of the 4 projection modes, shown in use any of the Projection Image Size and Projection Distance Example: NORMAL Mode (4:3) Picture Size 300" 200" 100" ...
...projector can use . (You can set the PRJ mode in "SCR-ADJ" menu. Select the mode most appropriate for the projection setting in the diagram below. See page 42.) I Table mounted, front projection I Ceiling mounted, front projection Setup Menu item © "Front" I Table mounted, rear projection (with a translucent screen... projection (with a translucent screen) Menu item © "Rear" Menu item © "Ceiling + Rear" Indication of the 4 projection modes, shown in use any of the Projection Image Size and Projection Distance Example: NORMAL Mode (4:3) Picture Size 300" 200" 100" ...
XR10S|XR10X|XR20S|XR20X Operation Manual
Page 24
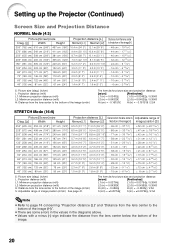
... from the lens center to the bottom of the image (cm/in ) See page 41. Setting up the Projector (Continued) Screen Size and Projection Distance NORMAL Mode (4:3) Picture (Screen) size Diag. [χ] Width Height Projection distance [L] Minimum [L1] Maximum [L2] 300Љ (762 cm) 610... projection distance (m/ft) L2: Maximum projection distance (m/ft) H: Distance from the lens center to the bottom of the image (cm/in) The formula for picture size and projection distance [m/cm] [Feet/inches] L1 (m) = 0.03794χ L1 (ft) = 0.03794χ / 0.3048 L2 (m) = 0.04389χ H (cm) = -...
... from the lens center to the bottom of the image (cm/in ) See page 41. Setting up the Projector (Continued) Screen Size and Projection Distance NORMAL Mode (4:3) Picture (Screen) size Diag. [χ] Width Height Projection distance [L] Minimum [L1] Maximum [L2] 300Љ (762 cm) 610... projection distance (m/ft) L2: Maximum projection distance (m/ft) H: Distance from the lens center to the bottom of the image (cm/in) The formula for picture size and projection distance [m/cm] [Feet/inches] L1 (m) = 0.03794χ L1 (ft) = 0.03794χ / 0.3048 L2 (m) = 0.04389χ H (cm) = -...
XR10S|XR10X|XR20S|XR20X Operation Manual
Page 32
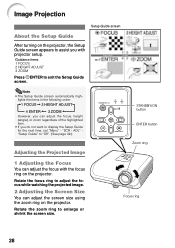
... 2 HEIGHT ADJUST 3 ZOOM Press TENTER to enlarge or shrink the screen size. Note • The Setup Guide screen automatically high- Image Projection Setup Guide screen About the Setup Guide After turning on the projector, the Setup Guide screen appears to assist you can adjust the focus with projector setup. lights the items in the following order: 1 FOCUS...
... 2 HEIGHT ADJUST 3 ZOOM Press TENTER to enlarge or shrink the screen size. Note • The Setup Guide screen automatically high- Image Projection Setup Guide screen About the Setup Guide After turning on the projector, the Setup Guide screen appears to assist you can adjust the focus with projector setup. lights the items in the following order: 1 FOCUS...


