
XR10S|XR10X|XR20S|XR20X Operation Manual
Page 5
... registration of the parts, service and labor warranty applicable to your new SHARP Projector, using the projector, please read this product to rain or moisture. DURING NORMAL OPERATION, NEVER TURN THE PROJECTOR OFF BY DISCONNECTING THE POWER CORD. Introduction Before using the REGISTRATION CARD ...SCREW. CAUTION: TO REDUCE THE RISK OF ELECTRIC SHOCK, DO NOT REMOVE COVER. NO USER-SERVICEABLE PARTS EXCEPT LAMP UNIT. The lightning flash with the projector. 1. WARNING: FCC Regulations state that any safety notification of inspection, modification, or recall that children do ...
... registration of the parts, service and labor warranty applicable to your new SHARP Projector, using the projector, please read this product to rain or moisture. DURING NORMAL OPERATION, NEVER TURN THE PROJECTOR OFF BY DISCONNECTING THE POWER CORD. Introduction Before using the REGISTRATION CARD ...SCREW. CAUTION: TO REDUCE THE RISK OF ELECTRIC SHOCK, DO NOT REMOVE COVER. NO USER-SERVICEABLE PARTS EXCEPT LAMP UNIT. The lightning flash with the projector. 1. WARNING: FCC Regulations state that any safety notification of inspection, modification, or recall that children do ...

XR10S|XR10X|XR20S|XR20X Operation Manual
Page 6
... outlet on page 50. ONLY PRODUCT DISPOSAL This projector utilizes tin-lead solder, and a pressurized lamp containing a small amount of the unit. 2 This will not occur in accordance with the operation manual, may result in a residential installation. ONLY Declaration of conformity SHARP PROJECTOR, MODEL XR-20X/XR-20S/XR-10X/XR-10S This device complies with Part 15 of...
... outlet on page 50. ONLY PRODUCT DISPOSAL This projector utilizes tin-lead solder, and a pressurized lamp containing a small amount of the unit. 2 This will not occur in accordance with the operation manual, may result in a residential installation. ONLY Declaration of conformity SHARP PROJECTOR, MODEL XR-20X/XR-20S/XR-10X/XR-10S This device complies with Part 15 of...

XR10S|XR10X|XR20S|XR20X Operation Manual
Page 7
...SCR - ADJ Picture Mode Contrast Bright Red Blue CLR Temp Bright Boost Lamp Setting Reset 0 0 0 0 7500K 1 Standard Bright Help SEL./ADJ. Note .........Indicates additional information for setting up and operating the projector. ADJ PRJ - ENTER END Useful Features Buttons used in this operation ...used in the same manner. • In this operation manual, the illustration and the screen display are slightly different, depending on the projector. 1 Press BMENU. • The "Picture" menu screen for the selected input mode is displayed. Using the Menu Screen ENTER ...
...SCR - ADJ Picture Mode Contrast Bright Red Blue CLR Temp Bright Boost Lamp Setting Reset 0 0 0 0 7500K 1 Standard Bright Help SEL./ADJ. Note .........Indicates additional information for setting up and operating the projector. ADJ PRJ - ENTER END Useful Features Buttons used in this operation ...used in the same manner. • In this operation manual, the illustration and the screen display are slightly different, depending on the projector. 1 Press BMENU. • The "Picture" menu screen for the selected input mode is displayed. Using the Menu Screen ENTER ...
XR10S|XR10X|XR20S|XR20X Operation Manual
Page 8
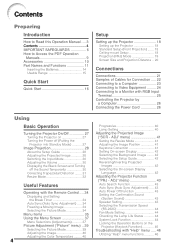
...the Transmission Speed (RS-232C 44 Fan Mode Setting 44 Checking the Lamp Life Status 44 System Lock Function 44 Locking the Operation Buttons on 27 Turning the Power off (Putting the Projector into Standby Mode 27 Image Projection 28 About the Setup Guide 28...Selecting the Background Image ........ 42 Selecting the Setup Guide 42 Reversing/Inverting Projected Images 42 Selecting the On-screen Display Language 42 Adjusting the Projector Function ("PRJ - Contents Preparing Introduction How to Read this Operation Manual .... 3 Contents 4 IMPORTANT SAFEGUARDS 6 How to Access the PDF ...
...the Transmission Speed (RS-232C 44 Fan Mode Setting 44 Checking the Lamp Life Status 44 System Lock Function 44 Locking the Operation Buttons on 27 Turning the Power off (Putting the Projector into Standby Mode 27 Image Projection 28 About the Setup Guide 28...Selecting the Background Image ........ 42 Selecting the Setup Guide 42 Reversing/Inverting Projected Images 42 Selecting the On-screen Display Language 42 Adjusting the Projector Function ("PRJ - Contents Preparing Introduction How to Read this Operation Manual .... 3 Contents 4 IMPORTANT SAFEGUARDS 6 How to Access the PDF ...

XR10S|XR10X|XR20S|XR20X Operation Manual
Page 12
... the curtains and dim the lights when setting up your nearest Sharp Authorized Projector Dealer or Service Center for long hours will return the projector to avoid personal injury caused by a Sharp Authorized Projector Dealer or Service Center. Rest your eyes. Caution concerning the lamp unit I For minimal servicing and to hit or damage the surface...
... the curtains and dim the lights when setting up your nearest Sharp Authorized Projector Dealer or Service Center for long hours will return the projector to avoid personal injury caused by a Sharp Authorized Projector Dealer or Service Center. Rest your eyes. Caution concerning the lamp unit I For minimal servicing and to hit or damage the surface...

XR10S|XR10X|XR20S|XR20X Operation Manual
Page 13
...to sub- The sound of the fan may affect the cabinet color or cause deformation of the picture. How to rise, the lamp will turn off period the projector will illuminate in the lower left corner of the plastic cover. Accessing the PDF Manuals for Windows® (For Macintosh®, skip..." will enter standby mode. Refer to rise in the fan speed. Please download Adobe® Reader® from the AC outlet and turning off the projector, the cooling fan runs to setup problems or blockage of the folder) that you want to view. 5 Double click the "10_20_" pdf file to ...
...to sub- The sound of the fan may affect the cabinet color or cause deformation of the picture. How to rise, the lamp will turn off period the projector will illuminate in the lower left corner of the plastic cover. Accessing the PDF Manuals for Windows® (For Macintosh®, skip..." will enter standby mode. Refer to rise in the fan speed. Please download Adobe® Reader® from the AC outlet and turning off the projector, the cooling fan runs to setup problems or blockage of the folder) that you want to view. 5 Double click the "10_20_" pdf file to ...

XR10S|XR10X|XR20S|XR20X Operation Manual
Page 14
Optional accessories I Lamp unit AN-C3CP2 AN-A1RS AN-MR2 AN-XR20LP (for XR-20X/XR-20S) AN-XR10LP (for XR-10X/XR-10S) Note • Some of the optional accessories may not be available depending on the region. Please check with your country. and ... cable (9n10o (3.0 m)) I DIN-D-sub RS-232C adaptor (5 57/64o (15 cm)) I Remote receiver I 3 RCA to the wall outlet in your nearest Sharp Authorized Projector Dealer or Service Center. 10 Accessories Supplied accessories Remote control Two R-6 batteries RGB cable RRMCGA398WJSA ("AA" size, UM/SUM-3, (9'10" (3.0 m)) HP-7 or similar...
Optional accessories I Lamp unit AN-C3CP2 AN-A1RS AN-MR2 AN-XR20LP (for XR-20X/XR-20S) AN-XR10LP (for XR-10X/XR-10S) Note • Some of the optional accessories may not be available depending on the region. Please check with your country. and ... cable (9n10o (3.0 m)) I DIN-D-sub RS-232C adaptor (5 57/64o (15 cm)) I Remote receiver I 3 RCA to the wall outlet in your nearest Sharp Authorized Projector Dealer or Service Center. 10 Accessories Supplied accessories Remote control Two R-6 batteries RGB cable RRMCGA398WJSA ("AA" size, UM/SUM-3, (9'10" (3.0 m)) HP-7 or similar...
XR10S|XR10X|XR20S|XR20X Operation Manual
Page 15
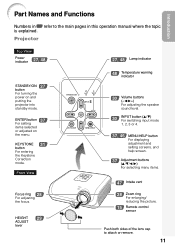
HEIGHT 29 ADJUST lever 27, 48 Lamp indicator 48 Temperature warning indicator 30 Volume buttons (-O/Q+) For adjusting the speaker sound level. 30 INPUT button ... main pages in Z refer to attach or remove. 11 Front View Focus ring 28 For adjusting the focus. Projector Top View Power indicator 27, 48 STANDBY/ON 27 button For turning the power on the menu. KEYSTONE 31...ENTER button 37 For setting items selected or adjusted on and putting the projector into standby mode. Introduction Part Names and Functions Numbers in this operation manual where the topic is explained.
HEIGHT 29 ADJUST lever 27, 48 Lamp indicator 48 Temperature warning indicator 30 Volume buttons (-O/Q+) For adjusting the speaker sound level. 30 INPUT button ... main pages in Z refer to attach or remove. 11 Front View Focus ring 28 For adjusting the focus. Projector Top View Power indicator 27, 48 STANDBY/ON 27 button For turning the power on the menu. KEYSTONE 31...ENTER button 37 For setting items selected or adjusted on and putting the projector into standby mode. Introduction Part Names and Functions Numbers in this operation manual where the topic is explained.

XR10S|XR10X|XR20S|XR20X Operation Manual
Page 19
flected off a screen for easy operation. Introduction Usable Range The remote control can be used to mois- Note • The signal from the fluorescent lamp. 30° Remote control signal transmitters 30° Remote control sensor 23n (7 m) Remote control 15 ture or high temperature. • The remote control... differ depending on the screen material. When using the remote control • Ensure that you do not drop, expose to control the projector within the ranges shown in the illustration. However, the effective distance of the signal may malfunction under a fluorescent...
flected off a screen for easy operation. Introduction Usable Range The remote control can be used to mois- Note • The signal from the fluorescent lamp. 30° Remote control signal transmitters 30° Remote control sensor 23n (7 m) Remote control 15 ture or high temperature. • The remote control... differ depending on the screen material. When using the remote control • Ensure that you do not drop, expose to control the projector within the ranges shown in the illustration. However, the effective distance of the signal may malfunction under a fluorescent...
XR10S|XR10X|XR20S|XR20X Operation Manual
Page 31
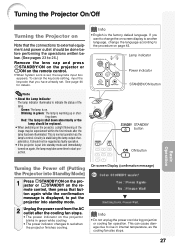
... cause damage due to rise in green: The lamp is warming up or shutting down abnormally or the lamp should be replaced. • When switching on the projector, a slight flickering of the lamp. See page 44 for details. Green: The lamp is displayed, to put into standby mode and immediately... turned on again, the lamp may take some time to start projection. Blinking in internal temperature, as faulty operation. • If the projector is put the projector into Standby Mode) 1 Press SSTANDBY/ON on the projector or eSTANDBY on the remote control, then press ...
... cause damage due to rise in green: The lamp is warming up or shutting down abnormally or the lamp should be replaced. • When switching on the projector, a slight flickering of the lamp. See page 44 for details. Green: The lamp is displayed, to put into standby mode and immediately... turned on again, the lamp may take some time to start projection. Blinking in internal temperature, as faulty operation. • If the projector is put the projector into Standby Mode) 1 Press SSTANDBY/ON on the projector or eSTANDBY on the remote control, then press ...
XR10S|XR10X|XR20S|XR20X Operation Manual
Page 39
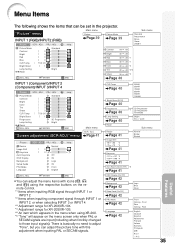
... through INPUT 1 or INPUT 2, or when selecting INPUT 3 or INPUT 4. *3 Adjustment range for XR-20X/XR-10X. *4 Adjustment range for XR-20S/XR-10S. *5 An item which appears in the projector. Menu Items The following shows the items that can adjust the menu items with this adjustment when inputting...). ADJ Picture Mode Contrast Bright Red Blue CLR Temp Bright Boost Lamp Setting Reset 0 0 0 0 7500K 1 Standard Bright SEL./ADJ. ENTER Help END Contrast -30 Bright -30 Red -30 Blue -30 Color -30 Tint -30 Sharp -30 Page 40 Sub menu Standard Presentation Movie Game sRGB*1 +...
... through INPUT 1 or INPUT 2, or when selecting INPUT 3 or INPUT 4. *3 Adjustment range for XR-20X/XR-10X. *4 Adjustment range for XR-20S/XR-10S. *5 An item which appears in the projector. Menu Items The following shows the items that can adjust the menu items with this adjustment when inputting...). ADJ Picture Mode Contrast Bright Red Blue CLR Temp Bright Boost Lamp Setting Reset 0 0 0 0 7500K 1 Standard Bright SEL./ADJ. ENTER Help END Contrast -30 Bright -30 Red -30 Blue -30 Color -30 Tint -30 Sharp -30 Page 40 Sub menu Standard Presentation Movie Game sRGB*1 +...
XR10S|XR10X|XR20S|XR20X Operation Manual
Page 41
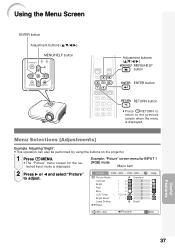
... input mode is displayed. Picture SCR - Menu Selections (Adjustments) Example: Adjusting "Bright". • This operation can also be performed by using the buttons on the projector. 1 Press BMENU. • The "Picture" menu screen for INPUT 1 (RGB) mode Menu item 2 Press Q or O and select "Picture" to the previous screen when the menu...
... input mode is displayed. Picture SCR - Menu Selections (Adjustments) Example: Adjusting "Bright". • This operation can also be performed by using the buttons on the projector. 1 Press BMENU. • The "Picture" menu screen for INPUT 1 (RGB) mode Menu item 2 Press Q or O and select "Picture" to the previous screen when the menu...
XR10S|XR10X|XR20S|XR20X Operation Manual
Page 42
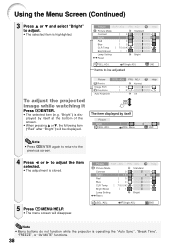
...the item selected. • The adjustment is highlighted. ADJ PRJ - Single ADJ Help END Note • Menu buttons do not function while the projector is displayed by itself at the bottom of the screen. • When pressing P or R, the following item ("Red" after "Bright") will ...disappear. Picture SCR - ADJ PRJ - ADJ PRJ - ADJ Picture Mode Contrast Bright Red Blue CLR Temp Bright Boost Lamp Setting Reset 0 0 0 0 7500K 1 Standard Bright SEL./ADJ. Using the Menu Screen (Continued) 3 Press P or R and select "Bright" to adjust. &#...
...the item selected. • The adjustment is highlighted. ADJ PRJ - Single ADJ Help END Note • Menu buttons do not function while the projector is displayed by itself at the bottom of the screen. • When pressing P or R, the following item ("Red" after "Bright") will ...disappear. Picture SCR - ADJ PRJ - ADJ PRJ - ADJ Picture Mode Contrast Bright Red Blue CLR Temp Bright Boost Lamp Setting Reset 0 0 0 0 7500K 1 Standard Bright SEL./ADJ. Using the Menu Screen (Continued) 3 Press P or R and select "Bright" to adjust. &#...
XR10S|XR10X|XR20S|XR20X Operation Manual
Page 44
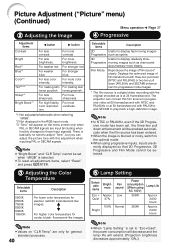
... the menu screen only when PAL or SECAM signals are only for general standard purposes. 40 5 Lamp Setting Selectable items Brightness Eco + Approx. For weaker red. For less sharpness. Displays the optimized image of film source* clearly. Quiet 87% 100% Bright Fan sound Low Normal...reproduction. There is selected. • To reset all adjustment items, select "Reset" and press hENTER. For making skin tones greenish. The projector can adjust the picture tone with NTSC and PAL60Hz or at 24 frames/second. Picture Adjustment ("Picture" menu) (Continued) Menu operation n Page...
... the menu screen only when PAL or SECAM signals are only for general standard purposes. 40 5 Lamp Setting Selectable items Brightness Eco + Approx. For weaker red. For less sharpness. Displays the optimized image of film source* clearly. Quiet 87% 100% Bright Fan sound Low Normal...reproduction. There is selected. • To reset all adjustment items, select "Reset" and press hENTER. For making skin tones greenish. The projector can adjust the picture tone with NTSC and PAL60Hz or at 24 frames/second. Picture Adjustment ("Picture" menu) (Continued) Menu operation n Page...
XR10S|XR10X|XR20S|XR20X Operation Manual
Page 47
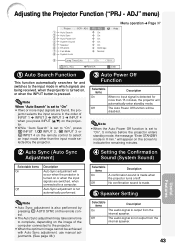
... to the projector. • When the optimum image cannot be disabled. will appear on , or when the INPUT button is not output from the internal speaker. The audio signal is pressed. ADJ On On On On On 9600 bps Normal Menu operation n Page 37 Help Lamp Timer(Life)...press C INPUT 1,C INPUT 2, D INPUT 3 or EINPUT 4 on the remote control to select an input mode other than 15 minutes, the projector will occur when the projector is detected for and switches to a computer. Note When "Auto Search" is not automatically performed. Note • Auto Sync adjustment is also performed...
... to the projector. • When the optimum image cannot be disabled. will appear on , or when the INPUT button is not output from the internal speaker. The audio signal is pressed. ADJ On On On On On 9600 bps Normal Menu operation n Page 37 Help Lamp Timer(Life)...press C INPUT 1,C INPUT 2, D INPUT 3 or EINPUT 4 on the remote control to select an input mode other than 15 minutes, the projector will occur when the projector is detected for and switches to a computer. Note When "Auto Search" is not automatically performed. Note • Auto Sync adjustment is also performed...

XR10S|XR10X|XR20S|XR20X Operation Manual
Page 48
... environments. We suggest you lose or forget your keycode, contact your nearest Sharp Authorized Projector Dealer or Service Center (see page 61). Lamp usage condition "Life" Operated exclusively with Lamp Setting set to "Eco +Quiet" Operated exclusively with Lamp Setting set to "Bright" Remaining lamp life 100% Approx. 3,000 hours Approx. 2,000 hours 5% Approx. 150 hours...
... environments. We suggest you lose or forget your keycode, contact your nearest Sharp Authorized Projector Dealer or Service Center (see page 61). Lamp usage condition "Life" Operated exclusively with Lamp Setting set to "Eco +Quiet" Operated exclusively with Lamp Setting set to "Bright" Remaining lamp life 100% Approx. 3,000 hours Approx. 2,000 hours 5% Approx. 150 hours...

XR10S|XR10X|XR20S|XR20X Operation Manual
Page 52
... location, " " will illuminate in red. If the temperature keeps on the projector indicate problems inside the projector increases, due to blockage of the picture. When the percentage becomes 0%, it will change to turn on the projector a fourth time without replacing the lamp, the projector will not turn on the screen. Maintenance Indicators I The warning lights...
... location, " " will illuminate in red. If the temperature keeps on the projector indicate problems inside the projector increases, due to blockage of the picture. When the percentage becomes 0%, it will change to turn on the projector a fourth time without replacing the lamp, the projector will not turn on the screen. Maintenance Indicators I The warning lights...

XR10S|XR10X|XR20S|XR20X Operation Manual
Page 53
... outlet, and then connect it again. • Carefully replace the lamp. (See page 51.) • Take the projector to your nearest Sharp Authorized Projector Dealer or Service Center (see page 61) for advice. Info • If the temperature warning indicator illuminates, and the projector enters standby mode, follow the possible solutions above and then wait...
... outlet, and then connect it again. • Carefully replace the lamp. (See page 51.) • Take the projector to your nearest Sharp Authorized Projector Dealer or Service Center (see page 61) for advice. Info • If the temperature warning indicator illuminates, and the projector enters standby mode, follow the possible solutions above and then wait...

XR10S|XR10X|XR20S|XR20X Operation Manual
Page 54
... recommended you notice a significant deterioration in the picture and color quality. Regarding the Lamp Lamp I Carefully change the lamp by a 90-day parts and labor limited warranty. Replacing the Lamp • Do not remove the lamp unit from your nearest Sharp Authorized Projector Dealer or Service Center to failure largely varies depending on -screen display icon are...
... recommended you notice a significant deterioration in the picture and color quality. Regarding the Lamp Lamp I Carefully change the lamp by a 90-day parts and labor limited warranty. Replacing the Lamp • Do not remove the lamp unit from your nearest Sharp Authorized Projector Dealer or Service Center to failure largely varies depending on -screen display icon are...
XR10S|XR10X|XR20S|XR20X Operation Manual
Page 56
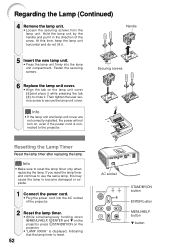
... do not tilt it in the direction of the projector. 2 52 Reset the lamp timer. • While simultaneously holding down UMENU/HELP, TENTER and R on the projector, press SSTANDBY/ON on the projector. • "LAMP 0000H" is displayed, indicating that the lamp timer is connected to the projector. Info • Make sure to become damaged or explode...
... do not tilt it in the direction of the projector. 2 52 Reset the lamp timer. • While simultaneously holding down UMENU/HELP, TENTER and R on the projector, press SSTANDBY/ON on the projector. • "LAMP 0000H" is displayed, indicating that the lamp timer is connected to the projector. Info • Make sure to become damaged or explode...


